| Site News |
|---|
| Warning: This wiki contains spoilers. Read at your own risk! Social media: If you would like, please join our Discord server, and/or follow us on X (Twitter) or Tumblr! |
L'Arachel: Difference between revisions
m (Text replacement - "|jap-" to "|jpn-") |
m (→Battle quotes: changed seliph's name to L'Arachel to properly match the character. twice. why was seliph here twice?) |
||
| (44 intermediate revisions by 11 users not shown) | |||
| Line 13: | Line 13: | ||
|appearances=*{{title|The Sacred Stones}} | |appearances=*{{title|The Sacred Stones}} | ||
*{{title|Heroes}} | *{{title|Heroes}} | ||
*{{title|Engage}} | |||
}} | }} | ||
{{Quote|Merely serving me must be the greatest pleasure man can know.|L'Arachel, to [[Rennac]]}} | |||
'''L'Arachel''' (pronounced {{IPA|ˌlɑɹəˈʃɛl}}<ref>''Heroes'' voice line</ref>; Japanese: {{hl|ラーチェル|Rācheru}} ''Larchel'') is a character in {{FE8}}. She is the princess of [[Rausten]] and Pontifex [[Mansel]]'s niece. She longs to be famous throughout [[Magvel]], and to do this, she sets out with her vassal [[Dozla]] and her hired hand [[Rennac]] to rid the continent of monsters. | |||
'''L'Arachel''' (pronounced {{IPA| | |||
=={{FE8}}== | =={{FE8}}== | ||
===Role=== | ===Role=== | ||
L'Arachel first appears in Chapter 4, where she, [[Dozla]], and [[Rennac]] witness [[Eirika]] and company as they fight off the monsters in the [[Za'ha Woods]]. Seeing the action, L'Arachel wishes to engage in battle with the monsters herself, but Rennac stops her from running down the mountain. The three take a different path, and by the time they arrive on the scene, [[Eirika]] has defeated all the monsters. L'Arachel is disappointed that she was unable to show off her monster-felling capabilities, but glad that the monsters were defeated anyway. Eirika asks L'Arachel who she is, and L'Arachel begins to introduce herself when Dozla stops her, reminding her to remain anonymous (though addressing her by name). The three then ride off, with L'Arachel leading the way. | L'Arachel first appears in Chapter 4, where she, [[Dozla]], and [[Rennac]] witness [[Eirika]] and company as they fight off the monsters in the [[Za'ha Woods]]. Seeing the action, L'Arachel wishes to engage in battle with the monsters herself, but Rennac stops her from running down the mountain. The three take a different path, and by the time they arrive on the scene, [[Eirika]] has defeated all the monsters. L'Arachel is disappointed that she was unable to show off her monster-felling capabilities, but glad that the monsters were defeated anyway. Eirika asks L'Arachel who she is, and L'Arachel begins to introduce herself when Dozla stops her, reminding her to remain anonymous (though addressing her by name). The three then ride off, with L'Arachel leading the way. | ||
====Eirika's route==== | ====Eirika's route==== | ||
L'Arachel appears again in Chapter 9 of Eirika's route, where she and her companions are in [[Carcino#Port Kiris|Port Kiris]]. L'Arachel is occupied enjoying a sugar pastry when Eirika approaches her about a ship that would take them to [[Rausten]]. L'Arachel reports that sadly no ship will leave port for fear of being destroyed by a supposed ghost ship ruling the waters north of [[Magvel]]. Instead, she and her companions planned to head to their home through the overland route, and she suggests that Eirika do the same. L'Arachel and her companions then leave the port, though [[Rennac]] escapes from her and hides in a nearby village. | L'Arachel appears again in Chapter 9 of Eirika's route, where she and her companions are in [[Carcino#Port Kiris|Port Kiris]]. L'Arachel is occupied enjoying a sugar pastry when Eirika approaches her about a ship that would take them to [[Rausten]]. L'Arachel reports that sadly no ship will leave port for fear of being destroyed by a supposed ghost ship ruling the waters north of [[Magvel]]. Instead, she and her companions planned to head to their home through the overland route, and she suggests that Eirika do the same. L'Arachel and her companions then leave the port, though [[Rennac]] escapes from her and hides in a nearby village. | ||
L'Arachel and [[Dozla]] are next seen in Chapter 11, where they arrive at the same building in which Eirika and her companions fight more monsters. L'Arachel was intending to spend the night in this building, but upon discovering the monsters populating it, she and Dozla take the opportunity to fight the monsters as well. If Eirika talks to L'Arachel during the battle, she will suggest that L'Arachel find a save place elsewhere, but L'Arachel insists on showing Eirika her skills in battle, and joins the party. L'Arachel can then recruit Dozla by talking to him, informing him of their company. After the battle, Eirika finally introduces herself to L'Arachel and explains her situation. L'Arachel, thinking it must be destiny, joins Eirika for the rest of the game, and rides of to share her news with Dozla. | L'Arachel and [[Dozla]] are next seen in Chapter 11, where they arrive at the same building in which Eirika and her companions fight more monsters. L'Arachel was intending to spend the night in this building, but upon discovering the monsters populating it, she and Dozla take the opportunity to fight the monsters as well. If Eirika talks to L'Arachel during the battle, she will suggest that L'Arachel find a save place elsewhere, but L'Arachel insists on showing Eirika her skills in battle, and joins the party. L'Arachel can then recruit Dozla by talking to him, informing him of their company. After the battle, Eirika finally introduces herself to L'Arachel and explains her situation. L'Arachel, thinking it must be destiny, joins Eirika for the rest of the game, and rides of to share her news with Dozla. | ||
As the journey continues and the party heads toward [[Jehanna]], L'Arachel claims that the Knights of Rausten are on their way to aid the party. Eirika is at first confused as to how L'Arachel knows this, and L'Arachel, still hiding her identity as Rausten's Princess, claims the wind told her. Once the Knights of Rausten arrive, they address their princess by her title, and L'Arachel explains to Eirika that she traveled anonymously to seek a path of justice. Having brought troops and funds, L'Arachel continues to be a supportive influence of Eirika on her way. | As the journey continues and the party heads toward [[Jehanna]], L'Arachel claims that the Knights of Rausten are on their way to aid the party. Eirika is at first confused as to how L'Arachel knows this, and L'Arachel, still hiding her identity as Rausten's Princess, claims the wind told her. Once the Knights of Rausten arrive, they address their princess by her title, and L'Arachel explains to Eirika that she traveled anonymously to seek a path of justice. Having brought troops and funds, L'Arachel continues to be a supportive influence of Eirika on her way. | ||
In Chapter 14, L'Arachel can recruit Rennac if she talks to him during the battle. Though Rennac had been hired by the [[ | In Chapter 14, L'Arachel can recruit Rennac if she talks to him during the battle. Though Rennac had been hired by the [[Grado]] Empire, L'Arachel's strong personality brings Rennac back into her company, and therefore also Eirika's. L'Arachel then participates in the search for [[Ismaire]] and Jehanna's [[Sacred Stone (object)|Sacred Stone]], as well as the four-nation alliance formed at the end of the chapter between [[Eirika]] of [[Renais]], [[Innes]] of [[Frelia]], [[Joshua]] of [[Jehanna]] and L'Arachel herself of [[Rausten]]. | ||
After Eirika and [[Ephraim]] reunite, L'Arachel participates in the sharing of information between the twins and their companions. She comes to the conclusion that the [[Sacred Stone (object)|Sacred Stone]]s are their best option for defeating the [[Sacred Stone (object)#The Dark Stone|Dark Stone]], and accompanies the party to retrieve [[Renais]]'s Sacred Stone. With one stone in hand, L'Arachel leads the party to Rausten, to retrieve the other remaining stone, held in the palace reliquary. Along the way, Eirika asks L'Arachel if the legends of Rausten tell of any way to shake the [[Fomortiis|Demon King]] out of a person. L'Arachel explains that the only person to ever do so was [[Latona|Saint Latona]], whose strong will drove the demon out of him, and that [[Lyon]] was long lost to the Demon King. After Lyon destroys the Sacred Stone of Renais, L'Arachel leads the party on to Rausten, to retrieve the last remaining stone. | After Eirika and [[Ephraim]] reunite, L'Arachel participates in the sharing of information between the twins and their companions. She comes to the conclusion that the [[Sacred Stone (object)|Sacred Stone]]s are their best option for defeating the [[Sacred Stone (object)#The Dark Stone|Dark Stone]], and accompanies the party to retrieve [[Renais]]'s Sacred Stone. With one stone in hand, L'Arachel leads the party to Rausten, to retrieve the other remaining stone, held in the palace reliquary. Along the way, Eirika asks L'Arachel if the legends of Rausten tell of any way to shake the [[Fomortiis|Demon King]] out of a person. L'Arachel explains that the only person to ever do so was [[Latona|Saint Latona]], whose strong will drove the demon out of him, and that [[Lyon]] was long lost to the Demon King. After Lyon destroys the Sacred Stone of Renais, L'Arachel leads the party on to Rausten, to retrieve the last remaining stone. | ||
| Line 41: | Line 41: | ||
L'Arachel's role in Ephraim's route is very similar to her role in Eirika's, with a few changes: | L'Arachel's role in Ephraim's route is very similar to her role in Eirika's, with a few changes: | ||
*L'Arachel first appears in Ephraim's route in Chapter 10, where she warns Ephraim not to board a ship because of the phantom ship ruling the waters. She herself though, is intent on purging the seas of the ship, and runs off with [[Dozla]] and [[Rennac]] to do so. | *L'Arachel first appears in Ephraim's route in Chapter 10, where she warns Ephraim not to board a ship because of the phantom ship ruling the waters. She herself though, is intent on purging the seas of the ship, and runs off with [[Dozla]] and [[Rennac]] to do so. | ||
*In the next chapter, L'Arachel and Dozla are aboard a ship without Rennac, fighting monsters. Ephraim can recruit L'Arachel, who is offended by the fact that Ephraim hasn't heard of her efforts in monster-fighting. L'Arachel can recruit Dozla. L'Arachel and Ephraim converse after the battle, and L'Arachel introduces herself as the Princess of [[Rausten]], allying herself with Ephraim for the rest of the game. | *In the next chapter, L'Arachel and Dozla are aboard a ship without Rennac, fighting monsters. Ephraim can recruit L'Arachel, who is offended by the fact that Ephraim hasn't heard of her efforts in monster-fighting. L'Arachel can recruit Dozla. L'Arachel and Ephraim converse after the battle, and L'Arachel introduces herself as the Princess of [[Rausten]], allying herself with Ephraim for the rest of the game. | ||
*In Chapter 14, L'Arachel can recruit Rennac using the same tactics as in Eirika's route. | *In Chapter 14, L'Arachel can recruit Rennac using the same tactics as in Eirika's route. | ||
*L'Arachel converses about [[Lyon]]'s fate with Ephraim instead of Eirika. | *L'Arachel converses about [[Lyon]]'s fate with Ephraim instead of Eirika. | ||
*Ephraim converses with [[Tana]] once the party reaches Rausten, rather than L'Arachel. | *Ephraim converses with [[Tana]] once the party reaches Rausten, rather than L'Arachel. | ||
| Line 77: | Line 77: | ||
|def1=15 | |def1=15 | ||
|res1=50 | |res1=50 | ||
|recruit=[[Creeping Darkness|Chapter 11]], talk to with [[Eirika]], or automatically at the end of the chapter if she survived | |recruit=[[Creeping Darkness|Chapter 11]], talk to with [[Eirika]], or automatically at the end of the chapter if she survived | ||
}} | }} | ||
|content2={{CharStats GBA | |content2={{CharStats GBA | ||
| Line 104: | Line 104: | ||
|def1=15 | |def1=15 | ||
|res1=50 | |res1=50 | ||
|recruit=[[Phantom Ship|Chapter 11]], talk to with [[Ephraim]] (appears on turn 5), or automatically at the end of the chapter if she survived | |recruit=[[Phantom Ship|Chapter 11]], talk to with [[Ephraim]] (appears on turn 5), or automatically at the end of the chapter if she survived | ||
}} | }} | ||
}} | }} | ||
| Line 134: | Line 134: | ||
===Analysis=== | ===Analysis=== | ||
{{analysis}} | {{analysis}} | ||
L'Arachel is a character who needs grinding to contribute anything more than small amounts of minor utility. [[Natasha]] joining in [[The Empire's Reach|Chapter 5]] at level 1 is already considered under-leveled by many players, and L'Arachel joins even later in Chapter 11 at level 3, unpromoted and with only D-level staves. At base, she is only capable of using basic staves and providing some [[Rescue (command)|rescue]] utility as a mounted unit. For both of these roles, there are plenty of other characters who can accomplish the same things while joining much earlier, easily having a level lead. Other staff users such as [[Artur]] and [[Moulder]] will have had time to raise their Staff rank and be far closer to powerful staves such as [[Warp]]. Additionally, [[Saleh]] joins [[Village of Silence|the next chapter]] in [[Eirika]]'s route and [[Scorched Sand|Chapter 15]] in [[Ephraim]]'s route, who has far better stats all around and starts at C staves, creating even more competition for staffing duties. When it comes to rescue-dropping allies, the Troubadour class and its promotions have lower Move than other mounted classes, and her low durability forces her to stay away from enemies to be safe, meaning most other mounted characters will be more reliable picks. | |||
To get from level 3 to level 10, L'Arachel needs 700 experience, | As a staff-locked unit, L'Arachel has much slower experience gain compared to combat units, further cementing her level deficit. To get from level 3 to level 10, L'Arachel needs 700 experience, while she usually only gains 11 or 12 experience in a single turn from [[Heal]] or [[Mend]], respectively. The fog in her join map lets her use [[Torch (staff)|Torch]] for slightly more experience, and C staves also unlocks options for faster experience gain, but this is ultimately a small boost through the long grind it takes for her to catch up. She has high growths in every area aside from HP and defense, but as she can't fight until promotion, it won't matter until she promotes. | ||
L'Arachel | Your reward for training L'Arachel to promotion is either a [[Mage Knight]] or [[Valkyrie]]. The two classes are virtually identical outside of the differences between [[anima]] and [[light magic]]. With her slow level-up speed, L'Arachel will either promote so late that her combat will be weak either way, or the player is grinding her up and thus can make her strong either way. Mage Knight is better overall, as the lower weight and higher might of anima spells will give her better damage output and more of a chance to be useful if she wasn't power-leveled. | ||
L'Arachel most likely will only heal and rescue her allies a small handful of times, during her join map and the map where she can recruit [[Rennac]] for free. Anything more than that will take a significant amount of time and Staff uses, and should be only be considered for players who like L'Arachel as a character enough to be willing to put up with her slow start. | |||
=={{FE13}}== | =={{FE13}}== | ||
===Role=== | |||
L'Arachel is playable as a [[SpotPass]] character, released in the ''The Sacred Stones'' character set. She is also present as an enemy in the [[Smash Brethren 2|second]] and [[Smash Brethren 3|third]] installments of the ''Smash Brethren'' [[Downloadable content in Fire Emblem Awakening|DLC]] series. | L'Arachel is playable as a [[SpotPass]] character, released in the ''The Sacred Stones'' character set. She is also present as an enemy in the [[Smash Brethren 2|second]] and [[Smash Brethren 3|third]] installments of the ''Smash Brethren'' [[Downloadable content in Fire Emblem Awakening|DLC]] series. | ||
| Line 174: | Line 177: | ||
|skillm=0 | |skillm=0 | ||
|spdm=+2 | |spdm=+2 | ||
|luckm= | |luckm=−1 | ||
|defm= | |defm=−3 | ||
|resm= | |resm=−1 | ||
|recruit=[[SpotPass]], hire her for 15,600 [[Gold|G]] or defeat her in a [[skirmish]] | |recruit=[[SpotPass]], hire her for 15,600 [[Gold|G]] or defeat her in a [[skirmish]] | ||
}} | }} | ||
| Line 192: | Line 195: | ||
===Growth rates when reclassed=== | ===Growth rates when reclassed=== | ||
{{ | {{Tab | ||
|tab1=Tactician/Grandmaster | |||
|tab2=Cavalier | |||
|tab3=Paladin | |||
|tab4=Knight | |||
|tab5=Great Knight | |||
|tab6=General | |||
|tab7=Mercenary/Hero | |||
|tab8=Bow Knight | |||
|tab9=Archer | |||
|tab10=Sniper | |||
|tab11=Myrmidon | |||
|tab12=Swordmaster | |||
|tab13=Assassin | |||
|tab14=Thief | |||
|tab15=Trickster | |||
|content1={{GrowthRates FE13|Tactician|Grandmaster}} | |||
|content2={{GrowthRates FE13|Cavalier}} | |||
|content3={{GrowthRates FE13|Paladin}} | |||
|content4={{GrowthRates FE13|Knight}} | |||
|content5={{GrowthRates FE13|Great Knight}} | |||
|content6={{GrowthRates FE13|General}} | |||
|content7={{GrowthRates FE13|Mercenary|Hero}} | |||
|content8={{GrowthRates FE13|Bow Knight}} | |||
|content9={{GrowthRates FE13|Archer}} | |||
|content10={{GrowthRates FE13|Sniper}} | |||
|content11={{GrowthRates FE13|Myrmidon}} | |||
|content12={{GrowthRates FE13|Swordmaster}} | |||
|content13={{GrowthRates FE13|Assassin}} | |||
|content14={{GrowthRates FE13|Thief}} | |||
|content15={{GrowthRates FE13|Trickster}} | |||
}} | |||
{{Tab | |||
|tab1=Pegasus Knight | |||
|tab2=Falcon Knight | |||
|tab3=Dark Flier | |||
|tab4=Wyvern Rider/Wyvern Lord | |||
|tab5=Griffon Rider | |||
|tab6=Troubadour | |||
|tab7=Cleric | |||
|tab8=Mage/Sage | |||
|tab9=Dark Mage | |||
|tab10=Dark Knight | |||
|tab11=Sorcerer | |||
|tab12=Troubadour/Valkyrie | |||
|tab13=Bride | |||
|content1={{GrowthRates FE13|Pegasus Knight}} | |||
|content2={{GrowthRates FE13|Falcon Knight}} | |||
|content3={{GrowthRates FE13|Dark Flier}} | |||
|content4={{GrowthRates FE13|Wyvern Rider|Wyvern Lord}} | |||
|content5={{GrowthRates FE13|Griffon Rider}} | |||
|content6={{GrowthRates FE13|Troubadour}} | |||
|content7={{GrowthRates FE13|Cleric}} | |||
|content8={{GrowthRates FE13|Mage|Sage}} | |||
|content9={{GrowthRates FE13|Dark Mage}} | |||
|content10={{GrowthRates FE13|Dark Knight}} | |||
|content11={{GrowthRates FE13|Sorcerer}} | |||
|content12={{GrowthRates FE13|Troubadour|Valkyrie}} | |||
|content13={{GrowthRates FE13|Bride}} | |||
}} | |||
===Promotion stat gains=== | ===Promotion stat gains=== | ||
| Line 226: | Line 288: | ||
===Skill set=== | ===Skill set=== | ||
Like all female bonus units in ''Awakening'', L'Arachel has access to all base class and advanced class skills available to standard female units. | Like all female bonus units in ''Awakening'', L'Arachel has access to all base class and advanced class skills available to standard female units. | ||
=={{FE17}}== | |||
===Role=== | |||
L'Arachel appears as an equippable [[Bond Ring]]. She can be summoned using [[Eirika]]'s [[Emblem Ring]]. | |||
===Bond Ring data=== | |||
{| class="basic" style="padding: 0px; border-spacing: 0px; border-width: 2px; width: 40%" | |||
|style="background:none"|[[File:Small portrait l'arachel fe17.png|128px]] | |||
|- | |||
|style="background:none"| | |||
{| class="basic mw-collapsible mw-collapsed" style="padding: 0px; border-spacing: 4px; border-width: 0px; width: 100%" | |||
! style="background: none" colspan="4" | Stat modifiers | |||
|- | |||
! class="roundtl" style="width:30%" | Ring level | |||
! style="width:calc(70%/3)" | [[Mag]] | |||
! style="width:calc(70%/3)" | [[Spd]] | |||
! class="roundtr" style="width:calc(70%/3)" | [[Lck]] | |||
|- | |||
| [[File:Is ns02 bond ring c.png|24px]] C | |||
| +0 | |||
| +1 | |||
| +0 | |||
|- | |||
| [[File:Is ns02 bond ring b.png|24px]] B | |||
| +0 | |||
| +1 | |||
| +1 | |||
|- | |||
| [[File:Is ns02 bond ring a.png|24px]] A | |||
| +1 | |||
| +1 | |||
| +1 | |||
|- | |||
| class="roundbl" | [[File:Is ns02 bond ring s.png|24px]] S | |||
| +1 | |||
| +2 | |||
| class="roundbr" | +1 | |||
|} | |||
|} | |||
=={{FEH}}== | =={{FEH}}== | ||
===Role=== | ===Role=== | ||
There are | There are four different variations of L'Arachel available to ''Heroes''. The normal variation of L'Arachel is one of the characters added to the game in the [[Fiery Resolve]] update, and became available for summoning by players on January 25, 2018. A Halloween variation of L'Arachel was made available on October 9, 2019 as part of the summoning event surrounding the launch of the [[Treat Fiends]] update. A young variation of L'Arachel was made available between the period of April 19, 2021 to May 19, 2021 as part of the summoning event surrounding the launch of the [[Childhood Encounter]] update, the update where this variation was added to the game. A summer variation of L'Arachel was added in the [[Summer Longing]] update, and was first available to summon from June 19, 2023. | ||
===L'Arachel: Princess of Light=== | ===L'Arachel: Princess of Light=== | ||
| Line 238: | Line 339: | ||
|tab3={{star|5}} | |tab3={{star|5}} | ||
|content1={{CharStats FEH | |content1={{CharStats FEH | ||
|portrait=[[File:Portrait l'arachel feh.png|100px]] | |portrait=[[File:Portrait l'arachel princess of light feh.png|100px]] | ||
|rarity=3 | |rarity=3 | ||
|wpntype=Blue tome | |wpntype=Blue tome | ||
| Line 247: | Line 348: | ||
|def=3 | |def=3 | ||
|res=6 | |res=6 | ||
| | |HP_gr=40 | ||
| | |atk_gr=55 | ||
| | |spd_gr=55 | ||
| | |def_gr=30 | ||
| | |res_gr=55 | ||
|offense=[[Ellight]] | |offense=[[Ellight]] | ||
}} | }} | ||
|content2={{CharStats FEH | |content2={{CharStats FEH | ||
|portrait=[[File:Portrait l'arachel feh.png|100px]] | |portrait=[[File:Portrait l'arachel princess of light feh.png|100px]] | ||
|rarity=4 | |rarity=4 | ||
|wpntype=Blue tome | |wpntype=Blue tome | ||
| Line 264: | Line 365: | ||
|def=3 | |def=3 | ||
|res=6 | |res=6 | ||
| | |HP_gr=40 | ||
| | |atk_gr=55 | ||
| | |spd_gr=55 | ||
| | |def_gr=30 | ||
| | |res_gr=55 | ||
|offense=[[Shine]] | |offense=[[Shine]] | ||
|special=[[Rising Light]] | |special=[[Rising Light]] | ||
}} | }} | ||
|content3={{CharStats FEH | |content3={{CharStats FEH | ||
|portrait=[[File:Portrait l'arachel feh.png|100px]] | |portrait=[[File:Portrait l'arachel princess of light feh.png|100px]] | ||
|rarity=5 | |rarity=5 | ||
|wpntype=Blue tome | |wpntype=Blue tome | ||
| Line 282: | Line 383: | ||
|def=4 | |def=4 | ||
|res=7 | |res=7 | ||
| | |HP_gr=40 | ||
| | |atk_gr=55 | ||
| | |spd_gr=55 | ||
| | |def_gr=30 | ||
| | |res_gr=55 | ||
|offense=[[Ivaldi]] | |offense=[[Ivaldi]] | ||
|special=[[Rising Light]] | |special=[[Rising Light]] | ||
| Line 293: | Line 394: | ||
====Skill set==== | ====Skill set==== | ||
{| | {{FEH skill set | ||
|name=L'Arachel: Princess of Light | |||
|sort=Larachel: Princess of Light | |||
|minrarity=3 | |||
|- | |- | ||
|weapon1=Light | |||
|weapon1article=Lightning | |||
|weapon1auto=1 | |||
|weapon1cost=50 | |||
|- | |- | ||
| | |weapon2=Ellight | ||
| | |weapon2unlock=2 | ||
| | |weapon2auto=3 | ||
|weapon2cost=100 | |||
|- | |- | ||
| | |weapon3=Shine | ||
| | |weapon3unlock=3 | ||
| | |weapon3auto=4 | ||
|weapon3cost=200 | |||
|- | |- | ||
| | |weapon4=Ivaldi | ||
|weapon4auto=5 | |||
| | |weapon4cost=400 | ||
| | |||
|- | |- | ||
| | |special1=Rising Light | ||
| | |special1unlock=3 | ||
| | |special1auto=4 | ||
| | |special1cost=150 | ||
|- | |- | ||
| | |special2=Growing Light | ||
|special2unlock=4 | |||
| | |special2cost=300 | ||
| | |||
|- | |- | ||
| | |passb1=Renewal 1 | ||
|passb1unlock=1 | |||
| | |passb1cost=60 | ||
| | |||
|- | |- | ||
| | |passb2=Renewal 2 | ||
|passb2unlock=2 | |||
| | |passb2cost=120 | ||
| | |||
|- | |- | ||
| | |passb3=Renewal 3 | ||
|passb3unlock=4 | |||
| | |passb3cost=240 | ||
| | |||
|- | |- | ||
| | |passc1=Res Tactic 1 | ||
| | |passc1unlock=3 | ||
|passc1cost=60 | |||
| | |||
|- | |- | ||
| | |passc2=Res Tactic 2 | ||
|passc2unlock=4 | |||
| | |passc2cost=120 | ||
| | |||
|- | |- | ||
| | |passc3=Res Tactic 3 | ||
|passc3unlock=5 | |||
|passc3cost=240 | |||
}} | |||
| | |||
| 240 | |||
===L'Arachel: Harvest Princess=== | ===L'Arachel: Harvest Princess=== | ||
| Line 374: | Line 465: | ||
|def=3 | |def=3 | ||
|res=7 | |res=7 | ||
| | |HP_gr=50 | ||
| | |atk_gr=65 | ||
| | |spd_gr=60 | ||
| | |def_gr=45 | ||
| | |res_gr=30 | ||
|offense=[[Madness Flask+]] | |offense=[[Madness Flask+]] | ||
|support=[[Rally Attack]] | |support=[[Rally Attack]] | ||
| Line 384: | Line 475: | ||
====Skill set==== | ====Skill set==== | ||
{| | {{FEH skill set | ||
|name=L'Arachel: Harvest Princess | |||
|sort=Larachel: Harvest Princess | |||
|minrarity=5 | |||
|- | |- | ||
|weapon1=Wind | |||
|weapon1auto=1 | |||
|weapon1cost=50 | |||
|- | |- | ||
| | |weapon2=Elwind | ||
| | |weapon2unlock=2 | ||
| | |weapon2auto=3 | ||
|weapon2cost=100 | |||
|- | |- | ||
| | |weapon3=Madness Flask | ||
| | |weapon3unlock=3 | ||
| | |weapon3auto=4 | ||
|weapon3cost=200 | |||
|- | |- | ||
| | |weapon4=Madness Flask+ | ||
|weapon4auto=5 | |||
| | |weapon4cost=300 | ||
|- | |- | ||
| | |assist1=Rally Attack | ||
| | |assist1unlock=3 | ||
| | |assist1auto=4 | ||
|assist1cost=150 | |||
|- | |- | ||
| | |assist2=Rally Atk/Spd | ||
| | |assist2unlock=4 | ||
| | |assist2cost=300 | ||
|- | |- | ||
| | |assist3=Rally Atk/Spd+ | ||
|assist3unlock=5 | |||
| | |assist3cost=400 | ||
| | |||
|- | |- | ||
| | |passa1=Death Blow 1 | ||
|passa1unlock=1 | |||
| | |passa1cost=50 | ||
| | |||
|- | |- | ||
| | |passa2=Swift Sparrow 1 | ||
| | |passa2unlock=2 | ||
|passa2cost=120 | |||
| | |||
|- | |- | ||
| | |passa3=Swift Sparrow 2 | ||
|passa3unlock=4 | |||
| | |passa3cost=240 | ||
| | |||
|- | |- | ||
| | |passb1=Spd/Res Ruse 1 | ||
|passb1unlock=3 | |||
| | |passb1cost=60 | ||
| | |||
|- | |- | ||
| | |passb2=Spd/Res Ruse 2 | ||
|passb2unlock=4 | |||
| | |passb2cost=120 | ||
| | |||
|- | |- | ||
| | |passb3=Spd/Res Ruse 3 | ||
|passb3unlock=5 | |||
|passb3cost=240 | |||
}} | |||
| | |||
| 240 | |||
===L'Arachel: Seeker of Justice=== | ===L'Arachel: Seeker of Justice=== | ||
| Line 458: | Line 540: | ||
:''L'Arachel: Seeker of Justice is only available at 5{{star}} rarity.'' | :''L'Arachel: Seeker of Justice is only available at 5{{star}} rarity.'' | ||
{{CharStats FEH | {{CharStats FEH | ||
|portrait=[[File:Portrait l | |portrait=[[File:Portrait l'arachel seeker of justice feh.png|100px]] | ||
|rarity=5 | |rarity=5 | ||
|wpntype=Staff | |wpntype=Staff | ||
| Line 467: | Line 549: | ||
|def=3 | |def=3 | ||
|res=8 | |res=8 | ||
| | |HP_gr=45 | ||
| | |atk_gr=65 | ||
| | |spd_gr=70 | ||
| | |def_gr=30 | ||
| | |res_gr=50 | ||
|support=[[Rescue+]] | |support=[[Rescue+]] | ||
|special=[[Kindled-Fire Balm]] | |special=[[Kindled-Fire Balm]] | ||
| Line 477: | Line 559: | ||
====Skill set==== | ====Skill set==== | ||
{| | {{FEH skill set | ||
|name=L'Arachel: Seeker of Justice | |||
|sort=Larachel: Seeker of Justice | |||
|minrarity=5 | |||
|- | |||
|weapon1=Assault | |||
|weapon1auto=1 | |||
|weapon1cost=50 | |||
|- | |||
|weapon2=Staff of Rausten | |||
|weapon2auto=5 | |||
|weapon2cost=400 | |||
|- | |||
|assist1=Heal | |||
|assist1auto=1 | |||
|assist1cost=50 | |||
|- | |||
|assist2=Reconcile | |||
|assist2unlock=2 | |||
|assist2auto=3 | |||
|assist2cost=100 | |||
|- | |||
|assist3=Rescue | |||
|assist3article=Rescue (staff) | |||
|assist3unlock=3 | |||
|assist3auto=4 | |||
|assist3cost=200 | |||
|- | |||
|assist4=Rescue+ | |||
|assist4auto=5 | |||
|assist4cost=300 | |||
|- | |||
|special1=Imbue | |||
|special1unlock=2 | |||
|special1auto=4 | |||
|special1cost=50 | |||
|- | |- | ||
|special2=Kindled-Fire Balm | |||
|special2unlock=3 | |||
|special2auto=5 | |||
|special2cost=150 | |||
|- | |- | ||
| [[File: | |special3=Windfire Balm | ||
| [[ | |special3unlock=4 | ||
| {{ | |special3cost=200 | ||
| | |- | ||
|special4=Windfire Balm+ | |||
|special4unlock=5 | |||
|special4cost=300 | |||
|- | |||
|passa1=Atk/Spd Push 1 | |||
|passa1unlock=2 | |||
|passa1cost=60 | |||
|- | |||
|passa2=Atk/Spd Push 2 | |||
|passa2unlock=3 | |||
|passa2cost=120 | |||
|- | |||
|passa3=Atk/Spd Push 3 | |||
|passa3unlock=4 | |||
|passa3cost=240 | |||
|- | |||
|passa4=Atk/Spd Push 4 | |||
|passa4unlock=5 | |||
|passa4cost=300 | |||
|- | |||
|passb1=S/R Far Trace 1 | |||
|passb1unlock=3 | |||
|passb1cost=60 | |||
|- | |||
|passb2=S/R Far Trace 2 | |||
|passb2unlock=4 | |||
|passb2cost=120 | |||
|- | |||
|passb3=S/R Far Trace 3 | |||
|passb3unlock=5 | |||
|passb3cost=240 | |||
}} | |||
===L'Arachel: Summer Princess=== | |||
====Starting stats==== | |||
{{Tab | |||
|tab1={{star|4}} | |||
|tab2={{star|5}} | |||
|content1={{CharStats FEH | |||
|portrait=[[File:Portrait l'arachel summer princess feh.png|100px]] | |||
|rarity=4 | |||
|wpntype=staff | |||
|unittype=flying | |||
|HP=14 | |||
|atk=16 | |||
|spd=9 | |||
|def=2 | |||
|res=5 | |||
|HP_gr=50 | |||
|atk_gr=70 | |||
|spd_gr=80 | |||
|def_gr=30 | |||
|res_gr=55 | |||
|offense=[[Seaside Parasol]] | |||
|special=[[Imbue]] | |||
}} | |||
|content2={{CharStats FEH | |||
|portrait=[[File:Portrait l'arachel summer princess feh.png|100px]] | |||
|rarity=5 | |||
|wpntype=staff | |||
|unittype=flying | |||
|HP=15 | |||
|atk=16 | |||
|spd=9 | |||
|def=3 | |||
|res=6 | |||
|HP_gr=50 | |||
|atk_gr=70 | |||
|spd_gr=80 | |||
|def_gr=30 | |||
|res_gr=55 | |||
|offense=[[Seaside Parasol+]] | |||
|special=[[Swift-Winds Balm]] | |||
}} | |||
}} | |||
====Skill set==== | |||
{{FEH skill set | |||
|name=L'Arachel: Summer Princess | |||
|sort=Larachel: Summer Princess | |||
|minrarity=4 | |||
|- | |- | ||
| | |weapon1=Assault | ||
|weapon1auto=1 | |||
| | |weapon1cost=50 | ||
| | |||
|- | |- | ||
| | |weapon2=Seaside Parasol | ||
| | |weapon2auto=3 | ||
| | |weapon2cost=200 | ||
|- | |- | ||
| | |weapon3=Seaside Parasol+ | ||
| | |weapon3auto=5 | ||
| | |weapon3cost=300 | ||
|- | |- | ||
| | |assist1=Heal | ||
| | |assist1auto=1 | ||
| | |assist1cost=50 | ||
|- | |- | ||
| | |assist2=Mend | ||
| | |assist2unlock=2 | ||
| | |assist2auto=3 | ||
|assist2cost=100 | |||
|- | |- | ||
| | |assist3=Recover | ||
| | |assist3unlock=3 | ||
| | |assist3auto=4 | ||
|assist3cost=200 | |||
|- | |- | ||
| | |assist4=Recover+ | ||
| | |assist4auto=5 | ||
|assist4cost=300 | |||
| | |||
|- | |- | ||
| | |special1=Imbue | ||
| | |special1unlock=2 | ||
| | |special1auto=4 | ||
| | |special1cost=50 | ||
|- | |- | ||
| | |special2=Swift-Winds Balm | ||
| | |special2unlock=3 | ||
| | |special2auto=5 | ||
| | |special2cost=150 | ||
|- | |- | ||
| | |special3=Earthwind Balm | ||
|special3unlock=4 | |||
| | |special3cost=200 | ||
| | |||
|- | |- | ||
| | |special4=Earthwind Balm+ | ||
|special4unlock=5 | |||
| | |special4cost=300 | ||
| | |||
|- | |- | ||
| | |passa1=Blade Session 1 | ||
| | |passa1unlock=3 | ||
|passa1cost=60 | |||
| | |||
|- | |- | ||
| | |passa2=Blade Session 2 | ||
| | |passa2unlock=4 | ||
|passa2cost=120 | |||
| | |||
|- | |- | ||
| | |passa3=Blade Session 3 | ||
|passa3unlock=5 | |||
| | |passa3cost=240 | ||
| | |||
|- | |- | ||
| | |passb1=Wrathful Staff 1 | ||
|passb1unlock=1 | |||
| | |passb1cost=60 | ||
| | |||
|- | |- | ||
| | |passb2=Wrathful Staff 2 | ||
|passb2unlock=2 | |||
| | |passb2cost=120 | ||
| | |||
|- | |- | ||
|passb3=Wrathful Staff 3 | |||
|passb3unlock=4 | |||
|passb3cost=240 | |||
}} | |||
==Personality | ==Personality== | ||
L'Arachel is a very optimistic, energetic princess who is always trying to save anyone she sees from evil. She is very self-confident to the point of being self-centered, even labeled so by the game script in two endings.<ref>{{cite|[Rennac] was never able to escape his service to the self-centered princess who became queen.|Rennac's normal ending|The Sacred Stones}}</ref><ref>{{cite|[Ephraim and L'Arachel's] marriage threw Rausten into turmoil, but L'Arachel's self-centeredness carried the day.|Ephraim and L'Arachel's paired ending|The Sacred Stones}}</ref> Still, she is never mean-spirited; only slightly arrogant. She strongly believes in divine forces, asserting that they bring people together on several occasions. Very strong-willed and enthusiastic, she is always ready to heal and help allies on the battlefield. As royalty, she acts very high-class and is always wary of manners, expecting great respect from others. | L'Arachel is a very optimistic, energetic princess who is always trying to save anyone she sees from evil. She is very self-confident to the point of being self-centered, even labeled so by the game script in two endings.<ref>{{cite|[Rennac] was never able to escape his service to the self-centered princess who became queen.|Rennac's normal ending|The Sacred Stones}}</ref><ref>{{cite|[Ephraim and L'Arachel's] marriage threw Rausten into turmoil, but L'Arachel's self-centeredness carried the day.|Ephraim and L'Arachel's paired ending|The Sacred Stones}}</ref> Still, she is never mean-spirited; only slightly arrogant. She strongly believes in divine forces, asserting that they bring people together on several occasions. Very strong-willed and enthusiastic, she is always ready to heal and help allies on the battlefield. As royalty, she acts very high-class and is always wary of manners, expecting great respect from others. | ||
| Line 633: | Line 826: | ||
==Quotes== | ==Quotes== | ||
===Battle quotes=== | ===Battle quotes=== | ||
{{Quote|'''Riev''': Heh heh heh. The young lady of Rausten... The more cruel and gruesome your death, the more that cur Mansel would weep, am I right? And that would make me so very, very happy.<br>'''L'Arachel''': Do you think your words will frighten me? I am the princess L'Arachel! Slaying demons is my forte! You who have sold your soul to the soulless... I grant you release from your wretched existence.|L'Arachel, when fighting [[Riev]] in [[Darkling Woods|Chapter 20]] of {{title|The Sacred Stones}}.}} | |||
'''Riev''': | |||
{{Quote|What sort of fools would let themselves be summoned into another's war?|L'Arachel, as an enemy in [[Smash Brethren 2]] in {{title|Awakening}}.}} | |||
{{Quote|'''Inigo:''' My lovely lady. Shall we just leave this ugly fighting and have some tea?<br>'''L'Arachel:''' I'm afraid you're not my type. For tea, that is. You'll do just fine for the ugly fighting.|L'Arachel, when fighting [[Inigo]] as an enemy in Smash Brethren 2 in ''Awakening''.}} | |||
{{Quote|Why are you even trying? You're just another feather waiting to be placed in my cap.|L'Arachel, as an enemy in [[Smash Brethren 3]] in {{title|Awakening}}.}} | |||
{{Quote|'''Inigo:''' How I wish to get to know you, milady! Are we doomed to meet only in battle?<br>'''L'Arachel:''' Yes. That's the idea.<br>'''Inigo:''' *Sigh* The truth stings all the more from the lips of one so lovely.|L'Arachel, when fighting [[Inigo]] as an enemy in Smash Brethren 3 in ''Awakening''.}} | |||
{{Quote|I serve the powers above!|L'Arachel's [[SpotPass]] parley quote in {{title|Awakening}}.}} | |||
{{Quote|We were brought here to win!|L'Arachel's SpotPass battle quote in {{title|Awakening}}.}} | |||
{{Quote|Clearly, I must accompany you.|L'Arachel's SpotPass recruitment quote in {{title|Awakening}}.}} | |||
===Death quotes=== | |||
{{Quote|This will never do! I find it hard to say, but I must beg your leave...|L'Arachel, in {{title|The Sacred Stones}}.}} | |||
{{Quote|Perhaps the messengers of justice the sagas spoke of were...you...|L'Arachel, as an enemy in [[Smash Brethren 2]] in {{title|Awakening}}.}} | |||
{{Quote|My illustrious career...ruined...|L'Arachel, as an enemy in [[Smash Brethren 3]] in {{title|Awakening}}.}} | |||
{{ | |||
===Heroes quotes=== | ==={{title|Heroes}} quotes=== | ||
{{main|L'Arachel/Quotes (Heroes)|l1=L'Arachel/Quotes (''Heroes'')}} | {{main|L'Arachel/Quotes (Heroes)|l1=L'Arachel/Quotes (''Heroes'')}} | ||
| Line 650: | Line 851: | ||
==={{FE9}}=== | ==={{FE9}}=== | ||
[[File:Cg fe09 fe08 l'arachel.png|200px|right]] | [[File:Cg fe09 fe08 l'arachel.png|200px|right]] | ||
L'arachel's official artwork from {{Title|The Sacred Stones}} can be viewed in {{Title|Path of Radiance}}'s extras menu if a copy of ''The Sacred Stones'' is connected to a copy of ''Path of Radiance''. | L'arachel's official artwork from {{Title|The Sacred Stones}} can be viewed in {{Title|Path of Radiance}}{{'}}s extras menu if a copy of ''The Sacred Stones'' is connected to a copy of ''Path of Radiance''. | ||
=== | ==={{TCGCipher}}=== | ||
L'Arachel is featured on four cards in {{TCGCipher}}. | L'Arachel is featured on four cards in {{TCGCipher}}. | ||
| Line 751: | Line 952: | ||
==Flavor text== | ==Flavor text== | ||
{{ | {{DescriptionHdr}} | ||
{{ | {{DescriptionCell | ||
| | |game={{title|The Sacred Stones}} | ||
| | |english=A young woman from Rausten. She<br>fights for justice and order. | ||
| | |japanese=ロストン聖教国出身の少女<br>正義と秩序の為 魔物を成敗する | ||
| | }} | ||
| | {{DescriptionCell | ||
| | |game={{title|Engage}} | ||
| | |english=Hero from beyond Elyos who is a<br>righteous defender of others.<br><br>She traveled the length of Magvel<br>defeating any monsters she found.<br><br>As princess of Rausten, she fought<br>alongside her two attendants.<br><br>Appears in The Sacred Stones. | ||
|japanese=異界の英雄で、人々を救う正義の少女。<br><br>マギ・ヴァル大陸の各地を渡り歩き<br>出現した魔物を退治していた。<br><br>その正体はロストン聖教国の聖王女で<br>二人のお供をつれて奮戦した。<br><br>「聖魔の光石」 | |||
| | }} | ||
| | {{DescriptionCell | ||
| | |game={{title|Heroes}}<br><small>(L'Arachel: Princess of Light)</small> | ||
|english=Princess of Rausten. Dozla and Rennac<br>accompany her on their quest to defeat<br>the monsters around Magvel. Appears in<br>Fire Emblem: The Sacred Stones. | |||
| | |japanese=ロストン聖教国の姫。ドズラとレナックを率いて<br>マギ・ヴァル大陸各地の魔物を倒す旅に出ている。<br>(登場:『ファイアーエムブレム 聖魔の光石』) | ||
| | }} | ||
| | {{DescriptionCell | ||
|game={{title|Heroes}}<br><small>(L'Arachel: Harvest Princess)</small> | |||
|english=Princess of Rausten. Enthusiastically<br>participating in the harvest festival<br>alongside her attendant Dozla. Appears<br>in Fire Emblem: The Sacred Stones. | |||
|japanese=ロストン聖教国の王女。<br>お供のドズラを率い、張り切って収穫祭に参加する。<br>(登場:『ファイアーエムブレム 聖魔の光石』) | |||
}} | |||
{{DescriptionCell | |||
|game={{title|Heroes}}<br><small>(L'Arachel: Seeker of Justice)</small> | |||
|english=Niece to Pontifex Mansel and princess of<br>Rausten. Her ultimate ambition is to rid the<br>world of monsters. Appears in Fire Emblem:<br>The Sacred Stones. | |||
|japanese=教皇マンセルを叔父に持つ、ロストン聖教国の王女。<br>いつの日か魔物を征伐せんと志している。<br>(登場:『ファイアーエムブレム 聖魔の光石』) | |||
}} | |||
{{DescriptionCell | |||
|game={{title|Heroes}}<br><small>(L'Arachel: Summer Princess)</small> | |||
|english=Princess of Rausten, gracing the beach in her<br>swimsuit to bring some summer color to Askr!<br>Appears in Fire Emblem: The Sacred Stones. | |||
|japanese=ロストン聖教国の王女。アスク王国の夏に<br>彩りを添えるため、水着姿で浜辺に降臨!<br>(登場:『ファイアーエムブレム 聖魔の光石』) | |||
}} | |||
{{DescriptionFtr}} | |||
==[[Meet some of the Heroes]] entries== | |||
{{Tab | |||
|tab1=Princess of Light | |||
|tab2=Harvest Princess | |||
|tab3=Seeker of Justice | |||
|tab4=Summer Princess | |||
|content1={{MtH | |||
|full_name=L'Arachel: Princess of Light | |||
|name=L'Arachel Princess of Light | |||
|blurb1=Wherever darkness strikes fear in the hearts of the people, the light of hope will reveal the way forward! Today I’ll be introducing you to L’Arachel, the Princess of Light and the pride of Rausten! | |||
|blurb2=L’Arachel is the niece of the Pontifex of Rausten. She’s devoted to fighting for justice, so she abandoned the comforts of home to defeat the monsters stalking Magvel! | |||
|blurb3=Joined by her followers, Dozla and Rennac, L’Arachel traveled the continent, a journey that brought them face-to-face with the evil forces threatening the peace. | |||
|blurb4=But not even the greatest of foes could withstand L’Arachel’s charge! The Princess of Light marches ever on, fighting to see the world bathed in the light of justice! | |||
|Related_name1=Dozla | |||
|Related_blurb1=An attendant in L’Arachel’s service. A hearty man with a thirst for life, who treasures children above all else. | |||
|Related_name2=Rennac | |||
|Related_blurb2=A thief from the republic of Carcino. Despite his street smarts, he found himself kept firmly under L’Arachel’s thumb. | |||
}} | |||
|content2={{MtH | |||
|full_name=L'Arachel: Harvest Princess | |||
|name=L'Arachel Harvest Princess | |||
|blurb1=L’Arachel is the princess of Rausten. Sure, she’s a member of high nobility and doesn’t hide it, but she’s very friendly and open-minded too! This time, she’s making her harvest festival appearance dressed as a mad scientist! | |||
|blurb2=Normally, she uses her staff to heal her allies, but you wouldn’t get that impression from her costume today! That white coat and glasses are a whole new look for her. | |||
|blurb3=She’s got the fashionable evildoer look down pat, but don’t forget that it’s just for show! For the festival, she’ll be taking Dozla around with her and handing out candy to all the kids! | |||
|blurb4=She looks fabulous in her usual princess outfit, but this costume is super cute too. I’m sure the kids will just love her this harvest festival! | |||
|Related_name1=Dozla | |||
|Related_blurb1=An attendant in L’Arachel’s service. A hearty man with a thirst for life, who treasures children above all else. | |||
}} | |||
|content3={{MtH | |||
|full_name=L'Arachel: Seeker of Justice | |||
|name=L'Arachel Seeker of Justice | |||
|blurb1=Here’s L’Arachel, Rausten’s Princess of Light! She’s a little younger than we’re used to seeing her, but even at this age, it’s her way or the highway! | |||
|blurb2=L’Arachel’s parents were brave fighters who defended the people of Rausten from the threat of monsters. Tragically, however, they perished in battle when L’Arachel was only a child, leaving her an orphan. | |||
|blurb3=L’Arachel tries not to let people see her when she’s vulnerable, but this must have been extremely difficult for her. I hear that when she was upset or would begin to cry back then, Dozla would try to cheer her up by letting her pull on his beard! | |||
|blurb4=Young L’Arachel dreams of going on her own journey to slay monsters when she gets older. I’m sure it’ll be a tough path to follow, but at the same time, I get the feeling that it’ll be a fun, exciting adventure for her! | |||
|Related_name1=Dozla | |||
|Related_blurb1=An attendant in L’Arachel’s service. A hearty man with a thirst for life, who treasures children above all else. | |||
}} | |||
|content4={{MtH | |||
|full_name=L'Arachel: Summer Princess | |||
|name=L'Arachel Summer Princess | |||
|blurb1=Whoa! Did you hear those peals of laughter coming from across the beach? Oh, it’s L’Arachel, the Princess of Light who’s come in a swimsuit to shine upon the beach! | |||
|blurb2=L’Arachel is the princess of Rausten, and even on vacation she looks so elegant. The frilly swimsuit design really fits her! | |||
|blurb3=Apparently, that parasol she’s carrying is imbued with powerful magic. If she catches any evildoers ransacking the beach, she’ll bring them to justice before they can say, “Where’s the sun lotion”! | |||
|blurb4=L’Arachel’s in even higher energy than usual in the free and tropical environment. I’m sure this will truly be a vacation to remember! | |||
|Related_name1=Dozla | |||
|Related_blurb1=An attendant in L’Arachel’s service. A hearty man with a thirst for life, who treasures children above all else. | |||
|Related_name2=Rennac | |||
|Related_blurb2=A thief forced to accompany L’Arachel on her adventures. Member of a wealthy merchant family and well-versed in the ways of the world. | |||
}} | |||
}} | }} | ||
==[[Choose Your Legends]] placement history== | |||
{{CYL results}} | |||
==Trivia== | ==Trivia== | ||
* Though L'Arachel often talks about how her mission is to smite all of the evil monsters plaguing [[Magvel]], she can only use staves when recruited, and therefore cannot attack any monsters (or enemies at all, for that matter), until she is promoted. | * Though L'Arachel often talks about how her mission is to smite all of the evil monsters plaguing [[Magvel]], she can only use staves when recruited, and therefore cannot attack any monsters (or enemies at all, for that matter), until she is promoted. | ||
* L'Arachel is the only character to have a support with [[Eirika]] but not have a paired ending with her. | * L'Arachel is the only character in {{title|The Sacred Stones}} to have a support with [[Eirika]] but not have a paired ending with her. | ||
==Etymology and other languages== | ==Etymology and other languages== | ||
| Line 794: | Line 1,064: | ||
==Gallery== | ==Gallery== | ||
{| class="mw-collapsible mw-collapsed" style="margin: auto; width: 75%; border: 2px solid {{Color2}}; background: {{Color1}}; border-radius: 15px; text-align: center" | {| class="mw-collapsible mw-collapsed pixel-art" style="margin: auto; width: 75%; border: 2px solid {{Color2}}; background: {{Color1}}; border-radius: 15px; text-align: center" | ||
! style="border: 1px solid {{Color2}}; background: {{Color1}}; border-radius: 15px" | [[File:Small portrait l'arachel fe08.png]] Sprite Gallery | ! style="border: 1px solid {{Color2}}; background: {{Color1}}; border-radius: 15px" | [[File:Small portrait l'arachel fe08.png]] Sprite Gallery | ||
|- | |- | ||
| Line 807: | Line 1,077: | ||
| style="border-left: 1px solid {{Color2}}" | [[File:Bs fe08 l'arachel valkyrie light.png]]<br>[[Light (magic)|Light]] | | style="border-left: 1px solid {{Color2}}" | [[File:Bs fe08 l'arachel valkyrie light.png]]<br>[[Light (magic)|Light]] | ||
| [[File:Bs fe08 l'arachel valkyrie staff.png]]<br>[[Staff]] | | [[File:Bs fe08 l'arachel valkyrie staff.png]]<br>[[Staff]] | ||
| style="border-left: 1px solid {{Color2}}" | [[File:Bs fe08 l'arachel mage knight anima.png]] <br>[[ | | style="border-left: 1px solid {{Color2}}" | [[File:Bs fe08 l'arachel mage knight anima.png]] <br>[[Anima]] | ||
| [[File:Bs fe08 l'arachel mage knight staff.png]]<br>[[Staff]] | | [[File:Bs fe08 l'arachel mage knight staff.png]]<br>[[Staff]] | ||
|} | |} | ||
|} | |} | ||
===Official artwork=== | |||
<gallery> | <gallery> | ||
FESS L'Arachel.png|Artwork of L'Arachel from {{title|The Sacred Stones}}. | FESS L'Arachel.png|Artwork of L'Arachel from {{title|The Sacred Stones}}. | ||
Portrait beta l'arachel fe08.png|Beta portrait of L'Arachel | </gallery> | ||
Small portrait spotpass l'arachel fe13.png|L'Arachel | ===Portraits=== | ||
<gallery> | |||
Portrait beta l'arachel fe08.png|Beta portrait of L'Arachel from {{title|The Sacred Stones prototype}}. | |||
Small portrait spotpass l'arachel fe13.png|Portrait of L'Arachel in {{title|Awakening}}. | |||
</gallery> | </gallery> | ||
===Battle animations=== | ===Battle animations=== | ||
<gallery> | <gallery> | ||
Ba fe08 l'arachel mage knight anima.gif|L'Arachel attacking as a [[Mage Knight]]. | Ba fe08 l'arachel mage knight anima.gif|L'Arachel attacking with [[anima magic]] as a [[Mage Knight]] in {{title|The Sacred Stones}}. | ||
Ba fe08 l'arachel mage knight anima critical.gif|L'Arachel performing a [[critical hit]] as a | Ba fe08 l'arachel mage knight anima critical.gif|L'Arachel performing a [[critical hit]] with anima magic as a Mage Knight in ''The Sacred Stones''. | ||
Ba fe08 l'arachel valkyrie light.gif|L'Arachel attacking as a [[Valkyrie]]. | Ba fe08 l'arachel valkyrie light.gif|L'Arachel attacking with [[light magic]] as a [[Valkyrie]] in ''The Sacred Stones''. | ||
Ba fe08 l'arachel valkyrie light critical.gif|L'Arachel performing a [[ | Ba fe08 l'arachel valkyrie light critical.gif|L'Arachel performing a critical hit with light magic as a Valkyrie in ''The Sacred Stones''. | ||
</gallery> | |||
===CG images=== | |||
<gallery> | |||
Ss fe08 l'arachel's group.png|CG image of L'Arachel, [[Rennac]], and [[Dozla]] in {{title|The Sacred Stones}}. | |||
Cg fe09 fe08 l'arachel.png|CG image of L'Arachel in {{title|Path of Radiance}}. | |||
</gallery> | |||
==={{title|Heroes}} artwork=== | |||
====Character artwork==== | |||
<gallery> | |||
FEH L'Arachel Princess of Light 01.png|Artwork of L'Arachel: Princess of Light. | |||
FEH L'Arachel Princess of Light 02.png|Artwork of L'Arachel: Princess of Light. | |||
FEH L'Arachel Princess of Light 02a.png|Artwork of L'Arachel: Princess of Light. | |||
FEH L'Arachel Princess of Light 03.png|Artwork of L'Arachel: Princess of Light. | |||
FEH Wallpaper L'Arachel Princess of Light.png|Artwork of L'Arachel: Princess of Light. | |||
FEH L'Arachel Princess of Light R01.png|Artwork of Resplendent L'Arachel: Princess of Light. | |||
FEH L'Arachel Princess of Light R02.png|Artwork of Resplendent L'Arachel: Princess of Light. | |||
FEH L'Arachel Princess of Light R02a.png|Artwork of Resplendent L'Arachel: Princess of Light. | |||
FEH L'Arachel Princess of Light R03.png|Artwork of Resplendent L'Arachel: Princess of Light. | |||
FEH L'Arachel Harvest Princess 01.png|Artwork of L'Arachel: Harvest Princess. | |||
FEH L'Arachel Harvest Princess 02.png|Artwork of L'Arachel: Harvest Princess. | |||
FEH L'Arachel Harvest Princess 02a.png|Artwork of L'Arachel: Harvest Princess. | |||
FEH L'Arachel Harvest Princess 03.png|Artwork of L'Arachel: Harvest Princess. | |||
FEH L'Arachel Seeker of Justice 01.png|Artwork of L'Arachel: Seeker of Justice. | |||
FEH L'Arachel Seeker of Justice 02.png|Artwork of L'Arachel: Seeker of Justice. | |||
FEH L'Arachel Seeker of Justice 02a.png|Artwork of L'Arachel: Seeker of Justice. | |||
FEH L'Arachel Seeker of Justice 03.png|Artwork of L'Arachel: Seeker of Justice. | |||
FEH L'Arachel Summer Princess 01.png|Artwork of L'Arachel: Summer Princess. | |||
FEH L'Arachel Summer Princess 02.png|Artwork of L'Arachel: Summer Princess. | |||
FEH L'Arachel Summer Princess 02a.png|Artwork of L'Arachel: Summer Princess. | |||
FEH L'Arachel Summer Princess 03.png|Artwork of L'Arachel: Summer Princess. | |||
</gallery> | |||
====[[Meet some of the Heroes]] artwork==== | |||
<gallery> | |||
FEH mth L'Arachel Princess of Light 01.png|Artwork of L'Arachel: Princess of Light. | |||
FEH mth L'Arachel Princess of Light 02.png|Artwork of L'Arachel: Princess of Light. | |||
FEH mth L'Arachel Princess of Light 03.png|Artwork of L'Arachel: Princess of Light. | |||
FEH mth L'Arachel Princess of Light 04.png|Artwork of L'Arachel: Princess of Light. | |||
FEH mth L'Arachel Harvest Princess 01.png|Artwork of L'Arachel: Harvest Princess. | |||
FEH mth L'Arachel Harvest Princess 02.png|Artwork of L'Arachel: Harvest Princess. | |||
FEH mth L'Arachel Harvest Princess 03.png|Artwork of L'Arachel: Harvest Princess. | |||
FEH mth L'Arachel Harvest Princess 04.png|Artwork of L'Arachel: Harvest Princess. | |||
FEH mth L'Arachel Seeker of Justice 01.png|Artwork of L'Arachel: Seeker of Justice. | |||
FEH mth L'Arachel Seeker of Justice 02.png|Artwork of L'Arachel: Seeker of Justice. | |||
FEH mth L'Arachel Seeker of Justice 03.png|Artwork of L'Arachel: Seeker of Justice. | |||
FEH mth L'Arachel Seeker of Justice 04.png|Artwork of L'Arachel: Seeker of Justice. | |||
FEH mth L'Arachel Summer Princess 01.png|Artwork of L'Arachel: Summer Princess. | |||
FEH mth L'Arachel Summer Princess 02.png|Artwork of L'Arachel: Summer Princess. | |||
FEH mth L'Arachel Summer Princess 03.png|Artwork of L'Arachel: Summer Princess. | |||
FEH mth L'Arachel Summer Princess 04.png|Artwork of L'Arachel: Summer Princess. | |||
FEH mth Rennac Rich "Merchant" 02.png|L'Arachel in an artwork of [[Rennac]]: Rich "Merchant". | |||
</gallery> | </gallery> | ||
=== | ==={{title|Cipher}} artwork=== | ||
<gallery> | <gallery> | ||
TCGCipher L'Arachel 01.jpg|Artwork of L'Arachel. | |||
TCGCipher L'Arachel 02.jpg|Artwork of L'Arachel wielding [[Latona]] and [[Ivaldi]]. | |||
</gallery> | </gallery> | ||
===Other appearances=== | ===Other appearances=== | ||
<gallery> | <gallery> | ||
Anniversary uta-garuta l'arachel.png|Artwork of L'Arachel from {{title|One Hundred Songs of Heroes}}. | |||
</gallery> | </gallery> | ||
Latest revision as of 23:09, 9 April 2024
| ||||||||||||||
|

| “ | Merely serving me must be the greatest pleasure man can know. | ” | — L'Arachel, to Rennac |
|---|
L'Arachel (pronounced /ˌlɑɹəˈʃɛl/[key][2]; Japanese: ラーチェル Larchel) is a character in Fire Emblem: The Sacred Stones. She is the princess of Rausten and Pontifex Mansel's niece. She longs to be famous throughout Magvel, and to do this, she sets out with her vassal Dozla and her hired hand Rennac to rid the continent of monsters.
Fire Emblem: The Sacred Stones
Role
L'Arachel first appears in Chapter 4, where she, Dozla, and Rennac witness Eirika and company as they fight off the monsters in the Za'ha Woods. Seeing the action, L'Arachel wishes to engage in battle with the monsters herself, but Rennac stops her from running down the mountain. The three take a different path, and by the time they arrive on the scene, Eirika has defeated all the monsters. L'Arachel is disappointed that she was unable to show off her monster-felling capabilities, but glad that the monsters were defeated anyway. Eirika asks L'Arachel who she is, and L'Arachel begins to introduce herself when Dozla stops her, reminding her to remain anonymous (though addressing her by name). The three then ride off, with L'Arachel leading the way.
Eirika's route
L'Arachel appears again in Chapter 9 of Eirika's route, where she and her companions are in Port Kiris. L'Arachel is occupied enjoying a sugar pastry when Eirika approaches her about a ship that would take them to Rausten. L'Arachel reports that sadly no ship will leave port for fear of being destroyed by a supposed ghost ship ruling the waters north of Magvel. Instead, she and her companions planned to head to their home through the overland route, and she suggests that Eirika do the same. L'Arachel and her companions then leave the port, though Rennac escapes from her and hides in a nearby village.
L'Arachel and Dozla are next seen in Chapter 11, where they arrive at the same building in which Eirika and her companions fight more monsters. L'Arachel was intending to spend the night in this building, but upon discovering the monsters populating it, she and Dozla take the opportunity to fight the monsters as well. If Eirika talks to L'Arachel during the battle, she will suggest that L'Arachel find a save place elsewhere, but L'Arachel insists on showing Eirika her skills in battle, and joins the party. L'Arachel can then recruit Dozla by talking to him, informing him of their company. After the battle, Eirika finally introduces herself to L'Arachel and explains her situation. L'Arachel, thinking it must be destiny, joins Eirika for the rest of the game, and rides of to share her news with Dozla.
As the journey continues and the party heads toward Jehanna, L'Arachel claims that the Knights of Rausten are on their way to aid the party. Eirika is at first confused as to how L'Arachel knows this, and L'Arachel, still hiding her identity as Rausten's Princess, claims the wind told her. Once the Knights of Rausten arrive, they address their princess by her title, and L'Arachel explains to Eirika that she traveled anonymously to seek a path of justice. Having brought troops and funds, L'Arachel continues to be a supportive influence of Eirika on her way.
In Chapter 14, L'Arachel can recruit Rennac if she talks to him during the battle. Though Rennac had been hired by the Grado Empire, L'Arachel's strong personality brings Rennac back into her company, and therefore also Eirika's. L'Arachel then participates in the search for Ismaire and Jehanna's Sacred Stone, as well as the four-nation alliance formed at the end of the chapter between Eirika of Renais, Innes of Frelia, Joshua of Jehanna and L'Arachel herself of Rausten.
After Eirika and Ephraim reunite, L'Arachel participates in the sharing of information between the twins and their companions. She comes to the conclusion that the Sacred Stones are their best option for defeating the Dark Stone, and accompanies the party to retrieve Renais's Sacred Stone. With one stone in hand, L'Arachel leads the party to Rausten, to retrieve the other remaining stone, held in the palace reliquary. Along the way, Eirika asks L'Arachel if the legends of Rausten tell of any way to shake the Demon King out of a person. L'Arachel explains that the only person to ever do so was Saint Latona, whose strong will drove the demon out of him, and that Lyon was long lost to the Demon King. After Lyon destroys the Sacred Stone of Renais, L'Arachel leads the party on to Rausten, to retrieve the last remaining stone.
L'Arachel arrives in Rausten with the rest of the party, and her uncle greets her with open arms. The group takes a night to recover from the stresses of travel, and L'Arachel invites Eirika to stay in her private quarters. That night, L'Arachel consoles Eirika about the loss of her friend, Lyon, and asks her what Lyon would want her to do if he were still alive. L'Arachel tells Eirika to think about things, and not to rush to any conclusions too quickly. The palace then falls under attack, and Eirika and her companions drive the attacking Grado army away. L'Arachel then retrieves the Sacred Stone from the palace, and bids her uncle farewell as he gives Eirika the Sacred Twins Ivaldi and Latona. The party heads out to Darkling Woods to confront the Demon King.
During the final battle, L'Arachel explains to Eirika that in order to seal the Demon King inside Rausten's Sacred Stone, they need the power of human will and desire for peace. After they successfully seal the fiend's soul away, L'Arachel tells that in order to fully defeat him, they must defeat the soulless body he left behind. Once the party is successful, L'Arachel remarks at how the actions of their ancestors have been reflected in their own, and she rides off once again with Dozla and Rennac. In the Epilogue, L'Arachel invites Eirika to join her tea club.
Ephraim's route
L'Arachel's role in Ephraim's route is very similar to her role in Eirika's, with a few changes:
- L'Arachel first appears in Ephraim's route in Chapter 10, where she warns Ephraim not to board a ship because of the phantom ship ruling the waters. She herself though, is intent on purging the seas of the ship, and runs off with Dozla and Rennac to do so.
- In the next chapter, L'Arachel and Dozla are aboard a ship without Rennac, fighting monsters. Ephraim can recruit L'Arachel, who is offended by the fact that Ephraim hasn't heard of her efforts in monster-fighting. L'Arachel can recruit Dozla. L'Arachel and Ephraim converse after the battle, and L'Arachel introduces herself as the Princess of Rausten, allying herself with Ephraim for the rest of the game.
- In Chapter 14, L'Arachel can recruit Rennac using the same tactics as in Eirika's route.
- L'Arachel converses about Lyon's fate with Ephraim instead of Eirika.
- Ephraim converses with Tana once the party reaches Rausten, rather than L'Arachel.
- In the Epilogue, L'Arachel wonders aloud what would happen if she and Ephraim were to be betrothed.
Starting stats and growth rates
Eirika's route Ephraim's route
|
| |||||||||||||||||||||||||||||||||||||||||||||||||||

Promotion stat gains
| Class | HP | Mag | Skill | Spd | Lck | Def | Res | Con | Mov | Weapon level |
|---|---|---|---|---|---|---|---|---|---|---|
| Valkyrie | +3 | +2 | +1 | +0 | +0 | +2 | +3 | +1 | +1 | |
| Mage Knight | +3 | +2 | +1 | +0 | +0 | +2 | +2 | +1 | +1 |
Analysis
| This character analysis section may not be accurate to every player's experience. |
L'Arachel is a character who needs grinding to contribute anything more than small amounts of minor utility. Natasha joining in Chapter 5 at level 1 is already considered under-leveled by many players, and L'Arachel joins even later in Chapter 11 at level 3, unpromoted and with only D-level staves. At base, she is only capable of using basic staves and providing some rescue utility as a mounted unit. For both of these roles, there are plenty of other characters who can accomplish the same things while joining much earlier, easily having a level lead. Other staff users such as Artur and Moulder will have had time to raise their Staff rank and be far closer to powerful staves such as Warp. Additionally, Saleh joins the next chapter in Eirika's route and Chapter 15 in Ephraim's route, who has far better stats all around and starts at C staves, creating even more competition for staffing duties. When it comes to rescue-dropping allies, the Troubadour class and its promotions have lower Move than other mounted classes, and her low durability forces her to stay away from enemies to be safe, meaning most other mounted characters will be more reliable picks.
As a staff-locked unit, L'Arachel has much slower experience gain compared to combat units, further cementing her level deficit. To get from level 3 to level 10, L'Arachel needs 700 experience, while she usually only gains 11 or 12 experience in a single turn from Heal or Mend, respectively. The fog in her join map lets her use Torch for slightly more experience, and C staves also unlocks options for faster experience gain, but this is ultimately a small boost through the long grind it takes for her to catch up. She has high growths in every area aside from HP and defense, but as she can't fight until promotion, it won't matter until she promotes.
Your reward for training L'Arachel to promotion is either a Mage Knight or Valkyrie. The two classes are virtually identical outside of the differences between anima and light magic. With her slow level-up speed, L'Arachel will either promote so late that her combat will be weak either way, or the player is grinding her up and thus can make her strong either way. Mage Knight is better overall, as the lower weight and higher might of anima spells will give her better damage output and more of a chance to be useful if she wasn't power-leveled.
L'Arachel most likely will only heal and rescue her allies a small handful of times, during her join map and the map where she can recruit Rennac for free. Anything more than that will take a significant amount of time and Staff uses, and should be only be considered for players who like L'Arachel as a character enough to be willing to put up with her slow start.
Fire Emblem Awakening
Role
L'Arachel is playable as a SpotPass character, released in the The Sacred Stones character set. She is also present as an enemy in the second and third installments of the Smash Brethren DLC series.
Starting stats and growth rates
|
| ||||||||||||||||||||||||||||||

Reclassing options
Growth rates when reclassed
Tactician/Grandmaster Cavalier Paladin Knight Great Knight General Mercenary/Hero Bow Knight Archer Sniper Myrmidon Swordmaster Assassin Thief Trickster
| Class | HP | Str | Mag | Skill | Spd | Lck | Def | Res |
|---|---|---|---|---|---|---|---|---|
| Tactician/ |
80% | 55% | 65% | 50% | 55% | 50% | 30% | 30% |
Pegasus Knight Falcon Knight Dark Flier Wyvern Rider/Wyvern Lord Griffon Rider Troubadour Cleric Mage/Sage Dark Mage Dark Knight Sorcerer Troubadour/Valkyrie Bride
| Class | HP | Str | Mag | Skill | Spd | Lck | Def | Res |
|---|---|---|---|---|---|---|---|---|
| Pegasus Knight | 80% | 55% | 55% | 60% | 65% | 50% | 25% | 30% |
Promotion stat gains
Archer Cavalier Cleric Dark Mage Wyvern Rider Knight Mage Mercenary Myrmidon Pegasus Knight Tactician Thief Troubadour
| Class | HP | Str | Mag | Skill | Spd | Lck | Def | Res | Mov | Weapon level |
|---|---|---|---|---|---|---|---|---|---|---|
| Sniper | +4 | +2 | +1 | +4 | +3 | +0 | +5 | +3 | +1 | -- |
| Bow Knight | +8 | +3 | +0 | +2 | +4 | +0 | +1 | +2 | +3 |
Skill set
Like all female bonus units in Awakening, L'Arachel has access to all base class and advanced class skills available to standard female units.
Fire Emblem Engage
Role
L'Arachel appears as an equippable Bond Ring. She can be summoned using Eirika's Emblem Ring.
Bond Ring data

| ||||||||||||||||||||||||
| ||||||||||||||||||||||||
Fire Emblem Heroes
Role
There are four different variations of L'Arachel available to Heroes. The normal variation of L'Arachel is one of the characters added to the game in the Fiery Resolve update, and became available for summoning by players on January 25, 2018. A Halloween variation of L'Arachel was made available on October 9, 2019 as part of the summoning event surrounding the launch of the Treat Fiends update. A young variation of L'Arachel was made available between the period of April 19, 2021 to May 19, 2021 as part of the summoning event surrounding the launch of the Childhood Encounter update, the update where this variation was added to the game. A summer variation of L'Arachel was added in the Summer Longing update, and was first available to summon from June 19, 2023.
L'Arachel: Princess of Light
Starting stats
★★★ ★★★★ ★★★★★
|
Initial Stats Level 40 Stats
|
| ||||||||||||||||||||||

Skill set
| Skill set | ||||
|---|---|---|---|---|
| Skill | Unlock | Auto-unlock | SP cost | |
| Light | ★★★ | ★★★ | 50 | |
| Ellight | ★★★ | ★★★ | 100 | |
| Shine | ★★★ | ★★★★ | 200 | |
| Ivaldi | ★★★★★ | ★★★★★ | 400 | |
| Rising Light | ★★★ | ★★★★ | 150 | |
| Growing Light | ★★★★ | — | 300 | |
| Renewal 1 | ★★★ | — | 60 | |
| Renewal 2 | ★★★ | — | 120 | |
| Renewal 3 | ★★★★ | — | 240 | |
| Res Tactic 1 | ★★★ | — | 60 | |
| Res Tactic 2 | ★★★★ | — | 120 | |
| Res Tactic 3 | ★★★★★ | — | 240 | |
L'Arachel: Harvest Princess
Starting stats
- L'Arachel: Harvest Princess is only available at 5★ rarity.
|
Initial Stats Level 40 Stats
|
| ||||||||||||||||||||||

Skill set
| Skill set | ||||
|---|---|---|---|---|
| Skill | Unlock | Auto-unlock | SP cost | |
| Wind | ★★★★★ | ★★★★★ | 50 | |
| Elwind | ★★★★★ | ★★★★★ | 100 | |
| Madness Flask | ★★★★★ | ★★★★★ | 200 | |
| Madness Flask+ | ★★★★★ | ★★★★★ | 300 | |
| Rally Attack | ★★★★★ | ★★★★★ | 150 | |
| Rally Atk/Spd | ★★★★★ | — | 300 | |
| Rally Atk/Spd+ | ★★★★★ | — | 400 | |
| Death Blow 1 | ★★★★★ | — | 50 | |
| Swift Sparrow 1 | ★★★★★ | — | 120 | |
| Swift Sparrow 2 | ★★★★★ | — | 240 | |
| Spd/Res Ruse 1 | ★★★★★ | — | 60 | |
| Spd/Res Ruse 2 | ★★★★★ | — | 120 | |
| Spd/Res Ruse 3 | ★★★★★ | — | 240 | |
L'Arachel: Seeker of Justice
Starting stats
- L'Arachel: Seeker of Justice is only available at 5★ rarity.
|
Initial Stats Level 40 Stats
|
| ||||||||||||||||||||||

Skill set
| Skill set | ||||
|---|---|---|---|---|
| Skill | Unlock | Auto-unlock | SP cost | |
| Assault | ★★★★★ | ★★★★★ | 50 | |
| Staff of Rausten | ★★★★★ | ★★★★★ | 400 | |
| Heal | ★★★★★ | ★★★★★ | 50 | |
| Reconcile | ★★★★★ | ★★★★★ | 100 | |
| Rescue | ★★★★★ | ★★★★★ | 200 | |
| Rescue+ | ★★★★★ | ★★★★★ | 300 | |
| Imbue | ★★★★★ | ★★★★★ | 50 | |
| Kindled-Fire Balm | ★★★★★ | ★★★★★ | 150 | |
| Windfire Balm | ★★★★★ | — | 200 | |
| Windfire Balm+ | ★★★★★ | — | 300 | |
| Atk/Spd Push 1 | ★★★★★ | — | 60 | |
| Atk/Spd Push 2 | ★★★★★ | — | 120 | |
| Atk/Spd Push 3 | ★★★★★ | — | 240 | |
| Atk/Spd Push 4 | ★★★★★ | — | 300 | |
| S/R Far Trace 1 | ★★★★★ | — | 60 | |
| S/R Far Trace 2 | ★★★★★ | — | 120 | |
| S/R Far Trace 3 | ★★★★★ | — | 240 | |
L'Arachel: Summer Princess
Starting stats
★★★★ ★★★★★
|
Initial Stats Level 40 Stats
|
| ||||||||||||||||||||||

Skill set
| Skill set | ||||
|---|---|---|---|---|
| Skill | Unlock | Auto-unlock | SP cost | |
| Assault | ★★★★ | ★★★★ | 50 | |
| Seaside Parasol | ★★★★ | ★★★★ | 200 | |
| Seaside Parasol+ | ★★★★★ | ★★★★★ | 300 | |
| Heal | ★★★★ | ★★★★ | 50 | |
| Mend | ★★★★ | ★★★★ | 100 | |
| Recover | ★★★★ | ★★★★ | 200 | |
| Recover+ | ★★★★★ | ★★★★★ | 300 | |
| Imbue | ★★★★ | ★★★★ | 50 | |
| Swift-Winds Balm | ★★★★ | ★★★★★ | 150 | |
| Earthwind Balm | ★★★★ | — | 200 | |
| Earthwind Balm+ | ★★★★★ | — | 300 | |
| Blade Session 1 | ★★★★ | — | 60 | |
| Blade Session 2 | ★★★★ | — | 120 | |
| Blade Session 3 | ★★★★★ | — | 240 | |
| Wrathful Staff 1 | ★★★★ | — | 60 | |
| Wrathful Staff 2 | ★★★★ | — | 120 | |
| Wrathful Staff 3 | ★★★★ | — | 240 | |
Personality
L'Arachel is a very optimistic, energetic princess who is always trying to save anyone she sees from evil. She is very self-confident to the point of being self-centered, even labeled so by the game script in two endings.[3][4] Still, she is never mean-spirited; only slightly arrogant. She strongly believes in divine forces, asserting that they bring people together on several occasions. Very strong-willed and enthusiastic, she is always ready to heal and help allies on the battlefield. As royalty, she acts very high-class and is always wary of manners, expecting great respect from others.
The princess of Rausten, L'Arachel journeys around Magvel helping out anyone she comes across and gathering fame, along with Dozla and Rennac. Her uncle Mansel is the current pontifex of Rausten, effectively its leader. Her parents died when she was at a young age fighting monsters from Darkling Woods, causing her obsession with fighting monsters.[5] However, she remains lively despite this.
After the game's ending, L'Arachel becomes queen of Rausten.
Supports
- Main article:
L'Arachel/Supports
|
Endings
L'Arachel, Queen of Light
She succeeded her uncle as ruler of the Rausten Theocracy several years after the war ended. She never lost her...unique perspective on life. She spent much of her rule visiting the neighboring countries.
Ephraim and L'Arachel
Ephraim and L'Arachel each returned home after the war, but L'Arachel visited Renais often. Over time, the two were wed. Their marriage threw Rausten into turmoil, but L'Arachel's self-centeredness carried the day.
L'Arachel and Innes
Stories tell of the sparks that flew between L'Arachel and Innes when they first met. As the love between them flourished, so too did the bond that united their two nations.
L'Arachel and Dozla
L'Arachel was, in time, made queen of Rausten, with Dozla at her side, as always. Later, Dozla wept like a baby when L'Arachel was wed. His emotional outburst is remembered as much as, if not more than, the ceremony itself.
Quotes
Battle quotes
| “ | Riev: Heh heh heh. The young lady of Rausten... The more cruel and gruesome your death, the more that cur Mansel would weep, am I right? And that would make me so very, very happy. L'Arachel: Do you think your words will frighten me? I am the princess L'Arachel! Slaying demons is my forte! You who have sold your soul to the soulless... I grant you release from your wretched existence. |
” | — L'Arachel, when fighting Riev in Chapter 20 of The Sacred Stones. |
|---|
| “ | What sort of fools would let themselves be summoned into another's war? | ” | — L'Arachel, as an enemy in Smash Brethren 2 in Awakening. |
|---|
| “ | Inigo: My lovely lady. Shall we just leave this ugly fighting and have some tea? L'Arachel: I'm afraid you're not my type. For tea, that is. You'll do just fine for the ugly fighting. |
” | — L'Arachel, when fighting Inigo as an enemy in Smash Brethren 2 in Awakening. |
|---|
| “ | Why are you even trying? You're just another feather waiting to be placed in my cap. | ” | — L'Arachel, as an enemy in Smash Brethren 3 in Awakening. |
|---|
| “ | Inigo: How I wish to get to know you, milady! Are we doomed to meet only in battle? L'Arachel: Yes. That's the idea. Inigo: *Sigh* The truth stings all the more from the lips of one so lovely. |
” | — L'Arachel, when fighting Inigo as an enemy in Smash Brethren 3 in Awakening. |
|---|
| “ | I serve the powers above! | ” | — L'Arachel's SpotPass parley quote in Awakening. |
|---|
| “ | We were brought here to win! | ” | — L'Arachel's SpotPass battle quote in Awakening. |
|---|
| “ | Clearly, I must accompany you. | ” | — L'Arachel's SpotPass recruitment quote in Awakening. |
|---|
Death quotes
| “ | This will never do! I find it hard to say, but I must beg your leave... | ” | — L'Arachel, in The Sacred Stones. |
|---|
| “ | Perhaps the messengers of justice the sagas spoke of were...you... | ” | — L'Arachel, as an enemy in Smash Brethren 2 in Awakening. |
|---|
| “ | My illustrious career...ruined... | ” | — L'Arachel, as an enemy in Smash Brethren 3 in Awakening. |
|---|
Heroes quotes
- Main article:
L'Arachel/Quotes (Heroes)
Other appearances
Fire Emblem: Path of Radiance

L'arachel's official artwork from The Sacred Stones can be viewed in Path of Radiance's extras menu if a copy of The Sacred Stones is connected to a copy of Path of Radiance.
Fire Emblem Cipher
L'Arachel is featured on four cards in Fire Emblem Cipher.
- Two of these cards' quotes and one further card's epithet are still in raw, untranslated Japanese; these need translation.
| Fire Emblem Cipher data for L'Arachel | |||||
|---|---|---|---|---|---|
Normal R+
|
Princess of Light, L'Arachel | ||||
| "As long as the righteousness of justice fills our hearts, how can we lose?" "あの不浄なるものたちはこの聖杖でぽこぽこにするのですわ!" | |||||
| Attack: 50 | Support: 20 | Range: 1-2 | Deploy Cost: 3 | ||
| Class: Valkyrie | Tier: Advanced | Class Change Cost: 2 | |||
| Identity Revealed: [Always] If this unit is in the same area as your Main Character, this unit gains +10 attack. "Evil must be struck down!": [Trigger] [Once per turn] When this unit's attack destroys a | |||||
| Card #B11-036R(+) • Artist: daigoman | |||||

|
Beauteous Maiden of Justice, L'Arachel | ||||
| "邪悪な魔物の非道は、このラーチェルが許しませんわ!" | |||||
| Attack: 20 | Support: 20 | Range: - | Deploy Cost: 1 | ||
| Class: Troubadour | Tier: Base | Class Change Cost: -- | |||
| Heal: [Activate] [ Latona's Protection: [Always] While any ally is battling a | |||||
| Card #B11-037N • Artist: Mayo | |||||
Normal SR+
|
正義と秩序の使者, L'Arachel | ||||
| "I, L'Arachel, strike in the name of righteousness, order, and Rausten!" | |||||
| Attack: 60 | Support: 20 | Range: 1-2 | Deploy Cost: 4 | ||
| Class: Valkyrie | Tier: Advanced | Class Change Cost: 3 | |||
| Stormcalling Pious Princess: [Activate] [Once per turn] [ Glorious Ivaldi: [Activate] [Tap all other allies] Until the end of the turn, this unit gains +20 attack per ally tapped as the cost of this skill. | |||||
| Card #B18-085SR(+) • Artist: Mayo | |||||

|
Princess of Rausten, L'Arachel | ||||
| "Now, I shall purge the seas of this vile vessel of villainy!" | |||||
| Attack: 20 | Support: 20 | Range: - | Deploy Cost: 1 | ||
| Class: Troubadour | Tier: Base | Class Change Cost: -- | |||
| Heal [Activate] [ | |||||
| Card #B18-086N • Artist: Mayo | |||||
| Some card information translation provided by Serenes Forest. For more detailed strategic information on these cards, see their TCG wiki article on L'Arachel . | |||||


Super Smash Bros. Ultimate
L'Arachel appears as a support spirit.

Flavor text
| Game | Text (English) |
Text (Japanese) |
|---|---|---|
| The Sacred Stones | A young woman from Rausten. She
fights for justice and order. |
ロストン聖教国出身の少女
正義と秩序の為 魔物を成敗する |
| Engage | Hero from beyond Elyos who is a
righteous defender of others. She traveled the length of Magvel defeating any monsters she found. As princess of Rausten, she fought alongside her two attendants. Appears in The Sacred Stones. |
異界の英雄で、人々を救う正義の少女。
マギ・ヴァル大陸の各地を渡り歩き 出現した魔物を退治していた。 その正体はロストン聖教国の聖王女で 二人のお供をつれて奮戦した。 「聖魔の光石」 |
| Heroes (L'Arachel: Princess of Light) |
Princess of Rausten. Dozla and Rennac
accompany her on their quest to defeat the monsters around Magvel. Appears in Fire Emblem: The Sacred Stones. |
ロストン聖教国の姫。ドズラとレナックを率いて
マギ・ヴァル大陸各地の魔物を倒す旅に出ている。 (登場:『ファイアーエムブレム 聖魔の光石』) |
| Heroes (L'Arachel: Harvest Princess) |
Princess of Rausten. Enthusiastically
participating in the harvest festival alongside her attendant Dozla. Appears in Fire Emblem: The Sacred Stones. |
ロストン聖教国の王女。
お供のドズラを率い、張り切って収穫祭に参加する。 (登場:『ファイアーエムブレム 聖魔の光石』) |
| Heroes (L'Arachel: Seeker of Justice) |
Niece to Pontifex Mansel and princess of
Rausten. Her ultimate ambition is to rid the world of monsters. Appears in Fire Emblem: The Sacred Stones. |
教皇マンセルを叔父に持つ、ロストン聖教国の王女。
いつの日か魔物を征伐せんと志している。 (登場:『ファイアーエムブレム 聖魔の光石』) |
| Heroes (L'Arachel: Summer Princess) |
Princess of Rausten, gracing the beach in her
swimsuit to bring some summer color to Askr! Appears in Fire Emblem: The Sacred Stones. |
ロストン聖教国の王女。アスク王国の夏に
彩りを添えるため、水着姿で浜辺に降臨! (登場:『ファイアーエムブレム 聖魔の光石』) |
Meet some of the Heroes entries
Princess of Light Harvest Princess Seeker of Justice Summer Princess
| L'Arachel: Princess of Light | |||||||
|---|---|---|---|---|---|---|---|

|

|

|

| ||||
| Wherever darkness strikes fear in the hearts of the people, the light of hope will reveal the way forward! Today I’ll be introducing you to L’Arachel, the Princess of Light and the pride of Rausten! | L’Arachel is the niece of the Pontifex of Rausten. She’s devoted to fighting for justice, so she abandoned the comforts of home to defeat the monsters stalking Magvel! | Joined by her followers, Dozla and Rennac, L’Arachel traveled the continent, a journey that brought them face-to-face with the evil forces threatening the peace. | But not even the greatest of foes could withstand L’Arachel’s charge! The Princess of Light marches ever on, fighting to see the world bathed in the light of justice! | ||||
| Closely Associated Characters | |||||||
| |||||||


Choose Your Legends placement history
| Round | Placement | Character | Votes |
|---|
| CYL 1 (2017) |
116 |  L'Arachel The Sacred Stones |
2,425 |
| CYL 2 (2018) |
108 (−8) |
L'Arachel The Sacred Stones |
2,338 (−87) |
| CYL 3 (2019) |
177 (+63) |
L'Arachel The Sacred Stones |
1,495 (−843) |
| CYL 4 (2020) |
224 (+36) |
L'Arachel The Sacred Stones |
714 (−781) |
| CYL 5 (2021) |
171 (−53) |
L'Arachel The Sacred Stones |
585 (−129) |
| CYL 6 (2022) |
93 (−79) |
L'Arachel The Sacred Stones |
1,039 (+454) |
| CYL 7 (2023) |
85 (−8) |
L'Arachel The Sacred Stones |
762 (−277) |
| CYL 8 (2024) |
90 (+5) |
L'Arachel The Sacred Stones |
793 (+31) |
| Total results | This character has 8 entries across all Choose Your Legends polls. | 10,151 |
|---|
Trivia
- Though L'Arachel often talks about how her mission is to smite all of the evil monsters plaguing Magvel, she can only use staves when recruited, and therefore cannot attack any monsters (or enemies at all, for that matter), until she is promoted.
- L'Arachel is the only character in The Sacred Stones to have a support with Eirika but not have a paired ending with her.
Etymology and other languages
| Names, etymology, and in other regions | ||
|---|---|---|
| Language | Name | Definition, etymology, and notes |
| English |
L'Arachel |
Potentially from Rachel, derived from the Hebrew רָחֵל rakhél, meaning "ewe". |
| Japanese |
ラーチェル |
Officially romanized as Larchel. |
| Spanish |
L'Arachel |
-- |
| French |
L'Arachel |
-- |
| German |
L'Arachel |
-- |
| Italian |
L'Arachel |
-- |
| Dutch |
L'Arachel |
Used in Super Smash Bros. Ultimate. |
| Portuguese (Brazil) |
L'Arachel |
-- |
| Russian |
Ларашель |
Larashel; used in Super Smash Bros. Ultimate. |
| Traditional Chinese |
拉切爾 |
Lachel; used in Heroes and Super Smash Bros. Ultimate. |
Gallery
| |||||||||||
Official artwork

Artwork of L'Arachel from The Sacred Stones.
Portraits

Beta portrait of L'Arachel from The Sacred Stones prototype.

Portrait of L'Arachel in Awakening.

Battle animations

L'Arachel attacking with anima magic as a Mage Knight in The Sacred Stones.

L'Arachel performing a critical hit with anima magic as a Mage Knight in The Sacred Stones.

L'Arachel attacking with light magic as a Valkyrie in The Sacred Stones.

L'Arachel performing a critical hit with light magic as a Valkyrie in The Sacred Stones.


CG images

CG image of L'Arachel, Rennac, and Dozla in The Sacred Stones.
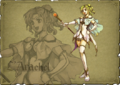
CG image of L'Arachel in Path of Radiance.

Heroes artwork
Character artwork

Artwork of L'Arachel: Princess of Light.

Artwork of L'Arachel: Princess of Light.

Artwork of L'Arachel: Princess of Light.

Artwork of L'Arachel: Princess of Light.

Artwork of L'Arachel: Princess of Light.

Artwork of Resplendent L'Arachel: Princess of Light.

Artwork of Resplendent L'Arachel: Princess of Light.

Artwork of Resplendent L'Arachel: Princess of Light.

Artwork of Resplendent L'Arachel: Princess of Light.

Artwork of L'Arachel: Harvest Princess.

Artwork of L'Arachel: Harvest Princess.

Artwork of L'Arachel: Harvest Princess.

Artwork of L'Arachel: Harvest Princess.

Artwork of L'Arachel: Seeker of Justice.

Artwork of L'Arachel: Seeker of Justice.

Artwork of L'Arachel: Seeker of Justice.

Artwork of L'Arachel: Seeker of Justice.

Artwork of L'Arachel: Summer Princess.

Artwork of L'Arachel: Summer Princess.

Artwork of L'Arachel: Summer Princess.

Artwork of L'Arachel: Summer Princess.


Meet some of the Heroes artwork

Artwork of L'Arachel: Princess of Light.

Artwork of L'Arachel: Princess of Light.

Artwork of L'Arachel: Princess of Light.

Artwork of L'Arachel: Princess of Light.

Artwork of L'Arachel: Harvest Princess.

Artwork of L'Arachel: Harvest Princess.

Artwork of L'Arachel: Harvest Princess.

Artwork of L'Arachel: Harvest Princess.

Artwork of L'Arachel: Seeker of Justice.

Artwork of L'Arachel: Seeker of Justice.

Artwork of L'Arachel: Seeker of Justice.

Artwork of L'Arachel: Seeker of Justice.

Artwork of L'Arachel: Summer Princess.

Artwork of L'Arachel: Summer Princess.

Artwork of L'Arachel: Summer Princess.

Artwork of L'Arachel: Summer Princess.

L'Arachel in an artwork of Rennac: Rich "Merchant".

Cipher artwork

Artwork of L'Arachel.


Other appearances
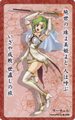
Artwork of L'Arachel from One Hundred Songs of Heroes.

References
- ↑ Voice Of L'Arachel - Fire Emblem Heroes | Behind The Voice Actors, www.behindthevoiceactors.com, Retrieved: 25 January, 2018
- ↑ Heroes voice line
- ↑ "[Rennac] was never able to escape his service to the self-centered princess who became queen." — Rennac's normal ending, Fire Emblem: The Sacred Stones
- ↑ "[Ephraim and L'Arachel's] marriage threw Rausten into turmoil, but L'Arachel's self-centeredness carried the day." — Ephraim and L'Arachel's paired ending, Fire Emblem: The Sacred Stones
- ↑ "Eirika: I've been curious about something, L'Arachel... Why are you so obsessed with fighting monsters?
L'Arachel: ...My parents were kind people. I would be like them if I am able. My home of Rausten is so near to Darkling Woods. We experienced many sudden raids. My parents took it upon themselves to defend our people against the monsters." — Eirika and L'Arachel's B support, Fire Emblem: The Sacred Stones

|
This article is part of Project Characters, a project focused on writing articles for every character present in the Fire Emblem series. |
| Fire Emblem Awakening | ||||||||||||||||||||||||||||||||||||||||||||||||||||||||||||||
|---|---|---|---|---|---|---|---|---|---|---|---|---|---|---|---|---|---|---|---|---|---|---|---|---|---|---|---|---|---|---|---|---|---|---|---|---|---|---|---|---|---|---|---|---|---|---|---|---|---|---|---|---|---|---|---|---|---|---|---|---|---|---|
| ||||||||||||||||||||||||||||||||||||||||||||||||||||||||||||||
| Fire Emblem Heroes | |||||||||||||||||||||||||||||||||||||||||||||||||||||||||||||||
|---|---|---|---|---|---|---|---|---|---|---|---|---|---|---|---|---|---|---|---|---|---|---|---|---|---|---|---|---|---|---|---|---|---|---|---|---|---|---|---|---|---|---|---|---|---|---|---|---|---|---|---|---|---|---|---|---|---|---|---|---|---|---|---|
| |||||||||||||||||||||||||||||||||||||||||||||||||||||||||||||||