| Site News |
|---|
| Warning: This wiki contains spoilers. Read at your own risk! Social media: If you would like, please join our Discord server, and/or follow us on X (Twitter) or Tumblr! |
World map
The world map (Japanese: フリーマップ free map) is a gameplay navigation system used only in Fire Emblem Gaiden, The Sacred Stones and Awakening. In it, as opposed to the linear and uninterrupted chapter progression in most games in the Fire Emblem series, the player can freely traverse the world at their own pace, fighting marauding bands of enemies which appear and visiting shops in between chapters, and starting said chapters whenever they so choose.

In all other games except Fire Emblem: Shadow Dragon & the Blade of Light, the world map exists only to show where the party is traveling.
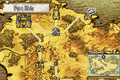
Fire Emblem Gaiden
In Gaiden, the player moves both Alm and Celica's parties around the world map, alternating between the two at their discretion. Movement across the world map is achieved by selecting the character, selecting the Move menu option, then picking one of the location's adjoining destinations. Uniquely in the Gaiden system, the world map itself has its own turn count, in which a turn elapses every time either Alm or Celica move, or at command by selecting the Rest menu option.
Every battle within Gaiden is technically a skirmish, with the main story mostly consisting of pre-defined skirmishes against set enemy groups posted at specific locations on the world map. In addition, more enemy groups are spawned from certain locations periodically, and will move at random around the map after a certain number of turns pass; these marauding groups can be fought on their own, and can also join up with other enemy groups (both pre-defined and marauding) and both be fought at once. Skirmishes are initiated by choosing to travel to a location with an enemy group posted on it; conversely, however, enemies can also advance on the player's location and initiate skirmishes themselves.
A small few locations - mostly villages, castles, fortresses and Mila Shrines - can be visited outside of battles, and in these the character in question can freely move around and interact with the locals. Some villages contain item exchange couriers who can send a specific item to the other character's party; however, these are limited in number and have only a finite number of uses.
| style="Template:Roundtl; border:none" width="100%" colspan="12"|World map of Fire Emblem Gaiden | ||||
|---|---|---|---|---|
| style="Template:Roundtl; border:none; background-color:#222222" width="60%"| Map | Location (Alm's route) | style="Template:Roundtr; border:none; background-color:#222222" colspan="2"| Location (Celica's rt.) | ||

|
Chapter 1 | Chapter 2 | ||
| 1 | Ram | 1 | Cloister | |
| 2 | Ram Woods | 2 | Novis Cemetery | |
| 3 | Thief Woods | 3 | Novis Port | |
| 4 | Thief Shrine | 4 | Sea 1 | |
| 5 | Ram Valley | 5 | Sea 2 | |
| 6 | Southern Fort | 6 | Pirate Fort | |
| 7 | South Zofia | 7 | Sea 3 | |
| 8 | South Zofia | 8 | Sea Shrine | |
| 9 | Liberation HQ | 9 | Sea 4 | |
| 10 | Zofia Gate | 10 | Sea 5 | |
| 11 | Zofia Castle | 11 | Zofia Port | |
| Chapter 3 | ||||
| 12 | North Gate | 12 | Zofia Shore | |
| 13 | North Zofia | 13 | East Zofia | |
| 14 | Zofia Woods | 14 | Mountain Graveyard | |
| 15 | Grove Town | 15 | Mountain Town | |
| 16 | Grove Town | 16 | Mila Valley | |
| 17 | Desaix's Fort | 17 | Dragon Shrine | |
| 18 | Zofia Forest 2 | 18 | Desert Fort | |
| 19 | Forest Temple | 19 | North Desert | |
| 20 | North Forest | 20 | South Desert | |
| 21 | Floodgate | 21 | Grieth's Fort | |
| 22 | Mila's Temple | |||
| Chapter 4 | ||||
| 22 | Border | 23 | Dead Swamp | |
| 23 | Rigel Woods | 24 | Bog Graveyard | |
| 24 | Fear Mountain | 25 | Dolk's Fort | |
| 25 | Fear Shrine | 26 | Lost Woods | |
| 26 | Nuibaba's Manor | 27 | Sage's Hamlet | |
| 27 | Rigel Plains/ Rigel Village |
28 | Duma's Gate | |
| 28 | Rigel Valley | 29 | Duma's Bog | |
| 29 | Dragon Crater | 30 | Tower of Duma | |
| 30 | Rigel Falls | |||
| 31 | Hidden Shrine | |||
| 32 | Fort | |||
| 33 | Rigel Castle | |||
| colspan="5" style="Template:Roundb; border:none; background-color:#222222" width="100%"|Note: Until Chapter 3 begins, #11 Zofia Port has a route connecting it to #10 Zofia Gate, which is removed once Chapter 3 begins. | ||||
Fire Emblem: The Sacred Stones
In The Sacred Stones, the player navigates Eirika or Ephraim around the world map by directly selecting their destination. Unlike Gaiden or Awakening, on some occasions multiple chapters will occur on the same world map location and the player is not allowed to return to the world map between each of these chapters. Some locations also offer armories or vendors to be accessed on the world map, usually selling the same items available in the matching shops in the chapter in question; additionally, after the game has been cleared and Creature Campaign mode has been entered, secret shops can also be accessed from the world map, albeit with different stock than what was offered in the original chapters.
After the completion of every chapter from Chapter 8 onward, or after leaving the Tower of Valni/Lagdou Ruins, up to three bands of enemy monsters will randomly spawn on certain locations on the world map. Eirika and Ephraim cannot pass through any location presently occupied by a monster band, and must engage the monsters in a skirmish before they can access or pass through the location again. This will usually not impede the player's ability to travel, especially later in the game, as the world map connects numerous paths between locations and usually provides an alternative.
Access to the Tower of Valni is granted once Chapter 8 has been cleared. Access to the Lagdou Ruins and Melkaen Coast is granted once Chapter 19 has been cleared.
| style="Template:Roundtl; border:none" width="100%" colspan="12"|World map of Fire Emblem: The Sacred Stones | ||||||||
|---|---|---|---|---|---|---|---|---|
style="Template:Round; border:none; background-color:#222222" colspan="9"| 
| ||||||||
| style="Template:Roundtl; border:none; background-color:#222222" width="1%"| | Chapter | Location | Chapter | Location | Chapter | style="Template:Roundtr; border:none; background-color:#222222" width="14%"| Location | ||
| 1 | Chapter 1 | Border Mulan | 10 | Chapter 10A | Teraz Plateau |
16 | Chapter 16 | Renais Castle |
| -- | -- | Castle Frelia | 11/12 | Chapter 11A Chapter 12A |
Caer Pelyn |
17 | Chapter 17 | Narube River |
| 2 | Chapter 2 | Ide |
13 | Chapter 13A | Hamill Canyon |
18 | Chapter 18 | Neleras Peak |
| 3 | Chapter 3 | Borgo Ridge | 9 | Chapter 9B | Fort Rigwald | 19 | Chapter 19 | Rausten Court |
| 4 | Chapter 4 | Za'ha Woods |
10 | Chapter 10B | Bethroen |
20 | Chapter 20 Final Chapter |
Black Temple |
| 5 | Chapter 5 | Serafew |
11/12 | Chapter 11B Chapter 12B |
Taizel |
M | -- | Melkaen Coast |
| 6 | Chapter 6 | Adlas Plains |
13 | Chapter 13B | Za'albul Marsh |
T | Tower of Valni | |
| 7/8 | Chapter 7 Chapter 8 |
Renvall | 14 | Chapter 14B | Grado Keep |
L | Lagdou Ruins | |
| 9 | Chapter 9A | Port Kiris |
13/14 | Chapter 14A Chapter 15A/B |
Jehanna Hall |
-- | ||
| colspan="9" style="Template:Roundb; border:none; background-color:#222222" width="100%"|Note: Locations numbered in teal comprise Eirika's route (Route A), while locations numbered in steel blue comprise Ephraim's route (Route B). Locations listed with a | ||||||||
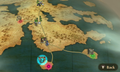
Fire Emblem Awakening
In Awakening, the player directly navigates between locations on the world map by pointing the Circle Pad or directional pad, rather than having to explicitly select a destination; there is also the option to press the Start button at any time to be automatically taken to the location of the next main chapter. All paralogues are exempt from the chapter order and can be challenged at any time and in any order once unlocked. All locations on the map, save for the Outrealm Gate and the Endgame's location, house an armory which is occasionally taken over by the appearance of a traveling merchant.
As with The Sacred Stones, Risen bands periodically appear to create skirmishes, but this time the player is not forced to defeat them to enter or pass the location, although the armory cannot be accessed while a Risen group is present. On rare occasions, two groups of Risen will appear on the same map location and are fought simultaneously, rewarding the player with both a sum of gold and a rare item. Additionally, bonus units and the teams they lead will spawn on the map to be parleyed with when the Nintendo 3DS console receives a StreetPass tag, and SpotPass bonus unit teams can be summoned to the world map at any time through the Wireless menu, with a maximum of ten allowed to be on the fully unlocked map at a time.
Access to the Outrealm Gate - and by extension all downloadable content - is granted after Chapter 4 has been cleared. Access to the six SpotPass paralogues, marked in orange, is granted once Chapter 25 has been cleared and the relevant SpotPass data has been activated on the save file.
| style="Template:Roundtl; border:none" width="100%" colspan="12"|World map of Fire Emblem Awakening | |||||||||||
|---|---|---|---|---|---|---|---|---|---|---|---|
style="Template:Round; border:none; background-color:#222222" colspan="12"| 
| |||||||||||
| style="Template:Roundtl; border:none; background-color:#222222" colspan="2" width="4%"| | Chapter | Location | Chapter | Location | Chapter | style="Template:Roundtr; border:none; background-color:#222222" colspan="2" width="17%"| Location | |||||
| O | Outrealm Gate | 16 | Chapter 16 | The Mila Tree | 7 | Paralogue 7 | Mila Shrine Ruins | ||||
| P | Prologue | Southtown | 17 | Chapter 17 | Fort Steiger | 8 | Paralogue 8 | Dueling Grounds | |||
| 1 | Chapter 1 | West of Ylisstol | 18 | Chapter 18 | The Demon's Ingle | 9 | Paralogue 9 | Verdant Forest | |||
| 2 | Chapter 2 | The Northroad | 19 | Chapter 19 | Valm Castle Approach | 10 | Paralogue 10 | Mercenary Fortress | |||
| 3 | Chapter 3 | The Longfort | 20 | Chapter 20 | Valm Castle | 11 | Paralogue 11 | Wyvern Valley | |||
| 4 | Chapter 4 | Arena Ferox | 21 | Chapter 21 | Plegia Castle | 12 | Paralogue 12 | The Ruins of Time | |||
| 5 | Chapter 5 | Border Pass | 22 | Chapter 22 | Table Approach | 13 | Paralogue 13 | Law's End | |||
| 6 | Chapter 6 | Ylisstol | 23 | Chapter 23 | The Dragon's Table | 14 | Paralogue 14 | Desert Oasis | |||
| 7 | Chapter 7 | Breakneck Pass | 24 | Chapter 24 | Mount Prism | 15 | Paralogue 15 | Kidnapper's Keep | |||
| 8 | Chapter 8 | Border Sands | 25 | Chapter 25 | Origin Peak | 16 | Paralogue 16 | Manor of Lost Souls | |||
| 9 | Chapter 9 | Plegia Castle Courtyard | E | Endgame | Grima | 17 | Paralogue 17 | Divine Dragon Grounds | |||
| 10 | Chapter 10 | The Midmire | 1 | Paralogue 1 | The Farfort | 18 | Paralogue 18 | Sea-King's Throne | |||
| 11 | Chapter 11 | Border Wastes | 2 | Paralogue 2 | The Twins' Turf | 19 | Paralogue 19 | Conqueror's Whetstone | |||
| 12 | Chapter 12 | Port Ferox | 3 | Paralogue 3 | Peaceful Village | 20 | Paralogue 20 | Mountain Village | |||
| 13 | Chapter 13 | Carrion Isle | 4 | Paralogue 4 | The Twins' Hideout | 21 | Paralogue 21 | Warriors' Tomb | |||
| 14 | Chapter 14 | The Searoad | 5 | Paralogue 5 | Sage's Hamlet | 22 | Paralogue 22 | Wellspring of Truth | |||
| 15 | Chapter 15 | Valm Harbor | 6 | Paralogue 6 | Great Gate | 23 | Paralogue 23 | Garden of Giants | |||
| colspan="12" style="Template:Roundb; border:none; background-color:#222222" width="100%"| | |||||||||||
Trivia
Gallery
Navigating the world map in The Sacred Stones.
Navigating the world map in Awakening.

