Oath of the Dagger
Clash at the Imperial Capital
|
|
Mural used to introduce Oath of the Dagger.
|
|
|
|
| “
|
So...that grotesque creature was Edelgard... If she is prepared to transform her very body to fight for this future of hers... Then I have no choice but to defeat her, even if it costs me my life! We must defend the present... After all, it is all that we truly have.
|
”
|
— Dimitri
|
Oath of the Dagger (Japanese: 短剣の誓い Dagger's Oath) is the twenty-second and final chapter of Fire Emblem: Three Houses in the Azure Moon route. It is not possible to return to Garreg Mach Monastery during this chapter; the previous chapter and this one must be completed consecutively. The chapter consists solely of a mission, Clash at the Imperial Capital (Japanese: 帝都決戦 Imperial Capital Decisive Battle).
Plot
- Main article: Oath of the Dagger/Script
Dimitri and his forces storm the Imperial palace and face Edelgard in a climactic final battle. Her most elite forces and her newfound demonic power prove no match for Dimitri, and she is defeated and reverted to human form. Dimitri offers her hand in reconciliation one last time, but she throws his old dagger into his shoulder, forcing him to execute her. Afterwards, as narrated by Jeralt, Dimitri unites Fódlan under his prosperous rule as king of Faerghus. Rhea is rescued and retires from her role as Archbishop of the Church of Seiros, passing her role onto Byleth.
Beginning log
After tearing through Enbarr, you proceed to storm the Imperial palace. The time has finally come for Dimitri to confront Edelgard.
Chapter data
|
|
|
|
|
| Victory: Defeat Edelgard
|
Player
|
Partner
|
Other
|
Enemy
|
Third
|
| Defeat: Byleth or Dimitri dies* or the player's army is routed*
|
2–12
|
{{{partner}}}
|
{{{other}}}
|
48−8+∞
|
{{{third}}}
|
|
|
Map dimensions:
25 columns by 32 rows
|
|
|
|
|
|
|
|
| Victory: Defeat Edelgard
|
Player
|
Partner
|
Other
|
Enemy
|
Third
|
| Defeat: Byleth or Dimitri dies* or the player's army is routed*
|
2–12
|
{{{partner}}}
|
{{{other}}}
|
52−10+∞
|
{{{third}}}
|
|
|
Map dimensions:
25 columns by 32 rows
|
|
|
|
|
|
|
|
| Victory: Defeat Edelgard
|
Player
|
Partner
|
Other
|
Enemy
|
Third
|
| Defeat: Byleth or Dimitri dies* or the player's army is routed*
|
2–12
|
{{{partner}}}
|
{{{other}}}
|
54−9+4+∞
|
{{{third}}}
|
|
|
Map dimensions:
25 columns by 32 rows
|
|
|
Character data
Item data
Enemy data
|
|
|
|
Name
|
Class
|
Lv
|
#
|
HP
|
Str
|
Mag
|
Dex
|
Spd
|
Lck
|
Prf
|
Wlv
|
Def
|
Res
|
Cha
|
Lck
|
Con
|
Mov
|
Inventory and Skills
|

|
Hegemon Edelgard
|
Hegemon Husk
|
44
|
1
|
54
54
81
108
|
30
|
19
|
20
|
16
|
11
|
15
|
12
|
34
|
-
|
 Crest of Flames Power • Twin-Crest Power Crest of Flames Power • Twin-Crest Power
 Imperial Lineage+ • Imperial Lineage+ •  Twin Crests • Twin Crests •  Commander • Commander •  Monster Effect Null • Monster Effect Null •  Counterattack • Counterattack •  Heavily Armored Wall • Heavily Armored Wall •  Vital Defense • Vital Defense •  Vantage Vantage  • •  Desperation Desperation  • •  Wrath Wrath 
 Wilted Flower Wilted Flower
|
• Bears the  Crest of Flames and the Crest of Flames and the  Minor Crest of Seiros. Minor Crest of Seiros.
• Stands on a throne.
• Always attacks Dimitri with her first move if he is in range.
• Will never attack the same unit twice in one turn.
• Switches to Twin-Crest Power when a unit ends their turn in the throne room.
|

|
Myson
|
Warlock
|
43
|
1
|
47
|
8
|
28
|
14
|
22
|
11
|
12
|
33
|
18+1
|
-
|
 Bohr Χ • Bohr Χ •  Hexlock Shield • Death Γ Hexlock Shield • Death Γ
 Agarthan Technology • Agarthan Technology •  Black Tomefaire • Black Tomefaire •  Black Magic Uses x2 • Black Magic Uses x2 •  Reason Lv 5 • Reason Lv 5 •  Immune Status • Immune Status •  Dark Magic Range +1 • Dark Magic Range +1 •  Infinite Magic • Infinite Magic •  Hit +20 Hit +20
 Dark Magic Corps Lv 5: Dark Magic Corps Lv 5:  Resonant Lightning Resonant Lightning
|
| --
|

|
Imperial Soldier
|
War Master
|
42
|
2
|
55
|
31
|
12
|
14
|
30
|
13
|
24
|
10
|
15
|
6
|
 Brave Axe Brave Axe
 Fistfaire • Fistfaire •  Axefaire • Axefaire •  Crit +20 Crit +20
|
| The center-south one begins moving if any player unit enters the throne room, or if the central Mortal Savant or a nearby Grappler or Gremory is provoked.
|

|
Imperial Soldier
|
Mortal Savant
|
42
|
3
|
44
|
22
|
19
|
15
|
17
|
12
|
19
|
19
|
15+8
|
6
|
 Bolganone • Bolganone •  Brave Sword Brave Sword
 Swordfaire • Black Tomefaire Swordfaire • Black Tomefaire
 Empire Holy Magic Users Lv 5: Empire Holy Magic Users Lv 5:  Blessing Blessing
|
| The central one begins moving if any player unit enters the throne room, or if the center-south War Master or a nearby Grappler or Gremory is provoked.
|
|
|
Imperial Soldier
|
War Master
|
42
|
3
|
55
|
31
|
12
|
14
|
30
|
13
|
24
|
10
|
15
|
6
|
 Silver Gauntlets Silver Gauntlets
Fistfaire • Axefaire • Crit +20
|
| The central one begins moving if any player unit enters the throne room, or if the nearby War Master is provoked.
|
|
|
Imperial Soldier
|
War Master
|
42
|
2
|
55
|
31
|
12
|
14
|
30
|
13
|
24
|
10
|
15
|
6
|
Silver Axe
Fistfaire • Axefaire • Crit +20
|
| The central one begins moving if any player unit enters the throne room, or if the nearby War Master is provoked.
|
|
|
Imperial Soldier
|
War Master
|
42
|
1
|
55
|
31
|
12
|
14
|
30
|
13
|
24
|
10
|
15
|
6
|
Killer Knuckles
Fistfaire • Axefaire • Crit +20
|
| Begins moving if a nearby Mortal Savant or Bishop is provoked.
|
|
|
Imperial Soldier
|
Mortal Savant
|
42
|
2
|
44
|
22
|
19
|
15
|
17
|
12
|
19
|
19
|
15+8
|
6
|
Bolganone • Silver Sword
Swordfaire • Black Tomefaire
Empire Holy Magic Users Lv 5: Blessing
|
| Both begin moving if any player unit enters the throne room, or if either is provoked.
|
|
|
Imperial Soldier
|
War Master
|
42
|
1
|
55
|
31
|
12
|
14
|
30
|
13
|
24
|
10
|
15+10
|
6
|
Tomahawk
Fistfaire • Axefaire • Crit +20
 Black Eagle Heavy Axes Lv 5: Black Eagle Heavy Axes Lv 5:  Onslaught Onslaught
|
| Begins moving if any player unit enters the throne room, or if the adjacent War Master is provoked.
|
|
|
Imperial Soldier
|
War Master
|
42
|
1
|
55
|
31
|
12
|
14
|
30
|
13
|
24
|
10
|
15+10
|
6
|
Silver Gauntlets
Fistfaire • Axefaire • Crit +20
 Black Eagle Heavy Axes Lv 5: Onslaught Black Eagle Heavy Axes Lv 5: Onslaught
|
| Begins moving if any player unit enters the throne room, or if the adjacent War Master is provoked.
|

|
Imperial Soldier
|
Gremory
|
42
|
1
|
39
|
13
|
32
|
22
|
20
|
12
|
13
|
30
|
19+8
|
5
|
 Abraxas • Physic Abraxas • Physic
Black Magic Uses x2 •  Dark Magic Uses x2 • Dark Magic Uses x2 •  White Magic Uses x2 White Magic Uses x2
Empire Holy Magic Users Lv 5: Blessing
|
| --
|

|
Imperial Soldier
|
Grappler
|
42
|
2
|
50
|
22
|
12
|
15
|
22
|
10
|
20
|
6
|
15
|
6
|
Silver Gauntlets • Unarmed
Fistfaire •  Unarmed Combat Unarmed Combat
|
| Both begin moving if any player unit enters the throne room, or if they, the central Mortal Savant, or the nearby War Master or Gremory is provoked.
|

|
Mysterious Soldier
|
Assassin
|
42
|
2
|
41
|
21
|
10
|
22
|
37
|
11
|
20
|
8
|
14
|
6
|
Wo Dao
Swordfaire •  Locktouch • Locktouch •  Stealth Stealth
|
• Both begin moving if either of them or the nearby Altered Demonic Beast is provoked.
• Leaves the map if Myson is defeated.
|
|
|
Mysterious Soldier
|
Warlock
|
42
|
1
|
41
|
13
|
20
|
13
|
20
|
10
|
12
|
30
|
16+1
|
4
|
Ragnarok • Bolganone
Black Tomefaire • Black Magic Uses x2
Mysterious Magic Users Lv 5: Resonant Flames
|
| Leaves the map if Myson is defeated.
|

|
Mysterious Soldier
|
Dark Bishop
|
42
|
2
|
41
|
13
|
21
|
14
|
19
|
10
|
12
|
29
|
14+1
|
4
|
Banshee Θ • Miasma Δ • Death Γ
Miasma Δ •  Fiendish Blow • Fiendish Blow •  Heartseeker Heartseeker
Mysterious Magic Users Lv 5: Resonant Flames
|
• Begins moving if the adjacent Altered Demonic Beast is provoked.
• Leaves the map if Myson is defeated.
|

|
Demonic Beast
|
Altered Demonic Beast
|
42
|
1
|
50
50
80
|
32
|
9
|
20
|
13
|
0
|
32
|
7
|
0
|
4
|
Artificial Crest Stone L
 Renewal • Heartseeker • Renewal • Heartseeker •  Seal Strength • Barrier • Vital Defense • Anti-Magic Armor • Vantage Seal Strength • Barrier • Vital Defense • Anti-Magic Armor • Vantage  • •  Seal Defense Seal Defense 
Brimstone Breath
|
•  Weak to Axes. Weak to Axes.
• Begins moving if the nearby Dark Bishop is provoked.
|
|
|
Demonic Beast
|
Altered Demonic Beast
|
42
|
1
|
50
50
80
|
32
|
9
|
20
|
13
|
0
|
32
|
7
|
0
|
4
|
Artificial Crest Stone L
Renewal • Heartseeker • Seal Strength • Barrier • Vital Defense • Anti-Magic Armor • Vantage • Seal Defense
Brimstone Breath
|
•  Weak to Lances. Weak to Lances.
• Begins moving if a nearby Assassin is provoked.
|
|
|
Demonic Beast
|
Altered Demonic Beast
|
42
|
1
|
50
50
80
|
32
|
9
|
20
|
13
|
0
|
32
|
7
|
0
|
4
|
Artificial Crest Stone L
Renewal • Heartseeker • Seal Strength • Barrier • Vital Defense • Anti-Magic Armor • Vantage • Seal Defense
Brimstone Breath
|
•  Weak to Swords. Weak to Swords.
• Begins moving if the nearby Dark Bishop is provoked.
|

|
Imperial Soldier
|
Mortal Savant
|
42
|
1
|
44
|
22
|
19
|
15
|
17
|
12
|
19
|
19
|
15
|
6
|
Ragnarok • Wo Dao
Swordfaire • Black Tomefaire
|
| Begins moving if the nearby War Master, Mortal Savant, or Bishop is provoked.
|
|
|
Imperial Soldier
|
Mortal Savant
|
42
|
1
|
44
|
22
|
19
|
15
|
17
|
12
|
19
|
19
|
15
|
6
|
Ragnarok • Wo Dao
Swordfaire • Black Tomefaire
|
| Begins moving if the nearby War Master, Mortal Savant, or Bishop is provoked.
|
|
|
Imperial Soldier
|
Mortal Savant
|
42
|
1
|
44
|
22
|
19
|
15
|
17
|
12
|
19
|
19
|
15+8
|
6
|
Ragnarok • Wo Dao
Swordfaire • Black Tomefaire
Empire Holy Magic Users Lv 5: Blessing
|
| Begins moving if the adjacent Sniper is provoked.
|
|
|
Imperial Soldier
|
Mortal Savant
|
42
|
1
|
44
|
22
|
19
|
15
|
17
|
12
|
19
|
19
|
15
|
6
|
Ragnarok • Silver Sword
Swordfaire • Black Tomefaire
|
| Begins moving if the nearby Mortal Savant or Gremory is provoked.
|
|
|
Imperial Soldier
|
Mortal Savant
|
42
|
1
|
44
|
22
|
19
|
15
|
17
|
12
|
19
|
19
|
15
|
6
|
Ragnarok • Armorslayer
Swordfaire • Black Tomefaire
|
| Begins moving if the nearby Mortal Savant or Gremory is provoked.
|

|
Imperial Soldier
|
Bishop
|
42
|
1
|
40
|
13
|
18
|
13
|
19
|
10
|
12
|
29
|
17+8
|
4
|
Abraxas • Fortify
White Magic Uses x2 •  White Magic Heal +10 • White Magic Heal +10 •  Terrain Resistance Terrain Resistance
Empire Holy Magic Users Lv 5: Blessing
|
| Begins moving if an adjacent War Master or Mortal Savant is provoked.
|

|
Imperial Soldier
|
Sniper
|
42
|
1
|
39
|
20
|
12
|
29
|
19
|
13
|
17
|
8
|
15+5
|
-
|
 Silver Bow Silver Bow
 Bowfaire • Bowfaire •  Bowrange +1 Bowrange +1
Empire Snipers Lv 5: Flash-Fire Arrows
|
| Mans a Ballista.
|
|
|
Imperial Soldier
|
Sniper
|
42
|
1
|
39
|
20
|
12
|
29
|
19
|
13
|
17
|
8
|
15
|
5
|
Brave Bow
Bowfaire • Bowrange +1
|
| Begins moving if the nearby Mortal Savant is provoked.
|
|
|
Imperial Soldier
|
Gremory
|
42
|
1
|
39
|
13
|
32
|
22
|
20
|
12
|
13
|
30
|
19+8
|
-
|
Ragnarok • Physic
Black Magic Uses x2 • Dark Magic Uses x2 • White Magic Uses x2
Empire Holy Magic Users Lv 5: Blessing
|
| Mans a Fire Orb.
|
|
|
Imperial Soldier
|
Gremory
|
42
|
1
|
39
|
13
|
32
|
22
|
20
|
12
|
13
|
30
|
19+8
|
5
|
Abraxas • Fortify
Black Magic Uses x2 • Dark Magic Uses x2 • White Magic Uses x2
Empire Holy Magic Users Lv 5: Blessing
|
| Begins moving if any player unit enters the throne room, or if the central Mortal Savant or a nearby War Master or Grappler is provoked.
|
|
|
Imperial Soldier
|
Gremory
|
42
|
1
|
39
|
13
|
32
|
22
|
20
|
12
|
13
|
30
|
19+8
|
5
|
Ragnarok • Physic
Black Magic Uses x2 • Dark Magic Uses x2 • White Magic Uses x2
Empire Holy Magic Users Lv 5: Blessing
|
| Begins moving if a nearby Mortal Savant is provoked.
|
|
|
Imperial Soldier
|
Gremory
|
42
|
4
|
39
|
13
|
32
|
22
|
20
|
12
|
13
|
30
|
19+8
|
5
|
Ragnarok • Silence
Black Magic Uses x2 • Dark Magic Uses x2 • White Magic Uses x2 • Hit +20
Empire Holy Magic Users Lv 5: Blessing
|
• The upper-left one begins moving if the closest Gremory is provoked.
• The upper-right one begins moving if the closest Gremory is provoked.
|
|
|
Imperial Soldier
|
Gremory
|
42
|
2
|
39
|
13
|
32
|
22
|
20
|
12
|
13
|
30
|
19+8
|
5
|
Ragnarok • Meteor
Black Magic Uses x2 • Dark Magic Uses x2 • White Magic Uses x2 •  Reason Lv 3 Reason Lv 3
Empire Holy Magic Users Lv 5: Blessing
|
• The left one begins moving if the Gremory to the upper-right is provoked.
• The right one begins moving if the Gremory to the upper-right is provoked.
|
|
|
Mysterious Soldier
|
Warlock
|
42
|
3
|
41
|
13
|
20
|
13
|
20
|
10
|
12
|
30
|
16+1
|
4
|
Ragnarok
Black Tomefaire • Black Magic Uses x2
Mysterious Magic Users Lv 5: Resonant Flames
|
| Leaves the map if Myson is defeated.
|
|
|
|
|
|
|
|
|
|
Name
|
Class
|
Lv
|
#
|
HP
|
Str
|
Mag
|
Dex
|
Spd
|
Lck
|
Prf
|
Wlv
|
Def
|
Res
|
Cha
|
Lck
|
Con
|
Mov
|
Inventory and Skills
|
|
|
Hegemon Edelgard
|
Hegemon Husk
|
45
|
1
|
75
75
107
139
|
37
|
26
|
27
|
23
|
18
|
21
|
18
|
41
|
-
|
Crest of Flames Power • Twin-Crest Power
Imperial Lineage+ • Twin Crests • Commander • Monster Effect Null • Counterattack • Heavily Armored Wall • Vital Defense • Vantage • Desperation • Wrath
Wilted Flower
|
• Bears the Crest of Flames and the Minor Crest of Seiros.
• Stands on a throne.
• Always attacks Dimitri with her first move if he is in range.
• Will never attack the same unit twice in one turn.
• Switches to Twin-Crest Power when a unit ends their turn in the throne room.
|
|
|
Myson
|
Warlock
|
44
|
1
|
54
|
14
|
35
|
21
|
29
|
18
|
12
|
34
|
24+1
|
-
|
Bohr Χ • Hexlock Shield • Death Γ
Agarthan Technology • Black Tomefaire • Black Magic Uses x2 • Reason Lv 5 • Immune Status • Dark Magic Range +1 • Infinite Magic • Hit +20
Dark Magic Corps Lv 5: Resonant Lightning
|
| --
|
|
|
Imperial Soldier
|
War Master
|
43
|
2
|
62
|
38
|
19
|
19
|
36
|
13
|
31
|
10
|
22
|
6
|
Brave Axe
Fistfaire • Axefaire • Crit +20 •  Axe Prowess Lv 3 • Axe Prowess Lv 3 •  Brawling Prowess Lv 3 Brawling Prowess Lv 3
|
| The center-south one begins moving if any player unit enters the throne room, or if the central Mortal Savant or a nearby Grappler or Gremory is provoked.
|
|
|
Imperial Soldier
|
Mortal Savant
|
43
|
3
|
51
|
29
|
25
|
20
|
23
|
18
|
26
|
26
|
22+8
|
6
|
Bolganone • Brave Sword
Swordfaire • Black Tomefaire • Reason Lv 3 •  Sword Prowess Lv 3 Sword Prowess Lv 3
Empire Holy Magic Users Lv 5: Blessing
|
| The central one begins moving if any player unit enters the throne room, or if the center-south War Master or a nearby Grappler or Gremory is provoked.
|
|
|
Imperial Soldier
|
War Master
|
43
|
4
|
62
|
38
|
19
|
19
|
36
|
13
|
31
|
10
|
22
|
6
|
Silver Gauntlets
Fistfaire • Axefaire • Crit +20 • Axe Prowess Lv 3 • Brawling Prowess Lv 3
|
• The central one begins moving if any player unit enters the throne room, or if the nearby War Master is provoked.
• The southwest one begins moving if the adjacent War Master is provoked.
|
|
|
Imperial Soldier
|
War Master
|
43
|
2
|
62
|
38
|
19
|
19
|
36
|
13
|
31
|
10
|
22
|
6
|
Silver Axe
Fistfaire • Axefaire • Crit +20 • Axe Prowess Lv 3 • Brawling Prowess Lv 3
|
• The central one begins moving if any player unit enters the throne room, or if the nearby War Master is provoked.
• The southwest one begins moving if the adjacent War Master is provoked.
|
|
|
Imperial Soldier
|
War Master
|
43
|
1
|
62
|
38
|
19
|
19
|
36
|
13
|
31
|
10
|
22
|
6
|
Killer Knuckles
Fistfaire • Axefaire • Crit +20 • Axe Prowess Lv 3 • Brawling Prowess Lv 3
|
| Begins moving if a nearby Mortal Savant or Bishop is provoked.
|
|
|
Imperial Soldier
|
Mortal Savant
|
43
|
2
|
51
|
29
|
25
|
20
|
23
|
18
|
26
|
26
|
22+8
|
6
|
Bolganone • Silver Sword
Swordfaire • Black Tomefaire • Reason Lv 3 • Sword Prowess Lv 3
Empire Holy Magic Users Lv 5: Blessing
|
| Both begin moving if any player unit enters the throne room, or if either is provoked.
|
|
|
Imperial Soldier
|
War Master
|
43
|
1
|
62
|
38
|
19
|
19
|
36
|
13
|
31
|
10
|
22+10
|
6
|
Tomahawk
Fistfaire • Axefaire • Crit +20 • Axe Prowess Lv 3 • Brawling Prowess Lv 3
Black Eagle Heavy Axes Lv 5: Onslaught
|
| Begins moving if any player unit enters the throne room, or if the adjacent War Master is provoked.
|
|
|
Imperial Soldier
|
War Master
|
43
|
1
|
62
|
38
|
19
|
19
|
36
|
13
|
31
|
10
|
22
|
6
|
Silver Gauntlets
Fistfaire • Axefaire • Crit +20 • Axe Prowess Lv 3 • Brawling Prowess Lv 3
Black Eagle Heavy Axes Lv 5: Onslaught
|
| Begins moving if any player unit enters the throne room, or if the adjacent War Master is provoked.
|
|
|
Imperial Soldier
|
Gremory
|
43
|
2
|
46
|
20
|
38
|
29
|
27
|
12
|
18
|
32
|
26+8
|
5
|
Abraxas • Physic
Black Magic Uses x2 • Dark Magic Uses x2 • White Magic Uses x2 • Reason Lv 3
Empire Holy Magic Users Lv 5: Blessing
|
| --
|
|
|
Imperial Soldier
|
Grappler
|
43
|
2
|
56
|
28
|
19
|
22
|
29
|
10
|
27
|
8
|
22
|
6
|
Silver Gauntlets • Unarmed
Fistfaire • Unarmed Combat • Brawling Prowess Lv 3
|
| Both begin moving if any player unit enters the throne room, or if they, the central Mortal Savant, or the nearby War Master or Gremory is provoked.
|
|
|
Mysterious Soldier
|
Assassin
|
43
|
2
|
48
|
27
|
17
|
29
|
44
|
11
|
27
|
11
|
21
|
6
|
Wo Dao
Swordfaire • Locktouch • Stealth • Sword Prowess Lv 3
|
• Both begin moving if they or the nearby Altered Demonic Beast is provoked.
• Leaves the map if Myson is defeated.
|
|
|
Mysterious Soldier
|
Warlock
|
43
|
3
|
48
|
20
|
24
|
19
|
27
|
10
|
14
|
32
|
23+1
|
4
|
Ragnarok • Bolganone
Black Tomefaire • Black Magic Uses x2 • Reason Lv 3
Mysterious Magic Users Lv 5: Resonant Flames
|
• The western one begins moving if the nearby Dark Bishop or Altered Demonic Beast is provoked.
• The eastern one begins moving if the nearby Dark Bishop or Altered Demonic Beast is provoked.
• Leaves the map if Myson is defeated.
|
|
|
Mysterious Soldier
|
Dark Bishop
|
43
|
2
|
48
|
20
|
25
|
20
|
26
|
10
|
14
|
31
|
21+1
|
-
|
Banshee Θ • Miasma Δ • Death Γ
Miasma Δ • Fiendish Blow • Heartseeker • Reason Lv 3
Mysterious Magic Users Lv 5: Resonant Flames
|
• The western one begins moving if the nearby Warlock or Altered Demonic Beast is provoked.
• The eastern one begins moving if the nearby Warlock or Altered Demonic Beast is provoked.
• Leaves the map if Myson is defeated.
|
|
|
Demonic Beast
|
Altered Demonic Beast
|
43
|
1
|
70
70
105
|
39
|
16
|
27
|
20
|
0
|
36
|
9
|
0
|
4
|
Artificial Crest Stone L
Renewal • Heartseeker • Seal Strength • Barrier • Vital Defense • Anti-Magic Armor • Vantage • Seal Defense
Brimstone Breath
|
• Weak to Axes.
• Begins moving if the nearby Warlock or Dark Bishop is provoked.
|
|
|
Demonic Beast
|
Altered Demonic Beast
|
43
|
1
|
70
70
105
|
39
|
16
|
27
|
20
|
0
|
36
|
9
|
0
|
4
|
Artificial Crest Stone L
Renewal • Heartseeker • Seal Strength • Barrier • Vital Defense • Anti-Magic Armor • Vantage • Seal Defense
Brimstone Breath
|
• Weak to Lances.
• Begins moving if a nearby Assassin is provoked.
|
|
|
Demonic Beast
|
Altered Demonic Beast
|
43
|
1
|
70
70
105
|
39
|
16
|
27
|
20
|
0
|
36
|
9
|
0
|
4
|
Artificial Crest Stone L
Renewal • Heartseeker • Seal Strength • Barrier • Vital Defense • Anti-Magic Armor • Vantage • Seal Defense
Brimstone Breath
|
• Weak to Swords.
• Begins moving if the nearby Warlock or Dark Bishop is provoked.
|
|
|
Imperial Soldier
|
Mortal Savant
|
43
|
1
|
51
|
29
|
25
|
20
|
23
|
18
|
26
|
26
|
22
|
6
|
Ragnarok • Wo Dao
Swordfaire • Black Tomefaire • Reason Lv 3 • Sword Prowess Lv 3
|
| Begins moving if the nearby War Master, Mortal Savant, or Bishop is provoked.
|
|
|
Imperial Soldier
|
Mortal Savant
|
43
|
1
|
51
|
29
|
25
|
20
|
23
|
18
|
26
|
26
|
22
|
6
|
Ragnarok • Wo Dao
Swordfaire • Black Tomefaire • Reason Lv 3 • Sword Prowess Lv 3
|
| Begins moving if the nearby War Master, Mortal Savant, or Bishop is provoked.
|
|
|
Imperial Soldier
|
Mortal Savant
|
43
|
1
|
51
|
29
|
25
|
20
|
23
|
18
|
26
|
26
|
22+8
|
6
|
Ragnarok • Wo Dao
Swordfaire • Black Tomefaire • Reason Lv 3 • Sword Prowess Lv 3
Empire Holy Magic Users Lv 5: Blessing
|
| Begins moving if the adjacent Sniper is provoked.
|
|
|
Imperial Soldier
|
Mortal Savant
|
43
|
1
|
51
|
29
|
25
|
20
|
23
|
18
|
26
|
26
|
22
|
6
|
Ragnarok • Silver Sword
Swordfaire • Black Tomefaire • Reason Lv 3 • Sword Prowess Lv 3
|
| Begins moving if the nearby Mortal Savant or Gremory is provoked.
|
|
|
Imperial Soldier
|
Mortal Savant
|
43
|
1
|
51
|
29
|
25
|
20
|
23
|
18
|
26
|
26
|
22
|
6
|
Ragnarok • Armorslayer
Swordfaire • Black Tomefaire • Reason Lv 3 • Sword Prowess Lv 3
|
| Begins moving if the nearby Mortal Savant or Gremory is provoked.
|
|
|
Imperial Soldier
|
Bishop
|
43
|
1
|
47
|
20
|
25
|
20
|
26
|
14
|
13
|
33
|
24+8
|
4
|
Abraxas • Fortify
White Magic Uses x2 • White Magic Heal +10 • Terrain Resistance •  Faith Lv 3 Faith Lv 3
Empire Holy Magic Users Lv 5: Blessing
|
| Begins moving if an adjacent War Master or Mortal Savant is provoked.
|
|
|
Imperial Soldier
|
Sniper
|
43
|
1
|
46
|
27
|
19
|
36
|
26
|
13
|
24
|
9
|
22+5
|
-
|
Silver Bow
Bowfaire • Bowrange +1 •  Bow Prowess Lv 3 Bow Prowess Lv 3
Empire Snipers Lv 5: Flash-Fire Arrows
|
| Mans a Ballista.
|
|
|
Imperial Soldier
|
Sniper
|
43
|
1
|
46
|
27
|
19
|
36
|
26
|
13
|
24
|
9
|
22
|
5
|
Brave Bow
Bowfaire • Bowrange +1 • Bow Prowess Lv 3
|
| Begins moving if the adjacent Mortal Savant is provoked.
|
|
|
Imperial Soldier
|
Gremory
|
43
|
1
|
46
|
20
|
38
|
29
|
27
|
12
|
18
|
32
|
26+8
|
-
|
Ragnarok • Physic
Black Magic Uses x2 • Dark Magic Uses x2 • White Magic Uses x2 • Reason Lv 3
Empire Holy Magic Users Lv 5: Blessing
|
| Mans a Fire Orb.
|
|
|
Imperial Soldier
|
Gremory
|
43
|
1
|
46
|
20
|
38
|
29
|
27
|
12
|
18
|
32
|
26+8
|
5
|
Abraxas • Fortify
Black Magic Uses x2 • Dark Magic Uses x2 • White Magic Uses x2 • Reason Lv 3
Empire Holy Magic Users Lv 5: Blessing
|
| Begins moving if any player unit enters the throne room, or if the central Mortal Savant or a nearby War Master or Grappler is provoked.
|
|
|
Imperial Soldier
|
Gremory
|
43
|
1
|
46
|
20
|
38
|
29
|
27
|
12
|
18
|
32
|
26+8
|
5
|
Ragnarok • Physic
Black Magic Uses x2 • Dark Magic Uses x2 • White Magic Uses x2 • Reason Lv 3
Empire Holy Magic Users Lv 5: Blessing
|
| Begins moving if a nearby Mortal Savant is provoked.
|
|
|
Imperial Soldier
|
Gremory
|
43
|
4
|
46
|
20
|
38
|
29
|
27
|
12
|
18
|
32
|
26+8
|
5
|
Ragnarok • Silence
Black Magic Uses x2 • Dark Magic Uses x2 • White Magic Uses x2 • Hit +20
Empire Holy Magic Users Lv 5: Blessing
|
• The upper-left one begins moving if the closest Gremory is provoked.
• The upper-right one begins moving if the closest Gremory is provoked.
|
|
|
Imperial Soldier
|
Gremory
|
43
|
2
|
46
|
20
|
38
|
29
|
27
|
12
|
18
|
32
|
26+8
|
5
|
Ragnarok • Meteor
Black Magic Uses x2 • Dark Magic Uses x2 • White Magic Uses x2 • Reason Lv 3
Empire Holy Magic Users Lv 5: Blessing
|
• The left one begins moving if the Gremory to the upper-right is provoked.
• The right one begins moving if the Gremory to the upper-right is provoked.
|
|
|
Mysterious Soldier
|
Warlock
|
43
|
3
|
48
|
20
|
24
|
19
|
27
|
10
|
14
|
32
|
23+1
|
4
|
Ragnarok
Black Tomefaire • Black Magic Uses x2 • Reason Lv 3
Mysterious Magic Users Lv 5: Resonant Flames
|
| Leaves the map if Myson is defeated.
|
|
|
|
|
|
|
|
|
|
Name
|
Class
|
Lv
|
#
|
HP
|
Str
|
Mag
|
Dex
|
Spd
|
Lck
|
Prf
|
Wlv
|
Def
|
Res
|
Cha
|
Lck
|
Con
|
Mov
|
Inventory and Skills
|
|
|
Hegemon Edelgard
|
Hegemon Husk
|
52
|
1
|
106
106
159
199
|
49
|
37
|
38
|
33
|
28
|
32
|
29
|
53
|
-
|
Crest of Flames Power • Twin-Crest Power
Imperial Lineage+ • Twin Crests • Commander • Monster Effect Null • Counterattack • Heavily Armored Wall • Vital Defense • Vantage • Desperation • Wrath
Wilted Flower
|
• Bears the Crest of Flames and the Minor Crest of Seiros.
• Stands on a throne.
• Will never attack the same unit twice in one turn.
• Switches to Twin-Crest Power when a unit ends their turn in the throne room.
|
|
|
Myson
|
Warlock
|
51
|
1
|
66
|
23
|
46
|
31
|
40
|
28
|
19
|
38
|
35+1
|
-
|
Bohr Χ • Hexlock Shield • Death Γ
Agarthan Technology • Black Tomefaire • Black Magic Uses x2 • Reason Lv 5 • Immune Status • Dark Magic Range +1 • Infinite Magic • Hit +20
Dark Magic Corps Lv 5: Resonant Lightning
|
| --
|
|
|
Imperial Soldier
|
War Master
|
50
|
2
|
75
|
50
|
28
|
28
|
49
|
19
|
35
|
18
|
32
|
6
|
Brave Axe
Fistfaire • Axefaire • Crit +20 •  Axe Prowess Lv 5 • Brawling Prowess Lv 3 • Axe Prowess Lv 5 • Brawling Prowess Lv 3 •  Tomebreaker Tomebreaker
|
| The center-south one begins moving if any player unit enters the throne room, or if the central Mortal Savant or a nearby Grappler or Gremory is provoked.
|
|
|
Imperial Soldier
|
Mortal Savant
|
50
|
3
|
63
|
40
|
35
|
29
|
33
|
28
|
36
|
34
|
32+8
|
6
|
Bolganone • Brave Sword
Swordfaire • Black Tomefaire • Reason Lv 5 •  Sword Prowess Lv 5 • Sword Prowess Lv 5 •  Seal Magic Seal Magic
Empire Holy Magic Users Lv 5: Blessing
|
| The central one begins moving if any player unit enters the throne room, or if the center-south War Master or a nearby Grappler or Gremory is provoked.
|
|
|
Imperial Soldier
|
War Master
|
50
|
4
|
75
|
50
|
8
|
28
|
49
|
19
|
35
|
18
|
32
|
6
|
Silver Gauntlets
Fistfaire • Axefaire • Crit +20 • Axe Prowess Lv 5 • Brawling Prowess Lv 3 • Tomebreaker
|
• The central one begins moving if any player unit enters the throne room, or if the nearby War Master is provoked.
• The southwest one begins moving if the adjacent War Master is provoked.
|
|
|
Imperial Soldier
|
War Master
|
50
|
2
|
75
|
50
|
8
|
28
|
49
|
19
|
35
|
18
|
32
|
6
|
Silver Axe
Fistfaire • Axefaire • Crit +20 • Axe Prowess Lv 5 • Brawling Prowess Lv 3 • Tomebreaker
|
• The central one begins moving if any player unit enters the throne room, or if the nearby War Master is provoked.
• The southwest one begins moving if the adjacent War Master is provoked.
|
|
|
Imperial Soldier
|
War Master
|
50
|
1
|
75
|
50
|
8
|
28
|
49
|
19
|
35
|
18
|
32
|
6
|
Killer Knuckles
Fistfaire • Axefaire • Crit +20 • Axe Prowess Lv 5 • Brawling Prowess Lv 3 • Tomebreaker
|
| Begins moving if a nearby Mortal Savant or Bishop is provoked.
|
|
|
Imperial Soldier
|
Mortal Savant
|
50
|
2
|
63
|
40
|
35
|
29
|
33
|
28
|
36
|
34
|
32+8
|
6
|
Bolganone • Silver Sword
Swordfaire • Black Tomefaire • Reason Lv 5 • Sword Prowess Lv 5 • Seal Magic
Empire Holy Magic Users Lv 5: Blessing
|
| Both begin moving if any player unit enters the throne room, or if either is provoked.
|
|
|
Imperial Soldier
|
War Master
|
50
|
1
|
75
|
50
|
8
|
28
|
49
|
19
|
35
|
18
|
32+10
|
6
|
Tomahawk
Fistfaire • Axefaire • Crit +20 • Axe Prowess Lv 5 • Brawling Prowess Lv 3 • Tomebreaker
Black Eagle Heavy Axes Lv 5: Onslaught
|
| Begins moving if any player unit enters the throne room, or if the adjacent War Master is provoked.
|
|
|
Imperial Soldier
|
War Master
|
50
|
1
|
75
|
50
|
8
|
28
|
49
|
19
|
35
|
18
|
32+10
|
6
|
Silver Gauntlets
Fistfaire • Axefaire • Crit +20 • Axe Prowess Lv 5 • Brawling Prowess Lv 3 • Tomebreaker
Black Eagle Heavy Axes Lv 5: Onslaught
|
| Begins moving if any player unit enters the throne room, or if the adjacent War Master is provoked.
|
|
|
Imperial Soldier
|
Gremory
|
50
|
2
|
57
|
29
|
0
|
40
|
38
|
18
|
27
|
36
|
36+8
|
5
|
Abraxas • Physic
Black Magic Uses x2 • Dark Magic Uses x2 • White Magic Uses x2 • Reason Lv 5 •  Defiant Mag Defiant Mag
Empire Holy Magic Users Lv 5: Blessing
|
| --
|
|
|
Imperial Soldier
|
Grappler
|
50
|
2
|
69
|
39
|
28
|
31
|
40
|
18
|
35
|
17
|
32
|
6
|
Silver Gauntlets • Unarmed
Fistfaire • Unarmed Combat •  Brawling Prowess Lv 5 • Tomebreaker • Brawling Prowess Lv 5 • Tomebreaker •  Defiant Spd Defiant Spd
|
| Both begin moving if any player unit enters the throne room, or if they, the central Mortal Savant, or the nearby War Master or Gremory is provoked.
|
|
|
Mysterious Soldier
|
Assassin
|
50
|
1
|
59
|
38
|
26
|
40
|
57
|
20
|
35
|
20
|
31
|
6
|
Wo Dao
Swordfaire • Locktouch • Stealth • Sword Prowess Lv 5 •  Pass • Pass •  Poison Poison
|
• Begins moving if a nearby Altered Demonic Beast is provoked.
• Leaves the map if Myson is defeated.
|
|
|
Mysterious Soldier
|
Warlock
|
50
|
3
|
59
|
29
|
34+2
|
28
|
38
|
19
|
23
|
36
|
33+1
|
4
|
Ragnarok • Bolganone
Black Tomefaire • Black Magic Uses x2 • Reason Lv 5 •  Magic +2 • Seal Defense Magic +2 • Seal Defense
Mysterious Magic Users Lv 5: Resonant Flames
|
• The western one begins moving if the nearby Dark Bishop or Altered Demonic Beast is provoked.
• The eastern one begins moving if the nearby Dark Bishop or Altered Demonic Beast is provoked.
• Leaves the map if Myson is defeated.
|
|
|
Mysterious Soldier
|
Dark Bishop
|
50
|
2
|
59
|
29
|
35+2
|
29
|
37
|
19
|
23
|
35
|
31+1
|
4
|
Banshee Θ • Miasma Δ • Death Γ
Miasma Δ • Fiendish Blow • Heartseeker • Reason Lv 5 • Magic +2 • Seal Strength
Mysterious Magic Users Lv 5: Resonant Flames
|
• The western one begins moving if the nearby Warlock or Altered Demonic Beast is provoked.
• The eastern one begins moving if the nearby Warlock or Altered Demonic Beast is provoked.
• Leaves the map if Myson is defeated.
|
|
|
Demonic Beast
|
Altered Demonic Beast
|
50
|
2
|
101
101
159
|
50
|
25
|
37
|
30
|
0
|
40
|
17
|
0
|
4
|
Artificial Crest Stone L
Renewal • Heartseeker • Seal Strength • Barrier • Vital Defense • Anti-Magic Armor • Vantage • Seal Defense
Brimstone Breath
|
• Weak to Axes.
• The center-east one begins moving if the nearby Warlock or Dark Bishop is provoked.
• The southeast one only moves to attack units in range.
|
|
|
Demonic Beast
|
Altered Demonic Beast
|
50
|
2
|
101
101
159
|
50
|
25
|
37
|
30
|
0
|
40
|
17
|
0
|
4
|
Artificial Crest Stone L
Renewal • Heartseeker • Seal Strength • Barrier • Vital Defense • Anti-Magic Armor • Vantage • Seal Defense
Brimstone Breath
|
• Weak to Lances.
• The southeast one only moves to attack units in range.
|
|
|
Demonic Beast
|
Altered Demonic Beast
|
50
|
1
|
101
101
159
|
50
|
25
|
37
|
30
|
0
|
40
|
17
|
0
|
4
|
Artificial Crest Stone L
Renewal • Heartseeker • Seal Strength • Barrier • Vital Defense • Anti-Magic Armor • Vantage • Seal Defense
Brimstone Breath
|
• Weak to Swords.
• Begins moving if the nearby Warlock or Dark Bishop is provoked.
|
|
|
Imperial Soldier
|
Mortal Savant
|
50
|
1
|
63
|
40
|
35
|
29
|
33
|
28
|
36
|
34
|
32
|
6
|
Ragnarok • Wo Dao
Swordfaire • Black Tomefaire • Reason Lv 5 • Sword Prowess Lv 5 • Seal Magic
|
| Begins moving if the nearby War Master, Mortal Savant, or Bishop is provoked.
|
|
|
Imperial Soldier
|
Mortal Savant
|
50
|
1
|
63
|
40
|
35
|
29
|
33
|
28
|
36
|
34
|
32
|
6
|
Ragnarok • Wo Dao
Swordfaire • Black Tomefaire • Reason Lv 5 • Sword Prowess Lv 5 • Seal Magic
|
| Begins moving if the nearby War Master, Mortal Savant, or Bishop is provoked.
|
|
|
Imperial Soldier
|
Mortal Savant
|
50
|
1
|
63
|
40
|
35
|
29
|
33
|
28
|
36
|
34
|
32+8
|
6
|
Ragnarok • Wo Dao
Swordfaire • Black Tomefaire • Reason Lv 5 • Sword Prowess Lv 5 • Seal Magic
Empire Holy Magic Users Lv 5: Blessing
|
| Begins moving if the adjacent Sniper is provoked.
|
|
|
Imperial Soldier
|
Mortal Savant
|
50
|
1
|
63
|
40
|
35
|
29
|
33
|
28
|
36
|
34
|
32
|
6
|
Ragnarok • Silver Sword
Swordfaire • Black Tomefaire • Reason Lv 5 • Sword Prowess Lv 5 • Seal Magic
|
| Begins moving if the nearby Mortal Savant or Gremory is provoked.
|
|
|
Imperial Soldier
|
Mortal Savant
|
50
|
1
|
63
|
40
|
35
|
29
|
33
|
28
|
36
|
34
|
32
|
6
|
Ragnarok • Armorslayer
Swordfaire • Black Tomefaire • Reason Lv 5 • Sword Prowess Lv 5 • Seal Magic
|
| Begins moving if the nearby Mortal Savant or Gremory is provoked.
|
|
|
Imperial Soldier
|
Bishop
|
50
|
1
|
58
|
29
|
35
|
29
|
37
|
23
|
22
|
37
|
34+8
|
4
|
Abraxas • Fortify
White Magic Uses x2 • White Magic Heal +10 • Terrain Resistance •  Faith Lv 5 • Renewal • Faith Lv 5 • Renewal •  Miracle Miracle
Empire Holy Magic Users Lv 5: Blessing
|
| Begins moving if an adjacent War Master or Mortal Savant is provoked.
|
|
|
Imperial Soldier
|
Sniper
|
50
|
1
|
57
|
37
|
28
|
48
|
37
|
21
|
34
|
18
|
32+5
|
-
|
Silver Bow
Bowfaire • Bowrange +1 •  Bow Prowess Lv 5 • Bow Prowess Lv 5 •  Poison Strike • Vantage Poison Strike • Vantage
Empire Snipers Lv 5: Flash-Fire Arrows
|
| Mans a Ballista.
|
|
|
Imperial Soldier
|
Sniper
|
50
|
1
|
63
|
40
|
35
|
29
|
33
|
28
|
36
|
34
|
32
|
5
|
Brave Bow
Bowfaire • Bowrange +1 • Bow Prowess Lv 5 • Poison Strike • Vantage
|
| Begins moving if the adjacent Mortal Savant is provoked.
|
|
|
Imperial Soldier
|
Gremory
|
50
|
1
|
57
|
29
|
50
|
40
|
38
|
18
|
27
|
36
|
36+8
|
-
|
Ragnarok • Physic
Black Magic Uses x2 • Dark Magic Uses x2 • White Magic Uses x2 • Reason Lv 5 • Defiant Mag
Empire Holy Magic Users Lv 5: Blessing
|
| Mans a Fire Orb.
|
|
|
Imperial Soldier
|
Gremory
|
50
|
1
|
57
|
29
|
50
|
40
|
38
|
18
|
27
|
36
|
36+8
|
5
|
Abraxas • Fortify
Black Magic Uses x2 • Dark Magic Uses x2 • White Magic Uses x2 • Reason Lv 5 • Defiant Mag
Empire Holy Magic Users Lv 5: Blessing
|
| Begins moving if any player unit enters the throne room, or if the central Mortal Savant or a nearby War Master or Grappler is provoked.
|
|
|
Imperial Soldier
|
Gremory
|
50
|
1
|
57
|
29
|
50
|
40
|
38
|
18
|
27
|
36
|
36+8
|
5
|
Ragnarok • Physic
Black Magic Uses x2 • Dark Magic Uses x2 • White Magic Uses x2 • Reason Lv 5 • Defiant Mag
Empire Holy Magic Users Lv 5: Blessing
|
| Begins moving if a nearby Mortal Savant is provoked.
|
|
|
Imperial Soldier
|
Gremory
|
50
|
4
|
57
|
29
|
50
|
40
|
38
|
18
|
27
|
36
|
36+8
|
5
|
Ragnarok • Silence
Black Magic Uses x2 • Dark Magic Uses x2 • White Magic Uses x2 • Hit +20
Empire Holy Magic Users Lv 5: Blessing
|
• The upper-left one begins moving if the closest Gremory is provoked.
• The upper-right one begins moving if the closest Gremory is provoked.
|
|
|
Imperial Soldier
|
Gremory
|
50
|
2
|
57
|
29
|
50
|
40
|
38
|
18
|
27
|
36
|
36+8
|
5
|
Ragnarok • Meteor
Black Magic Uses x2 • Dark Magic Uses x2 • White Magic Uses x2 • Reason Lv 3
Empire Holy Magic Users Lv 5: Blessing
|
• The left one begins moving if the Gremory to the upper-right is provoked.
• The right one begins moving if the Gremory to the upper-right is provoked.
|
|
|
Mysterious Soldier
|
Warlock
|
50
|
3
|
59
|
29
|
34+2
|
28
|
38
|
19
|
23
|
36
|
33+1
|
4
|
Ragnarok
Black Tomefaire • Black Magic Uses x2 • Reason Lv 5 • Magic +2 • Seal Defense
Mysterious Magic Users Lv 5: Resonant Flames
|
| Leaves the map if Myson is defeated.
|

|
Imperial Soldier
|
Fortress Knight
|
50
|
1
|
72
|
39
|
28
|
28
|
16
|
18
|
44
|
8
|
32+7
|
-
|
Silver Axe • Silver Shield
Axefaire •  Weight -5 • Axe Prowess Lv 5 • Weight -5 • Axe Prowess Lv 5 •  Armored Blow • Armored Blow •  Defiant Def Defiant Def
 Kingdom Heavy Soldiers Lv 5: Group Lance Attack Kingdom Heavy Soldiers Lv 5: Group Lance Attack
|
| --
|
|
|
|
|
|
Reinforcements
- After entering the throne room, continuing until every enemy in the central and throne rooms except Edelgard and the Bishop are defeated or player unit moves to the reinforcement spawn tile
- After any player unit ends their turn in the throne room (Maddening only)
- Starting one turn after any player unit ends their turn in the throne room, will be temporary halted if spawn tiles are occupied (Maddening only)
Boss data
Main boss
- Main article: Edelgard
|
|
|
|
|
|
|
Skill Levels

|

|

|

|

|

|

|

|

|

|

|
|
| E
|
E
|
E
|
E
|
E
|
E
|
E
|
E
|
E
|
E
|
E
|

|
|
|
|
|
|
|
|
|
|
Skill Levels
|
|
|
|
|
|
|
|
|
|
|
|
|
| E
|
E
|
E
|
E
|
E
|
E
|
E
|
E
|
E
|
E
|
E
|
|
|
|
|
|
|
|
|
|
|
Skill Levels
|
|
|
|
|
|
|
|
|
|
|
|
|
| E
|
E
|
E
|
E
|
E
|
E
|
E
|
E
|
E
|
E
|
E
|
|
|
|
Sub-boss
- Main article: Myson
|
|
|
|
|
|
|
Skill Levels
|
|
|
|
|
|
|
|
|
|
|
|
|
| E
|
E
|
E
|
E
|
E
|
A
|
E
|
E
|
E
|
E
|
E
|
|
|
|
|
|
|
|
|
|
|
Skill Levels
|
|
|
|
|
|
|
|
|
|
|
|
|
| E
|
E
|
E
|
E
|
E
|
A
|
E
|
E
|
E
|
E
|
E
|
|
|
|
|
|
|
|
|
|
|
Skill Levels
|
|
|
|
|
|
|
|
|
|
|
|
|
| E
|
E
|
E
|
E
|
E
|
A
|
E
|
E
|
E
|
E
|
E
|
|
|
|
Strategy
| This section details unofficial strategies that may help with completion of the chapter. This may not work for everybody.
|
Hegemon Edelgard's long-range Crest of Flames Power will be a threat present over most parts of the map from the beginning. There are three variations of it, used on each difficulty: each variation has 1 might and 1 weight, but has an increasing amount of hit and range with difficulty. On Normal and Hard, Edelgard will have a very low hit rate, and may deal significant damage but will likely struggle to kill most units. On Maddening, Edelgard has a much higher hit rate, both due to the higher hit of her weapon and her higher skill, and can fairly reliably one-shot frail units, though she will still struggle to consistently hit units with decent avoid or kill units with high defense. While she can act twice per turn, she mercifully cannot attack the same unit twice in a row even on Maddening, meaning your squishier units don't need to fear certain death. A number of units additionally have long-range weapons; Myson has Bohr Χ, there are enemies manning a Ballista and a Fire Orb, Gremories in the throne room have Meteor, and a number of the reinforcements on Maddening have Meteor and Bolting. The Sacred Shield gambit, available on the Kingdom Heavy Knights which require B authority, will prevent all damage from range, including that from Edelgard and the long-range spells, or Impregnable Wall can set all damage to 1 while doing the same for the unit it is active on; Bohr Χ will ignore both damage limitations, however, and its damage can only be avoided by avoiding the attack. Additionally, each of the spells can be retaliated against, and Retribution will allow for a unit to retaliate at any range for five turns; a unit with Vantage or Battalion Vantage could potentially defeat an attacker before they actually attack, especially with Wrath or Battalion Wrath. Myson is a top priority to neutralize, as he can leave one of your units ripe to be shot by Edelgard and killing him takes those who slither in the dark off the map.
The chests to the west contain items that are unlikely to be helpful; unless units are severely underleveled, two points of strength or resistance will likely not make a significant difference in their ability to fight the enemies present. Additionally, an unlimited amount of Elixirs can be purchased from Anna's shop at Garreg Mach Monastery, and a number could be obtained earlier throughout the game in places much more convenient to obtain. Much the same applies to the stealable shields present on some enemies: they are unlikely to make a significant impact on a unit's performance; additionally, units may be more useful in classes other than Thief or with abilities other than Steal.
The walls present throughout the map section it into several rooms; they create areas of relative safety by being an obstacle to enemy movement, but they are also an obstacle to player movement, including fliers. Enemies in rooms can be fought and defeated fairly safely, as enemies will not move without first being provoked; Edelgard, the Ballista, and the Fire Orb can only attack a limited area of the southern corner rooms. Additionally, reinforcements will only appear after a unit has entered the throne room to the north, so every enemy outside of it can be defeated before entering to limit the number of enemies that must be dealt with at once; most enemies within the room can be lured from outside of it, further decreasing the enemy count around Edelgard.
The Altered Demonic Beasts have Anti-Magic Armor, negating all magic damage while their barrier is active; as a result, gambits such as Resonant Lightning can only damage barriers by attacking other enemies near the Altered Demonic Beast. Non-magic gambits such as Wave Attack and Blaze can damage each of a monster's barriers and target and destroy one of them. Dealing damage effective against monsters—such as from Monster Crusher or a Blessed Lance—will also destroy a barrier without the need to use a gambit, though they can only damage a single barrier.
Actually proceeding through the map, the safest avenue of approach is the west side, as after Myson is taken out you only need to face some infantry enemies, one Fire Orb, and one Demonic Beast. By far the hardest part of the map is actually entering the throne room; while Edelgard permanently switches to her close-range attack at this point, four unpreventable enemy mage reinforcements, all with artillery spells, appear in the northern corners of the map. Without proper diligence, they will undoubtedly kill someone - it's best to use a tank or someone hopped up on Impregnable Wall to fence them in and keep everyone else as far as humanly possible away from the corners so they can spawn without killing someone, then rush in and eliminate them on player phase.
Destroying Edelgard's barrier will not inflict the confusion or armor break statuses on her, and her barrier will refresh at the start of each turn; as such, destroying her barrier serves only the purpose of negating its damage reduction and critical hit negation, and cannot be used to temporarily prevent her from acting or counterattacking. Edelgard's barrier can be broken with gambits and effective damage, though her Monster Effect Null ability negates bonus damage affecting monsters against her. Additionally, Edelgard stands on a throne, which grants her +5 to protection and resilience, +40% avoid, and 30% HP regeneration at the start of each enemy phase. Due to a glitch involving HP overflow, on Maddening, Edelgard can be defeated by dealing exactly 3 damage to her final health bar; when her HP is restored by the throne, it will overflow and be set to 0, causing her to be defeated. Upon any unit entering the throne room, Edelgard will switch from the Crest of Flames power to the Twin-Crest Power, which, while significantly more powerful and still relatively long-ranged at 6, cannot attack across most of the map, though she will still attack twice with them. If Edelgard cannot attack, she will wait, activating Imperial Lineage+ and granting her a temporary resistance +4 buff; this can occur after entering the throne room if no one is in her range, and can cause fighting her on the turn after marginally more difficult for magic-based units. The activation of each of Edelgard's latent abilities is based on the HP of her current bar; as such, depleting one will make her less of a threat until she is attacked again. It's also worth noting that she will not initiate combat against Byleth until and unless they do so first and she will only charge up her staggering blow if she attacks twice in the same turn, so if you have someone sufficiently powerful to survive prolonged combat with her you can use this to safely whittle down the first couple of health bars.
Edelgard is at her most relatively vulnerable when her barrier is destroyed, and she is no longer negating critical hits or halving incoming damage. Using Atrocity with Areadbhar, Dimitri would deal 16 damage if he had 0 strength, and can likely deal significantly more; as Atrocity deals bonus damage to everything, not just monsters, Monster Effect Null does not negate its bonus damage. War Master's Strike, which is similarly effective against all units, can be useful for the same purpose, though it requires that a unit master and be in War Master to use it. When Edelgard is at low health, her latent abilities begin to activate when she is attacked, however her counterattacks can be prevented by attacking with gambits or using the Windsweep combat art; while Edelgard's high charm will cause most gambits to have low accuracy, their accuracy and damage can be increased with a Gambit Boost. Other means of dealing high damage which are generally useful will be useful against Edelgard as well: brave weapons; weapons, combat arts, and spells with high might and crit; abilities that increase attack on player phase; rally abilities; etc. will all be useful against Edelgard. As this is the final map and Edelgard the final opponent, there is no point in holding off on using any remaining resources.
Trivia
- At the center of the map's middle room lies a statue of Wilhelm I; Edelgard's ancestor and co-founder of the Adrestian Empire, which shows him in the Holy Knight class while wielding a sword.
- This is the only final map in Three Houses which does not use the song "A Vow Remembered" for the Preparations screen, instead using the theme for the final map: "Apex of the World".
Etymology and other languages
Oath of the Dagger
| Names, etymology, and in other regions
|
| Language
|
Name
|
Definition, etymology, and notes
|
| English
|
Oath of the Dagger
|
--
|
| Japanese
|
短剣の誓い
|
Dagger's oath
|
| Spanish
|
El juramento de la daga
|
The oath of the dagger
|
| French
|
Le serment de la dague
|
The oath of the dagger
|
| German
|
Eid des Dolches
|
Oath of the Dagger
|
| Italian
|
La promessa del pugnale
|
The promise of the dagger
|
| Korean
|
단검의 맹세
|
Dagger's oath
|
| Simplified Chinese
|
短剑的誓约
|
Dagger's oath
|
| Traditional Chinese
|
短劍的誓約
|
Dagger's oath
|
|
|
Clash at the Imperial Capital
| Names, etymology, and in other regions
|
| Language
|
Name
|
Definition, etymology, and notes
|
| English
|
Clash at the Imperial Capital
|
--
|
| Japanese
|
帝都決戦
|
Imperial Capital Decisive Battle
|
| Spanish
|
Pugna en la capital imperial
|
Battle in the imperial capital
|
| French
|
Bataille décisive à Enbarr
|
Decisive battle at Enbarr
|
| German
|
Konfrontation in Enbarr
|
Confrontation in Enbarr
|
| Italian
|
Sfida nella capitale imperial
|
Challenge in the imperial capital
|
| Korean
|
제도 결전
|
Decisive battle at the imperial capital
|
| Simplified Chinese
|
帝都决战
|
Decisive battle at the imperial capital
|
| Traditional Chinese
|
帝都決戰
|
Decisive battle at the imperial capital
|
|
|
Gallery
This section has been marked as a stub. Please help improve the page by adding information.
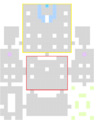
The red area is the central room and the yellow area is the throne room; entering the throne room triggers reinforcements and defeating every enemy in both stops them.
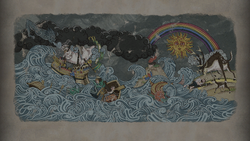
Mural shown during Azure Moon's epilogue narration.
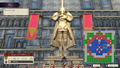
Statue of Wilhelm I seen from the top map, located in the central room.
Statue of Wilhelm I seen via Zoom View, located in the central room.
References