| Site News |
|---|
| Warning: This wiki contains spoilers. Read at your own risk! Social media: If you would like, please join our Discord server, and/or follow us on X (Twitter) or Tumblr! |
The Face Beneath
The Face Beneath (Japanese: 隠された素顔 Hidden Face) is a paralogue chapter in Fire Emblem: Three Houses. It is available from Chapter 15 to Chapter 16 ![]() /Chapter 19
/Chapter 19 ![]() /Chapter 17
/Chapter 17 ![]() and is unavailable on the Crimson Flower route. In order to attempt this paralogue, the player must have recruited Mercedes and Caspar and neither must have fallen in battle previously.
and is unavailable on the Crimson Flower route. In order to attempt this paralogue, the player must have recruited Mercedes and Caspar and neither must have fallen in battle previously.
| ||||
|

| “ | How many years has it been since we last spoke? I'm so sorry... I should have come back for you sooner... I'm sure it wasn't pleasant living in House Bartels. | ” | — Mercedes |
|---|
Plot
- Main article:
The Face Beneath/Script
Caspar reports that Imperial forces have been spotted in the Sealed Forest led by the Death Knight, and an apprehensive Mercedes reveals that she has been thinking about her younger brother Emile. Byleth leads their forces into the forest to drive off the Death Knight. In the forest, Mercedes confronts the Death Knight and asks him to remove his helmet, believing that he is Emile. Imperial reinforcements arrive and order the Death Knight to help them fight Byleth's forces, but the Death Knight refuses, citing a lack of interest in fighting.
Byleth and their companions defeat the Imperial soldiers. Afterwards, Mercedes asks the Death Knight to join their cause, and the Death Knight asks Mercedes to leave Garreg Mach Monastery; neither sibling is willing to back down. The Death Knight gives Mercedes the Heroes' Relic of House Bartels, the Rafail Gem; if Caspar defeated him, he also gifts him his Scythe of Sariel. The Death Knight vows to kill Mercedes the next time they meet before departing. Mercedes blames his upbringing in House Bartels for his current psychotic nature and believes that there is still a kind man within him.
Beginning log
Whispers of Death Knight sightings in Garreg Mach excite Caspar, but Mercedes has a much more pensive reaction. Something must be on her mind...
Chapter data
Normal Hard Maddening


Character data
Silver Snow ![]() Azure Moon
Azure Moon ![]() Verdant Wind
Verdant Wind ![]()
| Characters | |
|---|---|
New units
| |
| |
Required characters
| |
  
| |
Available characters
| |
                           
|


- Other characters may be available if the paralogue is attempted later.
Item data
| |||||||||||||||||||||||||||
|
Enemy data
- On Maddening, some stats are separated by a '~'. The stats to the left of the ~ are taken during Chapter 15, the earliest possible point where this paralogue may be undertaken; the stats to the right of the ~ are taken from Chapter 16 and later, at which point the enemies gain three levels.
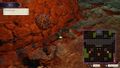
- Every non-monster enemy other than the Death Knight begins moving after any unit enters the central forested area.
Normal Hard Maddening
| ||||||||||||||||||||||||||||||||||||||||||||||||||||||||||||||||||||||||||||||||||||||||||||||||||||||||||||||||||||||||||||||||||||||||||||||||||||||||||||||||||||||||||||||||||||||||||||||||||||||||||||||||||||||||||||||||||||||||||||||||||||||||||||||||||||||||||||||||||||||||||||||||||||||||||||||||||||||||||||||||||||||||||||||||||||||||||||||||||||||||||||
| ||||||||||||||||||||||||||||||||||||||||||||||||||||||||||||||||||||||||||||||||||||||||||||||||||||||||||||||||||||||||||||||||||||||||||||||||||||||||||||||||||||||||||||||||||||||||||||||||||||||||||||||||||||||||||||||||||||||||||||||||||||||||||||||||||||||||||||||||||||||||||||||||||||||||||||||||||||||||||||||||||||||||||||||||||||||||||||||||||||||||||||
| ||||||||||||||||||||||||||||||||||||||||||||||||||||||||||||||||||||||||||||||||||||||||||||||||||||||||||||||||||||||||||||||||||||||||||||||||||||||||||||||||||||||||||||||||||||||||||||||||||||||||||||||||||||||||||||||||||||||||||||||||||||||||||||||||||||||||||||||||||||||||||||||||||||||||||||||||||||||||||||||||||||||||||||||||||||||||||||||||||||||||||||
| ||||||||||||||||||||||||||||||||||||||||||||||||||||||||||||||||||||||||||||||||||||||||||||||||||||||||||||||||||||||||||||||||||||||||||||||||||||||||||||||||||||||||||||||||||||||||||||||||||||||||||||||||||||||||||||||||||||||||||||||||||||||||||||||||||||||||||||||||||||||||||||||||||||||||||||||||||||||||||||||||||||||||||||||||||||||||||||||||||||||||||||
Reinforcements
- On turn 10, or after any player unit other than Mercedes or Caspar ending their turn within three tiles of Mercedes or Caspar; on Maddening, these can move the turn they appear
- 2/3 Dark Knights from the western forests
- 2/3 Heroes from the northeastern forests
- 2/3 Snipers from north of the Death Knight's starting position
Boss data
- On Maddening, some stats are separated by a '~'. The stats to the left of the ~ are taken during Chapter 15, the earliest possible point where this paralogue may be undertaken; the stats to the right of the ~ are taken from Chapter 16 and later, at which point this boss gains three levels.
- Main article:
Death Knight
Normal Hard Maddening
|
|
| |||||||||||||||||||||||||||||||||||||||||||||||||||||||||||||||||||||||||||||||||||

Strategy
| This section details unofficial strategies that may help with completion of the chapter. This may not work for everybody. |
The Rafail Gem obtained from this paralogue is a Hero's Relic associated with the Crest of Lamine; it negates bonus damage and critical hits against the bearer. Enemies wielding effective weapons other than bows are uncommon in Three Houses, and cavalry and flying classes can dismount on their turn without sacrificing their chance to move or make an attack. Enemies with high-crit weapons are also uncommon, though the crit-negation may be useful on a unit with particularly low luck who consistently face a low crit chance against many common enemies.
One of this paralogue's potential rewards is the Scythe of Sariel; it is the most accurate lance in the game with 100 hit, and has high might, high crit, and low weight, but requires A-level in lances. If the Scythe is obtained, the Death Knight will not have it in his later encounters, instead using a Brave Lance; if the Death Knight cannot be reliably one-shot, it may be better to not obtain the lance—even with the fairly heavy Brave Lance, the Death Knight is fast enough to attack many units four times, and the Rafail Gem obtained from this paralogue will negate critical hits outright. Alternately, the Scythe's high crit, especially in conjunction with Wrath and Vantage, can be used as a somewhat reliable way to defeat the Death Knight.
In order to obtain the Scythe of Sariel, Caspar must be the one to defeat the Death Knight. In order to one-shot the Death Knight, a unit would need (on Normal/Hard/Madding after Chapter 15) 73/83/99 physical attack or 68/77/96 magical attack; Caspar has boons and high base skill levels in axes and gauntlets, neither of which have weapons or combat arts effective against cavalry, with one exception. The axe art War Master's Strike, learned by mastering War Master, is effective against all units, including cavalry; however, War Master is a master class and mastering it may take some time, even with each of the saint statues' boosts. To two-shot him, a unit would need 49/56/67 physical attack or 44/50/64 magical attack, and 21/27/37 attack speed. Caspar can ignore the attack speed requirement with gauntlets, a brave weapon, or one of three combat arts which strike consecutively: Bombard, Fierce Iron Fist, or Hunter's Volley—each art also increased crit by 10. Hunter's Volley is the art Caspar is least likely to learn, as it requires mastering Sniper, and Caspar's weakness in bows makes it harder for him to reach the requirements for the class; it is the only art of three to increase hit, though with Caspar's Born Fighter, it is only a net increase of 5 points compared to the other two arts. Bows generally have similar hit to gauntlets, but usually have higher might. Caspar can learn Bombard at C+ brawling, but it only adds 3 might to each strike when gauntlets already strike twice. Fierce Iron Fist also adds little might, but it strikes three times—when striking thrice, Caspar needs 41/47/57 physical attack, or 36/41/54 magical attack with the Aura Knuckles; additionally, as Fierce Iron Fist strikes thrice, it is the art with which Caspar is the most likely to get at least one crit, potentially allowing him to defeat the Death Knight without meeting the three-shot requirement. If Caspar was not significantly invested into, he is unlikely to be able to defeat the Death Knight alone.
With his goal set to lances, Caspar can reach D lances in only a few weeks—even less time with instruction and seminars—which allows him to use the Horseslayer and learn Tempest Lance; at base strength using Tempest Lance and a Horseslayer, Caspar will deal 6 damage to the Death Knight on Maddening. If Caspar reaches C lances—which requires more investment than D but is still feasible—he will learn the Knightkneeler combat art; at base strength using the Lance of Ruin and Knightkneeler, Caspar will deal 23 damage to the Death Knight on Maddening. Caspar will not be able to defeat the Death Knight without help this way, but he can reliably defeat him. If Caspar has not been invested into, the Death Knight can be weakened to 1 HP and Caspar can deal the last point of damage; on Normal and Hard, with his stats and skill levels as they are when he is first recruited in the Black Eagles, Caspar can deal at least 1 damage with Freikugel or a Devil Axe and Smash—on Maddening, he needs one point of strength from base to deal 1 damage with Freikugel and Smash. Weakening the Death Knight may be difficult, as Commander reduces the damage of gambits and Counterattack does not allow ranged attackers to avoid damage. The Windsweep sword combat art, learned by Byleth and Dimitri at A and Yuri at C+, can prevent a counter attack, or the Subdue sword art, learned by mastering Lord, can leave the Death Knight at 1 HP; both arts can be used with the cavalry-effective Rapier.
One final potential strategy to defeat the Death Knight can be used if Caspar's recruitment is delayed until Chapter 12. If recruited in Chapter 12 and certified as a Warrior, Caspar has 35 attack with the Smash combat art, and needs 41/47/57 attack to kill the Death Knight with a single critical hit. On Normal and Hard, the Killer Axe+ provides enough might to reach the threshold; on Maddening, the Freikugel has enough might to ensure a critical kills, although the Axe of Ukonvasara provides more crit chance and the 3 points needed to reach the one-shot threshold can be granted by a battalion.
Disregarding the Death Knight, the rest of the battle is a fairly straightforward rout map. Most enemies move in relatively small groups, and can be lured and fought with little risk of being overwhelmed. However, the Sniper reinforcements from the north can pose a significant threat to Mercedes and Caspar. The reinforcements will appear on turn 10, or if any other player unit enters within two tiles of Mercedes or Caspar; moving a unit north to aid them could potentially put them in more danger, so it is best to move Mercedes and Caspar south towards other units.
Trivia
- The various spaces of "rock" terrain that can be seen on the map are actually the destroyed bodies of Golems.
- If zoom view is used to observe the northern cliff, one can find a rock bearing the Crest of Flames.
- This is the only chapter where, as an enemy, the Death Knight's level increases with the difficulty. In all other chapters, his stats increase with difficulty while his level remains the same.
- The in-game dialogue and text hinting how to obtain the Scythe of Sariel in this paralogue is present only in Normal difficulty.
Etymology and other languages
| Names, etymology, and in other regions | ||
|---|---|---|
| Language | Name | Definition, etymology, and notes |
| English |
The Face Beneath |
-- |
| Japanese |
隠された素顔 |
Hidden face |
| Spanish |
El enmascarado |
The masked |
| French |
Quand le masque tombe |
When the mask falls |
| German |
Das verborgene Antlitz |
The hidden Face |
| Italian |
Dietro la maschera |
Behind the mask |
| Korean |
감춰진 얼굴 |
Hidden face |
| Simplified Chinese |
藏起来的真面目 |
Hidden real identity |
| Traditional Chinese |
藏起來的真面目 |
Hidden real identity |
Gallery

Entering the area outlined in red triggers the movement of every non-monster enemy.
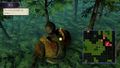
A part of rock terrain that can be found on the map.
The rock with the Crest of Flames that can be found on the map.


References
| The Face Beneath |
|---|