| Site News |
|---|
| Warning: This wiki contains spoilers. Read at your own risk! Social media: If you would like, please join our Discord server, and/or follow us on Twitter (X) or Tumblr! |
The Impregnable Fortress (Azure Moon)/Taking Fort Merceus
| ||||||||
|

Taking Fort Merceus (Japanese: メリセウス攻防戦 Meriseus battle) is the main battle map of the twentieth chapter of Fire Emblem: Three Houses in the Azure Moon route. In this map, Fort Merceus, the Impregnable Fortress, is besieged by the army of Faerghus.
Beginning log
After saving the embattled Alliance, you march south to Empire territory. Fort Merceus, said to be impregnable, stands between you and Enbarr, the Imperial Capital.
Map data
Normal Hard Maddening
| ||||||
|
| |||||
| Victory: Defeat the Death Knight | Player | Enemy | ||||
|---|---|---|---|---|---|---|
| Defeat: Byleth or Dimitri dies*, or the player's army is routed* | 2–10 | 38+∞ | ||||
| ||||||
| Map dimensions: 30 columns by 30 rows | ||||||


Character data
| Characters | |
|---|---|
New units
| |
| |
Required characters
| |
 
| |
Available characters
| |
                                 
|
Item data
| |||||||||||||||||||||
|
- Note: All stealable and dropable items are present on the generic replacements of Linhardt and Caspar
Enemy data
Normal Hard Maddening
| |||||||||||||||||||||||||||||||||||||||||||||||||||||||||||||||||||||||||||||||||||||||||||||||||||||||||||||||||||||||||||||||||||||||||||||||||||||||||||||||||||||||||||||||||||||||||||||||||||||||||||||||||||||||||||||||||||||||||||||||||||||||||||||||||||||||||||||||||||||||||||||||||||||||||||||||||||||||||||||||||||||||||||||||||||||||||||||||||||||||||||||||||||||||||||||||||||||||||||||||||||||||||||||||||||||||||||||||||||||||||||||||||||||||||||||||||||||||||||||||||||||||||||||||||||||||||||||||||||||||||||||||||||||||||||||||||||||||||||||||||||||||||||||||||||||||||||||||||||||||||||||||||||||||||||||||||||||||||||||||||||||||||||||||||||||||||||||||||||||||||||||||||||||||||||||||||||||||||||||||||||||||||||||||||||||
| |||||||||||||||||||||||||||||||||||||||||||||||||||||||||||||||||||||||||||||||||||||||||||||||||||||||||||||||||||||||||||||||||||||||||||||||||||||||||||||||||||||||||||||||||||||||||||||||||||||||||||||||||||||||||||||||||||||||||||||||||||||||||||||||||||||||||||||||||||||||||||||||||||||||||||||||||||||||||||||||||||||||||||||||||||||||||||||||||||||||||||||||||||||||||||||||||||||||||||||||||||||||||||||||||||||||||||||||||||||||||||||||||||||||||||||||||||||||||||||||||||||||||||||||||||||||||||||||||||||||||||||||||||||||||||||||||||||||||||||||||||||||||||||||||||||||||||||||||||||||||||||||||||||||||||||||||||||||||||||||||||||||||||||||||||||||||||||||||||||||||||||||||||||||||||||||||||||||||||||||||||||||||||||||||||||
| |||||||||||||||||||||||||||||||||||||||||||||||||||||||||||||||||||||||||||||||||||||||||||||||||||||||||||||||||||||||||||||||||||||||||||||||||||||||||||||||||||||||||||||||||||||||||||||||||||||||||||||||||||||||||||||||||||||||||||||||||||||||||||||||||||||||||||||||||||||||||||||||||||||||||||||||||||||||||||||||||||||||||||||||||||||||||||||||||||||||||||||||||||||||||||||||||||||||||||||||||||||||||||||||||||||||||||||||||||||||||||||||||||||||||||||||||||||||||||||||||||||||||||||||||||||||||||||||||||||||||||||||||||||||||||||||||||||||||||||||||||||||||||||||||||||||||||||||||||||||||||||||||||||||||||||||||||||||||||||||||||||||||||||||||||||||||||||||||||||||||||||||||||||||||||||||||||||||||||||||||||||||||||||||||||||
| |||||||||||||||||||||||||||||||||||||||||||||||||||||||||||||||||||||||||||||||||||||||||||||||||||||||||||||||||||||||||||||||||||||||||||||||||||||||||||||||||||||||||||||||||||||||||||||||||||||||||||||||||||||||||||||||||||||||||||||||||||||||||||||||||||||||||||||||||||||||||||||||||||||||||||||||||||||||||||||||||||||||||||||||||||||||||||||||||||||||||||||||||||||||||||||||||||||||||||||||||||||||||||||||||||||||||||||||||||||||||||||||||||||||||||||||||||||||||||||||||||||||||||||||||||||||||||||||||||||||||||||||||||||||||||||||||||||||||||||||||||||||||||||||||||||||||||||||||||||||||||||||||||||||||||||||||||||||||||||||||||||||||||||||||||||||||||||||||||||||||||||||||||||||||||||||||||||||||||||||||||||||||||||||||||||
Reinforcements
- Every other turn, starting turn 3
- 1 Paladin from the southeast, just south of the southernmost Paladin; halted by defeating the Paladin.
- 1 Dark Bishop from the southwest, just south of the southernmost Dark Bishop; halted by defeating the Dark Bishop.
Boss data
- Main article:
Death Knight
Normal Hard Maddening
|
|
| |||||||||||||||||||||||||||||||||||||||||||||||||||||||||||||||||||||||||||||||||||

Sub-bosses
- Main article:
Linhardt
Linhardt does not appear if he was recruited and is replaced by an Imperial General Bishop.
Normal Hard Maddening
|
|
| |||||||||||||||||||||||||||||||||||||||||||||||||||||||||||||||||||||||||||||||||||

- Main article:
Caspar
Caspar does not appear if he was recruited and is replaced by an Imperial General War Master.
Normal Hard Maddening
|
|
| |||||||||||||||||||||||||||||||||||||||||||||||||||||||||||||||||||||||||||||||||||

Strategy
| This section details unofficial strategies that may help with completion of the chapter. This may not work for everybody. |
The goal of this map is to defeat the Death Knight. Accounting for the enemies in the way and not accounting for terrain that may hinder non-fliers, the closest deployment positions—the bottom-most two—are 26 tiles away from the Death Knight, equivalent to two full movements of a Strided, 8-move flier; a Strided Dancer in one of the bottom-most deployment positions would need to be only a single tile right or down or have one more move—things which could be achieved with a repositioning skill such as Shove or the March Ring—to get such a flier in the other position to the Death Knight in one turn. A combination of one or more units with Warp, a battalion with the Dance of the Goddess gambit—namely the Blue Lion Dancers—and high-move units with good combat will greatly increase the number of units that could quickly reach the Death Knight, either through increasing their allies' mobility or clearing out enemies in the way.
Due to his fairly high speed and luck as well as his Lance Prowess Lv 5 ability and Reaper Knights battalion, the Death Knight has fairly high avoid, so increasing combat units' hit rates with adjutants or Rally Skill may be necessary. To defeat the Death Knight in one hit, the attacking unit will need (in Normal/Hard/Maddening difficulties) at least 87/102/112 physical attack or 81/95/110 magical attack. To defeat him in two hits, the attacking unit will need at least 60/70/76 physical attack or 53/63/74 magical attack to deal enough damage, and 40/42/50 attack speed to follow up if the Scythe of Sariel was not obtained in The Face Beneath or 29/37/46 if it was; attempting to two-shot the Death Knight is not recommended without a way to attack consecutively, such as with Swift Strikes, as units with the speed to two-shot him will likely lack the bulk to survive a crit or two hits from the Brave Lance—additionally, the Scythe of Sariel's high critical rate may pose a problem even for bulkier units, so a way to negate that, such as the Rafail Gem, may be appreciated. If one- or two-shots are unreliable or undesirable, offensive gambits can provide damage without suffering a counter attack; if too few units can reach him, a bulky unit such as Dedue or Gilbert (neither of whom can survive against the Death Knight in Maddening at base, though Gilbert requires only seven points of protection to survive two non-crits) can lure him closer to the main army.
The Death Knight lacks any bonus damage-nullifying skills, and as such is weak to anti-cavalry effects. Dark Spikes Τ has an effective might of 39 against the Death Knight, and the Spear of Assal has 42; any lance used with Knightkneeler not already effective against cavalry will have its might doubled with a +5 bonus—the Lance of Ruin, for instance, will have an effective might of 49—and using Beast Fang with Blutgang will have a might of 36. Lysithea has a high magic growth and access to Dark Spikes Τ; however, for faster clears, she will likely be preoccupied Warping the dancer or a strong combat unit rather than being that combat unit, and classes with access to spells may either limit her movement with Warlock, have high requirements like Dark Knight, or require DLC like Dark Flier. Units with access to Swift Strikes—Ferdinand, Sylvain, and Seteth—are effective against the Death Knight, particularly as Wyvern Lords, as A-level lances grants access to both Swift Strikes and the Spear of Assal, getting them over halfway to the attack requirement to two-shot the Death Knight on Maddening; a Sniper with Hunter's Volley can perform similarly due to Hunter's Volley's sequential attacks and increased crit, as can Cyril or Leonie with Point-Blank Volley, which does not require being in the Sniper class but lacks the crit bonus.
Etymology and other languages
| Names, etymology, and in other regions | ||
|---|---|---|
| Language | Name | Definition, etymology, and notes |
| English |
Taking Fort Merceus |
-- |
| Japanese |
メリセウス攻防戦 |
Meriseus battle |
| Spanish |
La toma de Fuerte Merceus |
The taking of Fort Merceus |
| French |
L'inexpugnable fort Merceus |
The impregnable fort Merceus |
| German |
Eroberung von Merceus |
Conquest of Merceus |
| Italian |
La presa del forte Merceus |
The taking of fort Merceus |
| Korean |
메리세우스 공방전 |
Battle for Merceus |
| Simplified Chinese |
梅利赛乌斯攻防战 |
Merceus siege battle |
| Traditional Chinese |
梅利賽烏斯攻防戰 |
Merceus siege battle |
Gallery
This section has been marked as a stub. Please help improve the page by adding information.
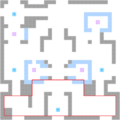
The area outlined in red is the southern area that triggers enemy movement.

References
| ← Saving Derdriu • | Taking Fort Merceus | • Assault on Enbarr → |
|---|