| Site News |
|---|
| Warning: This wiki contains spoilers. Read at your own risk! Social media: If you would like, please join our Discord server, and/or follow us on X (Twitter) or Tumblr! |
Tower of Black Winds/The Gautier Inheritance
The Gautier Inheritance (Japanese: ゴーティエ家督争乱 Gautier Inheritance Conflict) is the main battle map of the fifth chapter in Fire Emblem: Three Houses. In this map, the Church of Seiros discharges Byleth and company to neutralize Miklan's threats.
| ||||||||
|

Beginning log
A group of thieves led by a disowned son of House Gautier has stolen a Hero's Relic and begun to run amok. Seeking to neutralize this threat, the church is sending your house there to settle the matter.
Map data
Normal Hard Maddening
| ||||||
|
| |||||
| Victory: Defeat the Black Beast | Player | Other | Enemy | |||
|---|---|---|---|---|---|---|
| Defeat: Byleth or Edelgard |
1–10 | 1 | 18+9 | |||
| ||||||
| Map dimensions: 21 columns by 25 rows | ||||||


Character data
Black Eagles ![]() Blue Lions
Blue Lions ![]() Golden Deer
Golden Deer ![]()
| Characters | |
|---|---|
New units
| |
| |
Required characters
| |

| |
Available characters
| |
                        
|


Item data
| |||||||||||||||||||||||||||||||||
|
Enemy data
Normal Hard Maddening
| ||||||||||||||||||||||||||||||||||||||||||||||||||||||||||||||||||||||||||||||||||||||||||||||||||||||||||||||||||||||||||||||||||||||||||||||||||||||||||||||||||||||||||||||||||||||||||||||||||||||||||||||||||||||||||||||||||||||||||||||||||||||||||||||||||||||||||||||||||||||||||||||||||||||||||||||||||||||||||||||||||||||||||||||||||||||||||||||||||||||||||||
| ||||||||||||||||||||||||||||||||||||||||||||||||||||||||||||||||||||||||||||||||||||||||||||||||||||||||||||||||||||||||||||||||||||||||||||||||||||||||||||||||||||||||||||||||||||||||||||||||||||||||||||||||||||||||||||||||||||||||||||||||||||||||||||||||||||||||||||||||||||||||||||||||||||||||||||||||||||||||||||||||||||||||||||||||||||||||||||||||||||||||||||
| ||||||||||||||||||||||||||||||||||||||||||||||||||||||||||||||||||||||||||||||||||||||||||||||||||||||||||||||||||||||||||||||||||||||||||||||||||||||||||||||||||||||||||||||||||||||||||||||||||||||||||||||||||||||||||||||||||||||||||||||||||||||||||||||||||||||||||||||||||||||||||||||||||||||||||||||||||||||||||||||||||||||||||||||||||||||||||||||||||||||||||||
| ||||||||||||||||||||||||||||||||||||||||||||||||||||||||||||||||||||||||||||||||||||||||||||||||||||||||||||||||||||||||||||||||||||||||||||||||||||||||||||||||||||||||||||||||||||||||||||||||||||||||||||||||||||||||||||||||||||||||||||||||||||||||||||||||||||||||||||||||||||||||||||||||||||||||||||||||||||||||||||||||||||||||||||||||||||||||||||||||||||||||||||
Reinforcements
- Turn 2; on Maddening, these can act the turn they appear
- 2 Mages from west of ally starting positions (Maddening only)
- 2 Thieves with Iron Swords (Normal)/Steel Swords (Hard/Maddening) from west of ally starting positions
- Both have battalions on Hard and above
- For 2 turns after a player unit passes the broken northeastern pillar (reaching column 13 from the north)
- 2 Thieves with Iron Swords (Normal/Hard)/Steel Swords (Maddening) from the northeast corner of the map
- After Miklan is defeated once
- Turn 6; on Hard and above, these can act on the turn they appear
- 2 Thieves with Iron Swords (Normal/Hard)/Steel Swords (Maddening) from west of ally starting positions
- Both have battalions on Hard and above
- 2 Mages with battalions from west of ally starting positions (Hard/Maddening)
- Miklan transforms into the Black Beast, and all playable and NPC units are moved to the central chamber's entrance. All Divine Pulse charges are regained.
- 2 Thieves with Iron Swords (Normal/Hard)/Steel Swords (Maddening) from west of ally starting positions
NPC data
Normal Hard Maddening
Boss data
- Main article:
Miklan - Miklan
Normal Hard Maddening
|
|
| |||||||||||||||||||||||||||||||||||||||||||||||||||||||||||||||||||||||||||||||||||

- Black Beast
Normal Hard Maddening
|
|
| |||||||||||||||||||||||||||||||||||||||||||||||||||||||||||||||||||||||||||||||||||

Strategy
| This section details unofficial strategies that may help with completion of the chapter. This may not work for everybody. |
Before you even start this map—do you have any spare cash? There's a limit on the number of Intermediate Seals you can purchase from the Item Store each month of 3. Even if you don't need any at the moment, consider purchasing a few spare ones now for the next month from the pre-battle Marketplace, money permitting. You will need them shortly.
You are accompanied by Gilbert for this battle; he's tough, but he's not invincible, and can suffer death by a thousand cuts if left to his own devices. His accuracy is also fairly sketchy, typically managing hit rates in the 50s/60s against the Thieves that dominate this chapter. There's no reward for Gilbert surviving the map (don't worry, he won't "really" die and is still usable later for the Blue Lions on Classic), although it's good for your pride. Note that if Gilbert hugs the wall, he will aggro Miklan and his archer friends to come charging across the map at you in a giant mob which will make the map dramatically tougher, so it's not completely crazy to intentionally let Gilbert die against the mages that show up from the starting position.
Your first objective is to make your way through the tower, get to Miklan, and take him out. It is highly recommended to not sit in range of the archers "above" the starting position at the higher level, especially on Maddening where they pack Poison Strike, although if you really feel frisky you can use 3-range attacks like Curved Shot or Thoron to fight back. Several thugs will outflank you on turns 2 and 6, which encourages you to either play very quickly and never let them catch up, or slowly and carefully where you pick them all off before advancing to the upper right of the map. Note that there's an Armorslayer in the chest in the southeast corner if you want it. Keep an eye on the Archers on the top level, who can chip you if you blunder into their range. If you did set them off, you'll face the bulk of Miklan's army at the north end of the map crashing into you, so enjoy. Note that you can use movement skills to pull Gilbert back if you want to save him. If you avoided that, or set them off but defeated them but not Miklan himself, there are ambush spawns in the northeast corner. On Maddening, they are rather fast and have Pass to slip past your defenses and pick off your squishy units. Best to keep all of your squishy units safely far away, and only have your most mobile and tanky units move up to the pillar to set off the Thief reinforcements. In the northwest corner, there's a particularly nasty Fortress Knight lurking about. Make sure to sic your mages on him, or you're gonna have a bad time. Against Miklan, note that since he doesn't have a Crest, the Lance of Ruin deals 10 damage to him automatically after all combat he is involved in, so even single digit bow plinks are quite effective at whittling his health away. After Miklan goes down, instead of winning the mission, you win nightmares for the next week.
Upon Miklan transforming into the Black Beast, all charges of Divine Pulse are restored. Using Divine Pulse to back up and defeat Miklan again will restore them again, and can be done an infinite number of times. Pay very close attention to the following, since Demonic Beasts are a new type of enemy that requires new tactics to exploit their weaknesses and gain the maximum reward. When you move your cursor over Miklan, you'll notice that the tiles he occupies glow yellow. These are his barriers. Destroy one, and he won't counterattack the next attack. Destroy all of them to stun him for the entire phase (no more counterattacks this player phase) + next enemy phase and gain a rare crafting material (five Umbral Steels in this case, which can repair the Heroes' Relics). You want to get into the habit of doing this since Demonic Beasts will be your main source of such materials. Effective damage (such as Sword of the Creator's Ruptured Sky, or Bane of Monsters, Monster Piercer and the like) will deal double damage to the barriers, and using a gambit will force the monster to attack whoever last hit him with a gambit, as well as potentially damage multiple barriers at once. If you're trying to save Gilbert and he's still alive, you also want to use a movement combat art to move him to safety since he tends to suicide against Miklan. Fight smart, fight hard, and you can overcome this.
At the end of this map, all of your units should be past level 10 and ready to promote into intermediate classes. You can also stay in beginner classes until you master them and get the basic stat +2 skills and movement arts—your call.
Trivia
- During this mission, Gilbert lacks his personal ability Veteran Knight and, in earlier versions, his map sprite used the body of a generic Fortress Knight rather than his own unique sprite. This is because this mission uses a NPC duplicate of the character which lacks substantial character data compared to his playable counterpart.[1]
Etymology and other languages
| Names, etymology, and in other regions | ||
|---|---|---|
| Language | Name | Definition, etymology, and notes |
| English |
The Gautier Inheritance |
-- |
| Japanese |
ゴーティエ家督争乱 |
Gautier Inheritance Conflict |
| Spanish |
La herencia de los Gautier |
The heritage of the Gautier |
| French |
Le conflit des Gautier |
The conflict of the Gautier |
| German |
Das Erbe von Gautier |
The Heritage of Gautier |
| Italian |
L'eredità dei Gautier |
The heritage of the Gautier |
| Korean |
고티에 가문 승계의 난 |
The gautier inheritance revolt |
| Simplified Chinese |
戈迪耶家督之乱 |
The Gautier home supervisor revolt |
| Traditional Chinese |
戈迪耶家督之亂 |
The Gautier home supervisor revolt |
Gallery
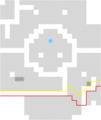
Crossing the red line triggers the movement of the right thief and left fighter below Miklan, crossing the yellow line triggers the movement of the right fighter below Miklan.
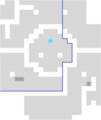
Entering the blue area triggers the northeast reinforcements and the northwest enemies' movement.


References
- ↑ The Gautier Inheritance. Mission - Chapter 5, fedatamine.com, Retrieved: February 25, 2021
| ← Assault at the Rite of Rebirth • | The Gautier Inheritance | • The Underground Chamber → |
|---|