| Site News |
|---|
| Warning: This wiki contains spoilers. Read at your own risk! Social media: If you would like, please join our Discord server, and/or follow us on Twitter (X) or Tumblr! |
The Impregnable Fortress (Azure Moon)/Taking Fort Merceus: Difference between revisions
m (Text replacement - "}} Lv." to "}} Lv") |
m (→Enemy data) |
||
| Line 232: | Line 232: | ||
|#14=1 | |#14=1 | ||
|inventory14={{Item|16|Giant Artificial Crest Stone|image=crest stone}}<br>{{Item|16|Defiant Str}} • {{Item|16|Defiant Def}} • {{Item|16|Renewal}} • {{Item|16|Barrier|link=Barrier (monster)}} • {{Item|16|Vital Defense|image=barrier ability}} • {{Item|16|Armored Blow}}{{hover|*|Latent, bar 2}} • {{Item|16|Death Blow}}{{hover|*|Latent, bar 3}}<br>{{Item|16|Arm Press|image=staggering blow}} | |inventory14={{Item|16|Giant Artificial Crest Stone|image=crest stone}}<br>{{Item|16|Defiant Str}} • {{Item|16|Defiant Def}} • {{Item|16|Renewal}} • {{Item|16|Barrier|link=Barrier (monster)}} • {{Item|16|Vital Defense|image=barrier ability}} • {{Item|16|Armored Blow}}{{hover|*|Latent, bar 2}} • {{Item|16|Death Blow}}{{hover|*|Latent, bar 3}}<br>{{Item|16|Arm Press|image=staggering blow}} | ||
|notes14=• [[Bonus damage|Weak]] to [[Sword]]s.<br>• Begins moving | |notes14=• [[File:Is ns01 weakness sword.png|x20px]] [[Bonus damage|Weak]] to [[Sword]]s.<br>• Begins moving if any player unit enters the southern area. | ||
|- | |- | ||
|name15=Giant Demonic Beast | |name15=Giant Demonic Beast | ||
| Line 239: | Line 239: | ||
|#15=1 | |#15=1 | ||
|inventory15={{Item|16|Giant Artificial Crest Stone|image=crest stone}}<br>{{Item|16|Defiant Str}} • {{Item|16|Defiant Def}} • {{Item|16|Renewal}} • {{Item|16|Barrier|link=Barrier (monster)}} • {{Item|16|Vital Defense|image=barrier ability}} • {{Item|16|Armored Blow}}{{hover|*|Latent, bar 2}} • {{Item|16|Death Blow}}{{hover|*|Latent, bar 3}}<br>{{Item|16|Arm Press|image=staggering blow}} | |inventory15={{Item|16|Giant Artificial Crest Stone|image=crest stone}}<br>{{Item|16|Defiant Str}} • {{Item|16|Defiant Def}} • {{Item|16|Renewal}} • {{Item|16|Barrier|link=Barrier (monster)}} • {{Item|16|Vital Defense|image=barrier ability}} • {{Item|16|Armored Blow}}{{hover|*|Latent, bar 2}} • {{Item|16|Death Blow}}{{hover|*|Latent, bar 3}}<br>{{Item|16|Arm Press|image=staggering blow}} | ||
|notes15=• [[Bonus damage|Weak]] to [[Lance (weapon)|Lance]]s.<br>• Begins moving | |notes15=• [[File:Is ns01 weakness lance.png|x20px]] [[Bonus damage|Weak]] to [[Lance (weapon)|Lance]]s.<br>• Begins moving if any player unit enters the southern area. | ||
|- | |- | ||
|name16=Imperial Soldier | |name16=Imperial Soldier | ||
| Line 268: | Line 268: | ||
|#19=1 | |#19=1 | ||
|inventory19={{Item|16|Nosferatu|image=white magic}} • {{Item|16|Elixir|image=potion}} • {{Item|16|Vulnerary|image=potion}} • {{Item|16|Heal|image=white magic}} • {{Item|16|Fortify|image=white magic}}<br>{{Item|16|Catnap|image=renewal}} • {{Item|16|White Magic Uses x2}} • {{Item|16|White Magic Heal +10}} • {{Item|16|Terrain Resistance}} • {{Item|16|Faith Lv 5}} • {{Item|16|White Magic Avo +20}} • {{Item|16|Defiant Res}} | |inventory19={{Item|16|Nosferatu|image=white magic}} • {{Item|16|Elixir|image=potion}} • {{Item|16|Vulnerary|image=potion}} • {{Item|16|Heal|image=white magic}} • {{Item|16|Fortify|image=white magic}}<br>{{Item|16|Catnap|image=renewal}} • {{Item|16|White Magic Uses x2}} • {{Item|16|White Magic Heal +10}} • {{Item|16|Terrain Resistance}} • {{Item|16|Faith Lv 5}} • {{Item|16|White Magic Avo +20}} • {{Item|16|Defiant Res}} | ||
|notes19= | |notes19=• Starts on a [[Terrain/Nintendo Switch games#Fire Emblem: Three Houses|heal tile +]].<br>• Begins moving if a nearby [[Dark Bishop]] is provoked.<br>• Replaced by a generic Bishop without Catnap if he was recruited. | ||
|- | |- | ||
|name20=[[Caspar]] | |name20=[[Caspar]] | ||
| Line 276: | Line 276: | ||
|#20=1 | |#20=1 | ||
|inventory20={{Item|16|Brave Axe|image=axe|type=drop}} • {{Item|16|Elixir|image=potion}}<br>{{Item|16|Born Fighter|image=heartseeker}} • {{Item|16|Fistfaire}} • {{Item|16|Axefaire}} • {{Item|16|Crit +20}} • {{Item|16|Axe Prowess Lv 5}} • {{Item|16|Desperation}} • {{Item|16|Battalion Wrath}} • {{Item|16|Pass}} • {{Item|16|Lancebreaker+|image=lancebreaker}}<br>{{Item|16|Helm Splitter|image=combat art axe}} | |inventory20={{Item|16|Brave Axe|image=axe|type=drop}} • {{Item|16|Elixir|image=potion}}<br>{{Item|16|Born Fighter|image=heartseeker}} • {{Item|16|Fistfaire}} • {{Item|16|Axefaire}} • {{Item|16|Crit +20}} • {{Item|16|Axe Prowess Lv 5}} • {{Item|16|Desperation}} • {{Item|16|Battalion Wrath}} • {{Item|16|Pass}} • {{Item|16|Lancebreaker+|image=lancebreaker}}<br>{{Item|16|Helm Splitter|image=combat art axe}} | ||
|notes20=• Begins moving | |notes20=• Starts on a [[Terrain/Nintendo Switch games#Fire Emblem: Three Houses|heal tile +]].<br>• Begins moving if the central [[Giant Demonic Beast]] is provoked, or if the left- or right-east [[Paladin]] is provoked.<br>• Replaced by a generic War Master without Born Fighter if he was recruited. | ||
|- | |- | ||
|nameb=[[Death Knight]] | |nameb=[[Death Knight]] | ||
| Line 409: | Line 409: | ||
|#16=1 | |#16=1 | ||
|inventory16={{Item|16|Giant Artificial Crest Stone|image=crest stone}}<br>{{Item|16|Defiant Str}} • {{Item|16|Defiant Def}} • {{Item|16|Renewal}} • {{Item|16|Barrier|link=Barrier (monster)}} • {{Item|16|Vital Defense|image=barrier ability}} • {{Item|16|Armored Blow}}{{hover|*|Latent, bar 2}} • {{Item|16|Death Blow}}{{hover|*|Latent, bar 3}}<br>{{Item|16|Arm Press|image=staggering blow}} | |inventory16={{Item|16|Giant Artificial Crest Stone|image=crest stone}}<br>{{Item|16|Defiant Str}} • {{Item|16|Defiant Def}} • {{Item|16|Renewal}} • {{Item|16|Barrier|link=Barrier (monster)}} • {{Item|16|Vital Defense|image=barrier ability}} • {{Item|16|Armored Blow}}{{hover|*|Latent, bar 2}} • {{Item|16|Death Blow}}{{hover|*|Latent, bar 3}}<br>{{Item|16|Arm Press|image=staggering blow}} | ||
|notes16=• [[Bonus damage|Weak]] to [[Sword]]s.<br>• Begins moving | |notes16=• [[File:Is ns01 weakness sword.png|x20px]] [[Bonus damage|Weak]] to [[Sword]]s.<br>• Begins moving if any player unit enters the southern area. | ||
|- | |- | ||
|name17=Giant Demonic Beast | |name17=Giant Demonic Beast | ||
| Line 416: | Line 416: | ||
|#17=1 | |#17=1 | ||
|inventory17={{Item|16|Giant Artificial Crest Stone|image=crest stone}}<br>{{Item|16|Defiant Str}} • {{Item|16|Defiant Def}} • {{Item|16|Renewal}} • {{Item|16|Barrier|link=Barrier (monster)}} • {{Item|16|Vital Defense|image=barrier ability}} • {{Item|16|Armored Blow}}{{hover|*|Latent, bar 2}} • {{Item|16|Death Blow}}{{hover|*|Latent, bar 3}}<br>{{Item|16|Arm Press|image=staggering blow}} | |inventory17={{Item|16|Giant Artificial Crest Stone|image=crest stone}}<br>{{Item|16|Defiant Str}} • {{Item|16|Defiant Def}} • {{Item|16|Renewal}} • {{Item|16|Barrier|link=Barrier (monster)}} • {{Item|16|Vital Defense|image=barrier ability}} • {{Item|16|Armored Blow}}{{hover|*|Latent, bar 2}} • {{Item|16|Death Blow}}{{hover|*|Latent, bar 3}}<br>{{Item|16|Arm Press|image=staggering blow}} | ||
|notes17=• [[Bonus damage|Weak]] to [[Lance (weapon)|Lance]]s.<br>• Begins moving | |notes17=• [[File:Is ns01 weakness lance.png|x20px]] [[Bonus damage|Weak]] to [[Lance (weapon)|Lance]]s.<br>• Begins moving if any player unit enters the southern area. | ||
|- | |- | ||
|name18=Giant Demonic Beast | |name18=Giant Demonic Beast | ||
| Line 423: | Line 423: | ||
|#18=1 | |#18=1 | ||
|inventory18={{Item|16|Giant Artificial Crest Stone|image=crest stone}}<br>{{Item|16|Defiant Str}} • {{Item|16|Defiant Def}} • {{Item|16|Renewal}} • {{Item|16|Barrier|link=Barrier (monster)}} • {{Item|16|Vital Defense|image=barrier ability}} • {{Item|16|Armored Blow}}{{hover|*|Latent, bar 2}} • {{Item|16|Death Blow}}{{hover|*|Latent, bar 3}}<br>{{Item|16|Arm Press|image=staggering blow}} | |inventory18={{Item|16|Giant Artificial Crest Stone|image=crest stone}}<br>{{Item|16|Defiant Str}} • {{Item|16|Defiant Def}} • {{Item|16|Renewal}} • {{Item|16|Barrier|link=Barrier (monster)}} • {{Item|16|Vital Defense|image=barrier ability}} • {{Item|16|Armored Blow}}{{hover|*|Latent, bar 2}} • {{Item|16|Death Blow}}{{hover|*|Latent, bar 3}}<br>{{Item|16|Arm Press|image=staggering blow}} | ||
|notes18=• [[Bonus damage|Weak]] to [[Axe]]s.<br>• Begins moving | |notes18=• [[File:Is ns01 weakness axe.png|x20px]] [[Bonus damage|Weak]] to [[Axe]]s.<br>• Begins moving if any player unit enters the southern area. | ||
|- | |- | ||
|name19=Imperial Soldier | |name19=Imperial Soldier | ||
| Line 459: | Line 459: | ||
|#23=1 | |#23=1 | ||
|inventory23={{Item|16|Nosferatu|image=white magic}} • {{Item|16|Elixir|image=potion}} • {{Item|16|Vulnerary|image=potion}} • {{Item|16|Heal|image=white magic}} • {{Item|16|Fortify|image=white magic}}<br>{{Item|16|Catnap|image=renewal}} • {{Item|16|White Magic Uses x2}} • {{Item|16|White Magic Heal +10}} • {{Item|16|Terrain Resistance}} • {{Item|16|Faith Lv 5}} • {{Item|16|White Magic Avo +20}} • {{Item|16|Defiant Res}}<br>{{Item|16|Hevring Prayer Troops|image=battalion infantry silver}} Lv 4: {{Item|16|Blessing|link=Blessing (gambit)|image=gambit support}} | |inventory23={{Item|16|Nosferatu|image=white magic}} • {{Item|16|Elixir|image=potion}} • {{Item|16|Vulnerary|image=potion}} • {{Item|16|Heal|image=white magic}} • {{Item|16|Fortify|image=white magic}}<br>{{Item|16|Catnap|image=renewal}} • {{Item|16|White Magic Uses x2}} • {{Item|16|White Magic Heal +10}} • {{Item|16|Terrain Resistance}} • {{Item|16|Faith Lv 5}} • {{Item|16|White Magic Avo +20}} • {{Item|16|Defiant Res}}<br>{{Item|16|Hevring Prayer Troops|image=battalion infantry silver}} Lv 4: {{Item|16|Blessing|link=Blessing (gambit)|image=gambit support}} | ||
|notes23= | |notes23=• Starts on a [[Terrain/Nintendo Switch games#Fire Emblem: Three Houses|heal tile +]].<br>• Begins moving if a nearby [[Dark Bishop]] is provoked.<br>• Replaced by a generic Bishop without Catnap if he was recruited. | ||
|- | |- | ||
|name24=[[Caspar]] | |name24=[[Caspar]] | ||
| Line 467: | Line 467: | ||
|#24=1 | |#24=1 | ||
|inventory24={{Item|16|Brave Axe|image=axe|type=drop}} • {{Item|16|Elixir|image=potion}}<br>{{Item|16|Born Fighter|image=heartseeker}} • {{Item|16|Fistfaire}} • {{Item|16|Axefaire}} • {{Item|16|Crit +20}} • {{Item|16|Axe Prowess Lv 5}} • {{Item|16|Desperation}} • {{Item|16|Battalion Wrath}} • {{Item|16|Pass}} • {{Item|16|Lancebreaker+|image=lancebreaker}}<br>{{Item|16|Helm Splitter|image=combat art axe}}<br>{{Item|16|Bergliez War Group|image=battalion infantry silver}} Lv 4: {{Item|16|Onslaught|image=gambit}} | |inventory24={{Item|16|Brave Axe|image=axe|type=drop}} • {{Item|16|Elixir|image=potion}}<br>{{Item|16|Born Fighter|image=heartseeker}} • {{Item|16|Fistfaire}} • {{Item|16|Axefaire}} • {{Item|16|Crit +20}} • {{Item|16|Axe Prowess Lv 5}} • {{Item|16|Desperation}} • {{Item|16|Battalion Wrath}} • {{Item|16|Pass}} • {{Item|16|Lancebreaker+|image=lancebreaker}}<br>{{Item|16|Helm Splitter|image=combat art axe}}<br>{{Item|16|Bergliez War Group|image=battalion infantry silver}} Lv 4: {{Item|16|Onslaught|image=gambit}} | ||
|notes24=• Begins moving | |notes24=• Starts on a [[Terrain/Nintendo Switch games#Fire Emblem: Three Houses|heal tile +]].<br>• Begins moving one turn after [[Linhardt]]{{hover|*|Or his replacement Bishop}} engages in combat, or if the left- or right-east [[Paladin]] is provoked.<br>• Replaced by a generic War Master without Born Fighter or [[Bergliez War Group]] and with [[Empire Pavise Co.]] if he was recruited. | ||
|- | |- | ||
|nameb=[[Death Knight]] | |nameb=[[Death Knight]] | ||
| Line 474: | Line 474: | ||
|lvb=50 | |lvb=50 | ||
|inventoryb={{Item|16|Scythe of Sariel|image=lance black}}{{hover|*|If the Death Knight was not defeated by Caspar in The Face Beneath}} • {{Item|16|Brave Lance|image=lance}}{{hover|*|If the Death Knight was defeated by Caspar in The Face Beneath}}<br>{{Item|16|Murderous Intent|image=heartseeker}} • {{Item|16|Canto}} • {{Item|16|Lancefaire}} • {{Item|16|Commander}} • {{Item|16|Counterattack}} • {{Item|16|Mastermind}} • {{Item|16|Poison Strike}} •{{Item|16|Lance Prowess Lv 5}}<br>{{Item|16|Glowing Ember|image=combat art lance}}<br>{{Item|16|Reaper Knights|image=battalion cavalry}} Lv 4: {{Item|16|Assault Troop|image=gambit}} | |inventoryb={{Item|16|Scythe of Sariel|image=lance black}}{{hover|*|If the Death Knight was not defeated by Caspar in The Face Beneath}} • {{Item|16|Brave Lance|image=lance}}{{hover|*|If the Death Knight was defeated by Caspar in The Face Beneath}}<br>{{Item|16|Murderous Intent|image=heartseeker}} • {{Item|16|Canto}} • {{Item|16|Lancefaire}} • {{Item|16|Commander}} • {{Item|16|Counterattack}} • {{Item|16|Mastermind}} • {{Item|16|Poison Strike}} •{{Item|16|Lance Prowess Lv 5}}<br>{{Item|16|Glowing Ember|image=combat art lance}}<br>{{Item|16|Reaper Knights|image=battalion cavalry}} Lv 4: {{Item|16|Assault Troop|image=gambit}} | ||
|notesb=• Begins moving if the nearby [[Warrior]], [[Fortress Knight]], or [[Dark Bishop]] is provoked | |notesb=• Starts on a [[Terrain/Nintendo Switch games#Fire Emblem: Three Houses|heal tile +]].<br>• Begins moving if the nearby [[Warrior]], [[Fortress Knight]], or [[Dark Bishop]] is provoked. | ||
|- | |- | ||
|namer1=Imperial Soldier | |namer1=Imperial Soldier | ||
Revision as of 01:10, 28 January 2020
| ||||
|

Taking Fort Merceus (Japanese: メリセウス攻防戦 Meriseus battle) is the main battle map of the twentieth chapter of Fire Emblem: Three Houses in the Azure Moon route. In this map, Fort Merceus, the Impregnable Fortress, is besieged by the army of Faerghus.
Plot
This section has been marked as a stub. Please help improve the page by adding information.
Beginning log
After saving the embattled Alliance, you march south to Empire territory. Fort Merceus, said to be impregnable, stands between you and Enbarr, the Imperial Capital.
Map data
This section has been marked as a stub. Please help improve the page by adding information.
Normal Hard
| ||||||
|
| |||||
| Victory: Defeat the Death Knight | Player | Enemy | ||||
|---|---|---|---|---|---|---|
| Defeat: Byleth or Dimitri dies*, or the player's army is routed* | 10 | 38+∞ | ||||
| ||||||


Character data
| Characters | |
|---|---|
New units
| |
| |
Available characters
| |
                              
|
Item data
| |||||||||||||||||||||
|
- Note: All stealable and dropable items are present on the generic replacements of any recruited characters
Enemy data
Normal Hard
| ||||||||||||||||||||||||||||||||||||||||||||||||||||||||||||||||||||||||||||||||||||||||||||||||||||||||||||||||||||||||||||||||||||||||||||||||||||||||||
| ||||||||||||||||||||||||||||||||||||||||||||||||||||||||||||||||||||||||||||||||||||||||||||||||||||||||||||||||||||||||||||||||||||||||||||||||||||||||||
| ||||||||||||||||||||||||||||||||||||||||||||||||||||||||||||||||||||||||||||||||||||||||||||||||||||||||||||||||||||||||||||||||||||||||||||||||||||||||||
|
Reinforcements
- Every other turn, starting turn 3
- 1 Paladin from the southeast, just south of the Paladin.
- 1 Dark Bishop from the southwest, just south of the Dark Bishop.
- Note: The reinforcements to the southeast and southwest are halted when the southeast Paladin and southwest Dark Bishop are defeated respectively.
Boss data
- Main article:
Death Knight
Normal Hard Maddening
|
|
| |||||||||||||||||||||||||||||||||||||||||||||||||||||||||||||||||||||||||||||||||||

Strategy
| This section details unofficial strategies that may help with completion of the chapter. This may not work for everybody. |
This section has been marked as a stub. Please help improve the page by adding information.
Trivia
Etymology and other languages
This section has been marked as a stub. Please help improve the page by adding information.
| Names, etymology, and in other regions | ||
|---|---|---|
| Language | Name | Definition, etymology, and notes |
| English |
Taking Fort Merceus |
-- |
| Spanish |
La toma de Fuerte Merceus |
The taking of Fort Merceus |
| French |
L'inexpugnable fort Merceus |
The impregnable fort Merceus |
| German |
Eroberung von Merceus |
Conquest of Merceus |
| Italian |
La presa del forte Merceus |
The taking of fort Merceus |
Gallery
This section has been marked as a stub. Please help improve the page by adding information.
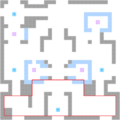
The area outlined in red is the southern area that triggers enemy movement.

References
| ← Saving Derdriu • | Taking Fort Merceus | • Assault on Enbarr → |
|---|