| Site News |
|---|
| Warning: This wiki contains spoilers. Read at your own risk! Social media: If you would like, please join our Discord server, and/or follow us on X (Twitter) or Tumblr! |
Blood of the Eagle and Lion/To War at Gronder (Azure Moon)
| This page has been marked as a stub. Please help improve the page by adding information. |
To War at Gronder (Japanese: グロンダーズの会戦 Pitched Battle of Gronders) is the main battle map of the seventeenth chapter on the Azure Moon route in Fire Emblem: Three Houses. In this map, the forces of Adrestia, Faerghus, and Leicester collide in a massive, bloody battle.
| ||||
|

Plot
This section has been marked as a stub. Please help improve the page by adding information.
Beginning log
At Gronder Field, where the Battle of the Eagle and Lion was once held, the house leaders of five years ago have a fateful reunion...but this time, the contest between the Empire, the Kingdom, and the Alliance is no mock battle.
Chapter data
| ||||||
|
| |||||
| Victory: Defeat Edelgard and Claude | Player | Enemy | Third | |||
|---|---|---|---|---|---|---|
| Defeat: Byleth or Dimitri dies* or the player's army is routed* | 10 | 22 | 10+6 | |||
| ||||||

Character data
| Characters | |
|---|---|
New units
| |
| |
Available characters
| |
                                   
|
Item data
| |||||||||||||||||||||||||||||||||||||||||||||||||||
|
- Note: Except for the Speed Ring all stealable and dropable items are present on the generic replacements of any recruited characters
Enemy data
| ||||||||||||||||||||||||||||||||||||||||||||||||||||||||||||||||||||||||||||||||||||||||||||||||||
|
Third army data
| |||||||||||||||||||||||||||||||||||||||||||||||||||||||||||||||
| |||||||||||||||||||||||||||||||||||||||||||||||||||||||||||||||
| |||||||||||||||||||||||||||||||||||||||||||||||||||||||||||||||
Reinforcements
- After any Alliance unit is attacked by any player unit, any player unit reaches the central hill or southeast region, or after Hubert is defeated and a female Fortress Knight, a Demonic Beast or Petra is defeated or Edelgard is provoked
- After any player unit reaches the central hill, any player unit reaches the central hill before provoking any Alliance unit, or after Hubert is defeated and a female Fortress Knight, a Demonic Beast or Petra is defeated or Edelgard is provoked
- 2 Pegasus Knights and Hilda from the north border of the map.
Boss data
- Main article:
Edelgard
Normal Hard Maddening
|
|
| |||||||||||||||||||||||||||||||||||||||||||||||||||||||||||||||||||||||||||||||||||

- Main article:
Claude
Normal Hard Maddening
|
|
| |||||||||||||||||||||||||||||||||||||||||||||||||||||||||||||||||||||||||||||||||||

Sub-bosses
The characters in question (sans Hubert) do not appear if they were recruited and are instead replaced by Imperial/Alliance Generals respectively.
- Due to technical limitations, the sub-bosses' stats have been split onto separate pages.
Strategy
| This section details unofficial strategies that may help with completion of the chapter. This may not work for everybody. |
This battle is like a repeat of The Battle of the Eagle and Lion in part one. However, perma-death is on this time if you play in classic, there is no reward for beating the most units, and instead of a rout the enemy objective, you only need to take out the other house leaders.
Your strategy should be to aim for Edelgard and Claude, both in their exclusive classes. Defeating both Bernadetta and Petra while trying to take the central platform will cause Edelgard to set it on fire. If this happens, move your grounded units away, and go around.
Edelgard is the harder of the two, having the Raging Flames gambit that covers a vertical 2 by horizontal 5 area of effect after initiated on the main target. She possesses Armored Effect Null to negate bonus damage from armor bonus damage weapons and gambits as well as standing on a healing tile. Try to take her out using multiple units on one turn. Be aware of her Raging Storm combat art that allows her to move and attack or use items again provided the attack hits. Note she can do this repeatedly within one turn giving her opportunities to defeat many of your units.
Claude is a little easier. Try attacking with magic where possible, exploiting his lower resistance stat. Note that he possesses Flying Effect Null, meaning that bows won't inflict bonus damage. He will call in reinforcements above and to the right of the map, so be wary of them.
Trivia
- In older versions of Three Houses, a second Hilda could appear as a reinforcement for the Alliance with the same stats that Hilda would have as an enemy; her portrait could display as someone else's if Hilda was recruited and deployed as an adjutant.
Etymology and other languages
| Names, etymology, and in other regions | ||
|---|---|---|
| Language | Name | Definition, etymology, and notes |
| English |
To War at Gronder |
-- |
| Spanish |
Choque en Gronder |
Clash in Gronder |
| French |
Retrouvailles à Gronder |
Homecomming at Gronder |
| German |
Schlacht bei Gronder |
Battle of Gronder |
| Italian |
In guerra nel Gronder |
At war in Gronder |
| Korean |
그론다즈 전투. |
Battle of Gronders |
| Simplified Chinese |
古隆达兹会战 |
Battle of Gronders |
| Traditional Chinese |
古隆達茲會戰 |
Battle of Gronders |
Gallery
This section has been marked as a stub. Please help improve the page by adding information.
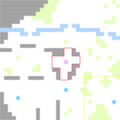
The central hill is the area outlined in red; the southeast region is the area outlined in yellow

References
| ← The Great Bridge Coup • | To War at Gronder | • Reclaiming the Capital → |
|---|