| Site News |
|---|
| Warning: This wiki contains spoilers. Read at your own risk! Social media: If you would like, please join our Discord server, and/or follow us on X (Twitter) or Tumblr! |
Blood of the Eagle and Lion/To War at Gronder (Verdant Wind): Difference between revisions
m (Text replacement - "}} Lv" to "}} Lv.") |
m (Text replacement - "}} Lv.." to "}} Lv") |
||
| Line 170: | Line 170: | ||
|lv5={{hover|33|Normal}}/{{hover|34|Hard}}/{{hover|40|Maddening}} | |lv5={{hover|33|Normal}}/{{hover|34|Hard}}/{{hover|40|Maddening}} | ||
|#5=1 | |#5=1 | ||
|inventory5={{Item|16|Horseslayer|image=lance}} • {{Item|16|Lampos Shield|image=shield|type=drop}}<br>{{Item|16|Canto}} • {{Item|16|Lancefaire}} • {{Item|16|Terrain Resistance}} • {{Item|16|Lance Prowess Lv 3}}{{hover|*|Hard only}}/{{Item|16|Lance Prowess Lv 5}}{{hover|*|Maddening only}} • {{Item|16|Swordbreaker+|image=swordbreaker}}{{hover|*|Maddening only}} • {{Item|16|Weight -3}}{{hover|*|Maddening only}}<br>{{Item|16|Empire Knights|image=battalion cavalry silver}} Lv | |inventory5={{Item|16|Horseslayer|image=lance}} • {{Item|16|Lampos Shield|image=shield|type=drop}}<br>{{Item|16|Canto}} • {{Item|16|Lancefaire}} • {{Item|16|Terrain Resistance}} • {{Item|16|Lance Prowess Lv 3}}{{hover|*|Hard only}}/{{Item|16|Lance Prowess Lv 5}}{{hover|*|Maddening only}} • {{Item|16|Swordbreaker+|image=swordbreaker}}{{hover|*|Maddening only}} • {{Item|16|Weight -3}}{{hover|*|Maddening only}}<br>{{Item|16|Empire Knights|image=battalion cavalry silver}} Lv {{hover|4|Normal}}/{{hover|5|Hard/Maddening}}: {{Item|16|Blaze|image=gambit}} | ||
|notes5=Begins moving if any Imperial unit and any Kingdom unit fight each other. | |notes5=Begins moving if any Imperial unit and any Kingdom unit fight each other. | ||
|- | |- | ||
| Line 206: | Line 206: | ||
|lv10={{hover|34|Normal}}/{{hover|35|Hard}}/{{hover|41|Maddening}} | |lv10={{hover|34|Normal}}/{{hover|35|Hard}}/{{hover|41|Maddening}} | ||
|#10=1 | |#10=1 | ||
|inventory10={{Item|16|Banshee Θ|image=dark magic}} • {{Item|16|Concoction|image=potion}} • {{Item|16|Miasma Δ|image=dark magic}} • {{Item|16|Mire Β|image=dark magic}}<br>{{Item|16|Officer Duty|image=skill gambit}} • {{Item|16|Miasma Δ|link=Miasma Δ (ability)}} • {{Item|16|Fiendish Blow}} • {{Item|16|Heartseeker}} • {{Item|16|Commander}} • {{Item|16|Paragon}} • {{Item|16|Reason Lv 3}} • {{Item|16|Authority Lv 3}}<br>{{Item|16|Vestra Sorcery Engineers|image=battalion infantry silver}} Lv | |inventory10={{Item|16|Banshee Θ|image=dark magic}} • {{Item|16|Concoction|image=potion}} • {{Item|16|Miasma Δ|image=dark magic}} • {{Item|16|Mire Β|image=dark magic}}<br>{{Item|16|Officer Duty|image=skill gambit}} • {{Item|16|Miasma Δ|link=Miasma Δ (ability)}} • {{Item|16|Fiendish Blow}} • {{Item|16|Heartseeker}} • {{Item|16|Commander}} • {{Item|16|Paragon}} • {{Item|16|Reason Lv 3}} • {{Item|16|Authority Lv 3}}<br>{{Item|16|Vestra Sorcery Engineers|image=battalion infantry silver}} Lv {{hover|4|Normal}}/{{hover|5|Hard/Maddening}}: {{Item|16|Resonant Lightning|image=gambit magic}} | ||
|notes10=Begins moving if any Imperial unit and any Kingdom unit fight each other, or if the central hill is set on fire. | |notes10=Begins moving if any Imperial unit and any Kingdom unit fight each other, or if the central hill is set on fire. | ||
|- | |- | ||
| Line 214: | Line 214: | ||
|lv11={{hover|34|Normal}}/{{hover|35|Hard}}/{{hover|41|Maddening}} | |lv11={{hover|34|Normal}}/{{hover|35|Hard}}/{{hover|41|Maddening}} | ||
|#11=1 | |#11=1 | ||
|inventory11={{Item|16|Sword of Zoltan|image=sword}} • {{Item|16|Concoction|image=potion}}<br>{{Item|16|Hunter's Boon|image=skill self buff}} • {{Item|16|Swordfaire}} • {{Item|16|Locktouch}} • {{Item|16|Stealth}} • {{Item|16|Sword Prowess Lv 4}} • {{Item|16|Alert Stance}} • {{Item|16|Keen Intuition}}<br>{{Item|16|Brigid Hunters|image=battalion infantry silver}} Lv | |inventory11={{Item|16|Sword of Zoltan|image=sword}} • {{Item|16|Concoction|image=potion}}<br>{{Item|16|Hunter's Boon|image=skill self buff}} • {{Item|16|Swordfaire}} • {{Item|16|Locktouch}} • {{Item|16|Stealth}} • {{Item|16|Sword Prowess Lv 4}} • {{Item|16|Alert Stance}} • {{Item|16|Keen Intuition}}<br>{{Item|16|Brigid Hunters|image=battalion infantry silver}} Lv {{hover|4|Normal}}/{{hover|5|Hard/Maddening}}: {{Item|16|Poison Tactic|image=gambit}} | ||
|notes11=• Begins moving if a unit reaches the central hill, or if [[Hubert]] is provoked.<br>• If a unit reached the central hill, then defeat of both her and [[Bernadetta]]{{hover|*|If she was not recruited}}/the Imperial General [[Sniper]]{{hover|*|If Bernadetta was recruited}} causes the hill to become [[Terrain/Nintendo Switch games#Fire Emblem: Three Houses|fiery floor]], and for all units on it that were not there initially to become [[File:Is ns01 status rattled.png|20px]] [[Status conditions#Rattled|rattled]].<br>• Replaced by an Imperial General Assassin without Hunter's Boon if she was recruited. | |notes11=• Begins moving if a unit reaches the central hill, or if [[Hubert]] is provoked.<br>• If a unit reached the central hill, then defeat of both her and [[Bernadetta]]{{hover|*|If she was not recruited}}/the Imperial General [[Sniper]]{{hover|*|If Bernadetta was recruited}} causes the hill to become [[Terrain/Nintendo Switch games#Fire Emblem: Three Houses|fiery floor]], and for all units on it that were not there initially to become [[File:Is ns01 status rattled.png|20px]] [[Status conditions#Rattled|rattled]].<br>• Replaced by an Imperial General Assassin without Hunter's Boon if she was recruited. | ||
|- | |- | ||
| Line 222: | Line 222: | ||
|lv12={{hover|34|Normal}}/{{hover|35|Hard}}/{{hover|41|Maddening}} | |lv12={{hover|34|Normal}}/{{hover|35|Hard}}/{{hover|41|Maddening}} | ||
|#12=1 | |#12=1 | ||
|inventory12={{Item|16|Brave Bow|image=bow|type=drop}} • {{Item|16|Concoction|image=potion}}<br>{{Item|16|Persecution Complex|image=skill self buff}} • {{Item|16|Bowfaire}} • {{Item|16|Bowrange +1}} • {{Item|16|Bow Prowess Lv 3}} • {{Item|16|Close Counter}} • {{Item|16|Vantage}} • {{Item|16|Stealth}} • {{Item|16|Magic Bind}}<br>{{Item|16|Varley Archers|image=battalion infantry silver}} Lv | |inventory12={{Item|16|Brave Bow|image=bow|type=drop}} • {{Item|16|Concoction|image=potion}}<br>{{Item|16|Persecution Complex|image=skill self buff}} • {{Item|16|Bowfaire}} • {{Item|16|Bowrange +1}} • {{Item|16|Bow Prowess Lv 3}} • {{Item|16|Close Counter}} • {{Item|16|Vantage}} • {{Item|16|Stealth}} • {{Item|16|Magic Bind}}<br>{{Item|16|Varley Archers|image=battalion infantry silver}} Lv {{hover|4|Normal}}/{{hover|5|Hard/Maddening}}: {{Item|16|Fusillade|image=gambit}} | ||
|notes12=• Immobile.<br>• Mans a [[Ballista (weapon)|Ballista]].<br>• If a unit reached the central hill, then defeat of both her and [[Petra]]{{hover|*|If she was not recruited}}/the Imperial General [[Assassin]]{{hover|*|If Petra was recruited}} causes the hill to become [[Terrain/Nintendo Switch games#Fire Emblem: Three Houses|fiery floor]], and for all units on it that were not there initially to become [[File:Is ns01 status rattled.png|20px]] [[Status conditions#Rattled|rattled]].<br>• Replaced by an Imperial General Sniper with [[Empire Pavise Co.]] instead of Varley Archers and without Persecution Complex if she was recruited. | |notes12=• Immobile.<br>• Mans a [[Ballista (weapon)|Ballista]].<br>• If a unit reached the central hill, then defeat of both her and [[Petra]]{{hover|*|If she was not recruited}}/the Imperial General [[Assassin]]{{hover|*|If Petra was recruited}} causes the hill to become [[Terrain/Nintendo Switch games#Fire Emblem: Three Houses|fiery floor]], and for all units on it that were not there initially to become [[File:Is ns01 status rattled.png|20px]] [[Status conditions#Rattled|rattled]].<br>• Replaced by an Imperial General Sniper with [[Empire Pavise Co.]] instead of Varley Archers and without Persecution Complex if she was recruited. | ||
|- | |- | ||
| Line 228: | Line 228: | ||
|classb=Armored Lord | |classb=Armored Lord | ||
|lvb={{hover|35|Normal}}/{{hover|36|Hard}}/{{hover|42|Maddening}} | |lvb={{hover|35|Normal}}/{{hover|36|Hard}}/{{hover|42|Maddening}} | ||
|inventoryb={{Item|16|Aymr|image=axe relic}} • {{Item|16|Sword of Seiros|image=sword silver}} • {{Item|16|Concoction|image=potion}} • {{Item|16|Master Seal|image=seal}}<br>{{Item|16|Imperial Lineage+}} • {{Item|16|Charm}} • {{Item|16|Axefaire}} • {{Item|16|Commander}} • {{Item|16|Counterattack}} • {{Item|16|Armored Effect Null}} • {{Item|16|Hit +20}} • {{Item|16|Axe Prowess Lv 4}}<br>{{Item|16|Raging Storm|image=combat art axe}}<br>{{Item|16|Supreme Armored Co.|image=battalion armored silver}} Lv | |inventoryb={{Item|16|Aymr|image=axe relic}} • {{Item|16|Sword of Seiros|image=sword silver}} • {{Item|16|Concoction|image=potion}} • {{Item|16|Master Seal|image=seal}}<br>{{Item|16|Imperial Lineage+}} • {{Item|16|Charm}} • {{Item|16|Axefaire}} • {{Item|16|Commander}} • {{Item|16|Counterattack}} • {{Item|16|Armored Effect Null}} • {{Item|16|Hit +20}} • {{Item|16|Axe Prowess Lv 4}}<br>{{Item|16|Raging Storm|image=combat art axe}}<br>{{Item|16|Supreme Armored Co.|image=battalion armored silver}} Lv {{hover|4|Normal}}/{{hover|5|Hard/Maddening}}: {{Item|16|Raging Flames|image=gambit}} | ||
|notesb=Starts on a [[Terrain/Nintendo Switch games#Fire Emblem: Three Houses|heal tile +]]. | |notesb=Starts on a [[Terrain/Nintendo Switch games#Fire Emblem: Three Houses|heal tile +]]. | ||
}} | }} | ||
| Line 267: | Line 267: | ||
|lv5={{hover|34|Normal}}/{{hover|35|Hard}}/{{hover|41|Maddening}} | |lv5={{hover|34|Normal}}/{{hover|35|Hard}}/{{hover|41|Maddening}} | ||
|#5=1 | |#5=1 | ||
|inventory5={{Item|16|Tomahawk|image=axe}} • {{Item|16|Speed Ring|image=ring}} • {{Item|16|Concoction|image=potion}}<br>{{Item|16|Staunch Shield|image=skill self buff}} • {{Item|16|Axefaire}} • {{Item|16|Weight -5}} • {{Item|16|Axe Prowess Lv 4}} • {{Item|16|Defiant Def}} • {{Item|16|Armored Blow}} • {{Item|16|Armored Effect Null}} • {{Item|16|Pavise}}<br>{{Item|16|Duscur Heavy Soldiers|image=battalion armored silver}} Lv | |inventory5={{Item|16|Tomahawk|image=axe}} • {{Item|16|Speed Ring|image=ring}} • {{Item|16|Concoction|image=potion}}<br>{{Item|16|Staunch Shield|image=skill self buff}} • {{Item|16|Axefaire}} • {{Item|16|Weight -5}} • {{Item|16|Axe Prowess Lv 4}} • {{Item|16|Defiant Def}} • {{Item|16|Armored Blow}} • {{Item|16|Armored Effect Null}} • {{Item|16|Pavise}}<br>{{Item|16|Duscur Heavy Soldiers|image=battalion armored silver}} Lv {{hover|4|Normal}}/{{hover|5|Hard/Maddening}}: {{Item|16|Line of Lances|image=gambit}} | ||
|- | |- | ||
|name6=[[Felix]] | |name6=[[Felix]] | ||
| Line 274: | Line 274: | ||
|lv6={{hover|34|Normal}}/{{hover|35|Hard}}/{{hover|41|Maddening}} | |lv6={{hover|34|Normal}}/{{hover|35|Hard}}/{{hover|41|Maddening}} | ||
|#6=1 | |#6=1 | ||
|inventory6={{Item|16|Sword of Moralta|image=sword silver}} • {{Item|16|Aegis Shield|image=shield relic}} • {{Item|16|Concoction|image=potion}}<br>{{Item|16|Lone Wolf|image=skill self buff}} • {{Item|16|Swordfaire}} • {{Item|16|Sword Crit +10}} • {{Item|16|Sword Prowess Lv 3}} • {{Item|16|Darting Blow}} • {{Item|16|Axebreaker+|image=axebreaker}}<br>{{Item|16|Fraldarius Soldiers|image=battalion infantry silver}} Lv | |inventory6={{Item|16|Sword of Moralta|image=sword silver}} • {{Item|16|Aegis Shield|image=shield relic}} • {{Item|16|Concoction|image=potion}}<br>{{Item|16|Lone Wolf|image=skill self buff}} • {{Item|16|Swordfaire}} • {{Item|16|Sword Crit +10}} • {{Item|16|Sword Prowess Lv 3}} • {{Item|16|Darting Blow}} • {{Item|16|Axebreaker+|image=axebreaker}}<br>{{Item|16|Fraldarius Soldiers|image=battalion infantry silver}} Lv {{hover|4|Normal}}/{{hover|5|Hard/Maddening}}: {{Item|16|Onslaught|image=gambit}} | ||
|notes6=• Begins moving if a Swordmaster is provoked.<br>• Replaced by a Kingdom General Swordmaster without [[Crests]], the Aegis Shield, or Lone Wolf if he was recruited. | |notes6=• Begins moving if a Swordmaster is provoked.<br>• Replaced by a Kingdom General Swordmaster without [[Crests]], the Aegis Shield, or Lone Wolf if he was recruited. | ||
|- | |- | ||
| Line 282: | Line 282: | ||
|lv7={{hover|34|Normal}}/{{hover|35|Hard}}/{{hover|41|Maddening}} | |lv7={{hover|34|Normal}}/{{hover|35|Hard}}/{{hover|41|Maddening}} | ||
|#7=1 | |#7=1 | ||
|inventory7={{Item|16|Seraphim|image=white magic}} • {{Item|16|Rafail Gem|image=gem relic}} • {{Item|16|Concoction|image=potion}} • {{Item|16|Heal|image=white magic}} • {{Item|16|Physic|image=white magic}}<br>{{Item|16|Live to Serve}} • {{Item|16|White Magic Uses x2}} • {{Item|16|White Magic Heal +10}} • {{Item|16|Terrain Resistance}} • {{Item|16|Faith Lv 3}} • {{Item|16|White Magic Avo +20}} • {{Item|16|Miracle}} • {{Item|16|White Magic Range +1}} • {{Item|16|Unsealable Magic}}<br>{{Item|16|Church Soldiers|image=battalion infantry silver}} Lv | |inventory7={{Item|16|Seraphim|image=white magic}} • {{Item|16|Rafail Gem|image=gem relic}} • {{Item|16|Concoction|image=potion}} • {{Item|16|Heal|image=white magic}} • {{Item|16|Physic|image=white magic}}<br>{{Item|16|Live to Serve}} • {{Item|16|White Magic Uses x2}} • {{Item|16|White Magic Heal +10}} • {{Item|16|Terrain Resistance}} • {{Item|16|Faith Lv 3}} • {{Item|16|White Magic Avo +20}} • {{Item|16|Miracle}} • {{Item|16|White Magic Range +1}} • {{Item|16|Unsealable Magic}}<br>{{Item|16|Church Soldiers|image=battalion infantry silver}} Lv {{hover|4|Normal}}/{{hover|5|Hard/Maddening}}: {{Item|16|Resonant White Magic|image=gambit support}} | ||
|notes7=• Begins moving if a [[Warlock]] is provoked.<br>• Replaced by a Kingdom General Bishop without [[Crests]], the Rafail Gem, or Live to Serve if she was recruited. | |notes7=• Begins moving if a [[Warlock]] is provoked.<br>• Replaced by a Kingdom General Bishop without [[Crests]], the Rafail Gem, or Live to Serve if she was recruited. | ||
|- | |- | ||
| Line 288: | Line 288: | ||
|classb=High Lord | |classb=High Lord | ||
|lvb={{hover|35|Normal}}/{{hover|36|Hard}}/{{hover|42|Maddening}} | |lvb={{hover|35|Normal}}/{{hover|36|Hard}}/{{hover|42|Maddening}} | ||
|inventoryb={{Item|16|Areadbhar|image=lance relic}} • {{Item|16|Concoction|image=potion}} • {{Item|16|Master Seal|image=seal}}<br>{{Item|16|Royal Lineage+}} • {{Item|16|Charm}} • {{Item|16|Lancefaire}} • {{Item|16|Commander}} • {{Item|16|Counterattack}} • {{Item|16|Lance Prowess Lv 4}} • {{Item|16|Defensive Tactics}}<br>{{Item|16|Atrocity|image=combat art lance}}<br>{{Item|16|King of Lions Corps|image=battalion infantry silver}} Lv | |inventoryb={{Item|16|Areadbhar|image=lance relic}} • {{Item|16|Concoction|image=potion}} • {{Item|16|Master Seal|image=seal}}<br>{{Item|16|Royal Lineage+}} • {{Item|16|Charm}} • {{Item|16|Lancefaire}} • {{Item|16|Commander}} • {{Item|16|Counterattack}} • {{Item|16|Lance Prowess Lv 4}} • {{Item|16|Defensive Tactics}}<br>{{Item|16|Atrocity|image=combat art lance}}<br>{{Item|16|King of Lions Corps|image=battalion infantry silver}} Lv {{hover|4|Normal}}/{{hover|5|Hard/Maddening}}: {{Item|16|Wave Attack|image=gambit}} | ||
|notesb=• Starts on a [[Terrain/Nintendo Switch games#Fire Emblem: Three Houses|heal tile +]].<br>• Begins moving if [[Mercedes]]{{hover|*|If she was not recruited}}/the Kingdom General [[Bishop]]{{hover|*|If Mercedes was recruited}} or a [[Warlock]] is provoked.<br>• He and all other third army enemies begin moving if a unit reaches the central hill, or if any Imperial unit and any Kingdom unit fight each other. | |notesb=• Starts on a [[Terrain/Nintendo Switch games#Fire Emblem: Three Houses|heal tile +]].<br>• Begins moving if [[Mercedes]]{{hover|*|If she was not recruited}}/the Kingdom General [[Bishop]]{{hover|*|If Mercedes was recruited}} or a [[Warlock]] is provoked.<br>• He and all other third army enemies begin moving if a unit reaches the central hill, or if any Imperial unit and any Kingdom unit fight each other. | ||
|- | |- | ||
| Line 308: | Line 308: | ||
|lvr3={{hover|34|Normal}}/{{hover|35|Hard}}/{{hover|41|Maddening}} | |lvr3={{hover|34|Normal}}/{{hover|35|Hard}}/{{hover|41|Maddening}} | ||
|#r3=1 | |#r3=1 | ||
|inventoryr3={{Item|16|Silver Lance|image=lance}} • {{Item|16|Concoction|image=potion}}<br>{{Item|16|Philanderer|image=rivalry}} • {{Item|16|Canto}} • {{Item|16|Lancefaire}} • {{Item|16|Terrain Resistance}} • {{Item|16|Lance Prowess Lv 3}} • {{Item|16|Death Blow}} • {{Item|16|Swordbreaker+|image=swordbreaker}} • {{Item|16|Pass}}<br>{{Item|16|Gautier Knights|image=battalion cavalry silver}} Lv | |inventoryr3={{Item|16|Silver Lance|image=lance}} • {{Item|16|Concoction|image=potion}}<br>{{Item|16|Philanderer|image=rivalry}} • {{Item|16|Canto}} • {{Item|16|Lancefaire}} • {{Item|16|Terrain Resistance}} • {{Item|16|Lance Prowess Lv 3}} • {{Item|16|Death Blow}} • {{Item|16|Swordbreaker+|image=swordbreaker}} • {{Item|16|Pass}}<br>{{Item|16|Gautier Knights|image=battalion cavalry silver}} Lv {{hover|4|Normal}}/{{hover|5|Hard/Maddening}}: {{Item|16|Stride|image=gambit support}} | ||
|notesr3=Replaced by a generic Paladin without [[Crests]] or Philanderer if he was recruited. | |notesr3=Replaced by a generic Paladin without [[Crests]] or Philanderer if he was recruited. | ||
|- | |- | ||
| Line 316: | Line 316: | ||
|lvrl={{hover|34|Normal}}/{{hover|35|Hard}}/{{hover|41|Maddening}} | |lvrl={{hover|34|Normal}}/{{hover|35|Hard}}/{{hover|41|Maddening}} | ||
|#rl=1 | |#rl=1 | ||
|inventoryrl={{Item|16|Lúin|image=lance relic}} • {{Item|16|Concoction|image=potion}}<br>{{Item|16|Lady Knight|image=skill gambit}} • {{Item|16|Canto}} • {{Item|16|Lancefaire}} • {{Item|16|Avo +10}} • {{Item|16|Lance Prowess Lv 3}} • {{Item|16|Pass}} • {{Item|16|Darting Blow}} • {{Item|16|Flying Effect Null}}<br>{{Item|16|Burning Quake|image=combat art lance}}<br>{{Item|16|Galatea Pegasus Co.|image=battalion flying silver}} Lv | |inventoryrl={{Item|16|Lúin|image=lance relic}} • {{Item|16|Concoction|image=potion}}<br>{{Item|16|Lady Knight|image=skill gambit}} • {{Item|16|Canto}} • {{Item|16|Lancefaire}} • {{Item|16|Avo +10}} • {{Item|16|Lance Prowess Lv 3}} • {{Item|16|Pass}} • {{Item|16|Darting Blow}} • {{Item|16|Flying Effect Null}}<br>{{Item|16|Burning Quake|image=combat art lance}}<br>{{Item|16|Galatea Pegasus Co.|image=battalion flying silver}} Lv {{hover|4|Normal}}/{{hover|5|Hard/Maddening}}: {{Item|16|Lure|image=gambit}} | ||
|notesrl=Replaced by a generic Pegasus Knight with a [[Silver Lance]] instead of Lúin and without [[Crests]] or Lady Knight if she was recruited. | |notesrl=Replaced by a generic Pegasus Knight with a [[Silver Lance]] instead of Lúin and without [[Crests]] or Lady Knight if she was recruited. | ||
}} | }} | ||
| Line 352: | Line 352: | ||
|skills={{Item|16|Imperial Lineage+}}<br>{{Item|16|Charm}}<br>{{Item|16|Axefaire}}<br>{{Item|16|Commander}}<br>{{Item|16|Counterattack}}<br>{{Item|16|Armored Effect Null}}<br>{{Item|16|Hit +20}}<br>{{Item|16|Axe Prowess Lv 4}} | |skills={{Item|16|Imperial Lineage+}}<br>{{Item|16|Charm}}<br>{{Item|16|Axefaire}}<br>{{Item|16|Commander}}<br>{{Item|16|Counterattack}}<br>{{Item|16|Armored Effect Null}}<br>{{Item|16|Hit +20}}<br>{{Item|16|Axe Prowess Lv 4}} | ||
|combatarts={{Item|16|Raging Storm|image=combat art axe}} | |combatarts={{Item|16|Raging Storm|image=combat art axe}} | ||
|battalion={{Item|16|Supreme Armored Co.|image=battalion armored silver}} Lv | |battalion={{Item|16|Supreme Armored Co.|image=battalion armored silver}} Lv 4<br>{{Item|16|Raging Flames|image=gambit}} | ||
|sw=A | |sw=A | ||
|la=C | |la=C | ||
| Line 381: | Line 381: | ||
|skills={{Item|16|Imperial Lineage+}}<br>{{Item|16|Charm}}<br>{{Item|16|Axefaire}}<br>{{Item|16|Commander}}<br>{{Item|16|Counterattack}}<br>{{Item|16|Armored Effect Null}}<br>{{Item|16|Hit +20}}<br>{{Item|16|Axe Prowess Lv 4}} | |skills={{Item|16|Imperial Lineage+}}<br>{{Item|16|Charm}}<br>{{Item|16|Axefaire}}<br>{{Item|16|Commander}}<br>{{Item|16|Counterattack}}<br>{{Item|16|Armored Effect Null}}<br>{{Item|16|Hit +20}}<br>{{Item|16|Axe Prowess Lv 4}} | ||
|combatarts={{Item|16|Raging Storm|image=combat art axe}} | |combatarts={{Item|16|Raging Storm|image=combat art axe}} | ||
|battalion={{Item|16|Supreme Armored Co.|image=battalion armored silver}} Lv | |battalion={{Item|16|Supreme Armored Co.|image=battalion armored silver}} Lv 5<br>{{Item|16|Raging Flames|image=gambit}} | ||
|sw=A | |sw=A | ||
|la=C | |la=C | ||
| Line 410: | Line 410: | ||
|skills={{Item|16|Imperial Lineage+}}<br>{{Item|16|Charm}}<br>{{Item|16|Axefaire}}<br>{{Item|16|Commander}}<br>{{Item|16|Counterattack}}<br>{{Item|16|Armored Effect Null}}<br>{{Item|16|Hit +20}}<br>{{Item|16|Axe Prowess Lv 4}} | |skills={{Item|16|Imperial Lineage+}}<br>{{Item|16|Charm}}<br>{{Item|16|Axefaire}}<br>{{Item|16|Commander}}<br>{{Item|16|Counterattack}}<br>{{Item|16|Armored Effect Null}}<br>{{Item|16|Hit +20}}<br>{{Item|16|Axe Prowess Lv 4}} | ||
|combatarts={{Item|16|Raging Storm|image=combat art axe}} | |combatarts={{Item|16|Raging Storm|image=combat art axe}} | ||
|battalion={{Item|16|Supreme Armored Co.|image=battalion armored silver}} Lv | |battalion={{Item|16|Supreme Armored Co.|image=battalion armored silver}} Lv 5<br>{{Item|16|Raging Flames|image=gambit}} | ||
|sw=A | |sw=A | ||
|la=C | |la=C | ||
| Line 447: | Line 447: | ||
|skills={{Item|16|Royal Lineage+}}<br>{{Item|16|Charm}}<br>{{Item|16|Lancefaire}}<br>{{Item|16|Commander}}<br>{{Item|16|Counterattack}}<br>{{Item|16|Lance Prowess Lv 4}}<br>{{Item|16|Defensive Tactics}} | |skills={{Item|16|Royal Lineage+}}<br>{{Item|16|Charm}}<br>{{Item|16|Lancefaire}}<br>{{Item|16|Commander}}<br>{{Item|16|Counterattack}}<br>{{Item|16|Lance Prowess Lv 4}}<br>{{Item|16|Defensive Tactics}} | ||
|combatarts={{Item|16|Atrocity|image=combat art lance}} | |combatarts={{Item|16|Atrocity|image=combat art lance}} | ||
|battalion={{Item|16|King of Lions Corps|image=battalion infantry silver}} Lv | |battalion={{Item|16|King of Lions Corps|image=battalion infantry silver}} Lv 4<br>{{Item|16|Wave Attack|image=gambit}} | ||
|sw=B | |sw=B | ||
|la=B | |la=B | ||
| Line 476: | Line 476: | ||
|skills={{Item|16|Royal Lineage+}}<br>{{Item|16|Charm}}<br>{{Item|16|Lancefaire}}<br>{{Item|16|Commander}}<br>{{Item|16|Counterattack}}<br>{{Item|16|Lance Prowess Lv 4}}<br>{{Item|16|Defensive Tactics}} | |skills={{Item|16|Royal Lineage+}}<br>{{Item|16|Charm}}<br>{{Item|16|Lancefaire}}<br>{{Item|16|Commander}}<br>{{Item|16|Counterattack}}<br>{{Item|16|Lance Prowess Lv 4}}<br>{{Item|16|Defensive Tactics}} | ||
|combatarts={{Item|16|Atrocity|image=combat art lance}} | |combatarts={{Item|16|Atrocity|image=combat art lance}} | ||
|battalion={{Item|16|King of Lions Corps|image=battalion infantry silver}} Lv | |battalion={{Item|16|King of Lions Corps|image=battalion infantry silver}} Lv 5<br>{{Item|16|Wave Attack|image=gambit}} | ||
|sw=B | |sw=B | ||
|la=B | |la=B | ||
| Line 505: | Line 505: | ||
|skills={{Item|16|Royal Lineage+}}<br>{{Item|16|Charm}}<br>{{Item|16|Lancefaire}}<br>{{Item|16|Commander}}<br>{{Item|16|Counterattack}}<br>{{Item|16|Lance Prowess Lv 4}}<br>{{Item|16|Defensive Tactics}} | |skills={{Item|16|Royal Lineage+}}<br>{{Item|16|Charm}}<br>{{Item|16|Lancefaire}}<br>{{Item|16|Commander}}<br>{{Item|16|Counterattack}}<br>{{Item|16|Lance Prowess Lv 4}}<br>{{Item|16|Defensive Tactics}} | ||
|combatarts={{Item|16|Atrocity|image=combat art lance}} | |combatarts={{Item|16|Atrocity|image=combat art lance}} | ||
|battalion={{Item|16|King of Lions Corps|image=battalion infantry silver}} Lv | |battalion={{Item|16|King of Lions Corps|image=battalion infantry silver}} Lv 5<br>{{Item|16|Wave Attack|image=gambit}} | ||
|sw=B | |sw=B | ||
|la=B | |la=B | ||
Revision as of 05:51, 20 January 2020
| ||||
|

To War at Gronder is the main battle map of the seventeenth chapter on the Verdant Wind route in Fire Emblem: Three Houses. In this map, the forces of Adrestia, Faerghus, and Leicester collide in a massive, bloody battle.
Map data
| ||||||
|
| |||||
| Victory: Defeat Edelgard and Dimitri | Player | Enemy | Third | |||
|---|---|---|---|---|---|---|
| Defeat: Byleth or Claude dies* or the player's army is routed* | 10 | 22 | 10+6 | |||
| ||||||

Character data
| Characters | |
|---|---|
New units
| |
| |
Available characters
| |
                            
|
Item data
| |||||||||||||||||||||||||||||||||||||||||||||||||||
|
Enemy data
| ||||||||||||||||||||||||||||||||||||||||||||||||||||||||||||||||||||||||||||||||||||||||||||||||||
|
Third army data
Reinforcements
- After a unit reaches the central hill, or if any Imperial unit and any Kingdom unit fight each other, or upon entering the southeastern region (reaching columns 22-30, rows 20-30)
- Sylvain from the northern border of the map
- 2 Paladins from the northern border of the map
- Ingrid from the eastern border of the map
- 2 Fortress Knights from the eastern border of the map
Boss data
- Main article:
Edelgard
Normal Hard Maddening
|
|
| |||||||||||||||||||||||||||||||||||||||||||||||||||||||||||||||||||||||||||||||||||

- Main article:
Dimitri
Normal Hard Maddening
|
|
| |||||||||||||||||||||||||||||||||||||||||||||||||||||||||||||||||||||||||||||||||||

Strategy
| This section details unofficial strategies that may help with completion of the chapter. This may not work for everybody. |
This section has been marked as a stub. Please help improve the page by adding information.
Trivia
Etymology and other languages
This section has been marked as a stub. Please help improve the page by adding information.
| Names, etymology, and in other regions | ||
|---|---|---|
| Language | Name | Definition, etymology, and notes |
| English |
To War at Gronder |
-- |
Gallery
This section has been marked as a stub. Please help improve the page by adding information.
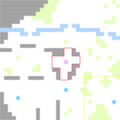
The central hill is the area outlined in red; the southeast reinforcement trigger region is the area outlined in yellow

| ← The Great Bridge Coup • | To War at Gronder | • Taking Fort Merceus → |
|---|
| Fire Emblem: Three Houses | |||||||||||||||||||||||||||||||||||||||||||||||||||||||||||||||||||||
|---|---|---|---|---|---|---|---|---|---|---|---|---|---|---|---|---|---|---|---|---|---|---|---|---|---|---|---|---|---|---|---|---|---|---|---|---|---|---|---|---|---|---|---|---|---|---|---|---|---|---|---|---|---|---|---|---|---|---|---|---|---|---|---|---|---|---|---|---|---|
| |||||||||||||||||||||||||||||||||||||||||||||||||||||||||||||||||||||