| Possessed
|
|
|
|
|
|
| “
|
At long last. I'm glad you could make it. <Prince/Princess> Corrin of Nohr. But know that so long as there is a single breath in my body, I will not let you pass. I mean that. You shall not enter our capital under any circumstances. Are you ready, dear <Brother/Sister>? Today is the day you die! Even if I must give my life to achieve it, I will not fail. I WILL kill you, Corrin! Prepare to die like the coward you are!
|
”
|
— Takumi preparing for his battle against Corrin.
|
Possessed (Japanese: 囚われし瞳 Captive Eyes) is the twenty-third chapter of the Conquest campaign in Fire Emblem Fates. In this chapter, Corrin leads their army toward the Great Wall of Suzanoh, the last major stronghold in the way between them and the Hoshidan capital. In the way is Takumi, determined not to let the one he grew up knowing as his sibling pass.
Plot
- Main article: Possessed/Script
Corrin asks Azura how Sakura is faring, to which Azura states that Sakura won't speak a word and refuses to eat, after which Corrin states that they aren't surprised considering what she had witnessed back at Fort Jinya; Corrin states that they were lucky that they were able to take Sakura, her retainers, and Yukimura as hostages, as they'd be dead if Iago and Hans weren't frightened of Xander. Corrin then asks if Sakura is being kept separate from the rest, to which Azura confirms and states that the isolation is making things harder for her before revealing that Elise has been keeping her company bringing food and blankets; Corrin states that they are surprised at that given how hostile Elise was toward Sakura back in Izumo, to which Azura states that Elise has learned to focus what she and Sakura have in common, both being the youngest princesses of their families. Azura states that Garon's men don't agree with the decision to keep the hostages alive, and that they should keep close watch over them lest something bad happen; it becomes revealed that the Nohrian army has fractioned into two, one whose allegiance lies with Corrin, Xander, Leo, and the rest of their generation, the other who swear fealty only to Garon, Iago and Hans. Azura states that conquering Hoshido is their only option to peace, but their group's methods have been called into question and they might have to deal with a rebellion; Garon being in Hoshido is convenient, but they'll be in grave danger if they lose his trust before he sits on the throne and thus the group should proceed with caution. Iago arrives on the scene and reveals that Garon has ordered the troops to mobilize immediately as they're approaching the Great Wall of Suzanoh; Iago reveals that the Great Wall of Suzanoh is the last hurdle that stands between them and the Hoshidan castle, and they'll be in the capital city once they're past. Iago reveals that his forces will lead the main charge, while Corrin is tasked with taking on their core legion led by Takumi, as revealed by Nohrian scouts recently; Iago states that there's no need to keep Takumi alive since they have Sakura hostage, and states that he knows Corrin would rather spare Takumi, but doubts that Garon would agree, to which Corrin reluctantly agrees with Iago and states that they will prepare for battle, with Iago once again talking behind Corrin's back, stating that he'll enjoy watching Corrin suffer after they have left the scene. Preparations take place at this point.
Once preparations are finished, Takumi tells Corrin that he's glad that they made it to the Great Wall of Suzanoh, but that he won't let them pass as long as he still breathes, stating that Corrin will not enter the capital under any circumstances; Takumi states that this is the day Corrin dies and that he will not fail even if he must give his life in order to do so, and tells Corrin to prepare to die like the coward they are. The battle begins at this point.
Once the battle ends, Corrin tells Takumi that the Nohrian army has seized the area and reveals that all remaining soldiers including him will be taken prisoner; Takumi is angered by his defeat and threatens that them that he hopes Corrin rots in a pit of eternal torment, but Leo steps in and states that Takumi should be grateful that they are letting him live and that he won't be treated cruelly even as a prisoner and they may even let him see Sakura if he behaves, to which Takumi is shocked by this and curses out Corrin and Leo as monsters. Corrin asks Takumi to calm himself and states that they must bind and imprison him before Garon arrives, to which Takumi warns Corrin not to touch him; Takumi blames Corrin for everything awful that's happened to Hoshido; that if it wasn't for them, none of this would have happened and nobody had to die and the Hoshidans could have stayed together as a whole family, then questions why Corrin returned to Nohr and not stay with their real family. Corrin attempts to answer, but Takumi warns them not to speak his name and states that nothing matters anymore; as Takumi starts to become shrouded in a menacing purple aura, he states that the time has come and that he can save Hoshido even without the aid of the Yato and they can't keep him prisoner and shouldn't have left him an escape route.
Takumi proceeds to fall off the wall, to Corrin's and Azura's horror; Corrin decides to run and attempt to save Takumi, to which Azura states that the area Takumi fell in isn't under Nohr's control as of yet. Corrin, frustrated at being unable to find Takumi, deduces that he must have fallen somewhere nearby; Azura states that Hoshidan soldiers could be in the direction Corrin's attempting to head. After Azura catches up with Corrin, who states that they can't find Takumi anywhere, that he's not where he fell from the wall; Azura states that such a feat is not possible, falling as far as he did would take a miracle to leave Takumi alive much less mobile, and deduces that somebody must have removed his body and that there has to be an explanation. Azura states that they don't have time to figure out what happened to Takumi, and that they need to get back to their troops, or else more innocent lives could be lost upon Garon arriving if the wall's not under their control by then; Corrin reluctantly agrees then wonders where Takumi is.
Summary
Still shocked by the massacre King Garon ordered, the group presses on toward the Great Wall of Suzanoh. Once more, an intense battle awaits them.
Chapter data
|
|
|
|
|
| Victory: Seize the throne
|
Player
|
Partner
|
Other
|
Enemy
|
Third
|
| Defeat: Corrin dies* or the player's army is routed*
|
1–15
|
{{{partner}}}
|
{{{other}}}
|
30+7
|
{{{third}}}
|
|
|
Map dimensions:
29 columns by 23 rows
|
|
|
|
|
|
|
|
| Victory: Seize the throne
|
Player
|
Partner
|
Other
|
Enemy
|
Third
|
| Defeat: Corrin dies* or the player's army is routed*
|
1–15
|
{{{partner}}}
|
{{{other}}}
|
42+10
|
{{{third}}}
|
|
|
Map dimensions:
29 columns by 23 rows
|
|
|
|
|
|
|
|
| Victory: Seize the throne
|
Player
|
Partner
|
Other
|
Enemy
|
Third
|
| Defeat: Corrin dies* or the player's army is routed*
|
1–15
|
{{{partner}}}
|
{{{other}}}
|
45+14
|
{{{third}}}
|
|
|
Map dimensions:
29 columns by 23 rows
|
|
|
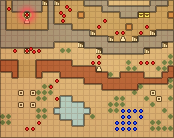
This chapter features Ballistae. They are located as follows:
- Column 5, row 4: Ballista with 3-8 Rng, 30 Mt, 125 Hit, used from its north side
- Column 17, row 12: Ballista with 3-8 Rng, 28 Mt, 120 Hit, used from its north side
- Column 21, row 7: Ballista with 3-8 Rng, 28 Mt, 120 Hit, used from its north side
This chapter features stairs that act as warp points between the rooms; by using the "Stairs" command while standing on them, a unit will be transported to the endpoint, and will be left with a movement stat = their base movement - the movement it took to reach the stairs. They are located as follows:
- Column 14, row 8–Column 16, row 6: Westernmost entrance to great wall
- Column 17, row 9–Column 19, row 7: Middle-western entrance to great wall
- Column 25, row 9–Column 23, row 7: Middle-eastern entrance to great wall (blocked by an enemy on Lunatic)
- Column 28, row 8–Column 26, row 6: Easternmost entrance to great wall (blocked by an enemy on Lunatic)
- Column 10, row 1–Column 8, row 1: Links the great wall and the boss room
Character data
Note: The returning characters list does not include any characters recruitable in paralogues or xenologues, as the player may not have taken on any available paralogue chapters yet. The list also does not include any bonus units, as they are recruitable at the player's discretion.
Item data
There are no Dragon Veins in this chapter.
Enemy data
|
|
|
|
Name
|
Class
|
Lv
|
#
|
HP
|
Str
|
Mag
|
Skill
|
Spd
|
Lck
|
Prf
|
Wlv
|
Def
|
Res
|
Cha
|
Lck
|
Con
|
Mov
|
Inventory and Skills
|

|
Takumi
|
Sniper
|
14
|
1
|
45
|
25
|
0
|
31
|
24
|
25
|
20
|
9+2
|
-
|
 Fujin Yumi • Fujin Yumi •  Goddess Icon Goddess Icon
 Competitive • Competitive •  Vengeance • Vengeance •  Point Blank Point Blank
|
• Stands on a throne, the chapter's seize point.
• Mans a Ballista.
|

|
Hoshidan
|
Sniper
|
12
|
1
|
41
|
23
|
0
|
27
|
24
|
11
|
20
|
12+2
|
-
|
Steel Yumi
 Amaterasu Amaterasu
|
| Mans a Ballista.
|
|
|
Hoshidan
|
Sniper
|
12
|
6
|
41
|
23
|
0
|
27
|
24
|
11
|
20
|
12+2
|
6
|
Steel Yumi
|
• One mans a Ballista.
• The southern two both begin moving if either of them or a nearby Sniper, Spear Master, or Basara is provoked.
• The northwestern two will not move until a unit is halfway across the bridge or beyond.
• The northeastern two move to attack if a unit is within the great wall; they return to their starting positions otherwise.
|
|
|
Hoshidan
|
Sniper
|
12
|
1
|
41
|
23
|
0
|
27
|
24
|
11
|
20
|
12+2
|
6
|
Dual Yumi
|
| Begins moving if a nearby Sniper, Spear Master, or Basara is provoked.
|

|
Hoshidan
|
Spear Master
|
12
|
2
|
42
|
26
|
0
|
25
|
23
|
11
|
20+1
|
14+1
|
6
|
 Silver Naginata Silver Naginata
|
| The southern one begins moving if a nearby Sniper, Spear Master, or Basara is provoked.
|
|
|
Hoshidan
|
Spear Master
|
12
|
4
|
42
|
26
|
0
|
25
|
23
|
11
|
20+1
|
14+1
|
6
|
Steel Naginata
|
• The southern one begins moving if a nearby Sniper, Spear Master, or Basara is provoked.
• The northeastern one begins moving if a nearby Basara, Master of Arms, or Spear Master is provoked.
• The northernmost two move to attack if a unit is within the great wall; they return to their starting positions otherwise.
|

|
Hoshidan
|
Basara
|
11
|
1
|
43
|
22
|
19
|
19
|
20
|
19
|
18+5
|
21+5
|
6
|
Guard Naginata •  Tiger Spirit Tiger Spirit
|
| Begins moving if a nearby Sniper or Spear Master is provoked.
|

|
Hinata
|
Swordmaster
|
13
|
1
|
44
|
24
|
3
|
20
|
23+1
|
26
|
23−1
|
11−1
|
6
|
 Silver Katana Silver Katana
 Triple Threat • Triple Threat •  Armored Blow Armored Blow
|
• Starts on a gate.
• Will not move until a unit is halfway across the bridge or beyond.
|
|
|
Hoshidan
|
Spear Master
|
12
|
2
|
42
|
26+3
|
0
|
25+3
|
23+2
|
11
|
20+1
|
14+1
|
6
|
Steel Naginata
 Rally Defense • Amaterasu Rally Defense • Amaterasu
|
• Paired up together.
• Will not move until a unit is halfway across the bridge or beyond.
|
|
|
Hoshidan
|
Basara
|
11
|
1
|
43
|
22
|
19
|
19
|
20+1
|
19
|
18
|
21
|
6
|
Tiger Spirit • Steel Naginata
|
| Will not move until he or the nearby Basara is fought.
|
|
|
Hoshidan
|
Basara
|
11
|
1
|
43
|
22
|
19
|
19
|
20
|
19
|
18
|
21+1
|
6
|
Rabbit Spirit • Steel Naginata
|
| Will not move until he or the nearby Basara is fought.
|

|
Hoshidan
|
Master of Arms
|
11
|
1
|
43
|
24
|
0
|
21
|
20
|
12
|
22
|
11
|
6
|
 Silver Club • Wakizashi • Steel Naginata Silver Club • Wakizashi • Steel Naginata
 Rally Strength • Rally Defense Rally Strength • Rally Defense
|
| Begins moving if a nearby Basara or Spear Master is provoked.
|
|
|
Hoshidan
|
Spear Master
|
12
|
1
|
42
|
26
|
0
|
25
|
23
|
11
|
20+1
|
14+1
|
6
|
Steel Naginata •  Spear Spear
|
| Begins moving if a nearby Basara, Master of Arms, or Spear Master is provoked.
|
|
|
Hoshidan
|
Basara
|
11
|
1
|
43
|
22
|
19
|
19
|
20+1
|
19
|
18+1
|
21
|
6
|
Calamity Gate • Steel Naginata
|
| Moves to attack if a unit is within the great wall; returns to his starting position otherwise.
|
|
|
Hoshidan
|
Basara
|
11
|
1
|
43
|
22
|
19
|
19
|
20+1
|
19
|
18
|
21
|
6
|
Tiger Spirit • Dual Naginata
|
| Moves to attack if a unit is within the great wall; returns to his starting position otherwise.
|

|
Oboro
|
Spear Master
|
13
|
1
|
40
|
27
|
4
|
26
|
25
|
22+5
|
25+1
|
16+4
|
6
|
Silver Naginata
 Nohr Enmity • Nohr Enmity •  Warding Blow Warding Blow
|
• Lead unit of pair up with a Basara.
• Moves to attack if a unit is within the great wall; returns to her starting position otherwise.
|
|
|
Hoshidan
|
Basara
|
11
|
1
|
43
|
22+3
|
19
|
19+3
|
20+3
|
19
|
18
|
21
|
6
|
Tiger Spirit • Steel Naginata
|
• Supporting unit of pair up with Oboro.
• Moves to attack if a unit is within the great wall; returns to his starting position otherwise.
|
|
|
Hoshidan
|
Master of Arms
|
11
|
1
|
43
|
24+2
|
0
|
21+2
|
20+3
|
12
|
22+1
|
11−1
|
6
|
Wakizashi • Steel Naginata • Steel Club
|
• Lead unit of pair up with another Master of Arms.
• Moves to attack if a unit is within the great wall; returns to his starting position otherwise.
|
|
|
Hoshidan
|
Master of Arms
|
11
|
1
|
43
|
24+2
|
0
|
21+2
|
20+2
|
12
|
22+2
|
11
|
6
|
Battering Club • Steel Katana • Steel Naginata
|
• Supporting unit of pair up with another Master of Arms.
• Moves to attack if a unit is within the great wall; returns to his starting position otherwise.
|
|
|
Hoshidan
|
Sniper
|
12
|
1
|
41
|
23
|
0
|
27
|
24
|
11
|
20
|
12+2
|
6
|
Silver Yumi
|
| Moves to attack if a unit is in range; returns to his starting position otherwise.
|
|
|
|
|
|
|
|
|
|
Name
|
Class
|
Lv
|
#
|
HP
|
Str
|
Mag
|
Skill
|
Spd
|
Lck
|
Prf
|
Wlv
|
Def
|
Res
|
Cha
|
Lck
|
Con
|
Mov
|
Inventory and Skills
|
|
|
Takumi
|
Sniper
|
14
|
1
|
51
|
29
|
0
|
37
|
28
|
25
|
24
|
11+2
|
-
|
Fujin Yumi • Goddess Icon
Competitive •  Rend Heaven • Vengeance • Rend Heaven • Vengeance •  Bowfaire • Point Blank Bowfaire • Point Blank
|
• Stands on a throne, the chapter's seize point.
• Mans a Ballista.
|
|
|
Hoshidan
|
Sniper
|
12
|
1
|
44
|
25
|
0
|
30
|
26
|
11
|
22
|
14+2
|
-
|
Steel Hankyu
Amaterasu
|
| Mans a Ballista.
|
|
|
Hoshidan
|
Sniper
|
12
|
3
|
44
|
25
|
0
|
30
|
26
|
11
|
22
|
14+2
|
6
|
Steel Yumi
 Counter Counter
|
• The southern two both begin moving if either of them or a nearby Sniper, Spear Master, or Basara is provoked.
• The northern one will not move until a unit is halfway across the bridge or beyond.
|
|
|
Hoshidan
|
Sniper
|
12
|
1
|
44
|
25
|
0
|
30
|
26
|
11
|
22
|
14+2
|
6
|
Dual Yumi
Counter
|
| Begins moving if a nearby Sniper, Spear Master, or Basara is provoked.
|
|
|
Hoshidan
|
Sniper
|
12
|
2
|
44
|
25
|
0
|
30
|
26
|
11
|
22
|
14+2
|
6
|
Silver Yumi
Counter
|
• The southern one begins moving if a nearby Sniper, Spear Master, or Basara is provoked.
• The northern one moves to attack if a unit is in range; he returns to his starting position otherwise.
|
|
|
Hoshidan
|
Spear Master
|
12
|
1
|
45
|
28
|
0
|
27
|
25
|
11
|
22+1
|
16+1
|
6
|
Silver Naginata
 Duelist's Blow Duelist's Blow
|
| Begins moving if a nearby Sniper, Spear Master, or Basara is provoked.
|
|
|
Hoshidan
|
Spear Master
|
12
|
1
|
45
|
28
|
0
|
27
|
25
|
11
|
22+1
|
16+1
|
6
|
Steel Naginata
Rally Defense
|
| Begins moving if a nearby Sniper, Spear Master, or Basara is provoked.
|
|
|
Hoshidan
|
Basara
|
11
|
1
|
46
|
24
|
21
|
20
|
22+1
|
19
|
20
|
23
|
6
|
Tiger Spirit • Steel Naginata
Rally Strength
|
| Begins moving if a nearby Sniper, Spear Master, or Basara is provoked.
|
|
|
Hoshidan
|
Basara
|
11
|
1
|
46
|
24
|
21
|
20
|
22
|
19
|
20+5
|
23+5
|
6
|
Guard Naginata • Tiger Spirit
Duelist's Blow
|
| Begins moving if a nearby Sniper, Spear Master, or Basara is provoked.
|
|
|
Hinata
|
Swordmaster
|
13
|
1
|
48
|
27
|
3
|
21
|
26+1
|
26
|
25−1
|
13−1
|
6
|
Silver Katana
Triple Threat •  Sol • Sol •  Countermagic • Armored Blow Countermagic • Armored Blow
|
• Starts on a gate.
• Will not move until a unit is halfway across the bridge or beyond.
|
|
|
Hoshidan
|
Spear Master
|
12
|
1
|
45
|
28
|
0
|
27
|
25
|
11
|
22+5
|
16+5
|
6
|
Guard Naginata
Rally Strength • Amaterasu
|
| Will not move until a unit is halfway across the bridge or beyond.
|
|
|
Hoshidan
|
Spear Master
|
12
|
2
|
45
|
28+3
|
0
|
27+3
|
25+2
|
11
|
22+1
|
16+1
|
6
|
Steel Naginata
Rally Defense • Amaterasu
|
• Paired up together.
• Will not move until a unit is halfway across the bridge or beyond.
|
|
|
Hoshidan
|
Sniper
|
12
|
2
|
44
|
25+2
|
0
|
30+3
|
26+3
|
11
|
22
|
14+2
|
6
|
Steel Yumi
Counter
|
• Paired up together.
• Will not move until a unit is halfway across the bridge or beyond.
|
|
|
Hoshidan
|
Basara
|
11
|
1
|
46
|
24
|
21
|
20
|
22+1
|
19
|
20
|
23
|
6
|
Tiger Spirit • Steel Naginata
Armored Blow
|
| Will not move until he or a nearby Basara is fought.
|
|
|
Hoshidan
|
Basara
|
11
|
2
|
46
|
24
|
21
|
20
|
22
|
19
|
20
|
23+1
|
6
|
Rabbit Spirit • Steel Naginata
Armored Blow
|
| The southern one will not move until he or a nearby Basara is fought.
|
|
|
Hoshidan
|
Basara
|
11
|
1
|
46
|
24
|
21
|
20
|
22+1
|
19
|
20
|
23
|
6
|
Tiger Spirit • Steel Naginata
 Life and Death Life and Death
|
| Will not move until he or a nearby Basara is fought.
|
|
|
Hoshidan
|
Master of Arms
|
11
|
1
|
46
|
26
|
0
|
22
|
22
|
12
|
24
|
13
|
6
|
Silver Club • Wakizashi • Steel Naginata
Rally Strength • Rally Defense
|
| Begins moving if a nearby Basara or Spear Master is provoked.
|
|
|
Hoshidan
|
Spear Master
|
12
|
1
|
45
|
28
|
0
|
27
|
25
|
11
|
22+1
|
16+1
|
6
|
Steel Naginata • Spear
 Quick Draw Quick Draw
|
| Begins moving if a nearby Basara, Master of Arms, or Spear Master is fought.
|
|
|
Hoshidan
|
Spear Master
|
12
|
1
|
45
|
28
|
0
|
27
|
25
|
11
|
22+1
|
16+1
|
6
|
Silver Naginata
Quick Draw
|
| Begins moving if a nearby Basara, Master of Arms, or Spear Master is fought.
|
|
|
Hoshidan
|
Spear Master
|
12
|
1
|
45
|
28
|
0
|
27
|
25
|
11
|
22+1
|
16+1
|
6
|
Steel Naginata
Quick Draw
|
| Begins moving if a nearby Basara, Master of Arms, or Spear Master is fought.
|
|
|
Hoshidan
|
Sniper
|
12
|
1
|
44
|
25
|
0
|
30
|
26
|
11
|
22
|
14+2
|
6
|
Steel Yumi
Amaterasu
|
• Mans a Ballista.
• Moves to attack if a unit is within the great wall; returns to his starting position otherwise.
|
|
|
Hoshidan
|
Sniper
|
12
|
1
|
44
|
25
|
0
|
30
|
26
|
11
|
22
|
14+2
|
6
|
Silver Yumi
Amaterasu
|
| Moves to attack if a unit is within the great wall; returns to his starting position otherwise.
|
|
|
Hoshidan
|
Sniper
|
12
|
2
|
44
|
25
|
0
|
30
|
26
|
11
|
22
|
14+2
|
6
|
Silver Yumi
 Strong Riposte Strong Riposte
|
| Moves to attack if a unit is within the great wall; returns to his starting position otherwise.
|
|
|
Hoshidan
|
Basara
|
11
|
1
|
46
|
24
|
21
|
20
|
22+1
|
19
|
20+1
|
23
|
6
|
Calamity Gate • Steel Naginata
Duelist's Blow
|
| Moves to attack if a unit is within the great wall; returns to his starting position otherwise.
|
|
|
Hoshidan
|
Basara
|
11
|
1
|
46
|
24
|
21
|
20
|
22+1
|
19
|
20
|
23
|
6
|
Tiger Spirit • Dual Naginata
Duelist's Blow
|
| Moves to attack if a unit is within the great wall; returns to his starting position otherwise.
|
|
|
Hoshidan
|
Spear Master
|
12
|
1
|
45
|
28
|
0
|
27
|
25
|
11
|
22+1
|
16+1
|
6
|
Silver Naginata
 Lunge Lunge
|
| Moves to attack if a unit is within the great wall; returns to his starting position otherwise.
|
|
|
Hoshidan
|
Spear Master
|
12
|
1
|
45
|
28
|
0
|
27
|
25
|
11
|
22+1
|
16+1
|
6
|
Steel Naginata
Lunge
|
| Moves to attack if a unit is within the great wall; returns to his starting position otherwise.
|
|
|
Oboro
|
Spear Master
|
13
|
1
|
44
|
31
|
4
|
28
|
28
|
22+5
|
28+1
|
18+4
|
6
|
Silver Naginata
Nohr Enmity •  Luna • Counter • Warding Blow Luna • Counter • Warding Blow
|
• Lead unit of pair up with a Basara.
• Moves to attack if a unit is within the great wall; returns to her starting position otherwise.
|
|
|
Hoshidan
|
Basara
|
11
|
1
|
46
|
24+3
|
21
|
20+3
|
22+3
|
19
|
20
|
23
|
6
|
Tiger Spirit • Steel Naginata
Armored Blow
|
• Supporting unit of pair up with Oboro.
• Moves to attack if a unit is within the great wall; returns to his starting position otherwise.
|
|
|
Hoshidan
|
Master of Arms
|
11
|
1
|
46
|
26+2
|
0
|
22+2
|
22+3
|
12
|
24+1
|
13−1
|
6
|
Wakizashi • Steel Naginata • Steel Club
 Seal Strength Seal Strength
|
• Lead unit of pair up with another Master of Arms.
• Moves to attack if a unit is within the great wall; returns to his starting position otherwise.
|
|
|
Hoshidan
|
Master of Arms
|
11
|
1
|
46
|
26+2
|
0
|
22+2
|
22+2
|
12
|
24+2
|
13
|
6
|
Battering Club • Steel Katana • Steel Naginata
Seal Strength
|
• Supporting unit of pair up with another Master of Arms.
• Moves to attack if a unit is within the great wall; returns to his starting position otherwise.
|
|
|
Hoshidan
|
Spear Master
|
12
|
1
|
45
|
28+3
|
0
|
27+3
|
25+2
|
11
|
22+1
|
16+1
|
6
|
Steel Naginata • Swordcatcher
 Seal Defense Seal Defense
|
• Lead unit of pair up with another Spear Master.
• Moves to attack if a unit is within the great wall; returns to his starting position otherwise.
|
|
|
Hoshidan
|
Spear Master
|
12
|
1
|
45
|
28+3
|
0
|
27+3
|
25+2
|
11
|
22+1
|
16+1
|
6
|
Silver Naginata
Seal Defense
|
• Supporting unit of pair up with another Spear Master.
• Moves to attack if a unit is within the great wall; returns to his starting position otherwise.
|
|
|
Hoshidan
|
Spear Master
|
12
|
2
|
45
|
28+3
|
0
|
27+3
|
25+2
|
11
|
22+1
|
16+1
|
6
|
Silver Naginata
Lunge
|
• Paired up together.
• Moves to attack if a unit is in range; returns to his starting position otherwise.
|
|
|
|
|
|
|
|
|
|
Name
|
Class
|
Lv
|
#
|
HP
|
Str
|
Mag
|
Skill
|
Spd
|
Lck
|
Prf
|
Wlv
|
Def
|
Res
|
Cha
|
Lck
|
Con
|
Mov
|
Inventory and Skills
|
|
|
Takumi
|
Sniper
|
14
|
1
|
51
|
29
|
0
|
37
|
28
|
25
|
24
|
11+2
|
-
|
Fujin Yumi • Goddess Icon
Competitive • Rend Heaven • Vengeance • Bowfaire • Point Blank
|
• Stands on a throne, the chapter's seize point.
• Mans a Ballista.
|
|
|
Hoshidan
|
Sniper
|
12
|
1
|
44
|
25
|
0
|
30
|
26
|
11
|
22
|
14+2
|
-
|
Silver Hankyu
Amaterasu
|
| Mans a Ballista.
|
|
|
Hoshidan
|
Sniper
|
12
|
2
|
44
|
25
|
0
|
30
|
26
|
11
|
22
|
14+2
|
6
|
Silver Yumi
Counter • Lunge
|
| Begins moving if a nearby Sniper, Spear Master, or Basara is provoked.
|
|
|
Hoshidan
|
Sniper
|
12
|
1
|
44
|
25
|
0
|
30
|
26
|
11
|
22
|
14+2
|
6
|
Dual Yumi
Counter • Lunge
|
| Begins moving if a nearby Sniper, Spear Master, or Basara is provoked.
|
|
|
Hoshidan
|
Sniper
|
12
|
1
|
44
|
25
|
0
|
30
|
26
|
11
|
22
|
14+2
|
6
|
Steel Yumi
Counter • Lunge
|
| Begins moving if a nearby Sniper, Spear Master, or Basara is provoked.
|
|
|
Hoshidan
|
Spear Master
|
12
|
1
|
45
|
28
|
0
|
27
|
25
|
11
|
22+1
|
16+1
|
6
|
Silver Naginata
Lunge • Duelist's Blow
|
| Begins moving if a nearby Sniper, Spear Master, or Basara is provoked.
|
|
|
Hoshidan
|
Spear Master
|
12
|
1
|
45
|
28
|
0
|
27
|
25
|
11
|
22+1
|
16+1
|
6
|
Steel Naginata
Rally Defense • Lunge
|
| Begins moving if a nearby Sniper, Spear Master, or Basara is provoked.
|
|
|
Hoshidan
|
Basara
|
11
|
1
|
46
|
24
|
21
|
20
|
22+1
|
19
|
20
|
23
|
6
|
Tiger Spirit • Steel Naginata
Rally Strength • Lunge
|
| Begins moving if a nearby Sniper, Spear Master, or Basara is provoked.
|
|
|
Hoshidan
|
Basara
|
11
|
1
|
46
|
24
|
21
|
20
|
22
|
19
|
20+5
|
23+5
|
6
|
Guard Naginata • Rabbit Spirit
Lunge • Duelist's Blow
|
| Begins moving if a nearby Sniper, Spear Master, or Basara is provoked.
|
|
|
Hinata
|
Swordmaster
|
13
|
1
|
48
|
27
|
3
|
21
|
26+1
|
26
|
25−1
|
13−1
|
6
|
Silver Katana
Triple Threat • Sol • Countermagic • Armored Blow
|
• Starts on a gate.
• Will not move until a unit is halfway across the bridge or beyond.
|
|
|
Hoshidan
|
Spear Master
|
12
|
1
|
45
|
28
|
0
|
27
|
25
|
11
|
22+1
|
16+1
|
6
|
Silver Naginata • Swordcatcher
Seal Defense • Quick Draw • Duelist's Blow
|
| Will not move until a unit is halfway across the bridge or beyond.
|
|
|
Hoshidan
|
Spear Master
|
12
|
1
|
45
|
28
|
0
|
27
|
25
|
11
|
22+5
|
16+5
|
6
|
Guard Naginata • Silver Naginata
Rally Strength •  Rally Skill • Rally Skill •  Rally Speed • Amaterasu Rally Speed • Amaterasu
|
| Will not move until a unit is halfway across the bridge or beyond.
|
|
|
Hoshidan
|
Spear Master
|
12
|
1
|
45
|
28+3
|
0
|
27+3
|
25+2
|
11
|
22+1
|
16+1
|
6
|
Steel Naginata • Silver Naginata
 Rally Luck • Rally Defense • Rally Luck • Rally Defense •  Rally Resistance • Amaterasu Rally Resistance • Amaterasu
|
• Lead unit of pair up with another Spear Master.
• Will not move until a unit is halfway across the bridge or beyond.
|
|
|
Hoshidan
|
Spear Master
|
12
|
1
|
45
|
28+3
|
0
|
27+3
|
25+2
|
11
|
22+1
|
16+1
|
6
|
Steel Naginata
Rally Luck • Rally Defense • Rally Resistance • Amaterasu
|
• Supporting unit of pair up with another Spear Master.
• Will not move until a unit is halfway across the bridge or beyond.
|
|
|
Hoshidan
|
Sniper
|
12
|
1
|
44
|
25+2
|
0
|
30+3
|
26+3
|
11
|
22
|
14+2
|
6
|
Steel Yumi
Counter
|
• Lead unit of pair up with another Sniper.
• Will not move until a unit is halfway across the bridge or beyond.
|
|
|
Hoshidan
|
Sniper
|
12
|
1
|
44
|
25+2
|
0
|
30+3
|
26+3
|
11
|
22
|
14+2
|
6
|
Silver Yumi
Counter • Life and Death
|
• Supporting unit of pair up with another Sniper.
• Will not move until a unit is halfway across the bridge or beyond.
|
|
|
Hoshidan
|
Sniper
|
12
|
2
|
44
|
25
|
0
|
30
|
26
|
11
|
22
|
14+2
|
6
|
Silver Yumi
Counter
|
• The southern one will not move until a unit is halfway across the bridge or beyond.
• The northern one moves to attack if a unit is in range; he returns to his starting position otherwise.
|
|
|
Hoshidan
|
Basara
|
11
|
1
|
46
|
24
|
21
|
20
|
22+1
|
19
|
20
|
23
|
6
|
Tiger Spirit • Steel Naginata
Armored Blow
|
| Will not move until he or a nearby Basara is fought.
|
|
|
Hoshidan
|
Basara
|
11
|
2
|
46
|
24
|
21
|
20
|
22
|
19
|
20
|
23+1
|
6
|
Rabbit Spirit • Steel Naginata
Armored Blow
|
• The southern one will not move until he or a nearby Basara is fought.
• The northern one moves to attack if a unit is within the great wall; he returns to his starting position otherwise.
|
|
|
Hoshidan
|
Basara
|
11
|
1
|
46
|
24
|
21
|
20
|
22
|
19
|
20
|
23+1
|
6
|
Rabbit Spirit • Steel Naginata
Life and Death
|
| Will not move until he or a nearby Basara is fought.
|
|
|
Hoshidan
|
Master of Arms
|
11
|
1
|
46
|
26
|
0
|
22
|
22
|
12
|
24
|
13
|
6
|
Silver Club • Wakizashi • Steel Naginata
Rally Strength • Rally Speed • Rally Defense • Rally Resistance
|
| Begins moving if a nearby Basara or Spear Master is provoked.
|
|
|
Hoshidan
|
Spear Master
|
12
|
1
|
45
|
28
|
0
|
27
|
25
|
11
|
22+1
|
16+1
|
6
|
Steel Naginata • Spear
Quick Draw
|
| Begins moving if a nearby Basara, Master of Arms, or Spear Master is provoked.
|
|
|
Hoshidan
|
Spear Master
|
12
|
2
|
45
|
28
|
0
|
27
|
25
|
11
|
22+1
|
16+1
|
6
|
Silver Naginata
Quick Draw
|
| Begins moving if a nearby Basara, Master of Arms, or Spear Master is provoked.
|
|
|
Hoshidan
|
Sniper
|
12
|
1
|
44
|
25
|
0
|
30
|
26
|
11
|
22
|
14+2
|
6
|
Steel Yumi
Amaterasu
|
• Mans a Ballista.
• Moves to attack if a unit is within the great wall; returns to his starting position otherwise.
|
|
|
Hoshidan
|
Sniper
|
12
|
1
|
44
|
25
|
0
|
30
|
26
|
11
|
22
|
14+2
|
6
|
Silver Yumi
Amaterasu
|
| Moves to attack if a unit is within the great wall; returns to his starting position otherwise.
|
|
|
Hoshidan
|
Sniper
|
12
|
2
|
44
|
25
|
0
|
30
|
26
|
11
|
22
|
14+2
|
6
|
Silver Yumi
Counter • Strong Riposte
|
| Moves to attack if a unit is within the great wall; returns to his starting position otherwise.
|
|
|
Hoshidan
|
Basara
|
11
|
1
|
46
|
24
|
21
|
20
|
22+1
|
19
|
20+1
|
23
|
6
|
Calamity Gate • Silver Naginata
Duelist's Blow
|
• Blocks one of the stairways leading into the great wall.
• Moves to attack if a unit is within the great wall; returns to his starting position otherwise.
|
|
|
Hoshidan
|
Basara
|
11
|
1
|
46
|
24
|
21
|
20
|
22
|
19
|
20
|
23+1
|
6
|
Rabbit Spirit • Dual Naginata
Duelist's Blow
|
• Blocks one of the stairways leading into the great wall.
• Moves to attack if a unit is within the great wall; returns to his starting position otherwise.
|
|
|
Hoshidan
|
Spear Master
|
12
|
2
|
45
|
28
|
0
|
27
|
25
|
11
|
22+1
|
16+1
|
6
|
Silver Naginata
Seal Defense • Lunge
|
| Moves to attack if a unit is within the great wall; returns to his starting position otherwise.
|
|
|
Hoshidan
|
Spear Master
|
12
|
1
|
45
|
28
|
0
|
27
|
25
|
11
|
22+1
|
16+1
|
6
|
Steel Naginata • Spear
Seal Defense • Lunge
|
| Moves to attack if a unit is within the great wall; returns to his starting position otherwise.
|
|
|
Oboro
|
Spear Master
|
13
|
1
|
44
|
31
|
4
|
28
|
28
|
22+5
|
28+1
|
18+4
|
6
|
Silver Naginata
Nohr Enmity • Luna • Counter • Warding Blow
|
• Lead unit of pair up with a Basara.
• Moves to attack if a unit is within the great wall; returns to her starting position otherwise.
|
|
|
Hoshidan
|
Basara
|
11
|
1
|
46
|
24+3
|
21
|
20+3
|
22+2
|
19
|
20
|
23+1
|
6
|
Rabbit Spirit • Steel Naginata
Armored Blow
|
• Supporting unit of pair up with Oboro.
• Moves to attack if a unit is within the great wall; returns to his starting position otherwise.
|
|
|
Hoshidan
|
Master of Arms
|
11
|
1
|
46
|
26+2
|
0
|
22+2
|
22+3
|
12
|
24+1
|
13−1
|
6
|
Wakizashi • Silver Naginata • Steel Club
Seal Strength
|
• Lead unit of pair up with another Master of Arms.
• Moves to attack if a unit is within the great wall; returns to his starting position otherwise.
|
|
|
Hoshidan
|
Master of Arms
|
11
|
1
|
46
|
26+2
|
0
|
22+2
|
22+2
|
12
|
24+2
|
13
|
6
|
Battering Club • Silver Katana • Steel Naginata
Seal Strength
|
• Supporting unit of pair up with another Master of Arms.
• Moves to attack if a unit is within the great wall; returns to his starting position otherwise.
|
|
|
Hoshidan
|
Spear Master
|
12
|
1
|
45
|
28+3
|
0
|
27+3
|
25+2
|
11
|
22+1
|
16+1
|
6
|
Steel Naginata • Swordcatcher
Seal Defense • Lunge
|
• Lead unit of pair up with another Seal Defense Spear Master.
• Moves to attack if a unit is within the great wall; returns to his starting position otherwise.
|
|
|
Hoshidan
|
Spear Master
|
12
|
1
|
45
|
28+3
|
0
|
27+3
|
25+2
|
11
|
22+1
|
16+1
|
6
|
Silver Naginata
Seal Defense • Lunge
|
• Supporting unit of pair up with another Seal Defense Spear Master.
• Moves to attack if a unit is within the great wall; returns to his starting position otherwise.
|
|
|
Hoshidan
|
Spear Master
|
12
|
2
|
45
|
28+3
|
0
|
27+3
|
25+2
|
11
|
22+1
|
16+1
|
6
|
Silver Naginata
Seal Strength • Seal Defense • Lunge
|
• Paired up together.
• Moves to attack if a unit is in range; returns to his starting position otherwise.
|
|
|
Hoshidan
|
Basara
|
11
|
1
|
46
|
24
|
21
|
20
|
22
|
19
|
20
|
23+1
|
6
|
Rabbit Spirit • Steel Naginata
Duelist's Blow
|
| Moves to attack if a unit is in range; returns to his starting position otherwise.
|
|
|
|
|
|
Reinforcements
- After any of the southwestern enemies is provoked
- 1 Sniper from the northwestern of the four western forts (Hard/Lunatic only)
- 1 Sniper from the northeastern of the four western forts
- 2 Basaras from the two southern of the four western forts
- After the multi-rally Master of Arms or an enemy nearby him is provoked
Boss data
- Main article: Takumi
Strategy
| This section details unofficial strategies that may help with completion of the chapter. This may not work for everybody.
|
Your first order of business is taking out the guys on the south side of the bridge. Xander should have no trouble dealing with the squad of Snipers; just beware their Counter skills. The rest of your units should bum rush the four guys in the southwest corner and the four reinforcements that come out of the forts. Once they're dead, it's time to deal with Hinata. It is important to note that Hinata's squad, and Hinata himself, will not move until a unit is halfway across the bridge or beyond; this will result in the entire squad beginning to move. Their squad can be avoided altogether by flying across the chasm out of their attack range, though this will trigger a squad of reinforcements. If you plan on fighting him, send your bulkiest unit, preferably hopped up on Defense-boosters such as tonics, Rally Defense, and meals, to aggro them. If your tank survives, preferable taking a few of Hinata's goons out in the process, rush the survivors. Once they're dead, leave some units on the northwest, northeast, and southeast forts, as well as the gate where Hinata was parked, to block the reinforcements that spawn when you pick a fight with the next group of enemies. Send someone to take out the Basaras. They're a bit stupid, and will often try to Dual Strike with the Sniper manning the ballista even if they could do more damage with their naginatas.
Further to the east stands the man, the myth, the legend himself: Rallyman. Though just a simple Master of Arms, he possesses several powerful rally skills: Rally Strength and Rally Defense on all difficulties, as well as Rally Speed and Rally Resistance exclusively on Lunatic. Though other units can learn the former two normally, the classes that do (Berserker and Wyvern Lord respectively) are typically the kind of unit that wants to be the one receiving those bonuses instead of giving them. Rally Speed is even rarer, with very few units in Conquest being able to reclass to its requisite class (Falcon Knight). Being a dedicated unit that can do both at once makes him a valuable support unit, and one that will prove quite worthwhile to capture. If you wish to capture him, be sure to have units that can deal with his partners, as well as Azura ready to refresh Niles in case he misses his finishing blow. It can be worth giving Niles the Shining Bow to make things easier, as Masters of Arms have considerably lower resistance than defense. Fire tomes and the Flame Shuriken are very good at weakening him without killing him since they hit his resistance and can't crit or trigger offensive skills.
The hardest part of the map is actually storming the Great Wall of Suzanoh. Snipers, Basaras, and Spear Masters up the wazoo are waiting to eviscerate anyone who dares profane Hoshido's soil. If you have a tank strong enough to survive the onslaught, you're in good shape. If not, your best bet is to bum-rush the right side and try to take control of it. If you can pull this off, you can use hit and run tactics to take out Oboro and her flunkies. This leaves Takumi and his toadies. Takumi is a little bit stupid and likes to drop ballista arrows on your weak units and fliers, even if he can engage in combat with the Fujin Yumi. Beware, however, as Takumi will attack you directly instead of firing his ballista if he can see a kill. Use someone squishy like Elise or Azura to draw his fire while a tank goes in and cleans out the minions. Then you can take out Takumi himself. If you have a level 15 Sorcerer with Bowbreaker, he's a total chump. Otherwise, Xander or a tanky Corrin are probably your best bets.
Trivia
- This chapter's map is later recycled into the DLC chapter IV: Light's Sacrifice, in the Heirs of Fate saga.
- The Master of Arms initially at column 25, row 9 has become popular among the fandom as the "Rallyman" due to the fact that, on Lunatic mode, he comes with four of the game's Rally skills (he has two on the lower difficulties).
- When fighting against Takumi during this chapter, the song "Puppet's Feast" plays instead of "You of the Light" that typically plays when facing against Hoshidan royalty. This is foreshadowing how Takumi is slowly being possessed by Anankos. This was also seen earler in Chapter 13.
- The name of the chapter also hints at Takumi's possession by Anankos.
Etymology and other languages
| Names, etymology, and in other regions
|
| Language
|
Name
|
Definition, etymology, and notes
|
| English
|
Possessed
|
--
|
| Japanese
|
囚われし瞳
|
Captive Eyes
|
| Spanish
|
Posesión
|
Possession
|
| French
|
La possession
|
The possession
|
| German
|
Besessen
|
Possessed
|
| Italian
|
Possessione
|
Possession
|
| Korean
|
사로잡힌 눈동자
|
Captive Eyes
|
|
|
Gallery
This section has been marked as a stub. Please help improve the page by adding information.
References


