| Site News |
|---|
| Warning: This wiki contains spoilers. Read at your own risk! Social media: If you would like, please join our Discord server, and/or follow us on Twitter (X) or Tumblr! |
Blood of the Eagle and Lion/To War at Gronder (Verdant Wind): Difference between revisions
| Line 538: | Line 538: | ||
{{strategy}} | {{strategy}} | ||
{{sectstub}} | {{sectstub}} | ||
==Trivia== | ==Trivia== | ||
Revision as of 00:08, 28 March 2021
| ||||
|

To War at Gronder (Japanese: グロンダーズの会戦 Goulders Battle) is the main battle map of the seventeenth chapter on the Verdant Wind route in Fire Emblem: Three Houses. In this map, the forces of Adrestia, Faerghus, and Leicester collide in a massive, bloody battle.
Beginning log
At Gronder Field, where the Battle of the Eagle and Lion was once held, the house leaders of five years ago have a fateful reunion...but this time, the contest between the Empire, the Kingdom, and the Alliance is no mock battle.
Map data
| ||||||
|
| |||||
| Victory: Defeat Edelgard and Dimitri | Player | Enemy | Third | |||
|---|---|---|---|---|---|---|
| Defeat: Byleth or Claude dies* or the player's army is routed* | 10 | 22 | 10+6 | |||
| ||||||

Character data
| Characters | |
|---|---|
New units
| |
| |
Available characters
| |
                                 
|
Item data
| |||||||||||||||||||||||||||||||||||||||||||||||||||
|
Enemy data
| ||||||||||||||||||||||||||||||||||||||||||||||||||||||||||||||||||||||||||||||||||||||||||||||||||
|
Third army data
Reinforcements
- After a unit reaches the central hill, or if any Imperial unit and any Kingdom unit fight each other, or upon entering the southeastern region (reaching columns 22-30, rows 20-30)
- Sylvain from the northern border of the map
- 2 Paladins from the northern border of the map
- Ingrid from the eastern border of the map
- 2 Fortress Knights from the eastern border of the map
Boss data
- Main article:
Edelgard
Normal Hard Maddening
|
|
| |||||||||||||||||||||||||||||||||||||||||||||||||||||||||||||||||||||||||||||||||||

- Main article:
Dimitri
Normal Hard Maddening
|
|
| |||||||||||||||||||||||||||||||||||||||||||||||||||||||||||||||||||||||||||||||||||

Sub-bosses
The characters in question (sans Hubert and Dedue) do not appear if they were recruited and are instead replaced by Imperial/Kingdom Generals respectively.
- Due to technical limitations, the sub-bosses' stats have been split onto separate pages.
Strategy
| This section details unofficial strategies that may help with completion of the chapter. This may not work for everybody. |
This section has been marked as a stub. Please help improve the page by adding information.
Trivia
- This map is one of the only two maps in Three Houses in which the song "The Dream is Over" does not play when killing any unrecruited units during their appearances as enemy units in Part II. The other map with this distinction is Chapter 18 of the Crimson Flower route.
- During his appearance in this chapter, Dimitri's character model lacks the eyebags that he is normally seen with after the timeskip in non-Crimson Flower routes; he also uses his set of character portraits from Azure Moon Chapter 18 onward, which depicts him without eyebags. This is likely due to the fact that he uses his "sad" portrait in dialogue whenever any unrecruited students from the Blue Lions house (sans Dedue) are killed as enemies during this chapter; Dimitri's "sad" portrait is difficult to distinguish from his neutral portrait while retaining the eyebags. His incorrect set of portraits was fixed in a later update, which now properly included his eyebags, though with his character model remaining unaffected by updates.
Etymology and other languages
| Names, etymology, and in other regions | ||
|---|---|---|
| Language | Name | Definition, etymology, and notes |
| English |
To War at Gronder |
-- |
| Spanish |
Choque en Gronder |
Clash in Gronder |
| French |
Retrouvailles à Gronder |
Homecomming at Gronder |
| German |
Schlacht bei Gronder |
Battle of Gronder |
| Italian |
In guerra nel Gronder |
At war in Gronder |
| Korean |
그론다즈 전투. |
Battle of Gronder |
| Simplified Chinese |
古隆达兹会战 |
Battle of Gronder |
| Traditional Chinese |
古隆達茲會戰 |
Battle of Gronder |
Gallery
This section has been marked as a stub. Please help improve the page by adding information.
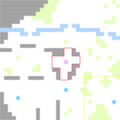
The central hill is the area outlined in red; the southeast reinforcement trigger region is the area outlined in yellow

| ← The Great Bridge Coup • | To War at Gronder | • Taking Fort Merceus → |
|---|
| Fire Emblem: Three Houses | |||||||||||||||||||||||||||||||||||||||||||||||||||||||||||||||||||||
|---|---|---|---|---|---|---|---|---|---|---|---|---|---|---|---|---|---|---|---|---|---|---|---|---|---|---|---|---|---|---|---|---|---|---|---|---|---|---|---|---|---|---|---|---|---|---|---|---|---|---|---|---|---|---|---|---|---|---|---|---|---|---|---|---|---|---|---|---|---|
| |||||||||||||||||||||||||||||||||||||||||||||||||||||||||||||||||||||