| Site News |
|---|
| Warning: This wiki contains spoilers. Read at your own risk! Social media: If you would like, please join our Discord server, and/or follow us on X (Twitter) or Tumblr! |
My Castle/Invasion 1 (Conquest): Difference between revisions
m (→Chapter data: ...Who put this there? Apparently someone who thought Corrin was a mandatory deployment in Invasions, even though the lead stated he/she is not (and the lead is based on firsthand observation)...) |
|||
| Line 17: | Line 17: | ||
|tab3=Lunatic | |tab3=Lunatic | ||
|content1={{ChapData | |content1={{ChapData | ||
|victory=Defend the throne and rout the enemy | |victory=Defend the throne and rout the enemy | ||
|defeat=Corrin dies{{hover|*|Classic mode}}, the player's army is routed, or the throne is seized by the enemy | |defeat=[[Corrin]] dies{{hover|*|Classic mode}}, the player's army is routed{{hover|*|Casual mode}}, or the throne is seized by the enemy | ||
|ally={{hover|10|May vary depending on how many player deployment slots are set up in the castle}} | |ally={{hover|10|May vary depending on how many player deployment slots are set up in the castle}} | ||
|other={{hover|0~4|Varies depending on whether the player has Lilith's Temple and/or Golems deployed in their castle}} | |other={{hover|0~4|Varies depending on whether the player has Lilith's Temple and/or Golems deployed in their castle}} | ||
| Line 24: | Line 24: | ||
}} | }} | ||
|content2={{ChapData | |content2={{ChapData | ||
|victory=Defend the throne and rout the enemy | |victory=Defend the throne and rout the enemy | ||
|defeat=Corrin dies{{hover|*|Classic mode}}, the player's army is routed{{hover|*|Casual mode}}, or the throne is seized by the enemy | |defeat=[[Corrin]] dies{{hover|*|Classic mode}}, the player's army is routed{{hover|*|Casual mode}}, or the throne is seized by the enemy | ||
|ally={{hover|10|May vary depending on how many player deployment slots are set up in the castle}} | |ally={{hover|10|May vary depending on how many player deployment slots are set up in the castle}} | ||
|other={{hover|0~4|Varies depending on whether the player has Lilith's Temple and/or Golems deployed in their castle}} | |other={{hover|0~4|Varies depending on whether the player has Lilith's Temple and/or Golems deployed in their castle}} | ||
| Line 31: | Line 31: | ||
}} | }} | ||
|content3={{ChapData | |content3={{ChapData | ||
|victory=Defend the throne and rout the enemy | |victory=Defend the throne and rout the enemy | ||
|defeat=Corrin dies{{hover|*|Classic mode}}, the player's army is routed{{hover|*|Casual mode}}, or the throne is seized by the enemy | |defeat=[[Corrin]] dies{{hover|*|Classic mode}}, the player's army is routed{{hover|*|Casual mode}}, or the throne is seized by the enemy | ||
|ally={{hover|10|May vary depending on how many player deployment slots are set up in the castle}} | |ally={{hover|10|May vary depending on how many player deployment slots are set up in the castle}} | ||
|other={{hover|0~4|Varies depending on whether the player has Lilith's Temple and/or Golems deployed in their castle}} | |other={{hover|0~4|Varies depending on whether the player has Lilith's Temple and/or Golems deployed in their castle}} | ||
| Line 78: | Line 78: | ||
|lv1=8 | |lv1=8 | ||
|#1=1 | |#1=1 | ||
|inventory1= | |inventory1={{Item|14|Steel Sword|image=sword}} | ||
|- | |- | ||
|name2=Invader | |name2=Invader | ||
| Line 85: | Line 85: | ||
|lv2=8 | |lv2=8 | ||
|#2=1 | |#2=1 | ||
|inventory2= | |inventory2={{Item|14|Iron Sword|image=sword}} | ||
|- | |- | ||
|name3=Invader | |name3=Invader | ||
| Line 92: | Line 92: | ||
|lv3=8 | |lv3=8 | ||
|#3=1 | |#3=1 | ||
|inventory3= | |inventory3={{Item|14|Javelin|image=lance}} | ||
|- | |- | ||
|name4=Invader | |name4=Invader | ||
| Line 99: | Line 99: | ||
|lv4=8 | |lv4=8 | ||
|#4=1 | |#4=1 | ||
|inventory4= | |inventory4={{Item|14|Steel Lance|image=lance}} | ||
|- | |- | ||
|name5=Invader | |name5=Invader | ||
| Line 106: | Line 106: | ||
|lv5=8 | |lv5=8 | ||
|#5=1 | |#5=1 | ||
|inventory5= | |inventory5={{Item|14|Steel Axe|image=axe}} | ||
|- | |- | ||
|name6=Invader | |name6=Invader | ||
| Line 113: | Line 113: | ||
|lv6=8 | |lv6=8 | ||
|#6=2 | |#6=2 | ||
|inventory6= | |inventory6={{Item|14|Iron Axe|image=axe}} | ||
|notes6=[[Pair Up|Paired up]] together. | |notes6=[[Pair Up|Paired up]] together. | ||
|- | |- | ||
| Line 121: | Line 121: | ||
|lv7=8 | |lv7=8 | ||
|#7=1 | |#7=1 | ||
|inventory7= | |inventory7={{Item|14|Iron Sword|image=sword}} | ||
|notes7=Lead unit of [[pair up]] with the boss Mercenary. | |notes7=Lead unit of [[pair up]] with the boss Mercenary. | ||
|- | |- | ||
| Line 128: | Line 128: | ||
|versionb=vallite | |versionb=vallite | ||
|lvb=10 | |lvb=10 | ||
|inventoryb= | |inventoryb={{Item|14|Steel Sword|image=sword}} • {{Item|14|Goddess Icon|image=stat booster|type=drop}}<br>{{Item|14|Lunge}} | ||
|notesb=Supporting unit of [[pair up]] with another Mercenary. | |notesb=Supporting unit of [[pair up]] with another Mercenary. | ||
}} | }} | ||
| Line 312: | Line 312: | ||
|content1={{BossStats FE14 | |content1={{BossStats FE14 | ||
|portrait=[[File:Generic small portrait mercenary vallite fe14.png]] | |portrait=[[File:Generic small portrait mercenary vallite fe14.png]] | ||
|sprite=mercenary vallite enemy | |||
|class=Mercenary | |class=Mercenary | ||
|lv=10 | |lv=10 | ||
| Line 329: | Line 330: | ||
|content2={{BossStats FE14 | |content2={{BossStats FE14 | ||
|portrait=[[File:Generic small portrait mercenary vallite fe14.png]] | |portrait=[[File:Generic small portrait mercenary vallite fe14.png]] | ||
|sprite=mercenary vallite enemy | |||
|class=Mercenary | |class=Mercenary | ||
|lv=10 | |lv=10 | ||
| Line 342: | Line 344: | ||
|inventory={{Item|14|Silver Sword|image=sword}}<br>{{Item|14|Goddess Icon|image=stat booster|type=drop}} | |inventory={{Item|14|Silver Sword|image=sword}}<br>{{Item|14|Goddess Icon|image=stat booster|type=drop}} | ||
|skills={{Item|14|Lunge}}<br>{{Item|14|Armored Blow}}<br>{{Item|14|Good Fortune}} | |skills={{Item|14|Lunge}}<br>{{Item|14|Armored Blow}}<br>{{Item|14|Good Fortune}} | ||
|sw=B | |sw=B | ||
}} | }} | ||
}} | }} | ||
Revision as of 14:51, 2 November 2019

|
It has been requested that image(s) be placed in this page or section. Please submit images to help improve this page and talk on this page's talk page about what images are needed. Remove this when this has been fixed. |
| ||||
|
Invasion 1 is the first of three optional pre-set skirmish battles in Fire Emblem Fates against mysterious invaders in the player's My Castle. This particular invasion is first unlocked upon completing chapter 8 in the Conquest campaign. Like other battles in the My Castle, Invasion 1 has no overall bearing on the plot, has no storyline, and does not require deploying Corrin; unlike other battles in the My Castle, this battle is treated in a similar fashion to a battle in the field, in that units defeated in this battle do not return when a player plays in Classic Mode, that Corrin's death results in a Game Over, and that players can gain experience and weapon experience in this battle. The ability for players to gain experience and weapon experience in this battle makes this battle one of four instances in Conquest outside of standard chapters where the player can gain these elements, the other three being the other two invasions and Boo Camp.
Chapter data
Normal Hard Lunatic
| ||||||
|
| |||||
| Victory: Defend the throne and rout the enemy | Player | Other | Enemy | |||
|---|---|---|---|---|---|---|
| Defeat: Corrin dies*, the player's army is routed*, or the throne is seized by the enemy | 10 | 0~4 | 9 | |||
This battle's map, like all other battles at the My Castle, is 29 columns by 30 rows.
Character data
| Characters | |
|---|---|
New units
| |
| |
Available characters
| |
Avatar f-default       
|
Note: Felicia is only a returning character if Corrin is male, while Jakob is only a returning character if Corrin is female. The returning characters list does not include any characters recruitable in paralogues or xenologues, as the player may not have taken on any available paralogue chapters yet. The list also does not include any bonus units, as they are recruitable at the player's discretion.
Item data
| ||||||
|
Enemy data
Normal Hard Lunatic
| |||||||||||||||||||||||||||||||||||||||||||||||||||||||||||||||
|
Boss data
Normal Hard/Lunatic
|
|
| ||||||||||||||||||||||||||||||||||||||||||||||||||

Strategy
| This section details unofficial strategies that may help with completion of the chapter. This may not work for everybody. |
This section has been marked as a stub. Please help improve the page by adding information.
Should the player want to make use of Lilith or any Golems, it is advisable to deploy them in a position where they are not near the boss; if any green NPC defeats the boss, the Goddess Icon will drop into their inventory and thus make it unobtainable for the player. Green NPCs are capable of using this Goddess Icon (in Lilith's case, provided her Luck stat isn't already at her class's formal cap in the stat; the Golems don't have this problem, as they'll usually have 0 Luck even at third-tier), but the effect will only last for the remainder of this battle.
Trivia
Etymology and other languages
| Names, etymology, and in other regions | ||
|---|---|---|
| Language | Name | Definition, etymology, and notes |
| English |
Invasion 1 |
|
Gallery
This section has been marked as a stub. Please help improve the page by adding information.
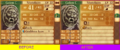
A Golem using the boss's Goddess Icon, rendered temporary by NPC mechanics. Note the effects before and after the item's usage.
References
| Invasion 1 | • Invasion 2 → |
|---|