| Dividing the World
|
|
|
|
| Location
|
Fódlan's Throat
|
| Boss(es)
|
Almyran Soldier
|
|
Dividing the World is a paralogue chapter in Fire Emblem: Three Houses. It is available from Chapter 12 /Chapter 10
 to Chapter 18. In order to attempt this paralogue, the player must have recruited Hilda, and neither she nor Cyril must have fallen in battle previously; by extension, this paralogue cannot be played on the Black Eagles/Crimson Flower route. In this chapter, Hilda is called to Goneril territory to beat back an Almyran attack.
Plot
- Main article: Dividing the World/Script
Hilda approaches Byleth and explains that she has been recalled to Goneril territory. Raiders from the eastern nation of Almyra are attacking the border fortress known as Fódlan's Locket, and Hilda's brother Holst wants her to drive them off. Cyril overhears the conversation and asks to tag along; he explains that he was captured in battle at Fódlan's Locket and forced into servitude in House Goneril before being taken in by Rhea, and wishes to spare any Almyran war orphans they encounter the same fate. Hilda invites Byleth to accompany her as well.
When Hilda and co. arrive at the border, Goneril soldiers reveal Holst has fallen ill and the Locket's defense rests entirely on Hilda's shoulders. Despite this setback, Hilda, Cyril, and Byleth successfully defeat the Almyrans. Afterwards, Cyril explains that the Almyrans are less concerned with invading Fódlan and more concerned with simply proving their strength. Hilda returns and reveals that Holst's illness was food poisoning brought on by a bad mushroom. She also reveals that she has received the Hero's Relic of House Goneril, Freikugel. As Hilda refuses to wield the relic herself because she feels unworthy of wielding such an important weapon and the fact that it occasionally pulsates as if it were alive, she decides to entrust it to Byleth for safekeeping and lets them decide what to do with it in the meantime.
Beginning log
Almyran forces are attacking Fódlan's Locket. With her brother suddenly fallen ill, it is up to Hilda to take over the defense. Cyril volunteers to accompany her.
Chapter data
|
|
|
|
|
| Victory: Rout the enemy
|
Player
|
Partner
|
Other
|
Enemy
|
Third
|
| Defeat: Byleth or Dimitri /Claude dies*, the player's army is routed*, Hilda or Cyril dies, all NPC units die, or a defended location is captured
|
11
|
{{{partner}}}
|
4
|
19
|
{{{third}}}
|
|
|
|
|
|
|
|
|
|
| Victory: Rout the enemy
|
Player
|
Partner
|
Other
|
Enemy
|
Third
|
| Defeat: Byleth or Dimitri /Claude dies*, the player's army is routed*, Hilda or Cyril dies, all NPC units die, or a defended location is captured
|
11
|
{{{partner}}}
|
4
|
23
|
{{{third}}}
|
|
|
|
|
|
|
|
|
|
| Victory: Rout the enemy
|
Player
|
Partner
|
Other
|
Enemy
|
Third
|
| Defeat: Byleth or Dimitri /Claude dies*, the player's army is routed*, Hilda or Cyril dies, all NPC units die, or a defended location is captured
|
11
|
{{{partner}}}
|
4
|
28
|
{{{third}}}
|
|
|
|
|
Character data
Black Eagles Blue Lions Golden Deer
This paralogue requires Hilda to be in Byleth's class, but Cyril will accompany them. If Cyril is not a member of their class, he will be temporarily controllable for this map with the following stats.
|
|
|
|
|
|
|
Skill Levels

|

|

|

|

|

|

|

|

|

|

|

|
| E
|
E
|
E
|
E
|
E
|
E
|
E
|
E
|
E
|
E
|
E
|

|
|
|
|
|
|
|
|
|
|
Skill Levels
|
|
|
|
|
|
|
|
|
|
|
|
|
| E
|
E
|
E
|
E
|
E
|
E
|
E
|
E
|
E
|
E
|
E
|
|
|
|
|
|
|
|
|
|
|
Skill Levels
|
|
|
|
|
|
|
|
|
|
|
|
|
| E
|
E
|
E
|
E
|
E
|
E
|
E
|
E
|
E
|
E
|
E
|
|
|
|
Item data
|
|
|
|
Name
|
Obtainment Method
|

|
Hexlock Shield
|
Automatically at the end of the chapter if all Goneril soldiers survived
|

|
Large Bullion
|
Automatically at the end of the chapter if at least one Goneril soldier survived
|

|
Goneril Valkyries
|
Automatically at the end of the chapter
|

|
Almyra Mercenaries
|
Automatically at the end of the chapter if Cyril is a party member
|

|
Freikugel
|
Automatically at the end of the chapter
|
|
Enemy data
|
|
|
|
|
|
|
|
Name
|
Class
|
Lv
|
#
|
Inventory and Skills
|
Notes
|
|
|
|
|
|
|
|
|
|
Name
|
Class
|
Lv
|
#
|
Inventory and Skills
|
Notes
|
|
|
|
|
|
|
|
|
|
Name
|
Class
|
Lv
|
#
|
Inventory and Skills
|
Notes
|
|
NPC data
|
|
|
|
|
|
|
|
Name
|
Class
|
Lv
|
#
|
Inventory and Skills
|
Notes
|
|
|
|
|
|
|
|
|
|
Name
|
Class
|
Lv
|
#
|
Inventory and Skills
|
Notes
|
|
Boss data
|
|
|
|
|
|
|
Skill Levels
|
|
|
|
|
|
|
|
|
|
|
|

|
| E
|
E
|
B
|
E
|
E
|
E
|
E
|
C
|
E
|
E
|
E
|
|
|
|
|
|
|
|
|
|
|
Skill Levels
|
|
|
|
|
|
|
|
|
|
|
|
|
| E
|
E
|
B
|
E
|
E
|
E
|
E
|
C
|
E
|
E
|
E
|
|
|
|
|
|
|
|
|
|
|
Skill Levels
|
|
|
|
|
|
|
|
|
|
|
|
|
| E
|
E
|
B
|
E
|
E
|
E
|
E
|
C
|
E
|
E
|
E
|
|
|
|
Strategy
| This section details unofficial strategies that may help with completion of the chapter. This may not work for everybody.
|
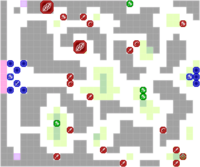
At the beginning of the battle, waste no time taking out the northeast Wyvern Riders. If you have a good flier with a bow and a Dancer in range, this can be very easy. The eastern group should rush to the center to reinforce the two Goneril Armored Knights. Meanwhile, the western group should send some fast movers down south to reinforce the southwestern Armored Knight. If you have some bowmen to spare, you can man the ballistae in the western corners of the map and make things messy for the Almyrans. The rest of that group should remain in position and make sure the enemy can't reach the seize point. Far and away the biggest problems are the enemy Cavaliers and Giant Birds, who are particularly prone to darting past your defensive line and taking the seize point. Mark them for death. Once you take out the enemies attacking the allied Armored Knights, said knights will stop moving entirely. Once the western charge has been dealt with, the rest of the battle is a cakewalk.
Trivia
- This is the only paralogue in Three Houses whose availability crosses the threshold between Parts I and II; all others either expire prior to the end of part I or don't become available until part II has already begun.
Etymology and other languages
| Names, etymology, and in other regions
|
| Language
|
Name
|
Definition, etymology, and notes
|
| English
|
Dividing the World
|
|
|
|
Gallery
References


