| Site News |
|---|
| Warning: This wiki contains spoilers. Read at your own risk! Social media: If you would like, please join our Discord server, and/or follow us on Twitter (X) or Tumblr! |
Birth of a Holy Knight: Difference between revisions
mNo edit summary |
(→Strategy: Removed the unit analyses as they are already on the units' pages) |
||
| (31 intermediate revisions by 9 users not shown) | |||
| Line 6: | Line 6: | ||
|new units=[[Sigurd]], [[Naoise]], [[Alec]], [[Arden]], [[Azelle]], [[Lex]], [[Quan]], [[Finn]], [[Ethlyn]], [[Midir]] | |new units=[[Sigurd]], [[Naoise]], [[Alec]], [[Arden]], [[Azelle]], [[Lex]], [[Quan]], [[Finn]], [[Ethlyn]], [[Midir]] | ||
|boss=[[DiMaggio]], [[Gerrard]] | |boss=[[DiMaggio]], [[Gerrard]] | ||
|next=[[Lady of the Forest]] | |||
}} | }} | ||
| Line 20: | Line 21: | ||
{{ChapData SNES02 | {{ChapData SNES02 | ||
|victory=Seize Evans | |victory=Seize Evans | ||
|defeat=Sigurd dies ''or'' Chalphy Castle is seized | |defeat=[[Sigurd]] dies ''or'' Chalphy Castle is seized | ||
|pl=4{{ | |pl=4{{h|+6|Upon Azelle, Lex, Quan, Finn, Ethlyn, and Midir being recruited}} | ||
|pa=1{{ | |pa=1{{h|+1|Upon Arvis arriving}}{{h|−2|Upon Midir being defeated and Arvis leaving}} | ||
|ot=0 | |ot=0 | ||
|en=32{{ | |en=32{{h|+15|Reinforcements}}{{h|−1|Upon Munnir leaving}} | ||
|map=[[File:Cm fe04 P.png|600px]] | |map=[[File:Cm fe04 P.png|600px]] | ||
|row=30 | |||
}} | }} | ||
{| | |||
!style=" | {| class="cellpadding-2 chapter-table" style="border-spacing: 2px; margin-top: 0.9em; width: 70%" | ||
! style="border-radius: 15px; font-size: larger" colspan="7" | Combatants and castles | |||
|- | |- | ||
!style=" | ! style="border-top-left-radius: 15px" | Army | ||
! | ! Commander | ||
! | ! Affiliation | ||
! | ! Units | ||
! | ! Castles | ||
! | ! Guardian | ||
!style=" | ! style="border-top-right-radius: 15px" | Notes | ||
|- | |- | ||
| Sigurd's | |||
| [[Sigurd]] | |||
|style=" | | style="background: #3850e0" | Player | ||
| 4 | |||
| [[Chalphy]] | |||
| [[Arden]] | |||
| Home castle | |||
|- | |- | ||
| | | rowspan="2" | [[Evans]] | ||
| | | rowspan="2" | [[Munnir]]{{h|*|Leaves on turn 1 after seizing Yngvi}}/<br>[[Gerrard]] | ||
|style=" | | style="background: #a83028" rowspan="2" | Enemy | ||
| | | rowspan="2" | 32{{h|+15|Upon Yngvi being seized}} | ||
| Evans | |||
| Gerrard | |||
| Main objective | |||
|- | |- | ||
| | | rowspan="2" | Yngvi | ||
| [[DiMaggio]] | |||
| | | rowspan="2" | • Seized by Munnir on turn 1; DiMaggio then becomes the guardian.<br>• Once seized by Sigurd, the west bridge will be lowered and 15 additional units will appear from Evans | ||
|- | |- | ||
| [[Yngvi]] | |||
| [[Midir]] | |||
|style="border:1px solid {{color2}}; background | | style="border:1px solid {{color2}}; background: #089000" | Partner | ||
| 1 | |||
| Midir | |||
|- | |- | ||
|style=" | | style="border-bottom-left-radius: 15px" | -- | ||
| [[Arvis]] | |||
|style=" | | style="background: #089000" | Partner | ||
| 1 | |||
| | | -- | ||
|style="border | | -- | ||
| style="border-bottom-right-radius: 15px" | • Appears once Sigurd seizes Yngvi.<br>• Does not have a faction, castle, or phase, and moves at the end of Evans Phase. | |||
|} | |} | ||
| Line 76: | Line 79: | ||
{{ChapChars | {{ChapChars | ||
|game#=04 | |game#=04 | ||
|newunit1={{NewUnit | |newunit1={{NewUnit | ||
|name=Sigurd | |name=Sigurd | ||
| Line 83: | Line 85: | ||
|HP=33 | |HP=33 | ||
|lv=5 | |lv=5 | ||
|recruitment method=Automatically from | |inventory={{Item|4|Steel Sword}}<br>{{Item|4|Iron Lance}}<br>5,000 [[Gold]] | ||
|recruitment method=Automatically from turn 1 | |||
}} | }} | ||
|newunit2={{NewUnit | |newunit2={{NewUnit | ||
| Line 91: | Line 94: | ||
|HP=33 | |HP=33 | ||
|lv=3 | |lv=3 | ||
|recruitment method=Automatically from | |inventory={{Item|4|Steel Sword}}<br>2,000 [[Gold]] | ||
|recruitment method=Automatically from turn 1 | |||
}} | }} | ||
|newunit3={{NewUnit | |newunit3={{NewUnit | ||
| Line 99: | Line 103: | ||
|HP=32 | |HP=32 | ||
|lv=2 | |lv=2 | ||
|recruitment method=Automatically from | |inventory={{Item|4|Iron Sword}}<br>2,000 [[Gold]] | ||
|recruitment method=Automatically from turn 1 | |||
}} | }} | ||
|newunit4={{NewUnit | |newunit4={{NewUnit | ||
|name=Arden | |name=Arden | ||
|portrait=[[File:Portrait arden fe04.png]] | |portrait=[[File:Portrait arden fe04.png]] | ||
|class= | |class=Sword Armor | ||
|HP=36 | |HP=36 | ||
|lv=3 | |lv=3 | ||
|recruitment method=Automatically from | |inventory={{Item|4|Iron Sword}}<br>2,000 [[Gold]] | ||
|recruitment method=Automatically from turn 1 | |||
}} | }} | ||
|newunit5={{NewUnit | |newunit5={{NewUnit | ||
| Line 115: | Line 121: | ||
|HP=30 | |HP=30 | ||
|lv=1 | |lv=1 | ||
|inventory={{Item|4|Fire}}<br>5,000 [[Gold]] | |||
|recruitment method=Automatically from turn 2 | |recruitment method=Automatically from turn 2 | ||
}} | }} | ||
| Line 123: | Line 130: | ||
|HP=33 | |HP=33 | ||
|lv=4 | |lv=4 | ||
|inventory={{Item|4|Iron Axe}}<br>5,000 [[Gold]] | |||
|recruitment method=Automatically from turn 2 | |recruitment method=Automatically from turn 2 | ||
}} | }} | ||
| Line 131: | Line 139: | ||
|HP=34 | |HP=34 | ||
|lv=4 | |lv=4 | ||
|inventory={{Item|4|Steel Lance}}<br>{{Item|4|Javelin}}<br>5,000 [[Gold]] | |||
|recruitment method=Automatically from turn 3 | |recruitment method=Automatically from turn 3 | ||
}} | }} | ||
| Line 139: | Line 148: | ||
|HP=32 | |HP=32 | ||
|lv=1 | |lv=1 | ||
|inventory={{Item|4|Iron Lance}}<br>2,000 [[Gold]] | |||
|recruitment method=Automatically from turn 3 | |recruitment method=Automatically from turn 3 | ||
}} | }} | ||
| Line 147: | Line 157: | ||
|HP=28 | |HP=28 | ||
|lv=1 | |lv=1 | ||
|inventory={{Item|4|Slim Sword}}<br>{{Item|4|Heal}}<br>4,000 [[Gold]] | |||
|recruitment method=Automatically from turn 3 | |recruitment method=Automatically from turn 3 | ||
}} | }} | ||
| Line 155: | Line 166: | ||
|HP=32 | |HP=32 | ||
|lv=2 | |lv=2 | ||
|recruitment method=Automatically | |inventory={{Item|4|Iron Bow}}<br>2,000 [[Gold]] | ||
|recruitment method=Automatically after seizing [[Yngvi]] | |||
}} | }} | ||
}} | }} | ||
| Line 167: | Line 179: | ||
|obtainlast=Talk to [[Arvis]] with Sigurd | |obtainlast=Talk to [[Arvis]] with Sigurd | ||
}} | }} | ||
In addition, five [[village]]s are present on the map, which can be visited to obtain up to 5,000 [[gold]] each. | |||
===Castle data=== | |||
While the town can be visited from the Chalphy or, once conquered, Yngvi castles, the arena and armory are unavailable. The other four facilities—the blacksmith, pawnbroker, supply, and augury—are normally accessible. | |||
===Event data=== | ===Event data=== | ||
| Line 172: | Line 188: | ||
|init1=[[Azelle]] | |init1=[[Azelle]] | ||
|rec1=[[Sigurd]] | |rec1=[[Sigurd]] | ||
|- | |- | ||
|init2=[[Lex]] | |init2=[[Lex]] | ||
|rec2=[[Sigurd]] | |rec2=[[Sigurd]] | ||
|- | |- | ||
|init3=[[Quan]] | |init3=[[Quan]] | ||
|rec3=[[Sigurd]] | |rec3=[[Sigurd]] | ||
|- | |- | ||
|init4=[[Ethlyn]] | |init4=[[Ethlyn]] | ||
|rec4=[[Sigurd]] | |rec4=[[Sigurd]] | ||
|- | |- | ||
|initl=[[Sigurd]] | |initl=[[Sigurd]] | ||
|recl=[[Arvis]]{{ | |recl=[[Arvis]]{{h|*|May initiate the event on his turn}} | ||
|rewardl={{item|4|Silver Sword}} for Sigurd | |rewardl={{item|4|Silver Sword}} for Sigurd | ||
}} | }} | ||
| Line 194: | Line 205: | ||
===Unit data=== | ===Unit data=== | ||
====Evans==== | ====Evans==== | ||
{{ | {{ChapUnitHdr|type=Enemy|platform=snes02}} | ||
|platform=snes02 | {{ChapUnitCellFE4 | ||
| | |name=Verdane | ||
| | |class=Barbarian | ||
| | |lv=1 | ||
|# | |#=14 | ||
| | |hp=36 | ||
|str=5 | |||
| | |mag=0 | ||
| | |skill=0 | ||
| | |spd=7 | ||
|# | |lck=0 | ||
| | |def=5 | ||
|res=0 | |||
| | |mov=6 | ||
| | |inventory={{Item|4|Iron Axe}} | ||
| | }} | ||
|#3= | {{ChapUnitCellFE4 | ||
| | |name=Verdane | ||
|class=Barbarian | |||
| | |lv=10 | ||
| | |#=4 | ||
| | |hp=45 | ||
|# | |str=8 | ||
| | |mag=0 | ||
| | |skill=3 | ||
|spd=10 | |||
| | |lck=0 | ||
| | |def=8 | ||
| | |res=1 | ||
|# | |mov=6 | ||
| | |inventory={{Item|4|Hand Axe}} | ||
| | }} | ||
{{ChapUnitCellFE4 | |||
| | |name=Verdane | ||
| | |class=Hunter | ||
| | |lv=1 | ||
|#6=1 | |#=3 | ||
| | |hp=36 | ||
| | |str=7 | ||
|mag=0 | |||
| | |skill=0 | ||
| | |spd=7 | ||
| | |lck=0 | ||
|# | |def=5 | ||
| | |res=0 | ||
| | |mov=6 | ||
|inventory={{Item|4|Iron Bow}} | |||
| | }} | ||
| | {{ChapUnitCellFE4 | ||
| | |name=Verdane | ||
| | |class=Brigand | ||
| | |lv=1 | ||
| | |#=5 | ||
| | |hp=36 | ||
| | |str=5 | ||
| | |mag=0 | ||
|# | |skill=0 | ||
| | |spd=7 | ||
|lck=0 | |||
| | |def=5 | ||
| | |res=0 | ||
| | |mov=6 | ||
|# | |inventory={{Item|4|Iron Axe}} | ||
| | |notes=Prioritizes raiding [[village]]s. | ||
}} | |||
| | {{ChapUnitCellFE4 | ||
| | |name=Verdane | ||
| | |class=Barbarian | ||
|# | |lv=5 | ||
| | |#=3 | ||
| | |hp=40 | ||
|str=6 | |||
|mag=0 | |||
|skill=1 | |||
|spd=8 | |||
|lck=0 | |||
|def=6 | |||
|res=0 | |||
|mov=6 | |||
|inventory={{Item|4|Iron Axe}} | |||
|notes='''Authority:''' DiMaggio<br>Will not move until Yngvi is seized. | |||
}} | |||
{{ChapUnitCellFE4 | |||
|name=[[DiMaggio]] | |||
|class=Axe Fighter | |||
|lv=10 | |||
|#=1 | |||
|hp=45 | |||
|str=11 | |||
|mag=0 | |||
|skill=6 | |||
|spd=13 | |||
|lck=0 | |||
|def=11 | |||
|res=1 | |||
|mov=6 | |||
|inventory={{Item|4|Steel Axe}} | |||
|notes='''Authority:''' ★<br>Does not move; guards Yngvi Castle after Munnir seizes it. | |||
}} | |||
{{ChapUnitCellFE4 | |||
|name=[[Gerrard]] | |||
|class=Axe Fighter | |||
|lv=20 | |||
|#=1 | |||
|hp=55 | |||
|str=14 | |||
|mag=0 | |||
|skill=9 | |||
|spd=16 | |||
|lck=0 | |||
|def=14 | |||
|res=2 | |||
|mov=6 | |||
|inventory={{Item|4|Steel Axe}} • {{Item|4|Hand Axe}} | |||
|notes='''Authority:''' ★★<br>Does not move; guards Evans castle. | |||
}} | |||
{{ChapUnitCellFE4 | |||
|name=[[Munnir]] | |||
|class=Warrior | |||
|lv=20 | |||
|#=1 | |||
|hp=60 | |||
|str=17 | |||
|mag=0 | |||
|skill=11{{h|+5|Granted by Skill Ring}} | |||
|spd=18 | |||
|lck=0 | |||
|def=16 | |||
|res=5 | |||
|mov=6 | |||
|inventory={{Item|4|Hand Axe}} • {{Item|4|Skill Ring|type=drop}}{{h|*|Impossible to obtain in normal gameplay}} | |||
|notes='''Authority:''' ★★<br>Seizes Yngvi Castle and leaves the map in a scripted story event on turn 1. | |||
|last=y | |||
}} | |||
{{ChapUnitReinf|type=Enemy|platform=snes02}} | |||
{{ChapUnitCellFE4 | |||
|name=Verdane | |||
|class=Barbarian | |||
|lv=5 | |||
|#=8 | |||
|hp=40 | |||
|str=6 | |||
|mag=0 | |||
|skill=1 | |||
|spd=8 | |||
|lck=0 | |||
|def=6 | |||
|res=0 | |||
|mov=6 | |||
|inventory={{Item|4|Iron Axe}} | |||
}} | |||
{{ChapUnitCellFE4 | |||
|name=Verdane | |||
|class=Hunter | |||
|lv=5 | |||
|#=5 | |||
|hp=40 | |||
|str=8 | |||
|mag=0 | |||
|skill=1 | |||
|spd=8 | |||
|lck=0 | |||
|def=6 | |||
|res=0 | |||
|mov=6 | |||
|inventory={{Item|4|Iron Bow}} | |||
}} | |||
{{ChapUnitCellFE4 | |||
|name=Verdane | |||
|class=Barbarian | |||
|lv=10 | |||
|#=2 | |||
|hp=45 | |||
|str=8 | |||
|mag=0 | |||
|skill=3 | |||
|spd=10 | |||
|lck=0 | |||
|def=8 | |||
|res=1 | |||
|mov=6 | |||
|inventory={{Item|4|Hand Axe}} | |||
|notes='''Authority:''' Gerrard | |||
|last=y | |||
}} | }} | ||
{{ChapUnitFtr}} | |||
=====Reinforcements===== | =====Reinforcements===== | ||
| Line 272: | Line 397: | ||
====Yngvi==== | ====Yngvi==== | ||
{{ | {{ChapUnitHdr|type=Partner|platform=snes02}} | ||
|platform=snes02 | {{ChapUnitCellFE4 | ||
| | |name=[[Midir]] | ||
| | |class=Arch Knight | ||
| | |type=partner | ||
|# | |lv=2 | ||
| | |#=1 | ||
| | |hp=32 | ||
|str=9 | |||
|mag=0 | |||
|skill=7 | |||
|spd=9 | |||
|lck=3 | |||
|def=7 | |||
|res=0 | |||
|mov=8 | |||
|inventory={{Item|4|Iron Bow}}<br>{{Item|4|Follow-Up}} • {{Item|4|Accost}} | |||
|notes=Guards Yngvi Castle; defeated in a scripted story event on turn 1. | |||
|last=y | |||
}} | }} | ||
{{ChapUnitFtr}} | |||
==== | ====Arvis==== | ||
{{ | {{ChapUnitHdr|type=Partner|platform=snes02}} | ||
|platform=snes02 | {{ChapUnitCellFE4 | ||
| | |name=[[Arvis]] | ||
| | |class=Sage | ||
| | |type=partner | ||
|# | |lv=25 | ||
| | |#=1 | ||
| | |hp=60 | ||
|str=15 | |||
|mag=30{{h|+10|Granted by Valflame}} | |||
|skill=27 | |||
|spd=30 | |||
|lck=0 | |||
|def=8{{h|+10|Granted by Valflame}} | |||
|res=22{{h|+10|Granted by Valflame}} | |||
|mov=6 | |||
|inventory={{Item|4|Valflame}} • {{Item|4|Recover Ring}}<br>{{Item|4|Adept}} • {{Item|4|Nihil}} | |||
|notes=Moves towards [[Sigurd]] to talk to him; leaves the map upon doing so. | |||
|last=y | |||
}} | }} | ||
{{ChapUnitFtr}} | |||
===Major units=== | ===Major units=== | ||
| Line 298: | Line 447: | ||
{{BossStats FE4 | {{BossStats FE4 | ||
|portrait=[[File:Portrait_dimaggio_fe04.png|DiMaggio]] | |portrait=[[File:Portrait_dimaggio_fe04.png|DiMaggio]] | ||
|sprite=fighter enemy | |sprite=axe fighter enemy | ||
|class=Fighter | |class=Axe Fighter | ||
|lv=10 | |lv=10 | ||
|HP=45 | |HP=45 | ||
| Line 319: | Line 468: | ||
{{BossStats FE4 | {{BossStats FE4 | ||
|portrait=[[File:Portrait_gerrard_fe04.png]] | |portrait=[[File:Portrait_gerrard_fe04.png]] | ||
|sprite=fighter enemy | |sprite=axe fighter enemy | ||
|class=Fighter | |class=Axe Fighter | ||
|lv=20 | |lv=20 | ||
|authority=<small>★★</small> | |authority=<small>★★</small> | ||
| Line 339: | Line 488: | ||
{{main|Munnir}} | {{main|Munnir}} | ||
{{BossStats FE4 | {{BossStats FE4 | ||
|portrait=[[File: | |portrait=[[File:Portrait_munnir_fe04.png]] | ||
|sprite=warrior enemy | |sprite=warrior enemy | ||
|class=Warrior | |class=Warrior | ||
| Line 347: | Line 496: | ||
|str=17 | |str=17 | ||
|magic=0 | |magic=0 | ||
|skill=11{{ | |skill=11{{h|+5|Granted by Skill Ring}} | ||
|spd=18 | |spd=18 | ||
|luck=0 | |luck=0 | ||
| Line 366: | Line 515: | ||
|class=Arch Knight | |class=Arch Knight | ||
|lv=2 | |lv=2 | ||
|HP=32 | |HP=32 | ||
|str=9 | |str=9 | ||
| Line 382: | Line 530: | ||
* <small>Midir is the guardian of Yngvi Castle and boss of Yngvi before being defeated by Munnir in a cutscene.</small> | * <small>Midir is the guardian of Yngvi Castle and boss of Yngvi before being defeated by Munnir in a cutscene.</small> | ||
==== | ====Arvis==== | ||
{{main|Arvis}} | {{main|Arvis}} | ||
{{BossStats FE4 | {{BossStats FE4 | ||
| Line 393: | Line 541: | ||
|HP=60 | |HP=60 | ||
|str=15 | |str=15 | ||
|magic=30{{ | |magic=30{{h|+10|Granted by Valflame}} | ||
|skill=27 | |skill=27 | ||
|spd=30 | |spd=30 | ||
|luck=0 | |luck=0 | ||
|def=8{{ | |def=8{{h|+10|Granted by Valflame}} | ||
|res=22{{ | |res=22{{h|+10|Granted by Valflame}} | ||
|move=6 | |move=6 | ||
|inventory={{item|4|Valflame}}<br>{{item|4|Recover Ring}}<br>5,000 [[Gold]] | |inventory={{item|4|Valflame}}<br>{{item|4|Recover Ring}}<br>5,000 [[Gold]] | ||
| Line 408: | Line 556: | ||
|li=B | |li=B | ||
}} | }} | ||
* <small>Arvis appears on the turn | * <small>Arvis appears on the turn Yngvi Castle is seized, and departs after Sigurd talks to him. He will actively seek out Sigurd and will only attack enemies which get in his way.</small> | ||
==Strategy== | ==Strategy== | ||
===Castle Yngvi=== | |||
[[Sigurd]]'s party sets out to save Castle Yngvi from a Verdanite invasion, but there's nothing they can do as [[Munnir]] will crit [[Midir]] out of the way and seize the castle at the start of the first Evans phase. For the time being, they need to fight their way over through the many [[Barbarian]]s and [[Hunter]]s. Sigurd is the best unit for the job as he can consistently one-round enemies and has a lot of avoid. | |||
The [[village]]s will begin burning, thanks to the enemy Brigands. They take their time wrecking the place, however, and only after ten turns of inaction on your part will the villages be completely destroyed. However, the sooner it is saved, the greater the payout; 5000G for an undamaged village, minus 500G for each turn it was being attacked. Some villages, such as the southernmost one on this map, give out items or have special events associated with them when visited; these items and events are unaffected by the amount of damage the village has received, except if the village is completely destroyed, at which point that item/event is lost forever. Because gold is stored on an individual unit basis, the player should distribute the gold to whatever units need the gold the most. | |||
On turn 2, [[Lex]] and [[Azelle]] join, this time at the top of the map, quite convenient for killing the nearby Brigand on the village. | |||
While Sigurd's party continues pushing toward Yngvi, Azelle and Lex should focus on clearing out the nearby enemies; Lex baiting out enemies and softening them up while Azelle roasts them with his magic damage. If either of them take damage, they can wait on the nearby Church tile. Churches fully heal the unit on top of them at the start of their turn, at the cost of 5G per point of HP recovered; if you can't afford a full heal, you will be healed for as much as your funds permit; broke units get no healing whatsoever. The same applies to Castle healing, be it guarding a Castle or being inside the Home Castle; Castle healing is capped at (20% of Max HP)-1 per turn however, but the same interaction occurs with units too poor to afford part or all of the healing. | |||
On turn 3, even more player units join, [[Quan]], [[Ethlyn]], and [[Finn]], this time just south of Chalphy. These units are the reason Arden was safe to walk off of Chalphy earlier if the nearby Barbarian was killed; any other enemy unit that could threaten Chalphy would simply not arrive in time before these units showed up to defend Chalphy if necessary. | |||
Sigurd's party should continue their attack on Yngvi; if any of them are too damaged to fight, they should retreat to get healed by Ethlyn. Quan's party should move south to back Sigurd up, while Azelle and Lex continue clearing out the enemies in the north. | |||
Once the initial situation has stabilized, it is time to move on to other objectives. Take out the Brigand on the southernmost village; that village contains the valuable [[Speed Ring]], that grants +5 Spd to whoever holds it. The [[trade]] command does not exist; to transfer items between two units, one unit must sell it to the pawnbroker, and the other unit needs to buy it from the pawnbroker. As the Speed Ring takes 20k to buy out of the pawnbroker, whoever plans to hold onto it for the next few maps should be the one to visit the village, unless that unit joins later (in which case the person visiting should be someone who will need the gold). Finn usually wants this item, as he needs it to reliably double in the next map, while Sigurd can use it to increase his Avo and solo enemy armies more reliably. Meanwhile, Lex and Azelle should NOT move towards Yngvi; they should instead focus on securing the remaining villages, as they are unlikely to arrive in time to be useful in Yngvi's conquest, but are in position to go after these villages that are out of the way. | |||
Afterwards, it is time to recapture Yngvi. Defending Yngvi is the first instance of a recurring enemy formation best described as a "three-man guard". These formations are all over the game, and they behave very similarly; they do not move at all while the boss, on top of the castle, is alive, but will begin aggressively moving to attack whatever is near once the boss is dead. Their lack of mobility, initially, makes them fairly easy to pick off, however, and their behavior also means their movement ranges can be mostly ignored if one does not intend to fight them yet. [[DiMaggio]] is on top of the castle, and as such, he gets +30 Avo and castle healing. However, he's not much of a threat; all he does is be bulky and hit you fairly hard, but not hard enough to one-shot your units if they are fully healed. He also lacks 2-range, but Azelle takes way too long to reach him and Quan's [[Javelin]] has horrendous accuracy anyway. Just have Sigurd besiege the castle until he goes down. | |||
===Castle Evans=== | |||
Once Sigurd seizes Yngvi, the remainder of the Evans army will emerge on their next turn. Instead of wastefully waiting for that to happen, have all non-Sigurd units continue to move towards the left side of the map. Additionally, Midir joins the party, having recovered to full HP after being crit earlier in the map. He is an [[Arch Knight]], who is unable to fight back at close quarters. He is exactly fast enough to double the remaining enemies on the map, and has Follow-Up to do so. He also comes with Accost to allow him to continue firing upon his enemies, very appreciable against 1-range enemies as the extra attacks are effectively free damage. Midir has no doubling issues in the short term, but he does have trouble doubling fast enemies later on; the Speed Ring can help with that, but overall other units benefit from it more in the short term, in regards to consideration for Midir to visit the village and grab the Speed Ring immediately. | |||
[[Arvis]] spawns at the top of the map at this time, and moves to hand a [[Silver Sword]] to Sigurd, and leaves once he does. He is comically invincible; not only are his stats absurdly high, his [[Recover Ring]] fully heals him each turn; nothing on the map can kill him, and anything that tries gets cooked by his 70 Atk. As he can speak to Sigurd on his own turn, there is little reason to have Sigurd go out of his way to do so; it is sufficient to simply leave Sigurd in Arvis' melee range, and this can easily be achieved by having Sigurd fight on the front line, and [[Canto]] towards Arvis after attacking once Arvis is sufficiently near. Once Sigurd has the Silver Sword, he has no need for his [[Steel Sword]] (as the Silver Sword has objectively better stats than the Steel Sword besides the higher rank), and it should be sold to a unit that would appreciate it like Alec or Arden. | |||
The bulk of the enemy Barbarians and Hunters have been beefed up to Lv5; this gives them +1 Def and +4 HP, requiring units like Alec and Naoise to get a few levels in Str to continue killing them in a timely manner. Additionally, Sigurd now requires 2 Str level ups to continue one-rounding with his [[Steel Sword]], but speed-ties the Hunters with his [[Iron Lance]]; a single Spd level up or the Speed Ring enables him to continue one-rounding without picking up his Silver Sword just yet; remember he can swap back to his Steel Sword during Canto to keep his evasion up. Otherwise, as long as the entire army retains cohesion and either performs hit-and-run attacks to stay out of enemy range, or rushes in to kill as many enemies as possible, the player's units should survive without too much issue. | |||
[[Gerrard]] sits alone atop Castle Evans. He is mostly just DiMaggio, but with higher stats and a [[Hand Axe]] to do damage at range. Sigurd can still handle him easily with Ethlyn's healing, but it's recommended not to kill him too quickly, particularly if other units have the HP to deal some chip damage to him. In FE4, EXP gain is determined solely by the level of the units in combat; while most of the enemies were Lv1 or Lv5, with DiMaggio and a few Barbarians being Lv10, Gerrard is massively overleveled at Lv20. While this means he gives out a truckload of EXP to whoever kills him, it also means that anyone who damages him and lives gets a ton of EXP too. This EXP, typically about 25 EXP per combat, is almost as much, ''if not more'' than actually killing some of the enemies on the map, so it may be a good idea to let as many units as possible get some licks in on Gerrard for the EXP before moving in for the kill. Once he dies, seize with Sigurd to clear the map. | |||
==Etymology and other languages== | ==Etymology and other languages== | ||
{{Names | {{Names | ||
|eng-name=Birth of a Holy Knight | |eng-name=Birth of a Holy Knight | ||
|eng-mean= | |eng-mean=From the title of the song "Prologue: Birth of a Holy Knight"<!--In-game, it's a line break, not a colon--> in {{FEH}}. "Holy Knight" is the byname of [[Sigurd]], and also that of his Crusader ancestor [[Baldr]]. | ||
|eng-fan-name=• Birth of the Holy Knight<br | |eng-fan-name=• Birth of the Holy Knight<br>• Birth of a Crusader | ||
|eng-fan-mean=• Used in earlier fan translations | |eng-fan-mean=• Used in earlier fan translations.<br>• Used in the ''Project Naga'' [[fan translation]]. | ||
| | |jpn-name={{hover|聖騎士誕生|Sei kishi tanjō}} | ||
| | |jpn-mean=Birth of a Holy Knight. Along with the above, "Holy Knight" is additionally the term for the [[Paladin]] class used in dialogue in Japanese. | ||
|span-sp-name=Nace el caballero sacro | |||
|span-sp-mean=Birth of the Holy Knight; from ''Heroes''. | |||
|span-la-name=Nace un caballero sagrado | |||
|span-la-mean=Birth of a Holy Knight; from ''Heroes''. | |||
|fren-name=Naissance d'un chevalier sacré | |||
|fren-mean=Birth of a Holy Knight; from ''Heroes''. | |||
|ger-name=Geburt eines Heiligen Ritters | |||
|ger-mean=Birth of a Holy Knight; from ''Heroes''. | |||
|ital-name=Genesi del sacro cavaliere | |||
|ital-mean=Genesis of the Holy Knight; from ''Heroes''. | |||
|por-br-name=Nasce um cavaleiro sagrado | |||
|por-br-mean=Birth of a Holy Knight; from ''Heroes''. | |||
|ch-trad-name={{h|聖騎士誕生|Shèng qíshì dànshēng}} | |||
|ch-trad-mean=Birth of a Holy Knight; from ''Heroes''. | |||
}} | }} | ||
==Gallery== | ==Gallery== | ||
<gallery> | |||
Cm fe04 P.png|Map of the chapter | |||
</gallery> | |||
{{ChapterNav | {{ChapterNav | ||
Latest revision as of 11:53, 29 April 2024
| ||||||||
|

Birth of a Holy Knight (Japanese: 聖騎士誕生 Birth of a Holy Knight) is the prologue chapter of Fire Emblem: Genealogy of the Holy War. The chapter chronicles the short-lived Verdane invasion of a relatively defenseless Grannvale, Sigurd's movement to defend Yngvi and rescue its Lady Edain, his rise as a Holy Knight of Grannvale, and the beginning of his slow descent into a grave predicament.
Plot
- Main article:
Birth of a Holy Knight/Script
While the bulk of the armies of Grannvale are off to war in Isaach, the country itself is largely undefended. Grannvale's former ally Verdane takes advantage of this in a surprise assault led by Prince Munnir, storming the country and assaulting the dukedom of Yngvi. In response to this news and the threat facing Yngvi's Lady Edain, neighboring Chalphy's Lord Sigurd convenes what few knights remain in Chalphy to depart to aid Edain. As the fight passes, others arrive to support him - first Azelle of Velthomer and Lex of Dozel, both against the wishes of their family, then Quan, Ethlyn and Finn of Leonster. Meanwhile, at Yngvi, Midir of the Yngvi knights is gravely wounded by Munnir in attempting to protect Edain, allowing the Verdane forces to seize the castle. Munnir takes Edain back with him to Yngvi, leaving DiMaggio in charge of the Grannvale effort.
Upon reclaiming Yngvi, Sigurd finds Midir, who informs him of Edain's capture and volunteers to assist despite his injury. Meanwhile, at Evans Castle on the other side of the border, Gerrard of the Verdane army learns of Dimaggio's failure and orders that the bridge across the Jun River be restored, and that the remaining forces move in. At this time, Duke Arvis of Velthomer arrives from the north to observe the situation; he finds Sigurd and entrusts him with a Silver Sword, a gift from King Azmur, then departs. Sigurd eventually seizes Evans Castle; finding Edain was not there, he establishes a headquarters there and prepares to sortie directly into Verdane to find her. Filat arrives as a messenger arrives from Belhalla, delivering the news that Sigurd had been appointed a Holy Knight of Grannvale for his efforts and commissioning him to guard the Verdane border.
Chapter data
| Chapter Data | |||||
|---|---|---|---|---|---|
| Conditions | Unit Data | ||||
| Victory: Seize Evans Defeat: Sigurd dies or Chalphy Castle is seized |
| ||||
| |||||
| Map dimensions: 62 columns by 30 rows | |||||
| Combatants and castles | ||||||
|---|---|---|---|---|---|---|
| Army | Commander | Affiliation | Units | Castles | Guardian | Notes |
| Sigurd's | Sigurd | Player | 4 | Chalphy | Arden | Home castle |
| Evans | Munnir*/ Gerrard |
Enemy | 32+15 | Evans | Gerrard | Main objective |
| Yngvi | DiMaggio | • Seized by Munnir on turn 1; DiMaggio then becomes the guardian. • Once seized by Sigurd, the west bridge will be lowered and 15 additional units will appear from Evans | ||||
| Yngvi | Midir | Partner | 1 | Midir | ||
| -- | Arvis | Partner | 1 | -- | -- | • Appears once Sigurd seizes Yngvi. • Does not have a faction, castle, or phase, and moves at the end of Evans Phase. |
Character data
| Characters | ||||||||||||||||||||||||||||||||||||||||||||||||||||||||||||||||||||||||||||||||||||||||||||||||||||||||||||||
|---|---|---|---|---|---|---|---|---|---|---|---|---|---|---|---|---|---|---|---|---|---|---|---|---|---|---|---|---|---|---|---|---|---|---|---|---|---|---|---|---|---|---|---|---|---|---|---|---|---|---|---|---|---|---|---|---|---|---|---|---|---|---|---|---|---|---|---|---|---|---|---|---|---|---|---|---|---|---|---|---|---|---|---|---|---|---|---|---|---|---|---|---|---|---|---|---|---|---|---|---|---|---|---|---|---|---|---|---|---|---|
New units
| ||||||||||||||||||||||||||||||||||||||||||||||||||||||||||||||||||||||||||||||||||||||||||||||||||||||||||||||
| ||||||||||||||||||||||||||||||||||||||||||||||||||||||||||||||||||||||||||||||||||||||||||||||||||||||||||||||
Available characters
| ||||||||||||||||||||||||||||||||||||||||||||||||||||||||||||||||||||||||||||||||||||||||||||||||||||||||||||||
| None | ||||||||||||||||||||||||||||||||||||||||||||||||||||||||||||||||||||||||||||||||||||||||||||||||||||||||||||||
Item data
| |||||||||
|
In addition, five villages are present on the map, which can be visited to obtain up to 5,000 gold each.
Castle data
While the town can be visited from the Chalphy or, once conquered, Yngvi castles, the arena and armory are unavailable. The other four facilities—the blacksmith, pawnbroker, supply, and augury—are normally accessible.
Event data
| ||||||||||||||||||||||||
|
Unit data
Evans
| |||||||||||||||||||||||||||||||||||||||||||||||||||||||||||||||||||||||||||||||||||||||||||||||||||||||||||||||||||||||||||||||||||||||||||||||||||||||||||||||||||||||||||||||||||||||||||||||||||||||||||||||||||||||||||||||||||||||
| |||||||||||||||||||||||||||||||||||||||||||||||||||||||||||||||||||||||||||||||||||||||||||||||||||||||||||||||||||||||||||||||||||||||||||||||||||||||||||||||||||||||||||||||||||||||||||||||||||||||||||||||||||||||||||||||||||||||
| |||||||||||||||||||||||||||||||||||||||||||||||||||||||||||||||||||||||||||||||||||||||||||||||||||||||||||||||||||||||||||||||||||||||||||||||||||||||||||||||||||||||||||||||||||||||||||||||||||||||||||||||||||||||||||||||||||||||
| |||||||||||||||||||||||||||||||||||||||||||||||||||||||||||||||||||||||||||||||||||||||||||||||||||||||||||||||||||||||||||||||||||||||||||||||||||||||||||||||||||||||||||||||||||||||||||||||||||||||||||||||||||||||||||||||||||||||
Reinforcements
Once Yngvi has been seized, 10 Barbarians and 5 Hunters emerge from Evans Castle.
Yngvi
| ||||||||||||||||||||||||||||||||||||||||||
| ||||||||||||||||||||||||||||||||||||||||||
Arvis
| ||||||||||||||||||||||||||||||||||||||||||
| ||||||||||||||||||||||||||||||||||||||||||
Major units
Evans
- Main article:
DiMaggio
|
|
| ||||||||||||||||||||||||||||||||||||||||||||||||||||||||||
- DiMaggio is the guardian of Yngvi Castle and a sub-boss affiliated with Evans.
- Main article:
Gerrard
|
|
| ||||||||||||||||||||||||||||||||||||||||||||||||||||||||||
- Gerrard is the guardian of Evans Castle, and the boss of Evans after Munnir leaves.
- Main article:
Munnir
|
|
| ||||||||||||||||||||||||||||||||||||||||||||||||||||||||||
- Munnir is only present in the chapter for the first turn. He departs after a cutscene where he defeats Midir at Yngvi, and as such is unfought.
Yngvi
- Main article:
Midir
|
|
| ||||||||||||||||||||||||||||||||||||||||||||||||||||||||
- Midir is the guardian of Yngvi Castle and boss of Yngvi before being defeated by Munnir in a cutscene.
Arvis
- Main article:
Arvis
|
|
| ||||||||||||||||||||||||||||||||||||||||||||||||||||||||||
- Arvis appears on the turn Yngvi Castle is seized, and departs after Sigurd talks to him. He will actively seek out Sigurd and will only attack enemies which get in his way.
Strategy
Castle Yngvi
Sigurd's party sets out to save Castle Yngvi from a Verdanite invasion, but there's nothing they can do as Munnir will crit Midir out of the way and seize the castle at the start of the first Evans phase. For the time being, they need to fight their way over through the many Barbarians and Hunters. Sigurd is the best unit for the job as he can consistently one-round enemies and has a lot of avoid.
The villages will begin burning, thanks to the enemy Brigands. They take their time wrecking the place, however, and only after ten turns of inaction on your part will the villages be completely destroyed. However, the sooner it is saved, the greater the payout; 5000G for an undamaged village, minus 500G for each turn it was being attacked. Some villages, such as the southernmost one on this map, give out items or have special events associated with them when visited; these items and events are unaffected by the amount of damage the village has received, except if the village is completely destroyed, at which point that item/event is lost forever. Because gold is stored on an individual unit basis, the player should distribute the gold to whatever units need the gold the most.
On turn 2, Lex and Azelle join, this time at the top of the map, quite convenient for killing the nearby Brigand on the village.
While Sigurd's party continues pushing toward Yngvi, Azelle and Lex should focus on clearing out the nearby enemies; Lex baiting out enemies and softening them up while Azelle roasts them with his magic damage. If either of them take damage, they can wait on the nearby Church tile. Churches fully heal the unit on top of them at the start of their turn, at the cost of 5G per point of HP recovered; if you can't afford a full heal, you will be healed for as much as your funds permit; broke units get no healing whatsoever. The same applies to Castle healing, be it guarding a Castle or being inside the Home Castle; Castle healing is capped at (20% of Max HP)-1 per turn however, but the same interaction occurs with units too poor to afford part or all of the healing.
On turn 3, even more player units join, Quan, Ethlyn, and Finn, this time just south of Chalphy. These units are the reason Arden was safe to walk off of Chalphy earlier if the nearby Barbarian was killed; any other enemy unit that could threaten Chalphy would simply not arrive in time before these units showed up to defend Chalphy if necessary.
Sigurd's party should continue their attack on Yngvi; if any of them are too damaged to fight, they should retreat to get healed by Ethlyn. Quan's party should move south to back Sigurd up, while Azelle and Lex continue clearing out the enemies in the north.
Once the initial situation has stabilized, it is time to move on to other objectives. Take out the Brigand on the southernmost village; that village contains the valuable Speed Ring, that grants +5 Spd to whoever holds it. The trade command does not exist; to transfer items between two units, one unit must sell it to the pawnbroker, and the other unit needs to buy it from the pawnbroker. As the Speed Ring takes 20k to buy out of the pawnbroker, whoever plans to hold onto it for the next few maps should be the one to visit the village, unless that unit joins later (in which case the person visiting should be someone who will need the gold). Finn usually wants this item, as he needs it to reliably double in the next map, while Sigurd can use it to increase his Avo and solo enemy armies more reliably. Meanwhile, Lex and Azelle should NOT move towards Yngvi; they should instead focus on securing the remaining villages, as they are unlikely to arrive in time to be useful in Yngvi's conquest, but are in position to go after these villages that are out of the way.
Afterwards, it is time to recapture Yngvi. Defending Yngvi is the first instance of a recurring enemy formation best described as a "three-man guard". These formations are all over the game, and they behave very similarly; they do not move at all while the boss, on top of the castle, is alive, but will begin aggressively moving to attack whatever is near once the boss is dead. Their lack of mobility, initially, makes them fairly easy to pick off, however, and their behavior also means their movement ranges can be mostly ignored if one does not intend to fight them yet. DiMaggio is on top of the castle, and as such, he gets +30 Avo and castle healing. However, he's not much of a threat; all he does is be bulky and hit you fairly hard, but not hard enough to one-shot your units if they are fully healed. He also lacks 2-range, but Azelle takes way too long to reach him and Quan's Javelin has horrendous accuracy anyway. Just have Sigurd besiege the castle until he goes down.
Castle Evans
Once Sigurd seizes Yngvi, the remainder of the Evans army will emerge on their next turn. Instead of wastefully waiting for that to happen, have all non-Sigurd units continue to move towards the left side of the map. Additionally, Midir joins the party, having recovered to full HP after being crit earlier in the map. He is an Arch Knight, who is unable to fight back at close quarters. He is exactly fast enough to double the remaining enemies on the map, and has Follow-Up to do so. He also comes with Accost to allow him to continue firing upon his enemies, very appreciable against 1-range enemies as the extra attacks are effectively free damage. Midir has no doubling issues in the short term, but he does have trouble doubling fast enemies later on; the Speed Ring can help with that, but overall other units benefit from it more in the short term, in regards to consideration for Midir to visit the village and grab the Speed Ring immediately.
Arvis spawns at the top of the map at this time, and moves to hand a Silver Sword to Sigurd, and leaves once he does. He is comically invincible; not only are his stats absurdly high, his Recover Ring fully heals him each turn; nothing on the map can kill him, and anything that tries gets cooked by his 70 Atk. As he can speak to Sigurd on his own turn, there is little reason to have Sigurd go out of his way to do so; it is sufficient to simply leave Sigurd in Arvis' melee range, and this can easily be achieved by having Sigurd fight on the front line, and Canto towards Arvis after attacking once Arvis is sufficiently near. Once Sigurd has the Silver Sword, he has no need for his Steel Sword (as the Silver Sword has objectively better stats than the Steel Sword besides the higher rank), and it should be sold to a unit that would appreciate it like Alec or Arden.
The bulk of the enemy Barbarians and Hunters have been beefed up to Lv5; this gives them +1 Def and +4 HP, requiring units like Alec and Naoise to get a few levels in Str to continue killing them in a timely manner. Additionally, Sigurd now requires 2 Str level ups to continue one-rounding with his Steel Sword, but speed-ties the Hunters with his Iron Lance; a single Spd level up or the Speed Ring enables him to continue one-rounding without picking up his Silver Sword just yet; remember he can swap back to his Steel Sword during Canto to keep his evasion up. Otherwise, as long as the entire army retains cohesion and either performs hit-and-run attacks to stay out of enemy range, or rushes in to kill as many enemies as possible, the player's units should survive without too much issue.
Gerrard sits alone atop Castle Evans. He is mostly just DiMaggio, but with higher stats and a Hand Axe to do damage at range. Sigurd can still handle him easily with Ethlyn's healing, but it's recommended not to kill him too quickly, particularly if other units have the HP to deal some chip damage to him. In FE4, EXP gain is determined solely by the level of the units in combat; while most of the enemies were Lv1 or Lv5, with DiMaggio and a few Barbarians being Lv10, Gerrard is massively overleveled at Lv20. While this means he gives out a truckload of EXP to whoever kills him, it also means that anyone who damages him and lives gets a ton of EXP too. This EXP, typically about 25 EXP per combat, is almost as much, if not more than actually killing some of the enemies on the map, so it may be a good idea to let as many units as possible get some licks in on Gerrard for the EXP before moving in for the kill. Once he dies, seize with Sigurd to clear the map.
Etymology and other languages
| Names, etymology, and in other regions | ||
|---|---|---|
| Language | Name | Definition, etymology, and notes |
| English |
Birth of a Holy Knight |
From the title of the song "Prologue: Birth of a Holy Knight" in Fire Emblem Heroes. "Holy Knight" is the byname of Sigurd, and also that of his Crusader ancestor Baldr. |
| English (unofficial) |
• Birth of the Holy Knight |
• Used in earlier fan translations. |
| Japanese |
聖騎士誕生 |
Birth of a Holy Knight. Along with the above, "Holy Knight" is additionally the term for the Paladin class used in dialogue in Japanese. |
| Spanish (Spain) |
Nace el caballero sacro |
Birth of the Holy Knight; from Heroes. |
| Spanish (Latin America) |
Nace un caballero sagrado |
Birth of a Holy Knight; from Heroes. |
| French |
Naissance d'un chevalier sacré |
Birth of a Holy Knight; from Heroes. |
| German |
Geburt eines Heiligen Ritters |
Birth of a Holy Knight; from Heroes. |
| Italian |
Genesi del sacro cavaliere |
Genesis of the Holy Knight; from Heroes. |
| Portuguese (Brazil) |
Nasce um cavaleiro sagrado |
Birth of a Holy Knight; from Heroes. |
| Traditional Chinese |
聖騎士誕生 |
Birth of a Holy Knight; from Heroes. |
Gallery
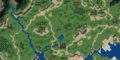
Map of the chapter
| Birth of a Holy Knight | • Lady of the Forest → |
|---|