| Site News |
|---|
| Warning: This wiki contains spoilers. Read at your own risk! Social media: If you would like, please join our Discord server, and/or follow us on Twitter (X) or Tumblr! |
Blood of Pride: Difference between revisions
m (Text replacement - "of Fire Emblem (GBA)" to "of Fire Emblem: The Blazing Blade") |
Thecornerman (talk | contribs) m (Text replacement - "[Cc]hapter (\d+)" to "Chapter $1") |
||
| (41 intermediate revisions by 13 users not shown) | |||
| Line 1: | Line 1: | ||
{{Chapter Infobox | {{Chapter Infobox | ||
|image=[[File:Cm fe07 6.png|200px]] | |||
|image=[[File:Cm fe07 6.png]] | |||
|location=[[Araphen]] | |location=[[Araphen]] | ||
|req units=[[Dorcas]], [[Erk]], [[Florina]], [[Kent]], [[Lyn]], [[Sain]], [[Serra]], [[Wil]] | |||
|new units=[[Rath]], [[Matthew]] | |new units=[[Rath]], [[Matthew]] | ||
|boss=[[Bool]] | |boss=[[Bool]] | ||
|previous=[[Beyond the Borders]] | |||
|next=[[Siblings Abroad]] | |||
}} | }} | ||
'''Blood of Pride''' (Japanese: {{ | |||
{{quote|These brigands are after me. If they're attacking the castle, it's because of me. So I must help if I can...|[[Lyn]]}} | |||
'''Blood of Pride''' (Japanese: {{hl|誇り高き血|Hokori takaki chi}} ''Proud Blood'') is the sixth chapter in {{FE7}}. | |||
==Plot== | ==Plot== | ||
{{main|Blood of Pride/Script}} | {{main|Blood of Pride/Script}} | ||
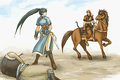
[[File:Cg fe07 06.png|thumb|right|[[Lyn]] meets [[Rath]].]] | |||
Lyn arrives in Lycia and stops in [[Araphen]] to request supplies from the marquess of the region. However, before they can receive the promised aid of Marquess Araphen that [[Kent]] arranged for, the castle is set ablaze by the mercenaries sent by [[Lundgren]]. Lyn is caught off guard by one of the mercenaries, but is saved just in time by [[Rath]], a member of the castle guard. Lyn insists on aiding him against the mercenaries, since she is the reason why the mercenaries are attacking the castle. Rath reveals that there is a secret tunnel that leads to the castle that will enable him and his men to ensure the marquess's safety in a timely manner. Lyn realizes that she does not have any means of opening the doors to the rooms where the triggers for the secret passage are located; fortunately, the thief [[Matthew]] watched the conflict from a nearby house, and is willing to lend his services. | |||
After defeating [[Bool]] and opening the secret passage, Rath and his troops suppress the mercenaries. Marquess Araphen requests a meeting with Lyn and her group; he rescinds his previous offer of supplies due to the annoyance he feels with being caught in [[Caelin]]'s inheritance dispute. Additionally, Marquess Araphen claims that he does not feel comfortable lending aid to one "tainted with the blood of Sacae", nor does not want to sour his relationship with Lundgren, who he believes will succeed in becoming the next Marquess of Caelin as Hausen has fallen ill. Lyn refuses to beg for aid from a man who disparages her lineage, and takes her leave of the marquess. After Lyn departs, Marquess Araphen rants to himself that he would have lent Lyn the aid he promised had she merely shed a few tears and acted more humble. Rath confronts Marquess Araphen on his treatment of Lyn and his comments about the Sacaens; Marquess Araphen insists he is proud of Rath's work, but Rath accuses the Marquess of only reserving his judgments of Sacaens when they are subservient to him, and resigns from his service. Rath catches up to Lyn before she leaves Araphen; if he fell in battle, he informs her that he intents to travel Lycia and heal before returning to Sacae, but asks to join her on her quest if he was not defeated—regardless, he also gifts her [[gold]] before they depart Araphen. | |||
==Chapter data== | ==Chapter data== | ||
{{ | {{ChapData | ||
|victory=Trigger 3 switches | |victory=Trigger 3 switches | ||
|defeat=[[Lyn]] dies | |defeat=[[Lyn]] dies | ||
|ally=8{{ | |ally=8{{h|+2|Upon Rath and Matthew being recruited}} | ||
|enemy=7 | |enemy=7 | ||
|map=[[File:Cm fe07 6.png]] | |map=[[File:Cm fe07 6.png]] | ||
| Line 29: | Line 31: | ||
===Character data=== | ===Character data=== | ||
{{ChapChars | {{ChapChars | ||
|newunit1={{NewUnit | |newunit1={{NewUnit | ||
|name=Rath | |name=Rath | ||
|portrait=[[File:Portrait rath fe07.png]] | |portrait=[[File:Portrait rath fe07.png|link=Rath#Starting stats and growth rates]] | ||
|class=Nomad | |class=Nomad | ||
|HP=25 | |HP=25 | ||
|lv=7 | |lv=7 | ||
|recruitment method=Automatically from | |inventory={{Item|7|Short Bow}}<br>{{Item|7|Vulnerary}} | ||
|recruitment method=Automatically from turn 1 | |||
}} | }} | ||
|newunit2={{NewUnit | |newunit2={{NewUnit | ||
|name=Matthew | |name=Matthew | ||
|portrait=[[File:Portrait matthew fe07.png]] | |portrait=[[File:Portrait matthew fe07.png|link=Matthew#Starting stats and growth rates]] | ||
|class=Thief | |class=Thief | ||
|HP=18 | |HP=18 | ||
|lv=2 | |lv=2 | ||
|recruitment method= | |inventory={{Item|7|Iron Sword}}<br>{{Item|7|Lockpick}} | ||
|recruitment method=Visit the northern village, or automatically on turn 3 | |||
}} | }} | ||
|game#=07 | |game#=07 | ||
| | |forced1=lyn | ||
| | |return1=kent | ||
| | |return2=sain | ||
| | |return3=wil | ||
| | |return4=florina | ||
| | |return5=dorcas | ||
| | |return6=serra | ||
| | |return7=erk | ||
}} | }} | ||
| Line 65: | Line 68: | ||
|obtain2=Open [[chest]] | |obtain2=Open [[chest]] | ||
|item3=Door Key | |item3=Door Key | ||
|obtain3=Visit | |obtain3=Visit central [[village]] | ||
| | |item4=Door Key | ||
| | |obtain4=Dropped by an enemy [[Soldier]] | ||
|item5=Door Key | |||
|obtain5=Dropped by an enemy [[Soldier]]<br><small>(Hard only)</small> | |||
|itemlast=5,000G | |||
|itemlastimage=gold | |||
|itemlastarticle=Gold | |||
|obtainlast=Automatically at end of chapter | |||
}} | }} | ||
===Enemy data=== | ===Enemy data=== | ||
{{ | :''Stats with two figures separated by a ~ are presented as a range, representing stats that vary due to random growths. The figures to the left and right of the ~ are the stat's minimum and maximum possible values respectively.'' | ||
{{ | {{Tab | ||
| | |width=100% | ||
| | |tab1=Normal | ||
| | |tab2=Hard | ||
| | |content1={{ChapUnitHdr|type=Enemy|platform=gba}} | ||
|# | {{ChapUnitCellGBA | ||
| | |name=[[Bool]] | ||
| | |class=Knight | ||
| | |lv=5 | ||
| | |#=1 | ||
| | |hp=26 | ||
|#2=1 | |str=8 | ||
| | |skill=4 | ||
| | |spd=2 | ||
| | |lck=1 | ||
| | |def=10 | ||
| | |res=0 | ||
|#3= | |con=13 | ||
| | |mov=4 | ||
| | |inventory={{Item|7|Steel Lance}} | ||
| | |notes=Does not move; will not act until revealed. | ||
| | }} | ||
| | {{ChapUnitCellGBA | ||
|#4=1 | |name=Bandit | ||
| | |class=Mercenary | ||
|lv=1 | |||
|#=2 | |||
|hp=18 | |||
|str=3 | |||
|skill=8 | |||
|spd=8 | |||
|lck=0 | |||
|def=4 | |||
|res=0 | |||
|con=9 | |||
|mov=5 | |||
|inventory={{Item|7|Iron Sword}} | |||
|notes=Moves to attack units in range. | |||
}} | |||
{{ChapUnitCellGBA | |||
|name=Bandit | |||
|class=Archer | |||
|lv=1 | |||
|#=1 | |||
|hp=20 | |||
|str=3 | |||
|skill=8 | |||
|spd=9 | |||
|lck=0 | |||
|def=4 | |||
|res=1 | |||
|con=9 | |||
|mov=5 | |||
|inventory={{Item|7|Iron Bow}} | |||
|notes=Will not act until revealed. | |||
}} | |||
{{ChapUnitCellGBA | |||
|name=Bandit | |||
|class=Soldier | |||
|lv=1 | |||
|#=2 | |||
|hp=20 | |||
|str=3 | |||
|skill=0 | |||
|spd=1 | |||
|lck=0 | |||
|def=0 | |||
|res=0 | |||
|con=6 | |||
|mov=5 | |||
|inventory={{Item|7|Iron Lance}} | |||
|notes=• The initially covered one moves to attack units in range; will not act until revealed.<br>• The one in front of the door does not move. | |||
}} | |||
{{ChapUnitCellGBA | |||
|name=Bandit | |||
|class=Soldier | |||
|lv=1 | |||
|#=1 | |||
|hp=20 | |||
|str=3 | |||
|skill=0 | |||
|spd=1 | |||
|lck=0 | |||
|def=0 | |||
|res=0 | |||
|con=6 | |||
|mov=5 | |||
|inventory={{Item|7|Iron Lance}} • {{Item|7|Door Key|type=drop}} | |||
|notes=Does not move; will not act until revealed. | |||
|last=y | |||
}} | |||
{{ChapUnitFtr}} | |||
|content2={{ChapUnitHdr|type=Enemy|platform=gba}} | |||
{{ChapUnitCellGBA | |||
|name=[[Bool]] | |||
|class=Knight | |||
|lv=5 | |||
|#=1 | |||
|hp=26 | |||
|str=8 | |||
|skill=4 | |||
|spd=2 | |||
|lck=1 | |||
|def=10 | |||
|res=0 | |||
|con=13 | |||
|mov=4 | |||
|inventory={{Item|7|Steel Lance}} | |||
|notes=Does not move; will not act until revealed. | |||
}} | |||
{{ChapUnitCellGBA | |||
|name=Bandit | |||
|class=Mercenary | |||
|lv=1 | |||
|#=2 | |||
|hp=18 | |||
|str=3 | |||
|skill=8 | |||
|spd=8 | |||
|lck=0 | |||
|def=4 | |||
|res=0 | |||
|con=9 | |||
|mov=5 | |||
|inventory={{Item|7|Iron Sword}} | |||
|notes=Moves to attack units in range. | |||
}} | |||
{{ChapUnitCellGBA | |||
|name=Bandit | |||
|class=Archer | |||
|lv=1 | |||
|#=1 | |||
|hp=20 | |||
|str=3 | |||
|skill=8 | |||
|spd=9 | |||
|lck=0 | |||
|def=4 | |||
|res=1 | |||
|con=9 | |||
|mov=5 | |||
|inventory={{Item|7|Iron Bow}} | |||
|notes=Will not act until revealed. | |||
}} | |||
{{ChapUnitCellGBA | |||
|name=Bandit | |||
|class=Soldier | |||
|lv=1 | |||
|#=1 | |||
|hp=20 | |||
|str=3 | |||
|skill=0 | |||
|spd=1 | |||
|lck=0 | |||
|def=0 | |||
|res=0 | |||
|con=6 | |||
|mov=5 | |||
|inventory={{Item|7|Iron Lance}} | |||
|notes=Moves to attack units in range; will not act until revealed. | |||
}} | |||
{{ChapUnitCellGBA | |||
|name=Bandit | |||
|class=Soldier | |||
|lv=1 | |||
|#=2 | |||
|hp=20 | |||
|str=3 | |||
|skill=0 | |||
|spd=1 | |||
|lck=0 | |||
|def=0 | |||
|res=0 | |||
|con=6 | |||
|mov=5 | |||
|inventory={{Item|7|Iron Lance}} • {{Item|7|Door Key|type=drop}} | |||
|notes=Does not move; the covered one will not act until revealed. | |||
|last=y | |||
}} | |||
{{ChapUnitFtr}} | |||
}} | }} | ||
| Line 103: | Line 267: | ||
{{BossStats GBA | {{BossStats GBA | ||
|portrait=[[File:Portrait bool fe07.png]] | |portrait=[[File:Portrait bool fe07.png]] | ||
|sprite=knight enemy | |||
|class=Knight | |class=Knight | ||
|lv=5 | |lv=5 | ||
| Line 115: | Line 280: | ||
|con=13 | |con=13 | ||
|aid=12 | |aid=12 | ||
|inventory={{Item|7|Steel Lance}} | |||
|la=D | |la=D | ||
}} | }} | ||
==Strategy== | ==Strategy== | ||
{{ | {{augury|character=none|note=[[Hannah]] will offer her services beginning in [[False Friends|Chapter 14]].}} | ||
{{strategy}} | |||
On normal mode, the player is given a forced tutorial. On the first turn, the game will force you to visit the house where you can recruit [[Matthew]], a [[Thief]]. Afterwards, the game will give a brief tutorial of how thieves and locked rooms work by forcing the player to open the nearest door with Matthew. Opening the door will reveal one of the three triggers that a unit must wait on top of to clear the chapter. [[Rath]] will be forced to activate the trigger, which causes a pathway that contains a single [[Soldier]] and a [[chest]] to be revealed. At the start of turn 2, Matthew will notice a chest and tell the tactician to move him to it so that he can [[steal]] it. The chest contains an [[Angelic Robe]] which the player should use before the end of [[List of chapters in Fire Emblem: The Blazing Blade|Lyn's tale]] or it will disappear. Matthew will suggest you use it on someone with poor defenses like himself, however, you should give it to someone who will see more combat like [[Sain]], [[Kent]], or [[Florina]]. After this point the player will be free to approach the chapter how they see fit. | |||
There is a trigger in the room to the south. Pick up the [[Door Key]] from the [[Village]] on the first turn with one of the mounted units so they can use [[Canto]] to move closer to the locked door. Take out the Soldier guarding the door with the units who did not grab the door key, open the door, then activate the trigger. It is worth noting that you do not have to "wait" on the triggers to set them off; If you move a mounted unit on top of the triggers and then use a [[Vulnerary]], trade, or [[Rescue (command)|rescue]]/drop a unit while on top of the trigger, that unit will activate the trigger and then, using Canto, they can move away from the tile. | |||
The boss will be revealed once the second trigger is activated. He will be between the locked room with the [[Armorslayer]] in it and the room with the first trigger. Make sure to move [[Erk]] towards this location. The soldier guarding the room with the Armorslayer does not move, making him very easy to approach and take out. | |||
The best unit to take out Bool is Erk on account of the boss's zero resistance and lack of 1-2 range weapons. Erk at base can inflict twenty damage in a single round of combat to Bool. After attacking with Erk, [[Lyn]] can get the kill with the [[Mani Katti]] or one of the [[Cavalier]]s can with a lance or the Armorslayer. | |||
The strategies displayed in the tutorials on Normal mode are not always the most efficient ways to clear a chapter; however, this chapter is an exception. The player should still recruit Matthew on the first turn, use Matthew to open the nearest door then have Rath stand on the first trigger. | |||
==Trivia== | ==Trivia== | ||
* The Marquess of Araphen shares his base portrait with [[Aion]], the boss of [[Imprisoner of Magic|Chapter 18xE/19xH]], though Aion is recolored. | |||
*The beginning log of this chapter makes it sound like Lyn is leaving Araphen, even though she is actually entering it. This is an error that only exists in the localization, as in the Japanese version the text only states she is in Araphen and is going to travel further from it in the future. | |||
==Etymology and other languages== | ==Etymology and other languages== | ||
{{Names | {{Names | ||
|eng-name=Blood of Pride | |eng-name=Blood of Pride | ||
| | |jpn-name={{h|誇り高き血|Hokori takaki chi}} | ||
|jpn-mean=Proud Blood | |||
| | |span-name=Sangre de orgullo | ||
| | |span-mean=Blood of pride | ||
| | |fren-name=Le sang de la vanité | ||
| | |fren-mean=The Blood of Vanity | ||
| | |ger-name=Stolzes Blut | ||
|ger-name= | |ger-mean=Proud Blood | ||
|ger-mean= | |ital-name=Sangue d'orgoglio | ||
|ital-name= | |ital-mean=Blood of pride | ||
|ital-mean= | |||
}} | }} | ||
==Gallery== | ==Gallery== | ||
<gallery> | <gallery> | ||
Cg fe07 06.png|[[Lyn]] | Cm fe07 6.png|This chapter's map. | ||
Cg fe07 museum 06.png|An earlier version of Lyn meeting Rath from [https://www.nintendo.co.jp/fe/fe_museum/rekka/gallery/index.html Fire Emblem Museum]. | Cg fe07 06.png|[[Lyn]] meets [[Rath]]. | ||
</gallery> | Cg fe07 museum 06.png|An earlier version of Lyn meeting Rath from [https://www.nintendo.co.jp/fe/fe_museum/rekka/gallery/index.html Fire Emblem Museum]{{dead link}}. | ||
===Prototype=== | </gallery> | ||
:<small>Images from the ''Fire Emblem'' [[Fire Emblem: The Blazing Blade | |||
<gallery> | ===Prototype=== | ||
Cg fe07 06 proto.png|Lyn meeting Rath in the prototype. | :<small>Images from the ''Fire Emblem'' [[Fire Emblem: The Blazing Blade pre-release build 0206|0206]] and [[Fire Emblem: The Blazing Blade pre-release build 0219|0219]] prototypes.</small> | ||
<gallery> | |||
Cg fe07 06 proto.png|Lyn meeting Rath in the prototype. | |||
</gallery> | </gallery> | ||
{{ChapterNav | {{ChapterNav | ||
|prechapter=Beyond the Borders | |prechapter=Beyond the Borders | ||
|nextchapter=Siblings Abroad | |nextchapter=Siblings Abroad | ||
}} | }} | ||
Latest revision as of 13:33, 28 March 2024
| ||||||||||||
|

| “ | These brigands are after me. If they're attacking the castle, it's because of me. So I must help if I can... | ” | — Lyn |
|---|
Blood of Pride (Japanese: 誇り高き血 Proud Blood) is the sixth chapter in Fire Emblem: The Blazing Blade.
Plot
- Main article:
Blood of Pride/Script

Lyn arrives in Lycia and stops in Araphen to request supplies from the marquess of the region. However, before they can receive the promised aid of Marquess Araphen that Kent arranged for, the castle is set ablaze by the mercenaries sent by Lundgren. Lyn is caught off guard by one of the mercenaries, but is saved just in time by Rath, a member of the castle guard. Lyn insists on aiding him against the mercenaries, since she is the reason why the mercenaries are attacking the castle. Rath reveals that there is a secret tunnel that leads to the castle that will enable him and his men to ensure the marquess's safety in a timely manner. Lyn realizes that she does not have any means of opening the doors to the rooms where the triggers for the secret passage are located; fortunately, the thief Matthew watched the conflict from a nearby house, and is willing to lend his services.
After defeating Bool and opening the secret passage, Rath and his troops suppress the mercenaries. Marquess Araphen requests a meeting with Lyn and her group; he rescinds his previous offer of supplies due to the annoyance he feels with being caught in Caelin's inheritance dispute. Additionally, Marquess Araphen claims that he does not feel comfortable lending aid to one "tainted with the blood of Sacae", nor does not want to sour his relationship with Lundgren, who he believes will succeed in becoming the next Marquess of Caelin as Hausen has fallen ill. Lyn refuses to beg for aid from a man who disparages her lineage, and takes her leave of the marquess. After Lyn departs, Marquess Araphen rants to himself that he would have lent Lyn the aid he promised had she merely shed a few tears and acted more humble. Rath confronts Marquess Araphen on his treatment of Lyn and his comments about the Sacaens; Marquess Araphen insists he is proud of Rath's work, but Rath accuses the Marquess of only reserving his judgments of Sacaens when they are subservient to him, and resigns from his service. Rath catches up to Lyn before she leaves Araphen; if he fell in battle, he informs her that he intents to travel Lycia and heal before returning to Sacae, but asks to join her on her quest if he was not defeated—regardless, he also gifts her gold before they depart Araphen.
Chapter data
| ||||||
|
| |||||
| Victory: Trigger 3 switches | Player | Enemy | ||||
|---|---|---|---|---|---|---|
| Defeat: Lyn dies | 8+2 | 7 | ||||
| ||||||
Character data
| Characters | ||||||||||||||||||||||
|---|---|---|---|---|---|---|---|---|---|---|---|---|---|---|---|---|---|---|---|---|---|---|
New units
| ||||||||||||||||||||||
| ||||||||||||||||||||||
Required characters
| ||||||||||||||||||||||
Available characters
| ||||||||||||||||||||||


Item data
| |||||||||||||||||||||
|
Enemy data
- Stats with two figures separated by a ~ are presented as a range, representing stats that vary due to random growths. The figures to the left and right of the ~ are the stat's minimum and maximum possible values respectively.
Normal Hard
| ||||||||||||||||||||||||||||||||||||||||||||||||||||||||||||||||||||||||||||||||||||||||||||||||||||||||||||||||||||||||||||||||||||||||||||||||||||||
| ||||||||||||||||||||||||||||||||||||||||||||||||||||||||||||||||||||||||||||||||||||||||||||||||||||||||||||||||||||||||||||||||||||||||||||||||||||||
Boss data
- Main article:
Bool
|
|
| |||||||||||||||||||||||||||||||||||||||||||||||||||

Strategy
| Augury | |
|---|---|
| This chapter has no augury. Hannah will offer her services beginning in Chapter 14. | |
| This section details unofficial strategies that may help with completion of the chapter. This may not work for everybody. |
On normal mode, the player is given a forced tutorial. On the first turn, the game will force you to visit the house where you can recruit Matthew, a Thief. Afterwards, the game will give a brief tutorial of how thieves and locked rooms work by forcing the player to open the nearest door with Matthew. Opening the door will reveal one of the three triggers that a unit must wait on top of to clear the chapter. Rath will be forced to activate the trigger, which causes a pathway that contains a single Soldier and a chest to be revealed. At the start of turn 2, Matthew will notice a chest and tell the tactician to move him to it so that he can steal it. The chest contains an Angelic Robe which the player should use before the end of Lyn's tale or it will disappear. Matthew will suggest you use it on someone with poor defenses like himself, however, you should give it to someone who will see more combat like Sain, Kent, or Florina. After this point the player will be free to approach the chapter how they see fit.
There is a trigger in the room to the south. Pick up the Door Key from the Village on the first turn with one of the mounted units so they can use Canto to move closer to the locked door. Take out the Soldier guarding the door with the units who did not grab the door key, open the door, then activate the trigger. It is worth noting that you do not have to "wait" on the triggers to set them off; If you move a mounted unit on top of the triggers and then use a Vulnerary, trade, or rescue/drop a unit while on top of the trigger, that unit will activate the trigger and then, using Canto, they can move away from the tile.
The boss will be revealed once the second trigger is activated. He will be between the locked room with the Armorslayer in it and the room with the first trigger. Make sure to move Erk towards this location. The soldier guarding the room with the Armorslayer does not move, making him very easy to approach and take out.
The best unit to take out Bool is Erk on account of the boss's zero resistance and lack of 1-2 range weapons. Erk at base can inflict twenty damage in a single round of combat to Bool. After attacking with Erk, Lyn can get the kill with the Mani Katti or one of the Cavaliers can with a lance or the Armorslayer.
The strategies displayed in the tutorials on Normal mode are not always the most efficient ways to clear a chapter; however, this chapter is an exception. The player should still recruit Matthew on the first turn, use Matthew to open the nearest door then have Rath stand on the first trigger.
Trivia
- The Marquess of Araphen shares his base portrait with Aion, the boss of Chapter 18xE/19xH, though Aion is recolored.
- The beginning log of this chapter makes it sound like Lyn is leaving Araphen, even though she is actually entering it. This is an error that only exists in the localization, as in the Japanese version the text only states she is in Araphen and is going to travel further from it in the future.
Etymology and other languages
| Names, etymology, and in other regions | ||
|---|---|---|
| Language | Name | Definition, etymology, and notes |
| English |
Blood of Pride |
-- |
| Japanese |
誇り高き血 |
Proud Blood |
| Spanish |
Sangre de orgullo |
Blood of pride |
| French |
Le sang de la vanité |
The Blood of Vanity |
| German |
Stolzes Blut |
Proud Blood |
| Italian |
Sangue d'orgoglio |
Blood of pride |
Gallery
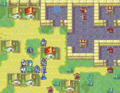
This chapter's map.
![An earlier version of Lyn meeting Rath from Fire Emblem Museum[dead link].](https://cdn.fireemblemwiki.org/thumb/e/e7/Cg_fe07_museum_06.png/120px-Cg_fe07_museum_06.png)
An earlier version of Lyn meeting Rath from Fire Emblem Museum[dead link].
![An earlier version of Lyn meeting Rath from Fire Emblem Museum[dead link].](/wiki/File:Cg_fe07_museum_06.png)
Prototype
Lyn meeting Rath in the prototype.

| ← Beyond the Borders • | Blood of Pride | • Siblings Abroad → |
|---|