| Site News |
|---|
| Warning: This wiki contains spoilers. Read at your own risk! Social media: If you would like, please join our Discord server, and/or follow us on X (Twitter) or Tumblr! |
Chosen by Fate
| ||||||||
|
| “ | Come, my friends! We have a dragon to tame! Help me confine Medeus to the shadows for all eternity and bring light back into the world! | ” | — Marth |
|---|
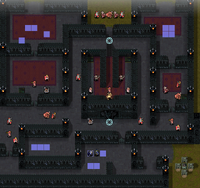
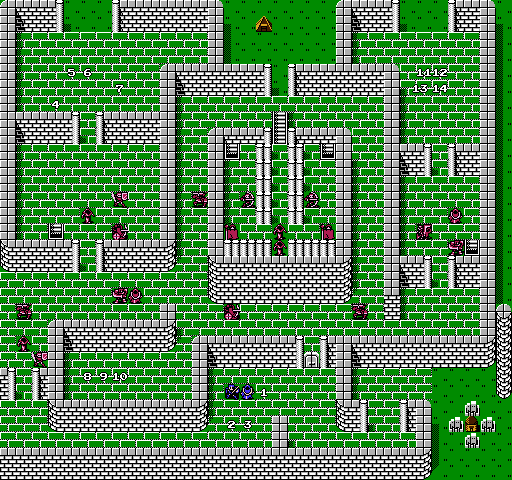
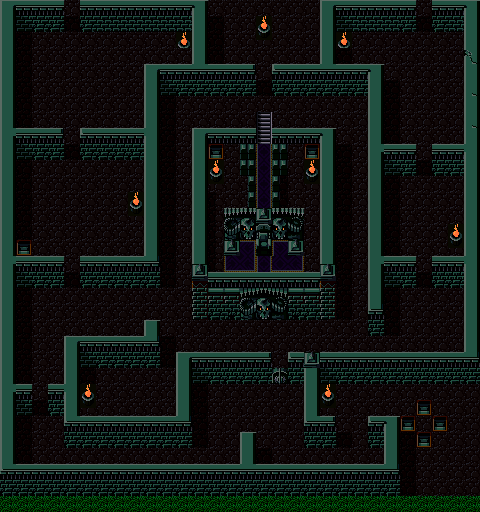
Chosen by Fate (Japanese: 選ばれし者たち The Chosen Ones) is twenty-fifth chapter of Fire Emblem: Shadow Dragon & the Blade of Light and Fire Emblem: Shadow Dragon, and the twentieth chapter of Book I of Fire Emblem: Mystery of the Emblem; it is the final chapter of each, and is termed "Endgame" in Shadow Dragon. The Archanean League storms Dolhr Keep to defeat Medeus and end the War of Shadows.
Plot
- Main article:
Chosen by Fate/Script
Joined by either Gotoh or Nagi, Marth and his companions engage Dolhr in a harrowing final battle and finally slay Medeus, bringing an end to the War of Shadows. Peace finally returns to the land. If Caeda survived the war, Marth (with a little helpful prodding from Nyna) asks her to accompany him back to Altea, and she happily agrees. If Caeda is dead, Marth laments his inability to protect her, and Nyna attributes it to a curse on the Fire Emblem.
Chapter data
Shadow Dragon & the Blade of Light Mystery of the Emblem Shadow Dragon
| ||||||
|
| |||||
| Victory: Defeat Medeus | Player | Enemy | ||||
|---|---|---|---|---|---|---|
| Defeat: Marth dies | 1–15+1 | 27+49 | ||||
| ||||||
| Map dimensions: 30 columns by 28 rows | ||||||
Throughout the chapter, doors will close on various predetermined player phases:
- The northeast and northwest doors close on turn 3
- The southwest door closes on turn 4
- The center-west door closes on turn 5
- The center-east door closes on turn 6
- The northernmost door closes on turn 9
- The center-most door closes on turn 10
Character data
Shadow Dragon & the Blade of Light Mystery of the Emblem Shadow Dragon
| Characters | ||||||||||||||||||||||
|---|---|---|---|---|---|---|---|---|---|---|---|---|---|---|---|---|---|---|---|---|---|---|
New units
| ||||||||||||||||||||||
| ||||||||||||||||||||||
Required characters
| ||||||||||||||||||||||

| ||||||||||||||||||||||
Available characters
| ||||||||||||||||||||||
                                                       
| ||||||||||||||||||||||
Item data
Shadow Dragon & the Blade of Light Mystery of the Emblem Shadow Dragon
| |||||||||||||||||||||
|
Shop data
Shadow Dragon & the Blade of Light Shadow Dragon
Swords Lances Axes Bows Tomes Staves Items Secret
None
Enemy data
Shadow Dragon & the Blade of Light Mystery of the Emblem Shadow Dragon
- Stats with a decimal can vary randomly; the decimal represents the chance for the stat to increase to the nearest integer, or otherwise be truncated.
Normal Hard-1 Hard-2 Hard-3 Hard-4 Hard-5
| |||||||||||||||||||||||||||||||||||||||||||||||||||||||||||||||||||||||||||||||||||||||||||||||||||||||||||||||||||||||||||||||||||||||||||||||||||||||||||||||||||||||||||||||||||||||||||||||||||||||||||||||||||||||||||||||||||||||||||||||||||||||||||||||||||||||||||||||||||||||||||||||||||||||||||||||||||||||||||||||||||||||||||||||||||||||||||||||||||||||||||||||||||||||||||||||||||||||||||||||||||||||||||||||||||||||||||||||||||||||||||||||||||||||||||||||||||||||||||||||||||||||||||||||||||||||||||||||||||||||||||||||||||||||||||||||||||||||||||
| |||||||||||||||||||||||||||||||||||||||||||||||||||||||||||||||||||||||||||||||||||||||||||||||||||||||||||||||||||||||||||||||||||||||||||||||||||||||||||||||||||||||||||||||||||||||||||||||||||||||||||||||||||||||||||||||||||||||||||||||||||||||||||||||||||||||||||||||||||||||||||||||||||||||||||||||||||||||||||||||||||||||||||||||||||||||||||||||||||||||||||||||||||||||||||||||||||||||||||||||||||||||||||||||||||||||||||||||||||||||||||||||||||||||||||||||||||||||||||||||||||||||||||||||||||||||||||||||||||||||||||||||||||||||||||||||||||||||||||
| |||||||||||||||||||||||||||||||||||||||||||||||||||||||||||||||||||||||||||||||||||||||||||||||||||||||||||||||||||||||||||||||||||||||||||||||||||||||||||||||||||||||||||||||||||||||||||||||||||||||||||||||||||||||||||||||||||||||||||||||||||||||||||||||||||||||||||||||||||||||||||||||||||||||||||||||||||||||||||||||||||||||||||||||||||||||||||||||||||||||||||||||||||||||||||||||||||||||||||||||||||||||||||||||||||||||||||||||||||||||||||||||||||||||||||||||||||||||||||||||||||||||||||||||||||||||||||||||||||||||||||||||||||||||||||||||||||||||||||
| |||||||||||||||||||||||||||||||||||||||||||||||||||||||||||||||||||||||||||||||||||||||||||||||||||||||||||||||||||||||||||||||||||||||||||||||||||||||||||||||||||||||||||||||||||||||||||||||||||||||||||||||||||||||||||||||||||||||||||||||||||||||||||||||||||||||||||||||||||||||||||||||||||||||||||||||||||||||||||||||||||||||||||||||||||||||||||||||||||||||||||||||||||||||||||||||||||||||||||||||||||||||||||||||||||||||||||||||||||||||||||||||||||||||||||||||||||||||||||||||||||||||||||||||||||||||||||||||||||||||||||||||||||||||||||||||||||||||||||
Reinforcements
Shadow Dragon & the Blade of Light
- Turns 6–70
- One Hero with a Silver Sword from the right central stairs
- One Manakete from the left central stairs
- Turns 7–70
- One Ballistician from the right western stairs
- One Wyvern Knight from the eastern stairs
- Turns 8–70
- One Bishop from the left western stairs
- Turns 10–70
- One Paladin from the upper southeastern fort
- One Wyvern Knight from the left southeastern fort
- One Manakete from the right southeastern fort
- One Hero with a Killing Edge from the lower southeastern fort
Mystery of the Emblem
- On turn 6, continuing until 1 of each has appeared; halted when Medeus is defeated
- One Bishop from the northeast entrance
- One Bishop from the northwest entrance
- Seven Mage Dragons, one from each stair
Shadow Dragon
- Turns 4, 6, 8, 10, 15, and 20
- One Ballistician from the right northwestern stairs
- One Bishop from the left northwestern stairs
- One Hero with a Silver Axe*/Brave Axe* from the right central stairs
- One Manakete with a Magestone from the left central stairs
- Turns 5, 8, 11, 15, and 20
- Two Dracoknights; one from the eastern stairs, one from the left southeastern fort
- One Paladin from the upper southeastern fort
- One Manakete with a Firestone from the right southeastern fort
- One Hero with a Silver Sword*/Brave Sword* from lower southeastern fort
Boss data
- Main article:
Medeus
Shadow Dragon & the Blade of Light Mystery of the Emblem Shadow Dragon
- Stats with a decimal can vary randomly; the decimal represents the chance for the stat to increase to the nearest integer, or be otherwise truncated.
Earth Dragon Manakete
Normal Hard-1 Hard-2 Hard-3 Hard-4 Hard-5
|
|
| |||||||||||||||||||||||||||||||||||||||||||
Strategy
| This section details unofficial strategies that may help with completion of the chapter. This may not work for everybody. |
Shadow Dragon & the Blade of Light
Throughout the chapter, doors will close at the start of certain player phases:
- The northeast and northwest doors close on turn 3
- The southwest door closes on turn 4
- The center-west door closes on turn 5
- The center-east door closes on turn 6
- The northernmost door, near the convoy, closes on turn 9
- The center-most door, at the top of the stairs into Medeus's chamber, closes on turn 11
Note that, so long as you move your units into the center in a timely manner, these doors will prevent most of the enemy reinforcements from being able to reach you.
Due to his Earthstone, Medeus is immune to both ranged and magical attacks (including the Levin Sword), and he has a massive 35 Defense. With the maximum Strength being only 20, very few weapons are at all capable of harming him. If you lack the Falchion, your highest damage options are Gradivus or a Devil Axe, each dealing a maximum of 5 damage per attack at 20 Strength. The other remaining options are Mercurius at 3 damage, Devil Sword at 2, or Bantu's Firestone at 1.
Shadow Dragon Hard-5
The fastest way of dealing with this chapter is to use Warp staves to send your best units to assassinate Medeus on turn 1. A Speed-capped Swordmaster, Horseman, or possibly Thief with 50 attack obtained from a forged Wyrmslayer can one-round the Manakete standing in front of Medeus. If you're using a Manakete incapable of surviving combat with Medeus, warp her to Medeus, attack and let her get killed, revive her with the Aum staff, and warp her back to Medeus to finish him off. If your Manakete does survive Medeus's retaliation, kill her with the Geosphere. Alternatively, warp in another powerful unit or two to soften him up with the Gradivus and Parthia before sending in your Manakete to finish him off.
If you plan to tackle this chapter with conventional strategy, there are several notable stat benchmarks you should consider. 57 Might allows you to two-shot Medeus; Tiki and Nagi reach this benchmark with a Divinestone under all circumstances, while Marth can do so with the true Falchion and 18-21 Strength depending on his sword rank. Since Marth and Tiki cannot accumulate enough Speed to avoid being doubled by Medeus on H5 mode, they need HP and Defense such that (50 − Def) × 2 < HP in order to survive combat with him; a level 30 Tiki can comfortably reach this mark with a couple of Seraph Robes, while Marth's Defense is poor enough that he will typically need several Dracoshields and a few Seraph Robes to make it. Nagi's join time and base stats make surviving Medeus a pipe dream for her. If neither Marth nor Tiki is capable of going toe-to-toe with Medeus, you need to be a Swordmaster, Sniper, Horseman, or Berserker to have the 27 Speed needed to survive two rounds with Medeus and still have enough power to one-shot him with a critical hit. A Swordmaster, Sniper, or Horseman with 24 Strength and A weapon rank can reach the 47 Might needed to one-shot him with a critical hit by the skin of their teeth with a +10 Might Silver weapon (and have a point or two to spare), while the Berserker's 30 Strength cap gives them plenty of breathing room to forge a powerful axe or, with 29 Strength, just grab Hauteclere. Regarding the generic goons, 23 Speed allows you to double enemy Bishops, Generals, and Paladins while protecting you from being doubled by everything other than Medeus himself, and is a good general benchmark to aim for. As far as bulk is concerned, most enemies have 34 attack and Brave weapons, so aim to have (34 − Def) x 2 < HP. Sell off all of your surplus weapons and items and use the money to forge one last ultimate uber-weapon for use in this chapter.
The enemy wields forged brave weapons and Thoron tomes, and all specialist weapons are now forged to have +8 Might, so watch out. If you have a Speed-capped Paladin, you might want to reset until the Levin Sword Hero in the northwest room has 21 Speed so you can double him. You start off split into four groups – Marth is in the southeast, and you have groups in the northeast, northwest, and southwest. Your immediate objective is to kill everyone in the west and east rooms, plug up the staircases in said rooms to stop the reinforcements, and have everyone regroup in the south hallway near the first save point. The northeast group has it relatively easy – if you have a Horseman who has either 19 Strength and the Parthia or 27 Speed to one-round the Dracoknight and can survive combat with the General, you should be fine. The Swarm Bishop is easy. Marth's group needs a door key, but only has to fight one measly Paladin. The southwest group is well-positioned to immediately neutralize both enemy Ballisticians with an 18-Might Thunderbolt, but is under extreme pressure from several enemies who can corner them in a chokepoint. If Marth's group can spare some cavalry to reinforce them, so much the better. The northwest group wants to quickly take out the Hero and Manakete and fight their way out of their room. They might be able to draw some fire away from the southwest if they're fast enough. Leave three men to stop the enemy reinforcements and regroup.
The hard part is behind you – it's time to end this. Push north towards the entrance to Medeus's chambers. Reinforcements will come from the far southeast and inside Medeus's room, but are removed enough from the front lines that they can be handled safely. Hammer your way to the throne and send your strongest units to slay the Shadow Dragon and bring peace back to Archanea.
Trivia
- This is the only chapter in Shadow Dragon & the Blade of Light and Shadow Dragon to not have seize as the victory condition, instead ending upon Medeus's death.
- This is also the only chapter to have a different objective between Shadow Dragon & the Blade of Light and Book I of Mystery of the Emblem.
- This chapter's incarnation in Shadow Dragon & the Blade of Light has the highest number of non-infinite enemies of any chapter in the entire Fire Emblem series, with a total of 585.
- This chapter's name was used for a summoning event in Fire Emblem Heroes that focused on characters from New Mystery of the Emblem; however, the English localization used the Japanese name of the chapter, "The Chosen Ones".
Etymology and other languages
| Names, etymology, and in other regions | ||
|---|---|---|
| Language | Name | Definition, etymology, and notes |
| English |
Chosen by Fate |
-- |
| Japanese |
選ばれし者たち |
The Chosen Ones. Officially romanized as The Chosen Ones in the Mystery of the Emblem guide. |
| Spanish |
Los elegidos |
The Chosen Ones |
| French |
Les élus |
The Chosen Ones |
| German |
Auserwählte |
Chosen One |
| Italian |
Il prescelto dal destino |
The One Chosen by Fate |
Gallery
This section has been marked as a stub. Please help improve the page by adding information.
CG image displayed during the intro for Shadow Dragon
CG image displayed during the intro for Shadow Dragon
Notes
- ↑ Not in Mystery of the Emblem.
- ↑ Only in Shadow Dragon.
References
| ← The Dragonkin Realm • ← The Alterspire (Shadow Draon) • |
Chosen by Fate |
|---|
| Fire Emblem: Mystery of the Emblem | ||||||||||||||||||||||||||||||||||||||
|---|---|---|---|---|---|---|---|---|---|---|---|---|---|---|---|---|---|---|---|---|---|---|---|---|---|---|---|---|---|---|---|---|---|---|---|---|---|---|
| ||||||||||||||||||||||||||||||||||||||
| Fire Emblem: Shadow Dragon | ||||||||||||||||||||
|---|---|---|---|---|---|---|---|---|---|---|---|---|---|---|---|---|---|---|---|---|
|
