| Site News |
|---|
| Warning: This wiki contains spoilers. Read at your own risk! Social media: If you would like, please join our Discord server, and/or follow us on Twitter (X) or Tumblr! |
Norden Line: Difference between revisions
m (Text replacement - "|return34=dean" to "|return34=deen |return34article=Deen (Thracia 776)") |
Thecornerman (talk | contribs) m (Text replacement - "([Cc])hapter (\d+)" to "$1hapter $2") |
||
| (50 intermediate revisions by 9 users not shown) | |||
| Line 1: | Line 1: | ||
{{Chapter Infobox | {{Chapter Infobox | ||
|image=[[File:Cm fe05 16A.png|200px]] | |image=[[File:Cm fe05 16A.png|200px]] | ||
|location=Fort | |location=Fort Norden | ||
|new units=[[Ilios]], [[Sleuf]] | |new units=[[Ilios]], [[Sleuf]] | ||
|boss=[[ | |boss=[[Brook]] | ||
|previous=[[Two Paths]] | |||
|next=[[The Gates of Leonster]] | |||
}} | }} | ||
{{Quote|Ballistae are clustered all around the fort... We'll have to do something about them to make an effective attack.|[[Leif]]}} | {{Quote|Ballistae are clustered all around the fort... We'll have to do something about them to make an effective attack.|[[Leif]]}} | ||
''' | |||
'''Norden Line''' (Japanese: {{hl|ノルデンライン|Noruden rain}} ''Nohrden Line'') is the sixteenth chapter of {{FE5}}. This is the first of two chapters on the "A" route; in order to play this chapter, Leif must have headed west towards Fort Norden in [[Two Paths|the previous chapter]]. | |||
==Plot== | ==Plot== | ||
{{main| | {{main|Norden Line/Script}} | ||
[[Kempf]] and [[Nikalaf]] discuss their strategy for dealing with [[Leif]]'s approaching forces. Nikalaf chastises Kempf for underestimating their enemy and orders him to hold the bridge with his battalion until the Knights of Ulster under Count [[Conomor]] arrive from the rear to trap Leif's forces in a pincer attack. | |||
At the same time, Leif confers with [[August]] about the enemy's formation and wonders if the enemy could be convinced to break that formation. If [[Olwen]] is present, she volunteers to tempt the enemy commander - Kempf - into leaving the bridge, as she has a "history" with him. | |||
The battle begins. If Olwen talks to Kempf, she sends a string of insults toward him, making him break formation and rush away from the bridge alongside his battalion in order to kill her. If Olwen is killed or has not been recruited, [[Karin]] can also talk to [[Ilios]], and if she does, she convinces Ilios to defect to Leif's army. His only condition is that he must receive a noble title once Leonster is liberated, a dream that Karin pokes fun at him for. | |||
If Leif visits the top eastern house during the battle, he meets [[Sleuf]]. Sleuf recalls his vision from the Tower of Bragi - the words of Father [[Claud]] - which leave the prince confused. Sleuf explains that Leif will understand in time, then decides to join the prince's army. | |||
Late into the battle, the Knights of Ulster under Conomor's command appear from the west, and Conomor orders them to charge. One of his soldiers questions this decision, claiming they could retake Ulster now instead of fighting for the Empire, but Conomor is worried that Princess [[Miranda]]'s safety would be in danger if they did so. | |||
Once the battle ends, [[Dryas]] praises Leif for his success, then they discuss the fall of Leonster and Leif's subsequent escape alongside [[Finn]]. Leif mentions how the Knights of Ulster striking from the rear made him briefly lose hope, to which Dryas responds that Count Conomor is a splendid and honorable leader. They both wonder why someone like that would fight for House Friege, but conclude that there must be some reason and that it would be best if they could avoid fighting Conomor again. | |||
[[ | |||
==Chapter data== | ==Chapter data== | ||
| Line 25: | Line 31: | ||
|victory=Seize the throne | |victory=Seize the throne | ||
|defeat=[[Leif]] dies | |defeat=[[Leif]] dies | ||
|ally= | |ally=8–16{{h|+2|Upon Ilios and Sleuf being recruited}} | ||
|enemy= | |enemy=40{{h|+24|Reinforcements}} | ||
|map=[[File:Cm fe05 16A.png]] | |map=[[File:Cm fe05 16A.png]] | ||
}} | }} | ||
Units are arranged based on their position in deployment order after Leif. | |||
===Character data=== | ===Character data=== | ||
{{ChapChars | {{ChapChars | ||
|game#=05 | |game#=05 | ||
|newunit1={{NewUnit | |newunit1={{NewUnit | ||
|name=Ilios | |name=Ilios | ||
| Line 40: | Line 46: | ||
|HP=40 | |HP=40 | ||
|lv=8 | |lv=8 | ||
|inventory={{Item|5|Bolting}}<br>{{Item|5|Meisterschwert}}<br>{{Item|5|Thoron}}<br>{{Item|5|Sol M}}anual | |||
|recruitment method=Enemy, talk to with [[Karin]]<br>(if [[Olwen]] was either killed or not recruited) | |recruitment method=Enemy, talk to with [[Karin]]<br>(if [[Olwen]] was either killed or not recruited) | ||
}} | }} | ||
| Line 48: | Line 55: | ||
|HP=18 | |HP=18 | ||
|lv=6 | |lv=6 | ||
|recruitment method=Visit upper eastern house with [[Leif]] | |inventory={{Item|5|Mend}}<br>{{Item|5|Bragi Scroll}} | ||
|recruitment method=Visit the upper eastern house with [[Leif]] if the church was visited in [[Two Paths|Chapter 15]] | |||
}} | }} | ||
|return1= | |forced1=leif | ||
|return2= | |return1=lifis | ||
|return3= | |return2=fergus | ||
|return4= | |return3=karin | ||
|return5= | |return4=brighton | ||
|return6= | |return5=machyua | ||
|return7= | |return6=lara | ||
|return8= | |return7=dalsin | ||
|return9= | |return8=asbel | ||
|return10= | |return9=nanna | ||
|return11= | |return10=hicks | ||
|return12= | |return11=finn | ||
|return13= | |return12=safy | ||
|return14= | |return13=shiva | ||
|return15= | |return14=osian | ||
|return16= | |return15=halvan | ||
|return17= | |return16=ronan | ||
|return18= | |return17=carrion | ||
|return19= | |return18=marty | ||
|return20= | |return19=dagdar | ||
|return21= | |return20=tanya | ||
|return22 | |return21=selphina | ||
|return22=cain | |||
| | |return22article=Cain (Thracia 776) | ||
| | |return23=alva | ||
| | |return23article=Alva (Thracia 776) | ||
| | |return24=robert | ||
| | |return25=fred | ||
|return26= | |return26=olwen | ||
|return27= | |return27=mareeta | ||
|return28= | |return28=salem | ||
|return29= | |return29=perne | ||
|return30= | |return30=troude | ||
|return31= | |return31=tina | ||
|return32= | |return32=glade | ||
|return33 | |return33=deen | ||
|return33article=Deen (Thracia 776) | |||
| | |return34=eda | ||
| | |return35=homer | ||
| | |return36=linoan | ||
| | |return37=ralf | ||
| | |||
}} | }} | ||
===Item data=== | ===Item data=== | ||
{{ChapItems | {{ChapItems | ||
|platform=snes03 | |platform=snes03 | ||
| Line 106: | Line 113: | ||
===Enemy data=== | ===Enemy data=== | ||
{{ | :''Stats with two figures separated by a ~ are presented as a range, representing stats that vary due to random growths. The figures to the left and right of the ~ are the stat's minimum and maximum possible values respectively.'' | ||
|platform=snes03 | {{ChapUnitHdr|type=Enemy|platform=snes03}} | ||
| | {{ChapUnitCellFE5 | ||
| | |name=Friege | ||
| | |class=Bishop | ||
|#1= | |lv=6 | ||
| | |#=1 | ||
| | |hp=20~28 | ||
| | |str=0~8 | ||
| | |mag=5~13 | ||
| | |skill=2~10 | ||
| | |spd=2~10 | ||
| | |lck=0~8 | ||
| | |def=1~9 | ||
| | |con=4~12 | ||
| | |mov=5~6 | ||
| | |inventory={{Item|5|Physic}} • {{Item|5|Elfire}} | ||
|# | |notes='''Authority:''' Brook<br>• Moves to attack units in range.<br>• Once [[Brook]] is defeated, ignores combat and begins moving to escape. | ||
| | }} | ||
| | {{ChapUnitCellFE5 | ||
| | |name=Friege | ||
| | |class=Lance Armor | ||
| | |lv=13 | ||
| | |#=4 | ||
| | |hp=20~35 | ||
| | |str=4~19 | ||
| | |mag=0~15 | ||
| | |skill=0~15 | ||
| | |spd=0~15 | ||
|# | |lck=0~15 | ||
| | |def=8~20 | ||
| | |con=9~20 | ||
| | |mov=5~6 | ||
| | |inventory={{Item|5|Killer Lance}} • {{Item|5|Vulnerary}} | ||
| | |notes='''Authority:''' Brook<br>• Moves to attack units in range.<br>• Once [[Brook]] is defeated, ignores combat and begins moving to escape. | ||
| | }} | ||
| | {{ChapUnitCellFE5 | ||
| | |name=[[Kempf]] | ||
|class=Mage Knight | |||
| | |lv=10 | ||
| | |#=1 | ||
| | |hp=40 | ||
|# | |str=13 | ||
| | |mag=9 | ||
| | |skill=13 | ||
| | |spd=13 | ||
| | |lck=10 | ||
| | |def=10 | ||
| | |con=14 | ||
| | |mov=8 | ||
| | |inventory={{Item|5|Venin Sword}} • {{Item|5|Thoron}} | ||
| | |notes='''Authority:''' ★★★<br>'''Action:''' ★<br>Does not move until [[Olwen]] talks to him, at which point he begins moving unprovoked. | ||
| | }} | ||
| | {{ChapUnitCellFE5 | ||
|# | |name=Friege | ||
| | |class=Axe Armor | ||
| | |lv=10 | ||
| | |#=3 | ||
| | |hp=20~32 | ||
| | |str=4~16 | ||
| | |mag=0~12 | ||
| | |skill=0~12 | ||
| | |spd=0~12 | ||
| | |lck=0~12 | ||
| | |def=8~20 | ||
| | |con=9~20 | ||
|# | |mov=5~6 | ||
| | |inventory={{Item|5|Battle Axe}} | ||
| | |notes='''Authority:''' Kempf<br>• Does not move until [[Olwen]] talks to [[Kempf]], at which point they begin moving unprovoked.<br>• Once Kempf is defeated, ignores combat and begins moving to escape. | ||
| | }} | ||
| | {{ChapUnitCellFE5 | ||
| | |name=Friege | ||
|# | |class=Soldier | ||
| | |lv=14 | ||
| | |#=3 | ||
| | |hp=20~36 | ||
| | |str=3~19 | ||
| | |mag=0~16 | ||
| | |skill=0~16 | ||
| | |spd=0~16 | ||
| | |lck=0~16 | ||
| | |def=1~17 | ||
| | |con=6~20 | ||
| | |mov=5~6 | ||
|#14= | |inventory={{Item|5|Javelin}} | ||
| | |notes='''Authority:''' Kempf<br>• Does not move until [[Olwen]] talks to [[Kempf]], at which point they begin moving unprovoked.<br>• Once Kempf is defeated, ignores combat and begins moving to escape. | ||
| | }} | ||
| | {{ChapUnitCellFE5 | ||
| | |name=Friege | ||
| | |class=Archer | ||
|#15= | |lv=13 | ||
| | |#=3 | ||
| | |hp=20~35 | ||
| | |str=3~18 | ||
| | |mag=0~15 | ||
| | |skill=0~15 | ||
|# | |spd=0~15 | ||
| | |lck=0~15 | ||
| | |def=1~16 | ||
| | |con=6~20 | ||
| | |mov=5~6 | ||
| | |inventory={{Item|5|Long Bow}} | ||
|# | |notes='''Authority:''' Kempf<br>• Does not move until [[Olwen]] talks to [[Kempf]], at which point they begin moving unprovoked.<br>• Once Kempf is defeated, ignores combat and begins moving to escape. | ||
| | }} | ||
| | {{ChapUnitCellFE5 | ||
| | |name=Friege | ||
| | |class=Mage | ||
| | |lv=10 | ||
|# | |#=2 | ||
| | |hp=18~30 | ||
| | |str=0~12 | ||
| | |mag=2~14 | ||
| | |skill=2~14 | ||
| | |spd=3~15 | ||
|# | |lck=0~12 | ||
| | |def=0~12 | ||
| | |con=4~16 | ||
| | |mov=6~7 | ||
| | |inventory={{Item|5|Thunder}} | ||
| | |notes='''Authority:''' Kempf<br>• Does not move until [[Olwen]] talks to [[Kempf]], at which point they begin moving unprovoked.<br>• Once Kempf is defeated, ignores combat and begins moving to escape. | ||
|# | }} | ||
| | {{ChapUnitCellFE5 | ||
|name=Friege | |||
|class=Ballista | |||
|classarticle=Ballista (class) | |||
|lv=10 | |||
|#=6 | |||
|hp=20 | |||
|str=10 | |||
|mag=3 | |||
|skill=3 | |||
|spd=1 | |||
|lck=2 | |||
|def=5 | |||
|con=8 | |||
|mov=0 | |||
|inventory={{Item|5|Ballista|link=Ballista (weapon)}} | |||
|notes='''Authority:''' Brook<br>Once [[Brook]] is defeated, ceases attacking. | |||
}} | |||
{{ChapUnitCellFE5 | |||
|name=Friege | |||
|class=Sword Armor | |||
|lv=10 | |||
|#=4 | |||
|hp=20~32 | |||
|str=4~16 | |||
|mag=0~12 | |||
|skill=0~12 | |||
|spd=0~12 | |||
|lck=0~12 | |||
|def=8~20 | |||
|con=9~20 | |||
|mov=5~6 | |||
|inventory={{Item|5|Great Sword}} | |||
|notes='''Authority:''' Brook<br>• Moves to attack units in range.<br>• Once [[Brook]] is defeated, ignores combat and begins moving to escape. | |||
}} | |||
{{ChapUnitCellFE5 | |||
|name=[[Ilios]] | |||
|class=Mage Knight | |||
|lv=8 | |||
|#=1 | |||
|hp=40 | |||
|str=11 | |||
|mag=9 | |||
|skill=13 | |||
|spd=14 | |||
|lck=14 | |||
|def=10 | |||
|con=6 | |||
|mov=8 | |||
|inventory={{Item|5|Bolting}} • {{Item|5|Meisterschwert}} • {{Item|5|Thoron}} • {{Item|5|Sol Manual|image=sol m}}<br>{{Item|5|Miracle}} • {{Item|5|Sol}} | |||
|notes='''Authority:''' ★★★<br>'''Action:''' ★<br>Begins moving once he or any unit under his authority is provoked. | |||
}} | |||
{{ChapUnitCellFE5 | |||
|name=Friege | |||
|class=Arch Knight | |||
|lv=14 | |||
|#=2 | |||
|hp=20~36 | |||
|str=3~19 | |||
|mag=0~16 | |||
|skill=3~19 | |||
|spd=4~20 | |||
|lck=0~16 | |||
|def=3~19 | |||
|con=6~20 | |||
|mov=8~9 | |||
|inventory={{Item|5|Long Bow}} | |||
|notes='''Authority:''' Ilios<br>• Begins moving unprovoked once [[Ilios]] or any unit under his authority is provoked.<br>• Once Ilios is defeated, ignores combat and begins moving to escape; does not change behavior if Ilios is recruited, but does if he is [[rescue (command)|rescue]]d or defeated after having been recruited. | |||
}} | |||
{{ChapUnitCellFE5 | |||
|name=Friege | |||
|class=Troubadour | |||
|lv=10 | |||
|#=1 | |||
|hp=16~28 | |||
|str=2~14 | |||
|mag=2~14 | |||
|skill=2~14 | |||
|spd=3~15 | |||
|lck=0~12 | |||
|def=2~14 | |||
|con=4~16 | |||
|mov=8~9 | |||
|inventory={{Item|5|Rapier}} • {{Item|5|Heal}} | |||
|notes='''Authority:''' Ilios<br>• Begins moving unprovoked once [[Ilios]] or any unit under his authority is provoked.<br>• Once Ilios is defeated, ignores combat and begins moving to escape; does not change behavior if Ilios is recruited, but does if he is [[rescue (command)|rescue]]d or defeated after having been recruited. | |||
}} | |||
{{ChapUnitCellFE5 | |||
|name=Friege | |||
|class=Lance Knight | |||
|lv=13 | |||
|#=3 | |||
|hp=20~35 | |||
|str=3~18 | |||
|mag=0~15 | |||
|skill=3~18 | |||
|spd=4~19 | |||
|lck=0~15 | |||
|def=3~18 | |||
|con=7~20 | |||
|mov=8~9 | |||
|inventory={{Item|5|Ridersbane}} | |||
|notes='''Authority:''' Ilios<br>• Begins moving unprovoked once [[Ilios]] or any unit under his authority is provoked.<br>• Once Ilios is defeated, ignores combat and begins moving to escape; does not change behavior if Ilios is recruited, but does if he is [[rescue (command)|rescue]]d or defeated after having been recruited. | |||
}} | |||
{{ChapUnitCellFE5 | |||
|name=Friege | |||
|class=Cavalier | |||
|lv=15 | |||
|#=3 | |||
|hp=20~37 | |||
|str=3~20 | |||
|mag=0~17 | |||
|skill=3~20 | |||
|spd=4~20 | |||
|lck=0~17 | |||
|def=3~20 | |||
|con=6~20 | |||
|mov=8~9 | |||
|inventory={{Item|5|Sleep Sword}} | |||
|notes='''Authority:''' Ilios<br>• Begins moving unprovoked once [[Ilios]] or any unit under his authority is provoked.<br>• Once Ilios is defeated, ignores combat and begins moving to escape; does not change behavior if Ilios is recruited, but does if he is [[rescue (command)|rescue]]d or defeated after having been recruited. | |||
}} | |||
{{ChapUnitCellFE5 | |||
|name=Brigand | |||
|class=Brigand | |||
|lv=3 | |||
|#=2 | |||
|hp=22~27 | |||
|str=5~10 | |||
|mag=0~3 | |||
|skill=0~5 | |||
|spd=0~5 | |||
|lck=0~5 | |||
|def=3~8 | |||
|con=9~14 | |||
|mov=6~7 | |||
|inventory={{Item|5|Hammer}} | |||
|notes=Ignores combat and moves to raid houses, then moves to attack units once nothing can be raided. | |||
}} | |||
{{ChapUnitCellFE5 | |||
|name=[[Brook]] | |||
|class=General | |||
|lv=16 | |||
|#=1 | |||
|hp=46 | |||
|str=17 | |||
|mag=5 | |||
|skill=14 | |||
|spd=10 | |||
|lck=12 | |||
|def=18 | |||
|con=19 | |||
|mov=6 | |||
|inventory={{Item|5|Master Lance}} • {{Item|5|Armorslayer}} • {{Item|5|Meisterbogen}} • {{Item|5|Ridersbane}} | |||
|notes='''Authority:''' ★★<br>Does not move; stands on the [[Terrain/Super Famicom games#Fire Emblem: Thracia 776|gate]], the chapter's seize point. | |||
}} | |||
{{ChapUnitCellFE5 | |||
|name=[[Nikalaf]] | |||
|class=General | |||
|lv=20 | |||
|#=1 | |||
|hp=54 | |||
|str=15 | |||
|mag=4 | |||
|skill=12 | |||
|spd=8 | |||
|lck=13 | |||
|def=15 | |||
|con=20 | |||
|mov=6 | |||
|notes='''Authority:''' ★★★★★<br>Leaves the map once [[preparations]] are complete. | |||
|last=y | |||
}} | |||
{{ChapUnitReinf|type=Enemy|platform=snes03}} | |||
{{ChapUnitCellFE5 | |||
|name=Pirate | |||
|class=Pirate | |||
|lv=3 | |||
|#=4 | |||
|hp=24~29 | |||
|str=5~10 | |||
|mag=0~3 | |||
|skill=0~5 | |||
|spd=0~5 | |||
|lck=0~5 | |||
|def=3~8 | |||
|con=9~14 | |||
|mov=5~6 | |||
|inventory={{Item|5|Iron Axe}} | |||
|notes=Ignores combat and moves to raid houses, then moves to attack units once nothing can be raided. | |||
}} | |||
{{ChapUnitCellFE5 | |||
|name=Silesse | |||
|class=Pegasus Rider | |||
|lv=6 | |||
|#=8 | |||
|hp=16~24 | |||
|str=2~10 | |||
|mag=3~11 | |||
|skill=3~11 | |||
|spd=6~14 | |||
|lck=0~8 | |||
|def=2~10 | |||
|con=4~12 | |||
|mov=8~9 | |||
|inventory={{Item|5|Ridersbane}} | |||
|notes=Moves to attack units in range; otherwise moves toward units with fewer than three allied units within eight tiles of them. | |||
}} | |||
{{ChapUnitCellFE5 | |||
|name=Ulster | |||
|class=Cavalier | |||
|lv=15 | |||
|#=11 | |||
|hp=20~37 | |||
|str=3~20 | |||
|mag=0~17 | |||
|skill=3~20 | |||
|spd=4~20 | |||
|lck=0~17 | |||
|def=3~20 | |||
|con=6~20 | |||
|mov=8~9 | |||
|inventory={{Item|5|Rapier}} • {{Item|5|Javelin}} | |||
|notes='''Authority:''' Conomor<br>Once [[Conomor]] or any unit under his authority is defeated, ignores combat and begins moving to escape. | |||
}} | |||
{{ChapUnitCellFE5 | |||
|name=[[Conomor]] | |||
|class=Paladin | |||
|lv=13 | |||
|#=1 | |||
|hp=39 | |||
|str=13 | |||
|mag=3 | |||
|skill=18 | |||
|spd=11 | |||
|lck=4 | |||
|def=12 | |||
|con=13 | |||
|mov=10 | |||
|inventory={{Item|5|Master Lance}} • {{Item|5|Killing Edge}} • {{Item|5|Nihil Manual|image=nihil m}}<br>{{Item|5|Accost}} | |||
|notes='''Authority:''' ★★★★<br>'''Action:''' ★<br>Once any unit under his authority is defeated, ignores combat and begins moving to escape. | |||
|last=y | |||
}} | }} | ||
{{ChapUnitFtr}} | |||
====Reinforcements==== | ====Reinforcements==== | ||
*Turn 5 | *Turn 5 | ||
** | **Two [[Pirate]]s; one from each of the longest northern isles | ||
*Turn 12 | *Turn 12 | ||
** | **Two [[Pirate]]s; one from south of the lower eastern house, one from the furthest southern end of the eastern river | ||
*Turn 15 | *Turn 15 | ||
** | **Two [[Pegasus Rider]]s from the center-southern mountains | ||
*Turn 20 | *Turn 20 | ||
**[[ | **Eleven [[Cavalier]]s and [[Conomor]] from the western border of the map | ||
===Boss data=== | ===Boss data=== | ||
| Line 256: | Line 502: | ||
|luck=12 | |luck=12 | ||
|def=18 | |def=18 | ||
| | |FCM=0 | ||
|build=19 | |build=19 | ||
|move=6 | |move=6 | ||
| Line 266: | Line 512: | ||
}} | }} | ||
==Strategy== | |||
{{strategy}} | |||
===The fast method=== | |||
If the player does not care for any of the chapter's valuable items, they can use Warp to kill the boss and end the chapter early. Because [[Sleuf]] joins with an A-rank in staves, the player can give [[Leif]] a second Warp staff to warp Leif to Sleuf's house then to the Gate, or use a [[Rescue (staff)|Rescue]] staff to bring a unit holding the Warp staff to the area (preferably [[Karin]] if the player wishes to recruit [[Ilios]]). Don't worry about the Ballistae - they stop attacking when the boss is killed. Doing this puts Leif, Sleuf, and any other units in the area in danger of Ilios and his squad, though thankfully Sleuf can survive two Boltings from Ilios. | |||
The player is still able to [[Thief (staff)|Thief]] a [[Sleep Sword]] (preferably on the last turn if Ilios it to be recruited, as otherwise the swordless Cavalier might take his [[Meisterschwert]]) and visit the [[Pure Water]] village, with the [[Knight Proof]] village also reachable with some planning, either having a flier Warped/Rescued over, or delaying the Warp skip by a few turns and having a flier travel through the mountains around Ilios's range. | |||
===The slow method=== | |||
The Pure Water village to the west is in danger to a brigand, though between their low level and only weapon being the Hammer they are no threat, so a single unit can handle them safely. | |||
[[Ilios]] is a powerful mage knight with [[Bolting]], a [[Meisterschwert]], and a [[Sol Manual]] that can be recruited with [[Karin]], though [[Olwen]] must be killed or unrecruited. It is recommended to either kill Ilios or recruit and rescue him, as doing either will cause the rest of his squadron in retreat. Some of the front-line Cavaliers have [[Sleep Sword]]s equipped, which are dangerous weapons to face but if obtained can help with recruiting [[Misha]] in [[The Gates of Leonster|the next chapter]] or [[Xavier]] in [[The Liberation of Leonster|Chapter 18]]. Acquiring them is difficult, however, as the swords are too heavy to be stolen, the Cavaliers cannot be captured without being put to sleep, and if they get to hit a unit the unit will be put to sleep. The easiest way to get one is with [[Tina]]'s Thief staff (at which point the weaponless Cavalier will either steal Ilios's Meisterschwert or run away and escape), with the only other method being putting them to sleep and capturing them. | |||
Unlike in [[Fort Dandrum|Chapter 11]], [[Kempf]] does not have a Meisterschwert and can take [[bonus damage]]. The units under his authority do not move, which makes it hard to attack him due to the ballistae from behind. His squad can be made to break formation by having Olwen talk to him, though depending on how it is done it risks her dying; this can be used on purpose if the player wishes to recruit Ilios, though this should ideally be done before engaging Illios's group with a Warp use. As with Ilios, killing him causes his entire division to go into retreat, though utilizing this is difficult to the enemy layout. The chapter boss, [[Brook]], also has this behavior with units under his authority, which includes all of the ballstae. This can be exploited by Warping a unit to kill Brook to deactivate all of the Ballistae. | |||
Recruiting Sleuf requires unlocking the drawbridge with a [[Bridge Key]] (the middle village has one), a thief with a [[Lockpick]] or the Unlock staff. He can also be reached with a flying unit or a combination of Warp, Rescue, and [[Rewarp]]. | |||
[[Conomor]] will show up on turn 20 with a [[Nihil Manual]]; killing him here will cause him not to re-appear in [[The Empire's Wrath|Chapter 19]]. Neutralizing him away is easy, as if any of his units are killed they will all run away. Additionally, if they have been lured past the 1-tile wide bridges, they can be rendered completely immobile by blocking their way out, making them easy pickings for EXP or for stealing the Nihil Manual. | |||
<!-- | |||
==Trivia== | ==Trivia== | ||
--> | |||
==Etymology and other languages== | ==Etymology and other languages== | ||
{{Names | {{Names | ||
|eng-fan-name=Norden Line | |eng-fan-name=• Norden Line<br>• Nordrhein | ||
|eng-fan-mean= | |eng-fan-mean=• Used in FireLizard's translation.<br>• Used in the Lil' Manster [[fan translation]] patch. | ||
| | |jpn-name={{h|ノルデンライン|Noruden rain}} | ||
| | |jpn-mean=Nohrden Line | ||
}} | }} | ||
==Gallery== | ==Gallery== | ||
<gallery> | |||
Cm fe05 16A.png|Map of the chapter | |||
</gallery> | |||
{{ChapterNav | {{ChapterNav | ||
|prechapter= | |prechapter=Two Paths | ||
|nextchapter=The Gates of Leonster | |||
|nextchapter=Leonster | |||
}} | }} | ||
{{Nav5}} | {{Nav5}} | ||
[[Category:Chapters of Fire Emblem: Thracia 776]] | [[Category:Chapters of Fire Emblem: Thracia 776]] | ||
Latest revision as of 16:18, 28 March 2024
| ||||||||||
|

| “ | Ballistae are clustered all around the fort... We'll have to do something about them to make an effective attack. | ” | — Leif |
|---|
Norden Line (Japanese: ノルデンライン Nohrden Line) is the sixteenth chapter of Fire Emblem: Thracia 776. This is the first of two chapters on the "A" route; in order to play this chapter, Leif must have headed west towards Fort Norden in the previous chapter.
Plot
- Main article:
Norden Line/Script
Kempf and Nikalaf discuss their strategy for dealing with Leif's approaching forces. Nikalaf chastises Kempf for underestimating their enemy and orders him to hold the bridge with his battalion until the Knights of Ulster under Count Conomor arrive from the rear to trap Leif's forces in a pincer attack.
At the same time, Leif confers with August about the enemy's formation and wonders if the enemy could be convinced to break that formation. If Olwen is present, she volunteers to tempt the enemy commander - Kempf - into leaving the bridge, as she has a "history" with him.
The battle begins. If Olwen talks to Kempf, she sends a string of insults toward him, making him break formation and rush away from the bridge alongside his battalion in order to kill her. If Olwen is killed or has not been recruited, Karin can also talk to Ilios, and if she does, she convinces Ilios to defect to Leif's army. His only condition is that he must receive a noble title once Leonster is liberated, a dream that Karin pokes fun at him for.
If Leif visits the top eastern house during the battle, he meets Sleuf. Sleuf recalls his vision from the Tower of Bragi - the words of Father Claud - which leave the prince confused. Sleuf explains that Leif will understand in time, then decides to join the prince's army.
Late into the battle, the Knights of Ulster under Conomor's command appear from the west, and Conomor orders them to charge. One of his soldiers questions this decision, claiming they could retake Ulster now instead of fighting for the Empire, but Conomor is worried that Princess Miranda's safety would be in danger if they did so.
Once the battle ends, Dryas praises Leif for his success, then they discuss the fall of Leonster and Leif's subsequent escape alongside Finn. Leif mentions how the Knights of Ulster striking from the rear made him briefly lose hope, to which Dryas responds that Count Conomor is a splendid and honorable leader. They both wonder why someone like that would fight for House Friege, but conclude that there must be some reason and that it would be best if they could avoid fighting Conomor again.
Chapter data
| ||||||
|
| |||||
| Victory: Seize the throne | Player | Enemy | ||||
|---|---|---|---|---|---|---|
| Defeat: Leif dies | 8–16+2 | 40+24 | ||||
| ||||||
Units are arranged based on their position in deployment order after Leif.
Character data
| Characters | ||||||||||||||||||||||
|---|---|---|---|---|---|---|---|---|---|---|---|---|---|---|---|---|---|---|---|---|---|---|
New units
| ||||||||||||||||||||||
| ||||||||||||||||||||||
Required characters
| ||||||||||||||||||||||
Available characters
| ||||||||||||||||||||||
Item data
| ||||||||||||
|
Enemy data
- Stats with two figures separated by a ~ are presented as a range, representing stats that vary due to random growths. The figures to the left and right of the ~ are the stat's minimum and maximum possible values respectively.
| ||||||||||||||||||||||||||||||||||||||||||||||||||||||||||||||||||||||||||||||||||||||||||||||||||||||||||||||||||||||||||||||||||||||||||||||||||||||||||||||||||||||||||||||||||||||||||||||||||||||||||||||||||||||||||||||||||||||||||||||||||||||||||||||||||||||||||||||||||||||||||||||||||||||||||||||||||||||||||||||||||||||||||||||||||||||||||||||||||||||||||||||||||||||||||||||||||||||||||||||||||||||||||||||||||||||||||||||||||||||||||||||||||||||||||||||||||||||||||
| ||||||||||||||||||||||||||||||||||||||||||||||||||||||||||||||||||||||||||||||||||||||||||||||||||||||||||||||||||||||||||||||||||||||||||||||||||||||||||||||||||||||||||||||||||||||||||||||||||||||||||||||||||||||||||||||||||||||||||||||||||||||||||||||||||||||||||||||||||||||||||||||||||||||||||||||||||||||||||||||||||||||||||||||||||||||||||||||||||||||||||||||||||||||||||||||||||||||||||||||||||||||||||||||||||||||||||||||||||||||||||||||||||||||||||||||||||||||||||
| ||||||||||||||||||||||||||||||||||||||||||||||||||||||||||||||||||||||||||||||||||||||||||||||||||||||||||||||||||||||||||||||||||||||||||||||||||||||||||||||||||||||||||||||||||||||||||||||||||||||||||||||||||||||||||||||||||||||||||||||||||||||||||||||||||||||||||||||||||||||||||||||||||||||||||||||||||||||||||||||||||||||||||||||||||||||||||||||||||||||||||||||||||||||||||||||||||||||||||||||||||||||||||||||||||||||||||||||||||||||||||||||||||||||||||||||||||||||||||
| ||||||||||||||||||||||||||||||||||||||||||||||||||||||||||||||||||||||||||||||||||||||||||||||||||||||||||||||||||||||||||||||||||||||||||||||||||||||||||||||||||||||||||||||||||||||||||||||||||||||||||||||||||||||||||||||||||||||||||||||||||||||||||||||||||||||||||||||||||||||||||||||||||||||||||||||||||||||||||||||||||||||||||||||||||||||||||||||||||||||||||||||||||||||||||||||||||||||||||||||||||||||||||||||||||||||||||||||||||||||||||||||||||||||||||||||||||||||||||
Reinforcements
- Turn 5
- Two Pirates; one from each of the longest northern isles
- Turn 12
- Two Pirates; one from south of the lower eastern house, one from the furthest southern end of the eastern river
- Turn 15
- Two Pegasus Riders from the center-southern mountains
- Turn 20
Boss data
- Main article:
Brook
|
|
| ||||||||||||||||||||||||||||||||||||||||||||||||||||||||||||
Strategy
| This section details unofficial strategies that may help with completion of the chapter. This may not work for everybody. |
The fast method
If the player does not care for any of the chapter's valuable items, they can use Warp to kill the boss and end the chapter early. Because Sleuf joins with an A-rank in staves, the player can give Leif a second Warp staff to warp Leif to Sleuf's house then to the Gate, or use a Rescue staff to bring a unit holding the Warp staff to the area (preferably Karin if the player wishes to recruit Ilios). Don't worry about the Ballistae - they stop attacking when the boss is killed. Doing this puts Leif, Sleuf, and any other units in the area in danger of Ilios and his squad, though thankfully Sleuf can survive two Boltings from Ilios.
The player is still able to Thief a Sleep Sword (preferably on the last turn if Ilios it to be recruited, as otherwise the swordless Cavalier might take his Meisterschwert) and visit the Pure Water village, with the Knight Proof village also reachable with some planning, either having a flier Warped/Rescued over, or delaying the Warp skip by a few turns and having a flier travel through the mountains around Ilios's range.
The slow method
The Pure Water village to the west is in danger to a brigand, though between their low level and only weapon being the Hammer they are no threat, so a single unit can handle them safely.
Ilios is a powerful mage knight with Bolting, a Meisterschwert, and a Sol Manual that can be recruited with Karin, though Olwen must be killed or unrecruited. It is recommended to either kill Ilios or recruit and rescue him, as doing either will cause the rest of his squadron in retreat. Some of the front-line Cavaliers have Sleep Swords equipped, which are dangerous weapons to face but if obtained can help with recruiting Misha in the next chapter or Xavier in Chapter 18. Acquiring them is difficult, however, as the swords are too heavy to be stolen, the Cavaliers cannot be captured without being put to sleep, and if they get to hit a unit the unit will be put to sleep. The easiest way to get one is with Tina's Thief staff (at which point the weaponless Cavalier will either steal Ilios's Meisterschwert or run away and escape), with the only other method being putting them to sleep and capturing them.
Unlike in Chapter 11, Kempf does not have a Meisterschwert and can take bonus damage. The units under his authority do not move, which makes it hard to attack him due to the ballistae from behind. His squad can be made to break formation by having Olwen talk to him, though depending on how it is done it risks her dying; this can be used on purpose if the player wishes to recruit Ilios, though this should ideally be done before engaging Illios's group with a Warp use. As with Ilios, killing him causes his entire division to go into retreat, though utilizing this is difficult to the enemy layout. The chapter boss, Brook, also has this behavior with units under his authority, which includes all of the ballstae. This can be exploited by Warping a unit to kill Brook to deactivate all of the Ballistae.
Recruiting Sleuf requires unlocking the drawbridge with a Bridge Key (the middle village has one), a thief with a Lockpick or the Unlock staff. He can also be reached with a flying unit or a combination of Warp, Rescue, and Rewarp.
Conomor will show up on turn 20 with a Nihil Manual; killing him here will cause him not to re-appear in Chapter 19. Neutralizing him away is easy, as if any of his units are killed they will all run away. Additionally, if they have been lured past the 1-tile wide bridges, they can be rendered completely immobile by blocking their way out, making them easy pickings for EXP or for stealing the Nihil Manual.
Etymology and other languages
| Names, etymology, and in other regions | ||
|---|---|---|
| Language | Name | Definition, etymology, and notes |
| English (unofficial) |
• Norden Line |
• Used in FireLizard's translation. |
| Japanese |
ノルデンライン |
Nohrden Line |
Gallery
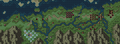
Map of the chapter
| ← Two Paths • | Norden Line | • The Gates of Leonster → |
|---|