| Site News |
|---|
| Warning: This wiki contains spoilers. Read at your own risk! Social media: If you would like, please join our Discord server, and/or follow us on Twitter (X) or Tumblr! |
Two Paths: Difference between revisions
Thecornerman (talk | contribs) m (→Plot: Trimmed) |
Thecornerman (talk | contribs) m (Text replacement - "([Cc])hapter (\d+)" to "$1hapter $2") |
||
| (25 intermediate revisions by 7 users not shown) | |||
| Line 1: | Line 1: | ||
{{Chapter Infobox | {{Chapter Infobox | ||
|image=[[File:Cm fe05 15.png|200px]] | |image=[[File:Cm fe05 15.png|200px]] | ||
|location= | |location= | ||
|new units=[[Linoan]]{{h|*|if Chapter 14x was not played}}, [[Ralf]] | |new units=[[Linoan]]{{h|*|if Chapter 14x was not played}}, [[Ralf]] | ||
|boss=[[Zyle]] | |boss=[[Zyle]] | ||
|previous=*[[ | |previous=*[[The Onslaught]] | ||
*[[ | *[[Yearning to Breathe Free]] | ||
|next=*[[ | |next=*[[Norden Line]] | ||
*[[ | *[[Dark Forest]] | ||
}} | }} | ||
{{Quote|Yes... We must follow the prince's judgment.|[[August]]}} | {{Quote|Yes... We must follow the prince's judgment.|[[August]]}} | ||
''' | '''Two Paths''' (Japanese: {{hl|二つの道|Futatsu no michi}} ''Two Paths'') is the fifteenth chapter of {{FE5}}. | ||
Which set of the next two chapters is played after this one depends on which of the arrive points [[Leif]] uses: if the west one is used, the "A" route will be played; if the east one is used, the "B" route is played instead. If Leif visits the church at the center of the map, the player selects which route to take in dialogue. | Which set of the next two chapters is played after this one depends on which of the arrive points [[Leif]] uses: if the west one is used, the "A" route will be played; if the east one is used, the "B" route is played instead. If Leif visits the church at the center of the map, the player selects which route to take in dialogue. | ||
==Plot== | ==Plot== | ||
{{main| | {{main|Two Paths/Script}} | ||
[[Leif]]'s forces | [[Leif]]'s forces reach Solwood Pass, and they find themselves at an impasse, as they can either go west to Norden or east to Millefeuille Forest. [[Dryas]] advocates for going west, as they will face more difficult battles there and they need the glory from winning those battles to succeed. [[August]] advocates for going east, as the casualties will be lower and the Empire will be taken off-guard. Ultimately, both of them leave the final decision up to Leif. | ||
In the meantime, bandits | In the meantime, [[Zyle]] commands his group of bandits to raid the nearby village and kidnap its women. At the same time, inside that village, [[Amalda]] leaves some children she saved from the child hunts under a bishop's care. She questions her servitude to House Friege and beats herself up for not being able to convince the Emperor to stop the child hunts, but [[Sleuf]], who is also present, tells her that her position allows her to save at least some children. Amalda then leaves, and Sleuf mentions that he had received a vision in the Tower of Bragi that told him to go on a journey. The bishop bids him farewell, and Sleuf leaves. | ||
[[Ralf]] then enters the building and warns the bishop that bandits are attacking the village and Amalda is helping to hold them off. He volunteers to help for free despite being a sellsword, but orders the bishop to escape the village alongside the women and children. | |||
Eventually, Leif's army makes it to the village, and Leif talks to Ralf. Ralf readily joins Leif's army, because he wants to see the Empire fall. [[Mareeta]] can also talk to [[Shannam]], who appears on a fort near the village. While posing as Prince [[Shannan]], Shannam accidentally teaches Mareeta [[Astra]]. | |||
Once the battle ends, the village's bishop offers to Warp Leif's army toward the west or east, depending on where he wishes to go. When Leif makes his decision, the army marches off in the respective direction. | |||
==Chapter data== | ==Chapter data== | ||
| Line 45: | Line 33: | ||
|defeat=[[Leif]] dies | |defeat=[[Leif]] dies | ||
|ally=6–12{{h|+2|Upon Linoan and Ralf being recruited}} | |ally=6–12{{h|+2|Upon Linoan and Ralf being recruited}} | ||
|other=0{{h|+2|Upon Ralf and Amalda arriving}}{{h| | |other=0{{h|+2|Upon Ralf and Amalda arriving}}{{h|−1|Upon Ralf being recruited}} | ||
|enemy=20{{h|+63|Reinforcements}} | |enemy=20{{h|+63|Reinforcements}} | ||
|map=[[File:Cm fe05 15.png]] | |map=[[File:Cm fe05 15.png]] | ||
| Line 61: | Line 49: | ||
|lv=3 | |lv=3 | ||
|inventory={{Item|5|Torch|link=Torch (staff)|image=torch staff}}<br>{{Item|5|Heal}}<br>{{Item|5|Magic Up}}<br>{{Item|5|Restore}} | |inventory={{Item|5|Torch|link=Torch (staff)|image=torch staff}}<br>{{Item|5|Heal}}<br>{{Item|5|Magic Up}}<br>{{Item|5|Restore}} | ||
|recruitment method=Automatically from turn 1<br>(if [[ | |recruitment method=Automatically from turn 1<br>(if [[Yearning to Breathe Free|Chapter 14x]] was not played) | ||
}} | }} | ||
|newunit2={{NewUnit | |newunit2={{NewUnit | ||
| Line 72: | Line 60: | ||
|recruitment method=Talk with [[Leif]] | |recruitment method=Talk with [[Leif]] | ||
}} | }} | ||
| | |forced1=leif | ||
| | |return1=lifis | ||
| | |return2=fergus | ||
| | |return3=karin | ||
| | |return4=brighton | ||
| | |return5=machyua | ||
| | |return6=lara | ||
| | |return7=dalsin | ||
| | |return8=asbel | ||
| | |return9=nanna | ||
| | |return10=hicks | ||
| | |return11=finn | ||
| | |return12=safy | ||
| | |return13=shiva | ||
| | |return14=osian | ||
| | |return15=halvan | ||
| | |return16=ronan | ||
| | |return17=carrion | ||
| | |return18=marty | ||
| | |return19=dagdar | ||
| | |return20=tanya | ||
| | |return21=selphina | ||
| | |return22=cain | ||
| | |return22article=Cain (Thracia 776) | ||
| | |return23=alva | ||
| | |return23article=Alva (Thracia 776) | ||
| | |return24=robert | ||
| | |return25=fred | ||
| | |return26=olwen | ||
| | |return27=mareeta | ||
| | |return28=salem | ||
| | |return29=perne | ||
| | |return30=troude | ||
| | |return31=tina | ||
| | |return32=glade | ||
| | |return33=deen | ||
| | |return33article=Deen (Thracia 776) | ||
| | |return34=eda | ||
| | |return35=homer | ||
| | |return36=linoan | ||
}} | }} | ||
| Line 126: | Line 114: | ||
|obtain4=Visit lone western house | |obtain4=Visit lone western house | ||
|item5=Astra | |item5=Astra | ||
|obtain5=Granted to [[Mareeta]] if she talks to [[Shannam]] | |obtain5=Granted to [[Mareeta]] if she talks to [[Shannam]] | ||
|itemlast=Restore | |itemlast=Restore | ||
| Line 148: | Line 135: | ||
:''Stats with two figures separated by a ~ are presented as a range, representing stats that vary due to random growths. The figures to the left and right of the ~ are the stat's minimum and maximum possible values respectively.'' | :''Stats with two figures separated by a ~ are presented as a range, representing stats that vary due to random growths. The figures to the left and right of the ~ are the stat's minimum and maximum possible values respectively.'' | ||
{{ChapUnitHdr|type=Enemy|platform=snes03}} | {{ChapUnitHdr|type=Enemy|platform=snes03}} | ||
{{ChapUnitCellFE5 | |||
|name=Mercenary | |||
|class=Sword Fighter | |||
|lv=7 | |||
|#=2 | |||
|hp=20~29 | |||
|str=3~12 | |||
|mag=0~3 | |||
|skill=5~14 | |||
|spd=6~15 | |||
|lck=0~9 | |||
|def=2~11 | |||
|con=6~15 | |||
|mov=6~7 | |||
|inventory={{Item|5|Iron Blade}} | |||
|notes='''Authority:''' Zyle | |||
}} | |||
{{ChapUnitCellFE5 | |||
|name=[[Zyle]] | |||
|class=Warrior | |||
|lv=18 | |||
|#=1 | |||
|hp=54 | |||
|str=20 | |||
|mag=3 | |||
|skill=15 | |||
|spd=16 | |||
|lck=9 | |||
|def=13 | |||
|con=20 | |||
|mov=6 | |||
|inventory={{Item|5|Silver Axe}} • {{Item|5|Poleax}} • {{Item|5|Poison Bow}} • {{Item|5|Vulnerary}} | |||
|notes='''Authority:''' ★<br>Moves to attack units in range. | |||
}} | |||
{{ChapUnitCellFE5 | {{ChapUnitCellFE5 | ||
|name=Brigand | |name=Brigand | ||
| Line 232: | Line 253: | ||
|inventory={{Item|5|Hammer}} | |inventory={{Item|5|Hammer}} | ||
|notes='''Authority:''' Zyle<br>Ignores combat and moves to raid houses and the church, then moves to attack units once nothing can be raided. | |notes='''Authority:''' Zyle<br>Ignores combat and moves to raid houses and the church, then moves to attack units once nothing can be raided. | ||
|last=y | |last=y | ||
}} | }} | ||
| Line 335: | Line 322: | ||
|mov=7 | |mov=7 | ||
|inventory={{Item|5|Iron Blade}}<br>{{Item|5|Bargain}} • {{Item|5|Adept}} | |inventory={{Item|5|Iron Blade}}<br>{{Item|5|Bargain}} • {{Item|5|Adept}} | ||
|notes='''Authority:''' Zyle<br>• Ignores combat; moves away from units until turn 40.<br>• [[Mareeta]] can talk to him, and will receive [[ | |notes='''Authority:''' Zyle<br>• Ignores combat; moves away from units until turn 40.<br>• [[Mareeta]] can talk to him, and will receive [[Astra]] for doing so. Afterwards, he moves to escape north. | ||
}} | }} | ||
{{ChapUnitCellFE5 | {{ChapUnitCellFE5 | ||
| Line 356: | Line 343: | ||
{{ChapUnitCellFE5 | {{ChapUnitCellFE5 | ||
|name=Mercenary | |name=Mercenary | ||
|class= | |class=Sword Fighter | ||
|lv=10 | |lv=10 | ||
|#=4 | |#=4 | ||
| Line 470: | Line 457: | ||
**[[Shannam]] from the middle northern fortress | **[[Shannam]] from the middle northern fortress | ||
*Turns 12–15 | *Turns 12–15 | ||
**1 [[ | **1 [[Sword Fighter]] from the middle northern fortress | ||
*Turns 16–18 | *Turns 16–18 | ||
**2 [[Warrior]]s with [[Hand Axe]]s; one from the left and middle northern fortresses each | **2 [[Warrior]]s with [[Hand Axe]]s; one from the left and middle northern fortresses each | ||
| Line 552: | Line 539: | ||
==Strategy== | ==Strategy== | ||
{{strategy}} | {{strategy}} | ||
This is ''Thracia''{{'}}s split route chapter. You can head left for the Norden Line in the west, or Millefeuille Forest in the east. Alternatively, one can make this decision at the church (recommended for receiving a [[Restore]] staff, and required to recruit [[Sleuf]] if the A route is chosen). Be sure to recruit [[Ralf]], a pre-promoted [[mercenary]]. The enemy [[brigand]]s will make their way to destroy the houses containing various goodies, including the church (though an NPC [[Amalda]] and Ralf will distract the brigands). If the church gets destroyed, not only will you miss out on a Restore staff, but you will also lose your chance of recruiting [[Sleuf]] (and by extension, Amalda) if you choose the western route. As such, it is recommended to rescue-drop [[Leif]] across the mountains instead of taking the long way around from the east to reach the church quickly. Be mindful of the boss: not only does he hit very hard and have a lot of HP and decent defense, but he has 16 speed, enough to make magic units incapable of doubling him, and moves. | |||
This is ''Thracia''{{'}}s split route chapter. You can head left for the | |||
Shannam will show up in the middle top fortress on turn 11 (unless a unit is currently waiting there), and while he cannot be recruited here, he has a [[talk]] conversation with [[Mareeta]] that allows him to "teach" her [[Astra]]. Getting to him however can be quite annoying, since he tends to run away when approached, and the reinforcement [[Thief|thieves]] that show up will more often than not choose to block Mareeta's way just to annoy you, which is not helped by the forest [[terrain]] slowing down everyone's movement. | |||
Each path has its own benefits and drawbacks: | Each path has its own benefits and drawbacks: | ||
* Heading west grants the bulky [[Thunder (magic)|thunder]] specialist-Mage Knight [[Ilios]], the unpromoted A-rank staves Priest Sleuf, the prepromoted Pegasus Knight [[Misha]], and the staff-wielding Paladin [[Amalda]]. All four of these new recruits are great, but the enemy numbers and recruitment difficulties make these chapters anything but a cakewalk | * Heading west grants the bulky [[Thunder (magic)|thunder]] specialist-Mage Knight [[Ilios]] (at the cost of Olwen needing to be dead/unrecruited), the unpromoted A-rank staves Priest Sleuf, the prepromoted Pegasus Knight [[Misha]], and the staff-wielding Paladin [[Amalda]]. All four of these new recruits are great, but the enemy numbers and recruitment difficulties make these chapters anything but a cakewalk. The chapters also give out two [[Warp]] staves, a [[Rescue (staff)|Rescue]] staff, up to two [[Fortify]] staves, and the [[Sol]] and [[Nihil]] manuals, amongst others, which cannot be obtained on the B route. | ||
* Heading east grants the frail mage [[Miranda]], the impostor low bases Swordmaster [[Shannam]], as well as the solid bases Paladin [[Conomor]]. While these units are arguably not quite as useful as the units you can get on the opposite route, this route contains some unique items, like a second copy of the [[Vouge]] axe, a [[Restore]] staff, a [[Berserk (staff)|Berserk]] staff, two [[Silence (staff)|Silence]] staves, and [[Skill items#Skill items in Thracia 776|Luna Manual]]. | |||
* Heading east grants the frail mage [[Miranda]], the impostor low bases Swordmaster [[Shannam]], as well as the solid bases Paladin [[Conomor]]. While these units are arguably not quite as useful as the units you can get on the opposite route, this route contains some unique items, like a second copy of the [[Vouge]] axe and [[Skill items#Skill items in Thracia 776|Luna Manual]]. | |||
Regardless of your chosen route, you will be able to recruit [[Sara]], albeit via different recruitment methods depending on the route. | Regardless of your chosen route, you will be able to recruit [[Sara]], albeit via different recruitment methods depending on the route. | ||
==Trivia== | ==Trivia== | ||
*This chapter's layout bears a significant resemblance to [[The Dragon Child|Chapter 15]] of {{title|The Binding Blade}}. Both are also the fifteenth chapters of their respective titles. | |||
==Etymology and other languages== | ==Etymology and other languages== | ||
{{Names | {{Names | ||
|eng-fan-name=• | |eng-fan-name=• Two Paths<br>• Two Paths | ||
|eng-fan-mean=• Used in FireLizard's translation.<br>• Used in the Lil' Manster [[fan translation]] patch. | |eng-fan-mean=• Used in FireLizard's translation.<br>• Used in the Lil' Manster [[fan translation]] patch. | ||
| | |jpn-name={{h|二つの道|Futatsu no michi}} | ||
| | |jpn-mean=Two Paths | ||
}} | }} | ||
==Gallery== | ==Gallery== | ||
<gallery> | |||
Cm fe05 15.png|Map of the chapter | |||
</gallery> | |||
{{ChapterNav | {{ChapterNav | ||
|prechapter= | |prechapter=The Onslaught | ||
|prealternate= | |prealternate=Yearning to Breathe Free{{!}}Yearning to Breathe Free <small>(side quest)</small> | ||
|nextchapter= | |nextchapter=Norden Line | ||
|nextalternate= | |nextalternate=Dark Forest | ||
}} | }} | ||
{{Nav5}} | {{Nav5}} | ||
[[Category:Chapters of Fire Emblem: Thracia 776]] | [[Category:Chapters of Fire Emblem: Thracia 776]] | ||
Latest revision as of 17:36, 28 March 2024
| ||||||||
|

| “ | Yes... We must follow the prince's judgment. | ” | — August |
|---|
Two Paths (Japanese: 二つの道 Two Paths) is the fifteenth chapter of Fire Emblem: Thracia 776.
Which set of the next two chapters is played after this one depends on which of the arrive points Leif uses: if the west one is used, the "A" route will be played; if the east one is used, the "B" route is played instead. If Leif visits the church at the center of the map, the player selects which route to take in dialogue.
Plot
- Main article:
Two Paths/Script
Leif's forces reach Solwood Pass, and they find themselves at an impasse, as they can either go west to Norden or east to Millefeuille Forest. Dryas advocates for going west, as they will face more difficult battles there and they need the glory from winning those battles to succeed. August advocates for going east, as the casualties will be lower and the Empire will be taken off-guard. Ultimately, both of them leave the final decision up to Leif.
In the meantime, Zyle commands his group of bandits to raid the nearby village and kidnap its women. At the same time, inside that village, Amalda leaves some children she saved from the child hunts under a bishop's care. She questions her servitude to House Friege and beats herself up for not being able to convince the Emperor to stop the child hunts, but Sleuf, who is also present, tells her that her position allows her to save at least some children. Amalda then leaves, and Sleuf mentions that he had received a vision in the Tower of Bragi that told him to go on a journey. The bishop bids him farewell, and Sleuf leaves.
Ralf then enters the building and warns the bishop that bandits are attacking the village and Amalda is helping to hold them off. He volunteers to help for free despite being a sellsword, but orders the bishop to escape the village alongside the women and children.
Eventually, Leif's army makes it to the village, and Leif talks to Ralf. Ralf readily joins Leif's army, because he wants to see the Empire fall. Mareeta can also talk to Shannam, who appears on a fort near the village. While posing as Prince Shannan, Shannam accidentally teaches Mareeta Astra.
Once the battle ends, the village's bishop offers to Warp Leif's army toward the west or east, depending on where he wishes to go. When Leif makes his decision, the army marches off in the respective direction.
Chapter data
| ||||||
|
| |||||
| Victory: Leif reaches one of the two arrive points or visits the church | Player | Other | Enemy | |||
|---|---|---|---|---|---|---|
| Defeat: Leif dies | 6–12+2 | 0+2−1 | 20+63 | |||
| ||||||
Units are arranged based on their position in deployment order after Leif.
Character data
| Characters | ||||||||||||||||||||||
|---|---|---|---|---|---|---|---|---|---|---|---|---|---|---|---|---|---|---|---|---|---|---|
New units
| ||||||||||||||||||||||
| ||||||||||||||||||||||
Required characters
| ||||||||||||||||||||||
Available characters
| ||||||||||||||||||||||
Item data
| |||||||||||||||||||||
|
Shop data
Swords Lances Axes Bows Tomes Staves Items Secret
None
Enemy data
- Stats with two figures separated by a ~ are presented as a range, representing stats that vary due to random growths. The figures to the left and right of the ~ are the stat's minimum and maximum possible values respectively.
| ||||||||||||||||||||||||||||||||||||||||||||||||||||||||||||||||||||||||||||||||||||||||||||||||||||||||||||||||||||||||||||||||||||||||||||||||||||||||||||||||||||||||||||||||||||||||||||||||||||||||||||||||||||||||||||||||||||||||||||||||||||||||||||||||||||||||||||||||||||||||||||||||||||||||||||||||||||||||
| ||||||||||||||||||||||||||||||||||||||||||||||||||||||||||||||||||||||||||||||||||||||||||||||||||||||||||||||||||||||||||||||||||||||||||||||||||||||||||||||||||||||||||||||||||||||||||||||||||||||||||||||||||||||||||||||||||||||||||||||||||||||||||||||||||||||||||||||||||||||||||||||||||||||||||||||||||||||||
| ||||||||||||||||||||||||||||||||||||||||||||||||||||||||||||||||||||||||||||||||||||||||||||||||||||||||||||||||||||||||||||||||||||||||||||||||||||||||||||||||||||||||||||||||||||||||||||||||||||||||||||||||||||||||||||||||||||||||||||||||||||||||||||||||||||||||||||||||||||||||||||||||||||||||||||||||||||||||
| ||||||||||||||||||||||||||||||||||||||||||||||||||||||||||||||||||||||||||||||||||||||||||||||||||||||||||||||||||||||||||||||||||||||||||||||||||||||||||||||||||||||||||||||||||||||||||||||||||||||||||||||||||||||||||||||||||||||||||||||||||||||||||||||||||||||||||||||||||||||||||||||||||||||||||||||||||||||||
Reinforcements
- Turns 1–10
- Turns 4–6
- Turns 11–15
- 2 Thieves with Venin Swords from the outer northern fortresses
- Turn 11
- Shannam from the middle northern fortress
- Turns 12–15
- 1 Sword Fighter from the middle northern fortress
- Turns 16–18
- 2 Warriors with Hand Axes; one from the left and middle northern fortresses each
- 1 Warrior with a Poison Axe from the right northern fortress
- Turns 19 and 20
- 1 Brigand with a Silver Axe from the left northern fortress
- 1 Thief with a Silver Sword from the middle northern fortress
- 1 Hunter with a Silver Bow from the right northern fortress
NPC data
| |||||||||||||||||||||||||||||||||||||||||||||||||||||||||||||||||||||
| |||||||||||||||||||||||||||||||||||||||||||||||||||||||||||||||||||||
| |||||||||||||||||||||||||||||||||||||||||||||||||||||||||||||||||||||
| |||||||||||||||||||||||||||||||||||||||||||||||||||||||||||||||||||||
Reinforcements
- Turn 1
Boss data
- Main article:
Zyle
|
|
| ||||||||||||||||||||||||||||||||||||||||||||||||||||||||||||
Strategy
| This section details unofficial strategies that may help with completion of the chapter. This may not work for everybody. |
This is Thracia's split route chapter. You can head left for the Norden Line in the west, or Millefeuille Forest in the east. Alternatively, one can make this decision at the church (recommended for receiving a Restore staff, and required to recruit Sleuf if the A route is chosen). Be sure to recruit Ralf, a pre-promoted mercenary. The enemy brigands will make their way to destroy the houses containing various goodies, including the church (though an NPC Amalda and Ralf will distract the brigands). If the church gets destroyed, not only will you miss out on a Restore staff, but you will also lose your chance of recruiting Sleuf (and by extension, Amalda) if you choose the western route. As such, it is recommended to rescue-drop Leif across the mountains instead of taking the long way around from the east to reach the church quickly. Be mindful of the boss: not only does he hit very hard and have a lot of HP and decent defense, but he has 16 speed, enough to make magic units incapable of doubling him, and moves.
Shannam will show up in the middle top fortress on turn 11 (unless a unit is currently waiting there), and while he cannot be recruited here, he has a talk conversation with Mareeta that allows him to "teach" her Astra. Getting to him however can be quite annoying, since he tends to run away when approached, and the reinforcement thieves that show up will more often than not choose to block Mareeta's way just to annoy you, which is not helped by the forest terrain slowing down everyone's movement.
Each path has its own benefits and drawbacks:
- Heading west grants the bulky thunder specialist-Mage Knight Ilios (at the cost of Olwen needing to be dead/unrecruited), the unpromoted A-rank staves Priest Sleuf, the prepromoted Pegasus Knight Misha, and the staff-wielding Paladin Amalda. All four of these new recruits are great, but the enemy numbers and recruitment difficulties make these chapters anything but a cakewalk. The chapters also give out two Warp staves, a Rescue staff, up to two Fortify staves, and the Sol and Nihil manuals, amongst others, which cannot be obtained on the B route.
- Heading east grants the frail mage Miranda, the impostor low bases Swordmaster Shannam, as well as the solid bases Paladin Conomor. While these units are arguably not quite as useful as the units you can get on the opposite route, this route contains some unique items, like a second copy of the Vouge axe, a Restore staff, a Berserk staff, two Silence staves, and Luna Manual.
Regardless of your chosen route, you will be able to recruit Sara, albeit via different recruitment methods depending on the route.
Trivia
- This chapter's layout bears a significant resemblance to Chapter 15 of The Binding Blade. Both are also the fifteenth chapters of their respective titles.
Etymology and other languages
| Names, etymology, and in other regions | ||
|---|---|---|
| Language | Name | Definition, etymology, and notes |
| English (unofficial) |
• Two Paths |
• Used in FireLizard's translation. |
| Japanese |
二つの道 |
Two Paths |
Gallery
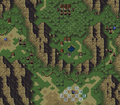
Map of the chapter
| ← The Onslaught • ← Yearning to Breathe Free (side quest) • |
Two Paths | • Norden Line → • Dark Forest → |
|---|