| Site News |
|---|
| Warning: This wiki contains spoilers. Read at your own risk! Social media: If you would like, please join our Discord server, and/or follow us on X (Twitter) or Tumblr! |
The Loptrian Altar: Difference between revisions
m (Text replacement - "The Lopt Altar" to "The Altar of Loptr") Tags: Mobile edit Mobile web edit |
RNGSOMEONE (talk | contribs) |
||
| (40 intermediate revisions by 9 users not shown) | |||
| Line 1: | Line 1: | ||
{{Chapter Infobox | {{Chapter Infobox | ||
|image=[[File:Cm fe05 24x.png|200px]] | |image=[[File:Cm fe05 24x.png|200px]] | ||
|location=[[Munster]] | |location=[[Munster]] | ||
| Line 8: | Line 5: | ||
|boss=[[Dark Bishop]] | |boss=[[Dark Bishop]] | ||
|weather=[[Fog of War]] | |weather=[[Fog of War]] | ||
|previous=[[The Baron in Black]] | |||
|next=[[Sworn Upon a Sword]] | |||
}} | }} | ||
{{Quote|We must not rush, Lord Leif. We must proceed patiently and with the utmost caution.|[[August]] to [[Leif]]}} | {{Quote|We must not rush, Lord Leif. We must proceed patiently and with the utmost caution.|[[August]] to [[Leif]]}} | ||
'''The Altar | |||
'''The Loptrian Altar''' (Japanese: {{hl|ロプトの祭壇|Roputo no saidan}} ''Lopt Altar'') is the [[side quest]] of the twenty-fourth chapter of {{FE5}}. In order to play this chapter, the [[Kia Staff]] must have been obtained in [[The Baron in Black|the previous chapter]] and [[Sara]] must have been recruited and be alive and uncaptured. | |||
==Plot== | ==Plot== | ||
{{main|The Altar | {{main|The Loptrian Altar/Script}} | ||
[[Leif]]'s forces enter a secret underground temple of the Loptians in order to undo the petrification spell on [[Eyvel]]. They fight the bishops residing there, and [[Sara]] uses the [[Kia]] staff to save Eyvel. Once Eyvel recovers, Leif and [[Mareeta]] – if she participated in the fight – reunite with her. After the battle, members of the [[Fiana Freeblades]], as well as [[Nanna]] and [[Finn]] all talk to Eyvel and express their happiness about her recovery. If [[Galzus]] has been recruited and is alive, he also talks to Eyvel, thanking her for taking care of Mareeta. | |||
==Chapter data== | ==Chapter data== | ||
| Line 20: | Line 21: | ||
|victory=Escape | |victory=Escape | ||
|defeat=[[Leif]] dies | |defeat=[[Leif]] dies | ||
|ally=16{{ | |ally=16{{h|+1|Upon Eyvel being recruited}} | ||
|other=1{{ | |other=1{{h|−1|Upon Eyvel being recruited}} | ||
|enemy=23{{ | |enemy=23{{h|+168|Reinforcements}} | ||
|map=[[File:Cm fe05 24x.png]] | |map=[[File:Cm fe05 24x.png]] | ||
}} | }} | ||
Units are arranged based on their position in deployment order after Leif. | |||
[[File:Cm fe05 24x warps.png|Locations and destinations of [[Hazards#Warp traps|warp tiles]].|thumb]] | |||
This map features [[Hazards#Warp traps|warp tiles]]. When a unit waits on a warp tile, they are teleported to a different tile. If the unit uses an action other than wait that ends their turn—such as [[attack]]ing or using an [[item]]—on the warp tile or another unit is present on the destination tile, that unit is not teleported. | |||
Every warp tile leads to the southern chamber (column 13, row 37; point A). The locations and destinations of warp tiles in this map are: | |||
*column 21, row 16 (point 1) | |||
*column 19, row 10 (point 2) | |||
*column 13, row 12 (point 3) | |||
*column 11, row 16 (point 4) | |||
*column 15, row 16 (point 5) | |||
*column 13, row 25 (point 6) | |||
*column 9, row 21 (point 7) | |||
*column 17, row 24 (point 8) | |||
*column 14, row 9 (point 9) | |||
*column 12, row 9 (point 10) | |||
*column 13, row 5 (point 11) | |||
*column 4, row 22 (point 12) | |||
*column 11, row 29 (point 13) | |||
*column 18, row 30 (point 14) | |||
{{clear}} | |||
===Character data=== | ===Character data=== | ||
{{ChapChars | {{ChapChars | ||
|game#=05 | |game#=05 | ||
|newunit1={{NewUnit | |newunit1={{NewUnit | ||
|name=Eyvel | |name=Eyvel | ||
| Line 36: | Line 57: | ||
|HP=Varies | |HP=Varies | ||
|lv=Varies | |lv=Varies | ||
|recruitment method=Use the [[Kia Staff]], then talk with [[Leif]] or [[Mareeta]] | |inventory=Varies | ||
|recruitment method=Use the [[Kia Staff]] on her, then talk to with [[Leif]] or [[Mareeta]] | |||
}} | }} | ||
|return1= | |forced1=leif | ||
|return2= | |return1=lifis | ||
|return3= | |return2=fergus | ||
|return4= | |return3=karin | ||
|return5= | |return4=brighton | ||
|return6= | |return5=machyua | ||
|return7= | |return6=lara | ||
|return8= | |return7=dalsin | ||
|return9= | |return8=asbel | ||
|return10= | |return9=nanna | ||
|return11= | |return10=hicks | ||
|return12= | |return11=finn | ||
|return13= | |return12=safy | ||
|return14= | |return13=shiva | ||
|return15= | |return14=osian | ||
|return16= | |return15=halvan | ||
|return17= | |return16=ronan | ||
|return18= | |return17=carrion | ||
|return19= | |return18=marty | ||
|return20= | |return19=dagdar | ||
|return21= | |return20=tanya | ||
|return22 | |return21=selphina | ||
|return22=cain | |||
| | |return22article=Cain (Thracia 776) | ||
| | |return23=alva | ||
| | |return23article=Alva (Thracia 776) | ||
| | |return24=robert | ||
| | |return25=fred | ||
|return26= | |return26=olwen | ||
|return27= | |return27=mareeta | ||
|return28= | |return28=salem | ||
|return29= | |return29=perne | ||
|return30= | |return30=troude | ||
|return31= | |return31=tina | ||
|return32= | |return32=glade | ||
|return33 | |return33=deen | ||
|return33article=Deen (Thracia 776) | |||
| | |return34=eda | ||
| | |return35=homer | ||
| | |return36=linoan | ||
| | |return37=ralf | ||
| | |return38=ilios | ||
| | |return39=sleuf | ||
| | |return40=misha | ||
| | |return41=shannam | ||
| | |return42=miranda | ||
| | |return43=sara | ||
| | |return44=xavier | ||
| | |return45=amalda | ||
| | |return46=conomor | ||
| | |return47=diarmuid | ||
| | |return48=saias | ||
| | |return49=ced | ||
| | |return50=galzus | ||
| | |||
}} | }} | ||
:[[Eyvel]] retains her level, stats, inventory, and skills from the end of [[Mother and Daughter|Chapter 5]]. | |||
===Item data=== | ===Item data=== | ||
| Line 109: | Line 129: | ||
===Enemy data=== | ===Enemy data=== | ||
{{ | :''Stats with two figures separated by a ~ are presented as a range, representing stats that vary due to random growths. The figures to the left and right of the ~ are the stat's minimum and maximum possible values respectively.'' | ||
|platform=snes03 | {{ChapUnitHdr|type=Enemy|platform=snes03}} | ||
| | {{ChapUnitCellFE5 | ||
| | |name=Loptrian | ||
| | |class=Dark Bishop | ||
|#1=10 | |lv=15 | ||
| | |#=1 | ||
| | |hp=30~47 | ||
| | |str=0~17 | ||
| | |mag=9~20{{h|+10|Granted by magic floor}} | ||
| | |skill=6~20 | ||
|# | |spd=6~20 | ||
| | |lck=0~17 | ||
|def=6~20 | |||
| | |con=5~20 | ||
| | |mov=6~7 | ||
| | |inventory={{Item|5|Poison|link=Poison (tome)}} • {{Item|5|Berserk|link=Berserk (staff)}} • {{Item|5|Jormungand}} | ||
|# | |notes=Does not move; stands on a [[Terrain/Super Famicom games#Fire Emblem: Thracia 776|seal]], the chapter's escape point. | ||
| | }} | ||
| | {{ChapUnitCellFE5 | ||
| | |name=Loptrian | ||
| | |class=Dark Mage | ||
| | |lv=20 | ||
|#4=5 | |#=1 | ||
| | |hp=24~46 | ||
| | |str=0~20 | ||
| | |mag=5~20{{h|+10|Granted by magic floor}} | ||
| | |skill=4~20 | ||
| | |spd=3~20 | ||
|#5= | |lck=0~20 | ||
| | |def=4~20 | ||
| | |con=5~20 | ||
| | |mov=6~7 | ||
| | |inventory={{Item|5|Jormungand}} • {{Item|5|Fenrir}} • {{Item|5|Silence|link=Silence (staff)}} | ||
| | }} | ||
| | {{ChapUnitCellFE5 | ||
| | |name=Loptrian | ||
| | |class=Dark Mage | ||
| | |lv=20 | ||
| | |#=1 | ||
|# | |hp=24~46 | ||
| | |str=0~20 | ||
|mag=5~20{{h|+10|Granted by magic floor}} | |||
| | |skill=4~20 | ||
| | |spd=3~20 | ||
| | |lck=0~20 | ||
|# | |def=4~20 | ||
| | |con=5~20 | ||
|mov=6~7 | |||
| | |inventory={{Item|5|Jormungand}} • {{Item|5|Fenrir}} • {{Item|5|Sleep|link=Sleep (staff)}} | ||
| | |notes=Moves to attack units in range. | ||
| | }} | ||
|# | {{ChapUnitCellFE5 | ||
| | |name=Loptrian | ||
|class=Dark Mage | |||
|lv=15 | |||
|#=5 | |||
|hp=24~41 | |||
|str=0~17 | |||
|mag=5~20{{h|+10|Granted by magic floor}} | |||
|skill=4~20 | |||
|spd=3~20 | |||
|lck=0~17 | |||
|def=4~20 | |||
|con=5~20 | |||
|mov=6~7 | |||
|inventory={{Item|5|Jormungand}} | |||
|notes=Moves to attack units in range. | |||
}} | |||
{{ChapUnitCellFE5 | |||
|name=Berserker | |||
|class=Berserker | |||
|lv=20 | |||
|#=10 | |||
|hp=32~54 | |||
|str=12~20 | |||
|mag=0~3 | |||
|skill=12~20 | |||
|spd=10~20 | |||
|lck=0~20 | |||
|def=8~20 | |||
|con=12~20 | |||
|mov=7~8 | |||
|inventory={{Item|5|Devil Axe}} • {{Item|5|Hammer}}<br>{{Item|5|Wrath}} | |||
|notes=• The northern five begin moving if any of them are provoked.<br>• The other five move to attack units in range. | |||
}} | |||
{{ChapUnitCellFE5 | |||
|name=Berserker | |||
|class=Berserker | |||
|lv=20 | |||
|#=3 | |||
|hp=32~54 | |||
|str=12~20 | |||
|mag=0~3 | |||
|skill=12~20 | |||
|spd=10~20 | |||
|lck=0~20 | |||
|def=8~20 | |||
|con=12~20 | |||
|mov=7~8 | |||
|inventory={{Item|5|Devil Axe}} • {{Item|5|Hammer}} • {{Item|5|Torch|link=Torch (item)}}<br>{{Item|5|Wrath}} | |||
|notes=Moves to attack units in range. | |||
}} | |||
{{ChapUnitCellFE5 | |||
|name=Loptrian | |||
|class=Dark Mage | |||
|lv=14 | |||
|#=2 | |||
|hp=24~40 | |||
|str=0~16 | |||
|mag=5~20 | |||
|skill=4~20 | |||
|spd=3~19 | |||
|lck=0~16 | |||
|def=4~20 | |||
|con=5~20 | |||
|mov=6~7 | |||
|inventory={{Item|5|Warp}} • {{Item|5|Warp}} • {{Item|5|Jormungand}} • {{Item|5|Physic}} • {{Item|5|Pure Water}} | |||
|notes=Moves to attack units in range. | |||
|last=y | |||
}} | |||
{{ChapUnitReinf|type=Enemy|platform=snes03}} | |||
{{ChapUnitCellFE5 | |||
|name=Loptrian | |||
|class=Dark Mage | |||
|lv=16 | |||
|#=128 | |||
|hp=24~42 | |||
|str=0~18 | |||
|mag=5~20 | |||
|skill=4~20 | |||
|spd=3~20 | |||
|lck=0~18 | |||
|def=4~20 | |||
|con=5~20 | |||
|mov=6~7 | |||
|inventory={{Item|5|Hel|link=Hel (tome)}} • {{Item|5|Jormungand}} • {{Item|5|Rewarp}} | |||
}} | |||
{{ChapUnitCellFE5 | |||
|name=Sniper | |||
|class=Sniper | |||
|lv=20 | |||
|#=20 | |||
|hp=22~44 | |||
|str=5~20 | |||
|mag=1~20 | |||
|skill=6~20 | |||
|spd=7~20 | |||
|lck=0~20 | |||
|def=3~20 | |||
|con=7~20 | |||
|mov=7~8 | |||
|inventory={{Item|5|Poison Bow}} | |||
}} | |||
{{ChapUnitCellFE5 | |||
|name=Mercenary | |||
|class=Mercenary | |||
|lv=20 | |||
|#=20 | |||
|hp=24~46 | |||
|str=6~20 | |||
|mag=1~20 | |||
|skill=7~20 | |||
|spd=8~20 | |||
|lck=0~20 | |||
|def=5~20 | |||
|con=8~20 | |||
|mov=6~7 | |||
|inventory={{Item|5|Sleep Sword}} | |||
|last=y | |||
}} | }} | ||
{{ChapUnitFtr}} | |||
====Reinforcements==== | ====Reinforcements==== | ||
*Turns | *Turns 1–32 | ||
** | **Four [[Dark Mage]]s; one from each of the four northern stairs | ||
*Turns | *Turns 1–20 | ||
** | **One [[Sniper]] from the left southern stairs | ||
** | **One [[Mercenary]] from the right southern stairs | ||
===NPC data=== | ===NPC data=== | ||
{{ | {{ChapUnitHdr|type=NPC|platform=snes03}} | ||
|platform=snes03 | {{ChapUnitCellFE5 | ||
| | |name=[[Eyvel]] | ||
| | |class=Swordmaster | ||
| | |version=female | ||
| | |type=other | ||
|# | |lv=Var. | ||
| | |#=1 | ||
| | |hp=Var. | ||
|str=Var. | |||
|mag=Var.{{h|+10|Granted by magic floor}} | |||
|skill=Var. | |||
|spd=Var. | |||
|lck=Var. | |||
|def=Var. | |||
|con=Var. | |||
|mov=Var. | |||
|inventory=Varies<br>{{Item|5|Adept}} • Varies | |||
|notes='''Authority:''' Leif; ★<br>'''Action:''' ★★<br>• Not present during preparations.<br>• Retains her stats, skills, and inventory from the end of [[Mother and Daughter|Chapter 5]].<br>• Initially [[Petrification|petrified]].<br>• Does not move; does not initiate combat. | |||
|last=y | |||
}} | }} | ||
{{ChapUnitFtr}} | |||
===Boss data=== | ===Boss data=== | ||
| Line 191: | Line 340: | ||
|class=Dark Bishop | |class=Dark Bishop | ||
|lv=15 | |lv=15 | ||
|HP= | |HP=30~47 | ||
|str= | |str=0~17 | ||
|mag= | |mag=9~20{{h|+10|Granted by magic floor}} | ||
|skill= | |skill=6~20 | ||
|spd= | |spd=6~20 | ||
|luck= | |luck=0~17 | ||
|def= | |def=6~20 | ||
|FCM=0 | |FCM=0 | ||
|build= | |build=5~20 | ||
|move=6 | |move=6 | ||
|inventory= | |inventory={{Item|5|Poison|link=Poison (tome)}}<br>{{Item|5|Berserk|link=Berserk (staff)}}<br>{{Item|5|Jormungand}} | ||
|st=A | |st=A | ||
|fi=D | |fi=D | ||
| Line 211: | Line 360: | ||
==Strategy== | ==Strategy== | ||
{{strategy}} | {{strategy}} | ||
The escape point of this chapter is behind a locked door, and there are no enemies on the map with [[Door Key]]s to be looted. If you enter this chapter without any means of opening doors or teleporting [[Leif]] behind the door, the map is softlocked. Therefore, a method to open a door or to Warp Leif into the exit chamber is required; the bare minimums to be able to clear this chapter (with no regard to the next chapter) are as follows: | |||
''Note that Sara's recruitment and survival is required to access this map, she can serve as either the "A-staves unit" or the "1 other unit" but not both at the same time; with a [[Knight Proof]], she can become an "A-staves unit" during this map if she can be exposed to enemy attacks to level up from surviving combat'' | |||
* [[Door Key]] | |||
* [[Lockpick]]s and [[Steal]] unit | |||
* [[Unlock]] and [[Tina]] | |||
* [[Rewarp]] and A-staves unit able to rescue Leif; A-staves unit Rewarps to Leif, rescues him and Rewarps both units into the exit chamber (if only one Rewarp use is left, another Rewarp use must be captured from one of the Dark Mages) | |||
* [[Rewarp]] and A-staves unit, either Leif or the A-staves unit must be able to capture a Dark Mage for his [[Warp]]; teleportation tiles can be used to enter the execution chamber to capture a Warp, which is used to send Leif to the exit chamber | |||
* [[Rewarp]], [[Rescue]] and A-staves unit; A-staves unit Rewarps into the exit chamber and Rescues Leif there | |||
* 2 uses of [[Thief (staff)|Thief Staff]] and A-staves Tina, Tina must be able to steal a Rewarp and a Warp; Tina can steal a Rewarp once a [[Dark Mage]] Rewarps himself into Leif's vision range, use the Rewarp to reach Leif, steal a Warp from the execution chamber (either Tina or Leif can enter the execution chamber to provide vision) and Warp Leif to the exit chamber | |||
* Thief Staff and A-staves Tina able to rescue Leif, Tina must be able to steal a Rewarp; Tina can steal a Rewarp once a Dark Mage Rewarps himself into Leif's vision range, use the Rewarp to reach Leif, rescue him, and Rewarp both of them into the exit chamber | |||
* Thief Staff and A-staves Tina, Tina must be able to steal a Rewarp, either Tina or Leif must be able to capture a Warp from the execution chamber; Tina can steal a Rewarp once a Dark Mage Rewarps himself into Leif's vision range, use the Rewarp to reach Leif, both units enter the execution chamber and either unit then captures a Warp for Tina to use to send Leif to the exit chamber | |||
* A-staves unit able to rescue Leif and 1 other unit, one of Leif or the A-staves unit must be able to capture a Dark Mage for his Rewarp; a staff user with more CON than Leif can rescue him and Rewarp them both into the exit chamber (if the A-staves unit is the sole remaining unit, they will be forcibly deployed into the left room and be unable to escape on their own, as there are no enemies in that room enemy Rewarp casters will not teleport there either; therefore another unit must take the first deployment slot so the A-staves unit can be deployed on Leif's side of the map) | |||
* A-staves unit and 1 other unit, one of Leif or the A-staves unit must be able to capture a Dark Mage in the execution chamber for his Warp; the teleport tiles can be used to reach the execution chamber, where a Warp staff can be captured to send Leif to the exit chamber (if the A-staves unit is the sole remaining unit, they will be forcibly deployed into the left room and be unable to escape on their own, as there are no enemies in that room enemy Rewarp casters will not teleport there either; therefore another unit must take the first deployment slot so the A-staves unit can be deployed on Leif's side of the map) | |||
* [[Warp]], A-staves unit and 1 other unit (if the Warp caster is the sole remaining unit, they will be forcibly deployed into the left room and be unable to escape on their own, as there are no enemies in that room enemy Rewarp casters will not teleport there either; therefore another unit must take the first deployment slot so the Warp caster can be deployed on Leif's side of the map) | |||
Note that while some of these clear methods require fewer than 6 units (including Leif), [[Sworn Upon a Sword|the next chapter]] requires a minimum of 6 total units to clear, so clearing this map may be meaningless if the player has too few units left alive or leaves too many units behind on this map. The following bare minimums necessary to get 6 units (including Leif) to the escape point are as follows (note that Rewarp and Warp can be sourced from this map if necessary, should the means to capture or steal them exist): | |||
* Any combination of 3 total Door Keys, Lockpicks (with Steal unit to use them) and Unlock (with Tina to use it) and 4 non-Leif units; opening three doors allows everyone to reach the escape point on foot, and to allow Sara to reach Eyvel | |||
* Any combination of 2 total Door Keys, Lockpicks (with Steal unit to use them) and Unlock (with Tina to use it) and 5 non-Leif units; two doors must be opened to allow everyone to reach the escape point on foot | |||
* Any combination of 1 total Door Key, Lockpick (with Steal unit to use them) and Unlock (with Tina to use it), A-staves unit, 4 non-Leif units and a combination of 3 [[Rescue Staff|Rescue]], Warp (caster will require up to 3 additional Rewarps]] or Rewarp (caster must be able to rescue left-side units and/or Eyvel); use staves to retrieve left side units and Eyvel, who can be rerecruited after being retrieved from her chamber, then walk to the escape point | |||
* Any combination of 1 total Door Key, Lockpick (with Steal unit to use them) and Unlock (with Tina to use it) and 10 non-Leif units; 5 units will be in the left room and left behind, while 5 others will be able to escape with Leif | |||
* Rewarp, any combination of 5 Warp, Rescue or 2x Rewarp (with Rewarp caster rescuing other units; 2 Rewarps substitute 1 Warp or 1 Rescue) and 5 total non-Leif units. For each of the following groups that must be sent to the exit chamber with Warp, add +1 required Rewarp to position the A-staves caster: Left side units, Eyvel. Use teleportation staves to teleport each unit into the exit chamber; Eyvel can be rerecruited in the exit chamber. | |||
This chapter features hidden [[Hazards#Warp_traps|Warp traps]] that, if an unfortunate player unit waits on them (moving onto them and doing any other action will not trigger them), they will be warped to an inescapable execution chamber at the southern part of the map, where they will be attacked by enemy reinforcements. The only way to get them out from the execution chamber is to use a [[Rescue (staff)|Rescue staff]] to save them; if the victim is a [[staff]] user, they can also use [[Rewarp]] on themselves to escape. As hinted by [[August]] at the start of this chapter, these Warp traps are typically (though not always) situated near doors, staircases, or narrow corridors. The same execution chamber is also used by the two [[Dark Mage]]s there to send enemy [[Sniper]] and [[Mercenary]] reinforcements via a [[Warp]] staff to attack your party outside. You can use [[Silence (staff)|Silence]] or [[Sleep (staff)|Sleep]] on the Dark Mages in the chamber to stop them from warping the reinforcements. | |||
If you don't have any of the aforementioned two warping staves to retrieve any units sent to the execution chamber, nothing can be done to save them, and you must leave them behind, as this chapter is an [[Objectives#Escape|Escape]] chapter. If [[Leif]] gets sent to the execution chamber and the player does not have any Rescue staves to bail him out, the chapter will be rendered unwinnable (since he needs to escape to complete the level), and the player will be forced to restart. | |||
During this chapter, you will be harassed by enemy staff users inflicting various status effects against your units, such as Silence, Sleep, and Berserk, and Dark Mages wielding the long range Dark tomes [[Fenrir]] and [[Poison (tome)|Poison]]. The main culprits are located in the central room, where the escape point is. If you have a unit who have a high enough avoid to safely dodge tank most (if not all) of the Dark Mage's attacks (such as [[Ced]]), you can warp them into the room so that the Dark Mages would be distracted with attacking him or her while the rest of your group can proceed safely, though still cautiously to avoid triggering the Warp traps. | |||
This map is also infested with loads of [[Berserker]]s. Berserkers are extremely deadly, as they have very high class bases (12 Str/Skl, 10 Spd) on top of being Lv20, giving them extremely high stats, [[Devil Axe]]s to deal massive damage, and most importantly, the [[Wrath]] skill. This means that attacking them up close is not safe at all, as while Devil Axes are inaccurate, their raw power means a critical hit will all but certainly be lethal, and the high Skl of Berserkers give them a low, but ever-present, chance to instakill any units that initiate combat against them at 1-range. Fortunately, ranged attackers bypass this problem, and [[Nihil]] stops Wrath from working. Not-so-fortunately is the interaction between [[Vantage]] and Wrath; units with Vantage always strike first, and units with Wrath always critical if they ''don't'' strike first; as a result, your Vantage units will be facing Wrath crits even on enemy phase, and will die if they get hit. If your Vantage units do not also have Nihil, keep them away from the frontline or bench them for the map as they will face chance of death against every single Berserker on this map. | |||
You can rerecruit [[Eyvel]] by having [[Sara]] use the [[Kia]] staff obtained from the [[The Baron in Black|previous chapter]] to undo her [[petrification]], then speak to her with Leif or [[Mareeta]]. Note however that the room that she is held in (located at the northernmost part of the map) has a Warp trap placed right in front of the door from the outside. Additionally, it's possible for the Dark Mages to cast Silence on Eyvel after she is unpetrified, which could prevent her from being recruited. | |||
A room located in the western portion contains a few treasure [[chest]]s that can be opened for some stat boosters and a [[Knight Proof]]. However, it's not particularly worthwhile to acquire them at this point in the game, as there is only one chapter left until the end of the game. The Knight Proof is particularly questionable to acquire during this chapter, since all of your main units should have already been long promoted by this point, making a very late promotion redundant at this stage of the game. | |||
==Trivia== | ==Trivia== | ||
*[[The Value of Life|Chapter 32x: The Value of Life]] in [[Hector]] hard mode from {{FE7}} drew heavy inspiration from this chapter. Both chapters require the player to circle around the map and kill a large number of [[berserker]]s in order to complete them. | *[[The Value of Life|Chapter 32x: The Value of Life]] in [[Hector]] hard mode from {{FE7}} drew heavy inspiration from this chapter. Both chapters require the player to circle around the map and kill a large number of [[berserker]]s in order to complete them. | ||
==Etymology and other languages== | ==Etymology and other languages== | ||
{{Names | {{Names | ||
|eng-fan-name=• The Altar of Lopto<br> | |eng-fan-name=• The Altar of Lopto<br>• The Loptrian Altar | ||
• The Loptrian Altar | |eng-fan-mean=• Used in FireLizard's translation.<br>• Used in the Lil' Manster [[fan translation]] patch. | ||
|eng-fan-mean=• Used in FireLizard's translation.<br> | |jpn-name={{h|ロプトの祭壇|Roputo no saidan}} | ||
• Used in the Lil' Manster [[fan translation]] patch. | |jpn-mean=Lopt Altar; "Lopt" is the adjective form of "Loputousu" in Japanese. | ||
| | |||
| | |||
}} | }} | ||
==Gallery== | ==Gallery== | ||
<gallery> | |||
Cm fe05 24x.png|Map of the chapter | |||
</gallery> | |||
{{ChapterNav | {{ChapterNav | ||
|prechapter=The Baron in Black | |prechapter=The Baron in Black | ||
|nextchapter=Sworn Upon a Sword | |||
|nextchapter= | |||
}} | }} | ||
{{Nav5}} | {{Nav5}} | ||
{{DEFAULTSORT:Loptrian Altar, The}} | |||
[[Category:Chapters of Fire Emblem: Thracia 776]] | [[Category:Chapters of Fire Emblem: Thracia 776]] | ||
Latest revision as of 02:28, 13 June 2024
| ||||||||||||
|

| “ | We must not rush, Lord Leif. We must proceed patiently and with the utmost caution. | ” | — August to Leif |
|---|
The Loptrian Altar (Japanese: ロプトの祭壇 Lopt Altar) is the side quest of the twenty-fourth chapter of Fire Emblem: Thracia 776. In order to play this chapter, the Kia Staff must have been obtained in the previous chapter and Sara must have been recruited and be alive and uncaptured.
Plot
- Main article:
The Loptrian Altar/Script
Leif's forces enter a secret underground temple of the Loptians in order to undo the petrification spell on Eyvel. They fight the bishops residing there, and Sara uses the Kia staff to save Eyvel. Once Eyvel recovers, Leif and Mareeta – if she participated in the fight – reunite with her. After the battle, members of the Fiana Freeblades, as well as Nanna and Finn all talk to Eyvel and express their happiness about her recovery. If Galzus has been recruited and is alive, he also talks to Eyvel, thanking her for taking care of Mareeta.
Chapter data
| ||||||
|
| |||||
| Victory: Escape | Player | Other | Enemy | |||
|---|---|---|---|---|---|---|
| Defeat: Leif dies | 16+1 | 1−1 | 23+168 | |||
| ||||||
Units are arranged based on their position in deployment order after Leif.

This map features warp tiles. When a unit waits on a warp tile, they are teleported to a different tile. If the unit uses an action other than wait that ends their turn—such as attacking or using an item—on the warp tile or another unit is present on the destination tile, that unit is not teleported.
Every warp tile leads to the southern chamber (column 13, row 37; point A). The locations and destinations of warp tiles in this map are:
- column 21, row 16 (point 1)
- column 19, row 10 (point 2)
- column 13, row 12 (point 3)
- column 11, row 16 (point 4)
- column 15, row 16 (point 5)
- column 13, row 25 (point 6)
- column 9, row 21 (point 7)
- column 17, row 24 (point 8)
- column 14, row 9 (point 9)
- column 12, row 9 (point 10)
- column 13, row 5 (point 11)
- column 4, row 22 (point 12)
- column 11, row 29 (point 13)
- column 18, row 30 (point 14)
Character data
| Characters | |||||||||||
|---|---|---|---|---|---|---|---|---|---|---|---|
New units
| |||||||||||
| |||||||||||
Required characters
| |||||||||||
Available characters
| |||||||||||
Item data
| ||||||||||||
|
Enemy data
- Stats with two figures separated by a ~ are presented as a range, representing stats that vary due to random growths. The figures to the left and right of the ~ are the stat's minimum and maximum possible values respectively.
| ||||||||||||||||||||||||||||||||||||||||||||||||||||||||||||||||||||||||||||||||||||||||||||||||||||||||||||||||||||||||||||||||||||||||||||||||||||||||||||||||||||||||||||||||||||||||||||||||||||||||||||
| ||||||||||||||||||||||||||||||||||||||||||||||||||||||||||||||||||||||||||||||||||||||||||||||||||||||||||||||||||||||||||||||||||||||||||||||||||||||||||||||||||||||||||||||||||||||||||||||||||||||||||||
| ||||||||||||||||||||||||||||||||||||||||||||||||||||||||||||||||||||||||||||||||||||||||||||||||||||||||||||||||||||||||||||||||||||||||||||||||||||||||||||||||||||||||||||||||||||||||||||||||||||||||||||
| ||||||||||||||||||||||||||||||||||||||||||||||||||||||||||||||||||||||||||||||||||||||||||||||||||||||||||||||||||||||||||||||||||||||||||||||||||||||||||||||||||||||||||||||||||||||||||||||||||||||||||||
Reinforcements
- Turns 1–32
- Four Dark Mages; one from each of the four northern stairs
- Turns 1–20
NPC data
| ||||||||||||||||||||||||||||||||||||||||||
| ||||||||||||||||||||||||||||||||||||||||||
Boss data
- Main article:
Dark Bishop
|
|
| ||||||||||||||||||||||||||||||||||||||||||||||||||||||||||
Strategy
| This section details unofficial strategies that may help with completion of the chapter. This may not work for everybody. |
The escape point of this chapter is behind a locked door, and there are no enemies on the map with Door Keys to be looted. If you enter this chapter without any means of opening doors or teleporting Leif behind the door, the map is softlocked. Therefore, a method to open a door or to Warp Leif into the exit chamber is required; the bare minimums to be able to clear this chapter (with no regard to the next chapter) are as follows:
Note that Sara's recruitment and survival is required to access this map, she can serve as either the "A-staves unit" or the "1 other unit" but not both at the same time; with a Knight Proof, she can become an "A-staves unit" during this map if she can be exposed to enemy attacks to level up from surviving combat
- Door Key
- Lockpicks and Steal unit
- Unlock and Tina
- Rewarp and A-staves unit able to rescue Leif; A-staves unit Rewarps to Leif, rescues him and Rewarps both units into the exit chamber (if only one Rewarp use is left, another Rewarp use must be captured from one of the Dark Mages)
- Rewarp and A-staves unit, either Leif or the A-staves unit must be able to capture a Dark Mage for his Warp; teleportation tiles can be used to enter the execution chamber to capture a Warp, which is used to send Leif to the exit chamber
- Rewarp, Rescue and A-staves unit; A-staves unit Rewarps into the exit chamber and Rescues Leif there
- 2 uses of Thief Staff and A-staves Tina, Tina must be able to steal a Rewarp and a Warp; Tina can steal a Rewarp once a Dark Mage Rewarps himself into Leif's vision range, use the Rewarp to reach Leif, steal a Warp from the execution chamber (either Tina or Leif can enter the execution chamber to provide vision) and Warp Leif to the exit chamber
- Thief Staff and A-staves Tina able to rescue Leif, Tina must be able to steal a Rewarp; Tina can steal a Rewarp once a Dark Mage Rewarps himself into Leif's vision range, use the Rewarp to reach Leif, rescue him, and Rewarp both of them into the exit chamber
- Thief Staff and A-staves Tina, Tina must be able to steal a Rewarp, either Tina or Leif must be able to capture a Warp from the execution chamber; Tina can steal a Rewarp once a Dark Mage Rewarps himself into Leif's vision range, use the Rewarp to reach Leif, both units enter the execution chamber and either unit then captures a Warp for Tina to use to send Leif to the exit chamber
- A-staves unit able to rescue Leif and 1 other unit, one of Leif or the A-staves unit must be able to capture a Dark Mage for his Rewarp; a staff user with more CON than Leif can rescue him and Rewarp them both into the exit chamber (if the A-staves unit is the sole remaining unit, they will be forcibly deployed into the left room and be unable to escape on their own, as there are no enemies in that room enemy Rewarp casters will not teleport there either; therefore another unit must take the first deployment slot so the A-staves unit can be deployed on Leif's side of the map)
- A-staves unit and 1 other unit, one of Leif or the A-staves unit must be able to capture a Dark Mage in the execution chamber for his Warp; the teleport tiles can be used to reach the execution chamber, where a Warp staff can be captured to send Leif to the exit chamber (if the A-staves unit is the sole remaining unit, they will be forcibly deployed into the left room and be unable to escape on their own, as there are no enemies in that room enemy Rewarp casters will not teleport there either; therefore another unit must take the first deployment slot so the A-staves unit can be deployed on Leif's side of the map)
- Warp, A-staves unit and 1 other unit (if the Warp caster is the sole remaining unit, they will be forcibly deployed into the left room and be unable to escape on their own, as there are no enemies in that room enemy Rewarp casters will not teleport there either; therefore another unit must take the first deployment slot so the Warp caster can be deployed on Leif's side of the map)
Note that while some of these clear methods require fewer than 6 units (including Leif), the next chapter requires a minimum of 6 total units to clear, so clearing this map may be meaningless if the player has too few units left alive or leaves too many units behind on this map. The following bare minimums necessary to get 6 units (including Leif) to the escape point are as follows (note that Rewarp and Warp can be sourced from this map if necessary, should the means to capture or steal them exist):
- Any combination of 3 total Door Keys, Lockpicks (with Steal unit to use them) and Unlock (with Tina to use it) and 4 non-Leif units; opening three doors allows everyone to reach the escape point on foot, and to allow Sara to reach Eyvel
- Any combination of 2 total Door Keys, Lockpicks (with Steal unit to use them) and Unlock (with Tina to use it) and 5 non-Leif units; two doors must be opened to allow everyone to reach the escape point on foot
- Any combination of 1 total Door Key, Lockpick (with Steal unit to use them) and Unlock (with Tina to use it), A-staves unit, 4 non-Leif units and a combination of 3 Rescue, Warp (caster will require up to 3 additional Rewarps]] or Rewarp (caster must be able to rescue left-side units and/or Eyvel); use staves to retrieve left side units and Eyvel, who can be rerecruited after being retrieved from her chamber, then walk to the escape point
- Any combination of 1 total Door Key, Lockpick (with Steal unit to use them) and Unlock (with Tina to use it) and 10 non-Leif units; 5 units will be in the left room and left behind, while 5 others will be able to escape with Leif
- Rewarp, any combination of 5 Warp, Rescue or 2x Rewarp (with Rewarp caster rescuing other units; 2 Rewarps substitute 1 Warp or 1 Rescue) and 5 total non-Leif units. For each of the following groups that must be sent to the exit chamber with Warp, add +1 required Rewarp to position the A-staves caster: Left side units, Eyvel. Use teleportation staves to teleport each unit into the exit chamber; Eyvel can be rerecruited in the exit chamber.
This chapter features hidden Warp traps that, if an unfortunate player unit waits on them (moving onto them and doing any other action will not trigger them), they will be warped to an inescapable execution chamber at the southern part of the map, where they will be attacked by enemy reinforcements. The only way to get them out from the execution chamber is to use a Rescue staff to save them; if the victim is a staff user, they can also use Rewarp on themselves to escape. As hinted by August at the start of this chapter, these Warp traps are typically (though not always) situated near doors, staircases, or narrow corridors. The same execution chamber is also used by the two Dark Mages there to send enemy Sniper and Mercenary reinforcements via a Warp staff to attack your party outside. You can use Silence or Sleep on the Dark Mages in the chamber to stop them from warping the reinforcements.
If you don't have any of the aforementioned two warping staves to retrieve any units sent to the execution chamber, nothing can be done to save them, and you must leave them behind, as this chapter is an Escape chapter. If Leif gets sent to the execution chamber and the player does not have any Rescue staves to bail him out, the chapter will be rendered unwinnable (since he needs to escape to complete the level), and the player will be forced to restart.
During this chapter, you will be harassed by enemy staff users inflicting various status effects against your units, such as Silence, Sleep, and Berserk, and Dark Mages wielding the long range Dark tomes Fenrir and Poison. The main culprits are located in the central room, where the escape point is. If you have a unit who have a high enough avoid to safely dodge tank most (if not all) of the Dark Mage's attacks (such as Ced), you can warp them into the room so that the Dark Mages would be distracted with attacking him or her while the rest of your group can proceed safely, though still cautiously to avoid triggering the Warp traps.
This map is also infested with loads of Berserkers. Berserkers are extremely deadly, as they have very high class bases (12 Str/Skl, 10 Spd) on top of being Lv20, giving them extremely high stats, Devil Axes to deal massive damage, and most importantly, the Wrath skill. This means that attacking them up close is not safe at all, as while Devil Axes are inaccurate, their raw power means a critical hit will all but certainly be lethal, and the high Skl of Berserkers give them a low, but ever-present, chance to instakill any units that initiate combat against them at 1-range. Fortunately, ranged attackers bypass this problem, and Nihil stops Wrath from working. Not-so-fortunately is the interaction between Vantage and Wrath; units with Vantage always strike first, and units with Wrath always critical if they don't strike first; as a result, your Vantage units will be facing Wrath crits even on enemy phase, and will die if they get hit. If your Vantage units do not also have Nihil, keep them away from the frontline or bench them for the map as they will face chance of death against every single Berserker on this map.
You can rerecruit Eyvel by having Sara use the Kia staff obtained from the previous chapter to undo her petrification, then speak to her with Leif or Mareeta. Note however that the room that she is held in (located at the northernmost part of the map) has a Warp trap placed right in front of the door from the outside. Additionally, it's possible for the Dark Mages to cast Silence on Eyvel after she is unpetrified, which could prevent her from being recruited.
A room located in the western portion contains a few treasure chests that can be opened for some stat boosters and a Knight Proof. However, it's not particularly worthwhile to acquire them at this point in the game, as there is only one chapter left until the end of the game. The Knight Proof is particularly questionable to acquire during this chapter, since all of your main units should have already been long promoted by this point, making a very late promotion redundant at this stage of the game.
Trivia
- Chapter 32x: The Value of Life in Hector hard mode from Fire Emblem: The Blazing Blade drew heavy inspiration from this chapter. Both chapters require the player to circle around the map and kill a large number of berserkers in order to complete them.
Etymology and other languages
| Names, etymology, and in other regions | ||
|---|---|---|
| Language | Name | Definition, etymology, and notes |
| English (unofficial) |
• The Altar of Lopto |
• Used in FireLizard's translation. |
| Japanese |
ロプトの祭壇 |
Lopt Altar; "Lopt" is the adjective form of "Loputousu" in Japanese. |
Gallery
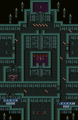
Map of the chapter
| ← The Baron in Black • | The Loptrian Altar | • Sworn Upon a Sword → |
|---|