| Site News |
|---|
| Warning: This wiki contains spoilers. Read at your own risk! Social media: If you would like, please join our Discord server, and/or follow us on Twitter (X) or Tumblr! |
The Walled City: Difference between revisions
m (Text replacement - " <!--==Trivia== -->==" to "<!-- ==Trivia== --> ==") |
|||
| (31 intermediate revisions by 9 users not shown) | |||
| Line 1: | Line 1: | ||
{{Chapter Infobox | |||
{{Chapter Infobox | |||
|image=[[File:Cm fe05 13.png|200px]] | |image=[[File:Cm fe05 13.png|200px]] | ||
|location=Surroundings of [[ | |location=Surroundings of [[Tarrah]], [[Munster District]] | ||
|new units=[[Glade]] | |new units=[[Glade]] | ||
|boss=[[List]] | |boss=[[List]] | ||
|previous=*[[The Bandits of Dacia]] | |||
*[[The Dandelion]] <small>(side quest)</small> | |||
|next=[[The Onslaught]] | |||
}} | }} | ||
{{Quote|I know it's dangerous, but we have no choice. | {{Quote|I know it's dangerous, but we have no choice. Tarrah's demise will mean our demise as well.|[[Leif]]}} | ||
'''The Walled City''' (Japanese: {{hl|城塞都市|Jōsai toshi}} ''Fortified City'') is the thirteenth chapter of {{FE5}}. | '''The Walled City''' (Japanese: {{hl|城塞都市|Jōsai toshi}} ''Fortified City'') is the thirteenth chapter of {{FE5}}. | ||
| Line 13: | Line 15: | ||
==Plot== | ==Plot== | ||
{{main|The Walled City/Script}} | {{main|The Walled City/Script}} | ||
Imperial generals [[Paulus]] and [[List]] surround the city of Tarrah. Paulus orders List to wait for reinforcements and then leaves, but once Paulus is gone, List immediately disobeys his orders and orders an assault on Tarrah. | |||
Outside Tarrah, [[Deen (Thracia 776) | Deen]], [[Glade]] and [[Eda]] discuss the situation, mentioning how Prince [[Shannan]] is in the city but womanizes instead of helping them fight. Glade ultimately deploys his troop of knights to defend the city as the other two get back inside. | |||
[[ | [[Leif]]'s forces then enter the area and notice the ongoing siege. Leif wants to help Tarrah immediately, but [[Dryas]] warns him that only their vanguard has made it here. [[August]], however, brings up the fact that their small army needs popular support and they are sure to lose it if they do not support Tarrah here. | ||
The battle begins, and during it, Leif, [[Finn]] and [[Selphina]] can talk to Glade. If Leif talks to Glade, Glade officially joins his forces with high morale. If Finn talks to Glade, they bring up their shared past as knights in Leonster's service and declare that they will share some drinks once they reclaim Leonster. If Selphina talks to Glade before Leif, Glade expresses his shame over sending knights to their deaths, and after Selphina reassures him, he gifts her a [[Brave Bow]]. If Selphina talks to Glade after Leif, they discuss what the prince inherited from his parents, and the conversation turns to the [[Aed Massacre]], prompting Selphina to cry. Glade then gifts Selphina a Brave Bow. | |||
Once the battle ends, Leif meets with Linoan and apologizes for being the reason Linoan's father died. However, Linoan stands by her father's decision and reinforces the fact that him sheltering Leif in Tarrah was his choice. She then admits she feels helpless in the face of her city being besieged, and Leif vows to help her. | |||
==Chapter data== | ==Chapter data== | ||
{{ChapData | {{ChapData | ||
|victory=Escape | |victory=Escape | ||
|defeat=[[Leif]] dies | |defeat=[[Leif]] dies or an enemy unit takes the gate to Tarrah | ||
|ally= | |ally=6–8{{h|+6|Upon Glade and the Leonster units being recruited}} | ||
|enemy=38{{ | |enemy=38{{h|+128|Reinforcements}} | ||
|map=[[File:Cm fe05 13.png]] | |map=[[File:Cm fe05 13.png]] | ||
}} | }} | ||
Units are arranged based on their position in deployment order after Leif. | |||
===Character data=== | ===Character data=== | ||
{{ChapChars | {{ChapChars | ||
|game#=05 | |game#=05 | ||
|newunit1={{NewUnit | |||
|newunit1={{NewUnit | |||
|name=Glade | |name=Glade | ||
|portrait=[[File:portrait glade fe05.png]] | |portrait=[[File:portrait glade fe05.png]] | ||
| Line 42: | Line 44: | ||
|HP=34 | |HP=34 | ||
|lv=2 | |lv=2 | ||
|inventory={{Item|5|Silver Lance}} | |||
|recruitment method=Automatically from turn 1 | |recruitment method=Automatically from turn 1 | ||
}} | }} | ||
|return1= | |forced1=leif | ||
|return2= | |return1=lifis | ||
|return3= | |return2=fergus | ||
|return4= | |return3=karin | ||
|return5= | |return4=brighton | ||
|return6= | |return5=machyua | ||
|return7= | |return6=lara | ||
|return8= | |return7=dalsin | ||
|return9= | |return8=asbel | ||
|return10= | |return9=nanna | ||
|return11= | |return10=hicks | ||
|return12= | |return11=finn | ||
|return13= | |return12=safy | ||
|return14= | |return13=shiva | ||
|return15= | |return14=osian | ||
|return16= | |return15=halvan | ||
|return17= | |return16=ronan | ||
|return18= | |return17=carrion | ||
|return19= | |return18=marty | ||
|return20= | |return19=dagdar | ||
|return21= | |return20=tanya | ||
|return22 | |return21=selphina | ||
|return22=cain | |||
| | |return22article=Cain (Thracia 776) | ||
| | |return23=alva | ||
| | |return23article=Alva (Thracia 776) | ||
| | |return24=robert | ||
| | |return25=fred | ||
|return26= | |return26=olwen | ||
|return27= | |return27=mareeta | ||
|return28= | |return28=salem | ||
|return29= | |return29=perne | ||
|return30= | |return30=troude | ||
|return31 | |return31=tina | ||
}} | }} | ||
Alongside [[Glade]], there | Alongside [[Glade]], there are two controllable [[Arch Knight]]s and three controllable [[Lance Knight]]s. | ||
:''Stats with two figures separated by a ~ are presented as a range, representing stats that vary due to random growths. The figures to the left and right of the ~ are the stat's minimum and maximum possible values respectively.'' | |||
{{ChapUnitHdr|type=Player|platform=snes03}} | |||
{{ChapUnitCellFE5 | |||
|name=Leonster | |||
|class=Arch Knight | |||
|type=playable | |||
|lv=5 | |||
|#=2 | |||
|hp=20~27 | |||
|str=3~10 | |||
|mag=0~7 | |||
|skill=3~10 | |||
|spd=4~11 | |||
|lck=0~7 | |||
|def=3~10 | |||
|con=6~13 | |||
|mov=8~9 | |||
|inventory={{Item|5|Steel Bow}} | |||
|notes='''Authority:''' Glade | |||
}} | |||
{{ChapUnitCellFE5 | |||
|name=Leonster | |||
|class=Lance Knight | |||
|type=playable | |||
|lv=5 | |||
|#=3 | |||
|hp=20~27 | |||
|str=3~10 | |||
|mag=0~7 | |||
|skill=3~10 | |||
|spd=4~11 | |||
|lck=0~7 | |||
|def=3~10 | |||
|con=7~14 | |||
|mov=8~9 | |||
|inventory={{Item|5|Iron Lance}} | |||
|notes='''Authority:''' Glade | |||
|last=y | |||
}} | |||
{{ChapUnitFtr}} | |||
===Item data=== | ===Item data=== | ||
{{ChapItems | {{ChapItems | ||
|platform=snes03 | |platform=snes03 | ||
|item1=Hammer | |item1=Hammer | ||
| Line 97: | Line 140: | ||
===Enemy data=== | ===Enemy data=== | ||
{{ | :''Stats with two figures separated by a ~ are presented as a range, representing stats that vary due to random growths. The figures to the left and right of the ~ are the stat's minimum and maximum possible values respectively.'' | ||
|platform=snes03 | {{ChapUnitHdr|type=Enemy|platform=snes03}} | ||
| | {{ChapUnitCellFE5 | ||
| | |name=Friege | ||
| | |class=Ballista | ||
|# | |classarticle=Ballista (class) | ||
| | |lv=3 | ||
| | |#=6 | ||
|hp=20~25 | |||
| | |str=4~9 | ||
| | |mag=0~5 | ||
| | |skill=3~8 | ||
|# | |spd=0~5 | ||
| | |lck=0~3 | ||
| | |def=5~10 | ||
|con=6~11 | |||
| | |mov=0 | ||
| | |inventory={{Item|5|Ballista|link=Ballista (weapon)}} | ||
| | |notes='''Authority:''' List<br>Ceases attacking after [[List]] is defeated.<!--AI is set to the same thing as others, but cannot move so cannot escape--> | ||
|#3=5 | }} | ||
| | {{ChapUnitCellFE5 | ||
| | |name=Friege | ||
| | |class=Soldier | ||
| | |lv=13 | ||
| | |#=5 | ||
| | |hp=20~35 | ||
| | |str=3~18 | ||
| | |mag=0~15 | ||
| | |skill=0~15 | ||
| | |spd=0~15 | ||
| | |lck=0~15 | ||
| | |def=1~16 | ||
| | |con=6~20 | ||
| | |mov=5~6 | ||
| | |inventory={{Item|5|Javelin}} | ||
| | |notes='''Authority:''' List<br>• Immediately begins moving to the player's escape point.<br>• After [[List]] is defeated, ignores combat and moves to escape south. | ||
| | }} | ||
{{ChapUnitCellFE5 | |||
| | |name=Friege | ||
| | |class=Archer | ||
| | |lv=12 | ||
|#6= | |#=5 | ||
| | |hp=20~34 | ||
< | |str=3~17 | ||
|mag=0~14 | |||
| | |skill=0~14 | ||
| | |spd=0~14 | ||
| | |lck=0~14 | ||
|#7=2 | |def=1~15 | ||
| | |con=6~20 | ||
| | |mov=5~6 | ||
|inventory={{Item|5|Short Bow}} | |||
| | |notes='''Authority:''' List<br>• Immediately begins moving to the player's escape point.<br>• After [[List]] is defeated, ignores combat and moves to escape south. | ||
| | }} | ||
| | {{ChapUnitCellFE5 | ||
|# | |name=Friege | ||
| | |class=Arch Knight | ||
| | |lv=6 | ||
|#=3 | |||
| | |hp=20~28 | ||
| | |str=3~11 | ||
| | |mag=0~8 | ||
|# | |skill=3~11 | ||
| | |spd=4~12 | ||
| | |lck=0~8 | ||
| | |def=3~11 | ||
| | |con=6~14 | ||
| | |mov=8~9 | ||
| | |inventory={{Item|5|Long Bow}} | ||
| | |notes='''Authority:''' List<br>• Immediately begins moving to the player's escape point.<br>• After [[List]] is defeated, ignores combat and moves to escape south. | ||
}} | |||
| | {{ChapUnitCellFE5 | ||
| | |name=Friege | ||
| | |class=Lance Armor | ||
|# | |lv=8 | ||
| | |#=9 | ||
| | |hp=20~30 | ||
| | |str=4~14 | ||
| | |mag=0~10 | ||
| | |skill=0~10 | ||
|# | |spd=0~10 | ||
| | |lck=0~10 | ||
| | |def=8~18 | ||
| | |con=9~19 | ||
| | |mov=5~6 | ||
| | |inventory={{Item|5|Javelin}} | ||
| | |notes='''Authority:''' List<br>Does not move until [[List]] is defeated, at which point ignores combat and moves to escape south. | ||
| | }} | ||
| | {{ChapUnitCellFE5 | ||
| | |name=[[List]] | ||
| | |class=General | ||
| | |lv=12 | ||
|# | |#=1 | ||
| | |hp=46 | ||
|str=14 | |||
|mag=2 | |||
|skill=11 | |||
|spd=9 | |||
|lck=6 | |||
|def=17 | |||
|con=20 | |||
|mov=6 | |||
|inventory={{Item|5|Killer Lance}} • {{Item|5|Poison Bow}} • {{Item|5|Vulnerary}} • {{Item|5|Vulnerary}}<br>{{Item|5|Pavise}} | |||
|notes='''Authority:''' ★<br>Moves to attack units in range; begins moving toward the player's escape point on turn 5. | |||
}} | |||
{{ChapUnitCellFE5 | |||
|name=Friege | |||
|class=Axe Armor | |||
|lv=10 | |||
|#=5 | |||
|hp=20~32 | |||
|str=4~16 | |||
|mag=0~12 | |||
|skill=0~12 | |||
|spd=0~12 | |||
|lck=0~12 | |||
|def=8~20 | |||
|con=9~20 | |||
|mov=5~6 | |||
|inventory={{Item|5|Battle Axe}} | |||
|notes='''Authority:''' List<br>• Immediately begins moving to the player's escape point.<br>• After [[List]] is defeated, ignores combat and moves to escape south. | |||
}} | |||
{{ChapUnitCellFE5 | |||
|name=Friege | |||
|class=Priest | |||
|lv=5 | |||
|#=2 | |||
|hp=16~23 | |||
|str=0~7 | |||
|mag=3~10 | |||
|skill=2~9 | |||
|spd=1~8 | |||
|lck=0~7 | |||
|def=0~7 | |||
|con=4~11 | |||
|mov=5~6 | |||
|inventory={{Item|5|Heal}} | |||
|notes='''Authority:''' List<br>After [[List]] is defeated, ignores combat and moves to escape south. | |||
}} | |||
{{ChapUnitCellFE5 | |||
|name=Friege | |||
|class=Mage | |||
|lv=7 | |||
|#=2 | |||
|hp=18~27 | |||
|str=0~9 | |||
|mag=2~11 | |||
|skill=2~11 | |||
|spd=3~12 | |||
|lck=0~9 | |||
|def=0~9 | |||
|con=4~13 | |||
|mov=6~7 | |||
|inventory={{Item|5|Thunder}} | |||
|notes='''Authority:''' List<br>• Moves to attack units in range; begins moving toward the player's escape point on turn 5.<br>• After [[List]] is defeated, ignores combat and moves to escape south. | |||
}} | |||
{{ChapUnitCellFE5 | |||
|name=Friege | |||
|class=Bishop | |||
|lv=12 | |||
|#=1 | |||
|hp=20~34 | |||
|str=0~14 | |||
|mag=5~19 | |||
|skill=2~16 | |||
|spd=2~16 | |||
|lck=0~14 | |||
|def=1~15 | |||
|con=4~18 | |||
|mov=5~6 | |||
|inventory={{Item|5|Bolting}} • {{Item|5|Elfire}} • {{Item|5|Physic}} • {{Item|5|Vulnerary}} | |||
|notes=Does not move. | |||
|last=y | |||
}} | |||
{{ChapUnitReinf|type=Enemy|platform=snes03}} | |||
{{ChapUnitCellFE5 | |||
|name=Friege | |||
|class=Arch Knight | |||
|lv=4 | |||
|#=13 | |||
|hp=20~26 | |||
|str=3~9 | |||
|mag=0~6 | |||
|skill=3~9 | |||
|spd=4~10 | |||
|lck=0~6 | |||
|def=3~9 | |||
|con=6~12 | |||
|mov=8~9 | |||
|inventory={{Item|5|Short Bow}} | |||
|notes='''Authority:''' List<br>• Immediately begins moving to the player's escape point.<br>• After [[List]] is defeated, ignores combat and moves to escape south. | |||
}} | |||
{{ChapUnitCellFE5 | |||
|name=Friege | |||
|class=Lance Armor | |||
|lv=15 | |||
|#=64 | |||
|hp=20~37 | |||
|str=4~20 | |||
|mag=0~17 | |||
|skill=0~17 | |||
|spd=0~17 | |||
|lck=0~17 | |||
|def=8~20 | |||
|con=9~20 | |||
|mov=5~6 | |||
|inventory={{Item|5|Long Lance}} | |||
|notes=Immediately begins moving to the player's escape point. | |||
}} | |||
{{ChapUnitCellFE5 | |||
|name=Friege | |||
|class=Bow Armor | |||
|lv=14 | |||
|#=32 | |||
|hp=20~36 | |||
|str=4~20 | |||
|mag=0~16 | |||
|skill=0~16 | |||
|spd=0~16 | |||
|lck=0~16 | |||
|def=8~20 | |||
|con=9~20 | |||
|mov=5~6 | |||
|inventory={{Item|5|Long Bow}} | |||
|notes=Immediately begins moving to the player's escape point. | |||
}} | |||
{{ChapUnitCellFE5 | |||
|name=Friege | |||
|class=Mage | |||
|lv=10 | |||
|#=32 | |||
|hp=18~30 | |||
|str=0~12 | |||
|mag=2~14 | |||
|skill=2~14 | |||
|spd=3~15 | |||
|lck=0~12 | |||
|def=0~12 | |||
|con=4~16 | |||
|mov=6~7 | |||
|inventory={{Item|5|Thunder}} | |||
|notes=Immediately begins moving to the player's escape point. | |||
|last=y | |||
}} | }} | ||
{{ChapUnitFtr}} | |||
====Reinforcements==== | ====Reinforcements==== | ||
*Turns | *Turns 1–13; halted upon [[List]] being defeated | ||
** | **One [[Arch Knight]] from east of the initial Arch Knights | ||
* | *Turns 1–32 after [[List]] has been defeated, or turns 13–32 if he is alive | ||
**Two [[Lance Armor]]s from north of the escape point | |||
** | **One [[Bow Armor]] from north of the escape point | ||
** | **One [[Mage]] from the northwest corner of the map | ||
** | |||
===Boss data=== | ===Boss data=== | ||
{{Main|List}} | {{Main|List}} | ||
{{BossStats FE5 | {{BossStats FE5 | ||
| Line 230: | Line 422: | ||
==Strategy== | ==Strategy== | ||
{{strategy}} | {{strategy}} | ||
This chapter is unique in that some generic knights of [[Leonster]] temporarily join the party. Their main purpose is to hold off the attack on [[Tarrah]] while your units rush to the scene of battle. Any items in their inventory are lost upon the end of the chapter. [[Glade]] is able to defend the gate very effectively if he is standing on it, as he has decent stats and the gate gives +10 defense, and most enemies will struggle to deal significant damage when he has 20 effective defense (except the mages). | |||
This chapter is unique in | |||
When approaching the castle, you will face a number of Lance Armors, Arch Knights, and Ballistae, but they are rather weak. If you wish to have [[Selphina]] speak with Glade to obtain the [[Brave Bow]], be careful not to put her in range of the ballistae, as her [[Accost]] skill can cause her to be attacked twice by one in a single round of combat. | |||
The village with a [[Knight Proof]] is blocked off by rivers, so Karin is the only unit who can acquire it without needing to use both [[Warp (staff)|Warp]] and [[Rescue (staff)|Rescue]]. However, if she hasn't been trained, she will need to rescue-drop someone within range, and the ballista due north must also be taken care of. | |||
==Trivia== | ==Trivia== | ||
*The generic playable units in this chapter have 0% [[growth rate]]s in all stats and cannot [[Class change|promote]]. | |||
==Etymology and other languages== | ==Etymology and other languages== | ||
{{Names | {{Names | ||
|eng-fan-name=• The Stronghold<br> | |eng-fan-name=• The Stronghold<br>• The Walled City | ||
• The Walled City | |eng-fan-mean=• Used in FireLizard's [[fan translation]].<br>• Used in the Lil' Manster fan translation patch. | ||
|eng-fan-mean=• Used in FireLizard's translation.<br> | |jpn-name={{h|城塞都市|Jōsai toshi}} | ||
• Used in the Lil' Manster | |jpn-mean=Fortified City | ||
| | |||
| | |||
}} | }} | ||
==Gallery== | ==Gallery== | ||
<gallery> | |||
Cm fe05 13.png|Map of the chapter | |||
</gallery> | |||
{{ChapterNav | {{ChapterNav | ||
|prechapter=The | |prechapter=The Bandits of Dacia | ||
|prealternate=Dandelion | |prealternate=The Dandelion{{!}}The Dandelion <small>(side quest)</small> | ||
|nextchapter=The Onslaught | |||
|nextchapter= | |||
}} | }} | ||
{{Nav5}} | {{Nav5}} | ||
{{DEFAULTSORT:Walled City, The}} | |||
[[Category:Chapters of Fire Emblem: Thracia 776]] | [[Category:Chapters of Fire Emblem: Thracia 776]] | ||
Latest revision as of 13:14, 20 February 2024
| ||||||||||
|

| “ | I know it's dangerous, but we have no choice. Tarrah's demise will mean our demise as well. | ” | — Leif |
|---|
The Walled City (Japanese: 城塞都市 Fortified City) is the thirteenth chapter of Fire Emblem: Thracia 776.
Plot
- Main article:
The Walled City/Script
Imperial generals Paulus and List surround the city of Tarrah. Paulus orders List to wait for reinforcements and then leaves, but once Paulus is gone, List immediately disobeys his orders and orders an assault on Tarrah.
Outside Tarrah, Deen, Glade and Eda discuss the situation, mentioning how Prince Shannan is in the city but womanizes instead of helping them fight. Glade ultimately deploys his troop of knights to defend the city as the other two get back inside.
Leif's forces then enter the area and notice the ongoing siege. Leif wants to help Tarrah immediately, but Dryas warns him that only their vanguard has made it here. August, however, brings up the fact that their small army needs popular support and they are sure to lose it if they do not support Tarrah here.
The battle begins, and during it, Leif, Finn and Selphina can talk to Glade. If Leif talks to Glade, Glade officially joins his forces with high morale. If Finn talks to Glade, they bring up their shared past as knights in Leonster's service and declare that they will share some drinks once they reclaim Leonster. If Selphina talks to Glade before Leif, Glade expresses his shame over sending knights to their deaths, and after Selphina reassures him, he gifts her a Brave Bow. If Selphina talks to Glade after Leif, they discuss what the prince inherited from his parents, and the conversation turns to the Aed Massacre, prompting Selphina to cry. Glade then gifts Selphina a Brave Bow.
Once the battle ends, Leif meets with Linoan and apologizes for being the reason Linoan's father died. However, Linoan stands by her father's decision and reinforces the fact that him sheltering Leif in Tarrah was his choice. She then admits she feels helpless in the face of her city being besieged, and Leif vows to help her.
Chapter data
| ||||||
|
| |||||
| Victory: Escape | Player | Enemy | ||||
|---|---|---|---|---|---|---|
| Defeat: Leif dies or an enemy unit takes the gate to Tarrah | 6–8+6 | 38+128 | ||||
| ||||||
Units are arranged based on their position in deployment order after Leif.
Character data
| Characters | |||||||||||
|---|---|---|---|---|---|---|---|---|---|---|---|
New units
| |||||||||||
| |||||||||||
Required characters
| |||||||||||
Available characters
| |||||||||||
Alongside Glade, there are two controllable Arch Knights and three controllable Lance Knights.
- Stats with two figures separated by a ~ are presented as a range, representing stats that vary due to random growths. The figures to the left and right of the ~ are the stat's minimum and maximum possible values respectively.
| |||||||||||||||||||||||||||||||||||||||||||||||||||||||||||||||||||||
| |||||||||||||||||||||||||||||||||||||||||||||||||||||||||||||||||||||
Item data
| |||||||||||||||
|
Enemy data
- Stats with two figures separated by a ~ are presented as a range, representing stats that vary due to random growths. The figures to the left and right of the ~ are the stat's minimum and maximum possible values respectively.
| |||||||||||||||||||||||||||||||||||||||||||||||||||||||||||||||||||||||||||||||||||||||||||||||||||||||||||||||||||||||||||||||||||||||||||||||||||||||||||||||||||||||||||||||||||||||||||||||||||||||||||||||||||||||||||||||||||||||||||||||||||||||||||||||||||||||||||||||||||||||||||||
| |||||||||||||||||||||||||||||||||||||||||||||||||||||||||||||||||||||||||||||||||||||||||||||||||||||||||||||||||||||||||||||||||||||||||||||||||||||||||||||||||||||||||||||||||||||||||||||||||||||||||||||||||||||||||||||||||||||||||||||||||||||||||||||||||||||||||||||||||||||||||||||
| |||||||||||||||||||||||||||||||||||||||||||||||||||||||||||||||||||||||||||||||||||||||||||||||||||||||||||||||||||||||||||||||||||||||||||||||||||||||||||||||||||||||||||||||||||||||||||||||||||||||||||||||||||||||||||||||||||||||||||||||||||||||||||||||||||||||||||||||||||||||||||||
| |||||||||||||||||||||||||||||||||||||||||||||||||||||||||||||||||||||||||||||||||||||||||||||||||||||||||||||||||||||||||||||||||||||||||||||||||||||||||||||||||||||||||||||||||||||||||||||||||||||||||||||||||||||||||||||||||||||||||||||||||||||||||||||||||||||||||||||||||||||||||||||
Reinforcements
- Turns 1–13; halted upon List being defeated
- One Arch Knight from east of the initial Arch Knights
- Turns 1–32 after List has been defeated, or turns 13–32 if he is alive
- Two Lance Armors from north of the escape point
- One Bow Armor from north of the escape point
- One Mage from the northwest corner of the map
Boss data
- Main article:
List
|
|
| ||||||||||||||||||||||||||||||||||||||||||||||||||||||||||||
Strategy
| This section details unofficial strategies that may help with completion of the chapter. This may not work for everybody. |
This chapter is unique in that some generic knights of Leonster temporarily join the party. Their main purpose is to hold off the attack on Tarrah while your units rush to the scene of battle. Any items in their inventory are lost upon the end of the chapter. Glade is able to defend the gate very effectively if he is standing on it, as he has decent stats and the gate gives +10 defense, and most enemies will struggle to deal significant damage when he has 20 effective defense (except the mages).
When approaching the castle, you will face a number of Lance Armors, Arch Knights, and Ballistae, but they are rather weak. If you wish to have Selphina speak with Glade to obtain the Brave Bow, be careful not to put her in range of the ballistae, as her Accost skill can cause her to be attacked twice by one in a single round of combat.
The village with a Knight Proof is blocked off by rivers, so Karin is the only unit who can acquire it without needing to use both Warp and Rescue. However, if she hasn't been trained, she will need to rescue-drop someone within range, and the ballista due north must also be taken care of.
Trivia
- The generic playable units in this chapter have 0% growth rates in all stats and cannot promote.
Etymology and other languages
| Names, etymology, and in other regions | ||
|---|---|---|
| Language | Name | Definition, etymology, and notes |
| English (unofficial) |
• The Stronghold |
• Used in FireLizard's fan translation. |
| Japanese |
城塞都市 |
Fortified City |
Gallery
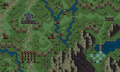
Map of the chapter
| ← The Bandits of Dacia • ← The Dandelion (side quest) • |
The Walled City | • The Onslaught → |
|---|