| Site News |
|---|
| Warning: This wiki contains spoilers. Read at your own risk! Social media: If you would like, please join our Discord server, and/or follow us on Twitter (X) or Tumblr! |
Crumbling League: Difference between revisions
Thecornerman (talk | contribs) m (→Gallery: Updated link) |
Thecornerman (talk | contribs) m (Text replacement - "[Cc]hapter (\d+)" to "Chapter $1") |
||
| (24 intermediate revisions by 11 users not shown) | |||
| Line 4: | Line 4: | ||
|new units=[[Clarine]], [[Rutger]] | |new units=[[Clarine]], [[Rutger]] | ||
|boss=[[Erik]] | |boss=[[Erik]] | ||
|previous=[[Latecomer's Sorrow]] | |||
|next=[[Fire Emblem (The Binding Blade chapter)|Fire Emblem]] | |||
}} | }} | ||
{{Quote|You, blockade the highroad from Ostia. This Roy might just pass by. I want his head!|[[Narcian]]}} | {{Quote|You, blockade the highroad from Ostia. This Roy might just pass by. I want his head!|[[Narcian]]}} | ||
'''Crumbling League''' (Japanese: {{hl|同盟の崩壊|Dōmei no hōkai}} ''Collapse of the alliance'') is the fourth chapter of {{FE6}}. While traveling to [[Ostia]], Roy's army is attacked by [[Laus]]' forces, which are lead by none other than [[Erik|Marquess Laus]] himself. | '''Crumbling League''' (Japanese: {{hl|同盟の崩壊|Dōmei no hōkai}} ''Collapse of the alliance'') is the fourth chapter of {{FE6}}. While traveling to [[Ostia]], Roy's army is attacked by [[Laus]]' forces, which are lead by none other than [[Erik|Marquess Laus]] himself. | ||
==Plot== | ==Plot== | ||
{{main|Crumbling League/Script}} | {{main|Crumbling League/Script}} | ||
[[Roy]]'s forces enter [[Laus]], the territory of Lord [[Erik]], on their way toward [[Ostia]]. In the meantime, [[Narcian]] confers with Erik about the latter aligning himself with Bern. He also retrieves Erik's "gift" for him - an Etrurian noblewoman, [[Clarine]]. Narcian tries to talk to Clarine, but she only laughs at him and insults him. Their interaction is interrupted by a soldier who barges in to tell the Wyvern General that [[Slater]] has been defeated by Roy at Araphen. Narcian, annoyed by the interruption, orders Erik to imprison Clarine and to block the road toward Ostia, then leaves. | |||
The battle begins, and during it, [[Rutger]] visits Clarine in her cell. He takes her away from the cell, and Clarine initially resists him, but she soon realizes that he is leading her out of the castle. He gives her a previously prepared horse and tells her to run, claiming that his actions are motivated by his hatred of [[Bern]]. | |||
Clarine eventually makes it to Roy and talks to him, ordering him to protect her from Laus's soldiers. [[Merlinus]] protests against her joining the army, but she declares she can help by healing wounded allies, and Roy accepts her inclusion. | |||
In the meantime, Rutger is ordered by Erik to prepare for battle and eventually enters the battlefield. After he is deployed, Clarine can talk to him. When she does, she convinces him to join Roy's side by revealing to him that Roy is fighting Bern, a nation Rutger hates. | |||
The battle concludes with Erik's defeat. Roy expresses his disbelief that Erik would betray Lycia and fears there is no peaceful solution to this conflict, then asks [[Guinivere]] if she intends to return to Bern. Guinivere says she wants to stay, because she disagrees with her brother's method of 'freeing the world.' She must stop him somehow, even though he believes in his cause. | |||
==Chapter data== | ==Chapter data== | ||
{{ChapData | {{Tab | ||
|tab1=Normal | |||
|tab2=Hard | |||
|content1={{ChapData | |||
|victory=Seize the castle gate | |||
|defeat=[[Roy]] dies | |||
|ally=14{{h|+2|Upon Clarine and Rutger being recruited}} | |||
|other=0{{h|+1|Upon Clarine arriving}}{{h|−1|Upon Clarine being recruited}} | |||
|enemy=16{{h|+10|Reinforcements}}{{h|−1|Upon Rutger being recruited}} | |||
|map=[[File:Cm fe06 4.png]] | |||
}} | |||
|content2={{ChapData | |||
|victory=Seize the castle gate | |victory=Seize the castle gate | ||
|defeat=[[Roy]] dies | |defeat=[[Roy]] dies | ||
|ally=14{{ | |ally=14{{h|+2|Upon Clarine and Rutger being recruited}} | ||
|other=0{{ | |other=0{{h|+1|Upon Clarine arriving}}{{h|−1|Upon Clarine being recruited}} | ||
|enemy=16{{ | |enemy=16{{h|+18|Reinforcements}}{{h|−1|Upon Rutger being recruited}} | ||
|map=[[File:Cm fe06 4.png]] | |map=[[File:Cm fe06 4.png]] | ||
}} | }} | ||
}} | |||
Units are arranged based on their position in deployment order. If every unit is recruited and alive, the deployment order is: [[Roy]], [[Marcus]], [[Alen]], [[Bors]], [[Wolt]], [[Lance (character)|Lance]], [[Merlinus]], [[Elen]], [[Ward (character)|Ward]], [[Lot]], [[Dieck]], [[Shanna]], [[Chad]], and [[Lugh]]. | |||
===Character data=== | ===Character data=== | ||
{{ChapChars | {{ChapChars | ||
|game#=06 | |game#=06 | ||
|newunit1={{NewUnit | |newunit1={{NewUnit | ||
|name=Clarine | |name=Clarine | ||
| Line 53: | Line 57: | ||
|HP=15 | |HP=15 | ||
|lv=1 | |lv=1 | ||
|recruitment method=NPC, talk to with [[Roy]] | |inventory={{Item|6|Heal}}<br>{{Item|6|Vulnerary}} | ||
|recruitment method=[[NPC]], talk to with [[Roy]] | |||
}} | }} | ||
|newunit2={{NewUnit | |newunit2={{NewUnit | ||
| Line 61: | Line 66: | ||
|HP=22 | |HP=22 | ||
|lv=4 | |lv=4 | ||
|recruitment method=Enemy, talk to with [[Clarine]] | |inventory={{Item|6|Killing Edge}} | ||
|recruitment method=[[Enemy]], talk to with [[Clarine]] | |||
}} | }} | ||
|return1= | |forced1=roy | ||
|return2= | |return1=marcus | ||
|return3= | |return2=alen | ||
|return4=lance | |return3=bors | ||
| | |return4=wolt | ||
| | |return5=lance | ||
| | |return5article=Lance (character) | ||
| | |return6=merlinus | ||
| | |return7=elen | ||
|return9= | |return8=ward | ||
|return10= | |return8article=Ward (character) | ||
|return11= | |return9=lot | ||
|return12= | |return10=dieck | ||
|return13 | |return11=shanna | ||
|return12=chad | |||
|return13=lugh | |||
}} | }} | ||
| Line 83: | Line 90: | ||
{{ChapItems | {{ChapItems | ||
|platform=gba | |platform=gba | ||
|item1= | |item1=Vulnerary | ||
|obtain1= | |obtain1=Steal from enemy [[Archer]] (reinforcement) | ||
|item2= | |item2=Vulnerary | ||
|obtain2= | |obtain2=Steal from enemy [[Fighter]] (reinforcement) | ||
|item3= | |item3=Vulnerary | ||
|obtain3= | |obtain3=Steal from enemy [[Fighter]] (reinforcement) | ||
|item4= | |item4=Door Key | ||
|obtain4= | |obtain4=Visiting the northeastern [[village]] | ||
|item5= | |item5=Steel Blade | ||
|obtain5= | |obtain5=Visiting the northwestern [[village]] | ||
|itemlast= | |itemlast=Angelic Robe | ||
|obtainlast= | |obtainlast=Visiting the southern [[village]] | ||
}} | }} | ||
===Shop data=== | ===Shop data=== | ||
{{ | {{ChapShop GBA | ||
| | |sword1=Iron Sword | ||
| | |swcost1=460 | ||
| | |sword2=Slim Sword | ||
| | |swcost2=480 | ||
| | |lance1=Iron Lance | ||
| | |lacost1=360 | ||
|lance2=Slim Lance | |||
|lacost2=450 | |||
|lance3=Javelin | |||
|lacost3=400 | |||
|axe1=Iron Axe | |||
|axcost1=270 | |||
|axe2=Hand Axe | |||
|axcost2=300 | |||
|anima1=Fire | |||
|ancost1=560 | |||
|staff1=Heal | |||
|stcost1=600 | |||
|item1=Vulnerary | |||
|itcost1=300 | |||
| | |||
}} | }} | ||
===Enemy data=== | ===Enemy data=== | ||
{{ | {{Tab | ||
|platform=gba | |width=100% | ||
| | |tab1=Normal | ||
| | |tab2=Hard | ||
| | |content1={{ChapUnitHdr|type=Enemy|platform=gba}} | ||
|#1=1 | {{ChapUnitCellGBA | ||
| | |name=[[Erik]] | ||
| | |class=Cavalier | ||
| | |lv=10 | ||
| | |#=1 | ||
| | |hp=26 | ||
|#2=2 | |str=8 | ||
| | |skill=8 | ||
| | |spd=9 | ||
| | |lck=2 | ||
| | |def=8 | ||
| | |res=2 | ||
|#3=1 | |con=9 | ||
| | |mov=7 | ||
| | |inventory={{Item|6|Steel Sword}} • {{Item|6|Javelin}} | ||
| | }} | ||
| | {{ChapUnitCellGBA | ||
| | |name=Laus | ||
|#4=2 | |class=Cavalier | ||
| | |lv=4 | ||
| | |#=1 | ||
| | |hp=21~23 | ||
| | |str=5~7 | ||
| | |skill=3~4 | ||
|#5=2 | |spd=5~6 | ||
| | |lck=0~2 | ||
| | |def=6~7 | ||
| | |res=0~1 | ||
| | |con=9 | ||
| | |mov=7 | ||
|#6=3 | |inventory={{Item|6|Iron Sword}} | ||
| | |notes=Does not attack [[Clarine]]; begins moving unprovoked when he can attack a unit within two turns, or on turn 4. | ||
| | }} | ||
| | {{ChapUnitCellGBA | ||
| | |name=Laus | ||
| | |class=Archer | ||
|#7=1 | |lv=5 | ||
| | |#=2 | ||
| | |hp=20~22 | ||
| | |str=5~6 | ||
| | |skill=4~5 | ||
| | |spd=4~5 | ||
|# | |lck=1~2 | ||
| | |def=3~4 | ||
| | |res=0~1 | ||
| | |con=7 | ||
| | |mov=5 | ||
| | |inventory={{Item|6|Iron Bow}} | ||
|# | |notes=• Does not attack [[Clarine]].<br>• The northern one moves to attack units in range.<br>• The southern one begins moving unprovoked when he can attack a unit within two turns. | ||
| | }} | ||
| | {{ChapUnitCellGBA | ||
| | |name=Laus | ||
| | |class=Cavalier | ||
| | |lv=3 | ||
| | |#=3 | ||
| | |hp=21~22 | ||
| | |str=5~6 | ||
| | |skill=2~3 | ||
| | |spd=5~6 | ||
|# | |lck=0~1 | ||
| | |def=6~7 | ||
| | |res=0~1 | ||
| | |con=9 | ||
| | |mov=7 | ||
| | |inventory={{Item|6|Iron Lance}} | ||
|# | |notes=• Does not attack [[Clarine]].<br>• The easternmost one moves to attack units in range. | ||
| | }} | ||
| | {{ChapUnitCellGBA | ||
| | |name=Laus | ||
| | |class=Cavalier | ||
| | |lv=3 | ||
|# | |#=2 | ||
| | |hp=21~22 | ||
| | |str=5~6 | ||
| | |skill=2~3 | ||
| | |spd=5~6 | ||
| | |lck=0~1 | ||
|# | |def=6~7 | ||
| | |res=0~1 | ||
| | |con=9 | ||
| | |mov=7 | ||
| | |inventory={{Item|6|Iron Sword}} | ||
| | |notes=• Does not attack [[Clarine]].<br>• The easternmost one moves to attack units in range. | ||
|# | }} | ||
| | {{ChapUnitCellGBA | ||
| | |name=Laus | ||
| | |class=Cavalier | ||
| | |lv=5 | ||
| | |#=1 | ||
| | |hp=22~24 | ||
| | |str=6~7 | ||
|skill=3~4 | |||
|spd=5~7 | |||
|lck=1~2 | |||
|def=6~7 | |||
|res=0~1 | |||
|con=9 | |||
|mov=7 | |||
|inventory={{Item|6|Iron Lance}} | |||
|notes=Does not attack [[Clarine]]; begins moving unprovoked when he can attack a unit within two turns. | |||
}} | |||
{{ChapUnitCellGBA | |||
|name=Laus | |||
|class=Cavalier | |||
|lv=2 | |||
|#=2 | |||
|hp=20~21 | |||
|str=5~6 | |||
|skill=2~3 | |||
|spd=5~6 | |||
|lck=0~1 | |||
|def=6~7 | |||
|res=0~1 | |||
|con=9 | |||
|mov=7 | |||
|inventory={{Item|6|Iron Lance}} | |||
|notes=Does not attack [[Clarine]]. | |||
}} | |||
{{ChapUnitCellGBA | |||
|name=Laus | |||
|class=Cavalier | |||
|lv=2 | |||
|#=1 | |||
|hp=20~21 | |||
|str=5~6 | |||
|skill=2~3 | |||
|spd=5~6 | |||
|lck=0~1 | |||
|def=6~7 | |||
|res=0~1 | |||
|con=9 | |||
|mov=7 | |||
|inventory={{Item|6|Iron Sword}} | |||
|notes=Does not attack [[Clarine]]. | |||
}} | |||
{{ChapUnitCellGBA | |||
|name=Laus | |||
|class=Archer | |||
|lv=4 | |||
|#=1 | |||
|hp=19~21 | |||
|str=4~6 | |||
|skill=4~5 | |||
|spd=3~5 | |||
|lck=0~2 | |||
|def=3~4 | |||
|res=0~1 | |||
|con=7 | |||
|mov=5 | |||
|inventory={{Item|6|Iron Bow}} | |||
|notes=Does not attack [[Clarine]]; begins moving unprovoked when he can attack a unit within two turns, or on turn 4. | |||
}} | |||
{{ChapUnitCellGBA | |||
|name=Laus | |||
|class=Nomad | |||
|lv=1 | |||
|#=2 | |||
|hp=16 | |||
|str=5 | |||
|skill=4 | |||
|spd=5 | |||
|lck=0 | |||
|def=4 | |||
|res=0 | |||
|con=7 | |||
|mov=7 | |||
|inventory={{Item|6|Iron Bow}} | |||
|notes=Does not attack [[Clarine]]. | |||
|last=y | |||
}} | |||
{{ChapUnitReinf|type=Enemy|platform=gba}} | |||
{{ChapUnitCellGBA | |||
|name=Pirate | |||
|class=Pirate | |||
|lv=4 | |||
|#=3 | |||
|hp=20~22 | |||
|str=5~6 | |||
|skill=2~4 | |||
|spd=6~7 | |||
|lck=0~1 | |||
|def=3~4 | |||
|res=0~1 | |||
|con=10 | |||
|mov=5 | |||
|inventory={{Item|6|Iron Axe}} | |||
|notes=Does not attack [[Clarine]]; moves to raid [[village]]s, then moves to attack units unprovoked. | |||
}} | |||
{{ChapUnitCellGBA | |||
|name=Pirate | |||
|class=Pirate | |||
|lv=3 | |||
|#=3 | |||
|hp=20~21 | |||
|str=4~6 | |||
|skill=2~3 | |||
|spd=6~7 | |||
|lck=0~1 | |||
|def=3~4 | |||
|res=0~1 | |||
|con=10 | |||
|mov=5 | |||
|inventory={{Item|6|Hand Axe}} | |||
|notes=Does not attack [[Clarine]]; moves to raid [[village]]s, then moves to attack units unprovoked. | |||
}} | |||
{{ChapUnitCellGBA | |||
|name=Laus | |||
|class=Fighter | |||
|lv=3 | |||
|#=1 | |||
|hp=21~22 | |||
|str=5~7 | |||
|skill=2~3 | |||
|spd=4~5 | |||
|lck=0~1 | |||
|def=2~3 | |||
|res=0~1 | |||
|con=11 | |||
|mov=5 | |||
|inventory={{Item|6|Iron Axe}} • {{Item|6|Vulnerary}} | |||
|notes=Does not attack [[Clarine]]. | |||
}} | |||
{{ChapUnitCellGBA | |||
|name=Laus | |||
|class=Fighter | |||
|lv=2 | |||
|#=1 | |||
|hp=20~21 | |||
|str=5~6 | |||
|skill=2~3 | |||
|spd=4~5 | |||
|lck=0~1 | |||
|def=2~3 | |||
|res=0~1 | |||
|con=11 | |||
|mov=5 | |||
|inventory={{Item|6|Iron Axe}} • {{Item|6|Vulnerary}} | |||
|notes=Does not attack [[Clarine]]. | |||
}} | |||
{{ChapUnitCellGBA | |||
|name=Laus | |||
|class=Archer | |||
|lv=2 | |||
|#=1 | |||
|hp=18~19 | |||
|str=4~5 | |||
|skill=3~4 | |||
|spd=3~4 | |||
|lck=0~1 | |||
|def=3~4 | |||
|res=0~1 | |||
|con=7 | |||
|mov=5 | |||
|inventory={{Item|6|Iron Bow}} • {{Item|6|Vulnerary}} | |||
|notes=Does not attack [[Clarine]]. | |||
}} | |||
{{ChapUnitCellGBA | |||
|name=[[Rutger]] | |||
|class=Myrmidon | |||
|lv=4 | |||
|#=1 | |||
|hp=22 | |||
|str=7 | |||
|skill=12 | |||
|spd=13 | |||
|lck=2 | |||
|def=5 | |||
|res=0 | |||
|con=7 | |||
|mov=5 | |||
|inventory={{Item|6|Killing Edge}} | |||
|notes=Does not attack [[Clarine]]. | |||
|last=y | |||
}} | |||
{{ChapUnitFtr}} | |||
|content2={{ChapUnitHdr|type=Enemy|platform=gba}} | |||
{{ChapUnitCellGBA | |||
|name=[[Erik]] | |||
|class=Cavalier | |||
|lv=10 | |||
|#=1 | |||
|hp=32~36 | |||
|str=10~12 | |||
|skill=10~14 | |||
|spd=11~13 | |||
|lck=4~6 | |||
|def=8~10 | |||
|res=2~4 | |||
|con=9 | |||
|mov=7 | |||
|inventory={{Item|6|Steel Sword}} • {{Item|6|Javelin}} | |||
}} | |||
{{ChapUnitCellGBA | |||
|name=Laus | |||
|class=Cavalier | |||
|lv=4 | |||
|#=1 | |||
|hp=27~33 | |||
|str=7~11 | |||
|skill=5~10 | |||
|spd=7~10 | |||
|lck=2~6 | |||
|def=6~9 | |||
|res=0~3 | |||
|con=9 | |||
|mov=7 | |||
|inventory={{Item|6|Iron Sword}} | |||
|notes=Does not attack [[Clarine]]; begins moving unprovoked when he can attack a unit within two turns, or on turn 4. | |||
}} | |||
{{ChapUnitCellGBA | |||
|name=Laus | |||
|class=Archer | |||
|lv=5 | |||
|#=2 | |||
|hp=26~30 | |||
|str=7~10 | |||
|skill=6~11 | |||
|spd=6~9 | |||
|lck=3~6 | |||
|def=3~6 | |||
|res=0~3 | |||
|con=7 | |||
|mov=5 | |||
|inventory={{Item|6|Iron Bow}} | |||
|notes=• Does not attack [[Clarine]].<br>• The northern one moves to attack units in range.<br>• The southern one begins moving unprovoked when he can attack a unit within two turns. | |||
}} | |||
{{ChapUnitCellGBA | |||
|name=Laus | |||
|class=Cavalier | |||
|lv=3 | |||
|#=3 | |||
|hp=27~32 | |||
|str=7~10 | |||
|skill=4~9 | |||
|spd=7~10 | |||
|lck=2~5 | |||
|def=6~9 | |||
|res=0~3 | |||
|con=9 | |||
|mov=7 | |||
|inventory={{Item|6|Iron Lance}} | |||
|notes=• Does not attack [[Clarine]].<br>• The easternmost one moves to attack units in range. | |||
}} | |||
{{ChapUnitCellGBA | |||
|name=Laus | |||
|class=Cavalier | |||
|lv=3 | |||
|#=2 | |||
|hp=27~32 | |||
|str=7~10 | |||
|skill=4~9 | |||
|spd=7~10 | |||
|lck=2~5 | |||
|def=6~9 | |||
|res=0~3 | |||
|con=9 | |||
|mov=7 | |||
|inventory={{Item|6|Iron Sword}} | |||
|notes=• Does not attack [[Clarine]].<br>• The easternmost one moves to attack units in range. | |||
}} | |||
{{ChapUnitCellGBA | |||
|name=Laus | |||
|class=Cavalier | |||
|lv=5 | |||
|#=1 | |||
|hp=28~34 | |||
|str=8~11 | |||
|skill=5~10 | |||
|spd=7~11 | |||
|lck=3~6 | |||
|def=6~9 | |||
|res=0~3 | |||
|con=9 | |||
|mov=7 | |||
|inventory={{Item|6|Iron Lance}} | |||
|notes=Does not attack [[Clarine]]; begins moving unprovoked when he can attack a unit within two turns. | |||
}} | |||
{{ChapUnitCellGBA | |||
|name=Laus | |||
|class=Cavalier | |||
|lv=2 | |||
|#=2 | |||
|hp=26~31 | |||
|str=7~10 | |||
|skill=4~9 | |||
|spd=7~10 | |||
|lck=2~5 | |||
|def=6~9 | |||
|res=0~3 | |||
|con=9 | |||
|mov=7 | |||
|inventory={{Item|6|Iron Lance}} | |||
|notes=Does not attack [[Clarine]]. | |||
}} | |||
{{ChapUnitCellGBA | |||
|name=Laus | |||
|class=Cavalier | |||
|lv=2 | |||
|#=1 | |||
|hp=26~31 | |||
|str=7~10 | |||
|skill=4~9 | |||
|spd=7~10 | |||
|lck=2~5 | |||
|def=6~9 | |||
|res=0~3 | |||
|con=9 | |||
|mov=7 | |||
|inventory={{Item|6|Iron Sword}} | |||
|notes=Does not attack [[Clarine]]. | |||
}} | |||
{{ChapUnitCellGBA | |||
|name=Laus | |||
|class=Archer | |||
|lv=4 | |||
|#=1 | |||
|hp=25~29 | |||
|str=6~10 | |||
|skill=6~11 | |||
|spd=5~9 | |||
|lck=2~6 | |||
|def=3~6 | |||
|res=0~3 | |||
|con=7 | |||
|mov=5 | |||
|inventory={{Item|6|Iron Bow}} | |||
|notes=Does not attack [[Clarine]]; begins moving unprovoked when he can attack a unit within two turns, or on turn 4. | |||
}} | |||
{{ChapUnitCellGBA | |||
|name=Laus | |||
|class=Nomad | |||
|lv=1 | |||
|#=2 | |||
|hp=20~24 | |||
|str=7~9 | |||
|skill=6~10 | |||
|spd=7~11 | |||
|lck=2~4 | |||
|def=4~6 | |||
|res=0~2 | |||
|con=7 | |||
|mov=7 | |||
|inventory={{Item|6|Iron Bow}} | |||
|notes=Does not attack [[Clarine]]. | |||
|last=y | |||
}} | |||
{{ChapUnitReinf|type=Enemy|platform=gba}} | |||
{{ChapUnitCellGBA | |||
|name=Pirate | |||
|class=Pirate | |||
|lv=4 | |||
|#=5 | |||
|hp=23~27 | |||
|str=7~9 | |||
|skill=3~6 | |||
|spd=7~9 | |||
|lck=0~2 | |||
|def=3~5 | |||
|res=0~2 | |||
|con=10 | |||
|mov=5 | |||
|inventory={{Item|6|Iron Axe}} | |||
|notes=Does not attack [[Clarine]]; moves to raid [[village]]s, then moves to attack units unprovoked. | |||
}} | |||
{{ChapUnitCellGBA | |||
|name=Pirate | |||
|class=Pirate | |||
|lv=3 | |||
|#=5 | |||
|hp=23~26 | |||
|str=6~9 | |||
|skill=3~5 | |||
|spd=7~9 | |||
|lck=0~2 | |||
|def=3~5 | |||
|res=0~2 | |||
|con=10 | |||
|mov=5 | |||
|inventory={{Item|6|Hand Axe}} | |||
|notes=Does not attack [[Clarine]]; moves to raid [[village]]s, then moves to attack units unprovoked. | |||
}} | |||
{{ChapUnitCellGBA | |||
|name=Laus | |||
|class=Fighter | |||
|lv=3 | |||
|#=1 | |||
|hp=24~27 | |||
|str=7~11 | |||
|skill=3~5 | |||
|spd=5~7 | |||
|lck=0~2 | |||
|def=2~4 | |||
|res=0~2 | |||
|con=11 | |||
|mov=5 | |||
|inventory={{Item|6|Iron Axe}} • {{Item|6|Vulnerary}} | |||
|notes=Does not attack [[Clarine]]. | |||
}} | |||
{{ChapUnitCellGBA | |||
|name=Laus | |||
|class=Fighter | |||
|lv=2 | |||
|#=1 | |||
|hp=23~26 | |||
|str=7~10 | |||
|skill=3~5 | |||
|spd=5~7 | |||
|lck=0~2 | |||
|def=2~4 | |||
|res=0~2 | |||
|con=11 | |||
|mov=5 | |||
|inventory={{Item|6|Iron Axe}} • {{Item|6|Vulnerary}} | |||
|notes=Does not attack [[Clarine]]. | |||
}} | |||
{{ChapUnitCellGBA | |||
|name=Laus | |||
|class=Archer | |||
|lv=2 | |||
|#=1 | |||
|hp=21~23 | |||
|str=5~7 | |||
|skill=4~7 | |||
|spd=4~6 | |||
|lck=1~3 | |||
|def=3~5 | |||
|res=0~2 | |||
|con=7 | |||
|mov=5 | |||
|inventory={{Item|6|Iron Bow}} • {{Item|6|Vulnerary}} | |||
|notes=Does not attack [[Clarine]]. | |||
}} | |||
{{ChapUnitCellGBA | |||
|name=[[Rutger]] | |||
|class=Myrmidon | |||
|lv=4 | |||
|#=1 | |||
|hp=25~26 | |||
|str=8~9 | |||
|skill=13~15 | |||
|spd=14~16 | |||
|lck=3~4 | |||
|def=5~6 | |||
|res=0~1 | |||
|con=7 | |||
|mov=5 | |||
|inventory={{Item|6|Killing Edge}} | |||
|notes=Does not attack [[Clarine]]. | |||
}} | |||
{{ChapUnitCellGBA | |||
|name=Laus | |||
|class=Cavalier | |||
|lv=4 | |||
|#=3 | |||
|hp=24~28 | |||
|str=6~9 | |||
|skill=4~7 | |||
|spd=6~8 | |||
|lck=1~4 | |||
|def=6~8 | |||
|res=0~2 | |||
|con=9 | |||
|mov=7 | |||
|inventory={{Item|6|Iron Lance}} | |||
}} | |||
{{ChapUnitCellGBA | |||
|name=Laus | |||
|class=Cavalier | |||
|lv=4 | |||
|#=1 | |||
|hp=24~28 | |||
|str=6~9 | |||
|skill=4~7 | |||
|spd=6~8 | |||
|lck=1~4 | |||
|def=6~8 | |||
|res=0~2 | |||
|con=9 | |||
|mov=7 | |||
|inventory={{Item|6|Iron Lance}} • {{Item|6|Javelin}} | |||
|last=y | |||
}} | |||
{{ChapUnitFtr}} | |||
}} | }} | ||
====Reinforcements==== | |||
*Enemy phases of turns 4, 6, and 8; and enemy phases of turns 9 and 10 on Hard Mode | |||
**One [[Pirate]] with an [[Iron Axe]] from the easternmost fort | |||
**One Pirate with a [[Hand Axe]] one tile left of the westernmost fort | |||
*Enemy phase of turn 6 | |||
**Two [[Fighter]]s, one [[Archer]], and [[Rutger]] from east of the gate | |||
*Enemy phase of turn 11 on Hard Mode | |||
**Four [[Cavalier]]s from the eastern edge of the map | |||
===NPC data=== | ===NPC data=== | ||
{{ | {{ChapUnitHdr|type=NPC|platform=gba}} | ||
|platform=gba | {{ChapUnitCellGBA | ||
| | |name=[[Clarine]] | ||
| | |class=Troubadour | ||
| | |type=other | ||
|# | |lv=1 | ||
| | |#=1 | ||
}} | |hp=15 | ||
* | |str=2 | ||
|skill=5 | |||
|spd=9 | |||
|lck=8 | |||
|def=2 | |||
|res=5 | |||
|con=5 | |||
|mov=7 | |||
|inventory={{Item|6|Heal}} • {{Item|6|Vulnerary}} | |||
|last=y | |||
}} | |||
{{ChapUnitFtr}} | |||
====Reinforcements==== | |||
*Turn 3 other phase | |||
**[[Clarine]] from northeast of the gate | |||
===Boss data=== | ===Boss data=== | ||
{{Main|Erik}} | {{Main|Erik}} | ||
:''Stats with two figures separated by a ~ are presented as a range, representing stats that vary due to random growths. The figures to the left and right of the ~ are the stat's minimum and maximum possible values respectively.''<ref>https://fe6.triangleattack.com/chapters/crumbling_league</ref> | :''Stats with two figures separated by a ~ are presented as a range, representing stats that vary due to random growths. The figures to the left and right of the ~ are the stat's minimum and maximum possible values respectively.''<ref>{{cite web|url=https://fe6.triangleattack.com/chapters/crumbling_league|title=Crumbling League|site=triangleattack.com|retrieved=December 24, 2020}}</ref> | ||
{{Tab | {{Tab | ||
|tab1=Normal | |tab1=Normal | ||
| Line 300: | Line 784: | ||
|class=Cavalier | |class=Cavalier | ||
|lv=10 | |lv=10 | ||
|HP=32~ | |HP=32~36 | ||
|str= | |str=10~12 | ||
|skill= | |skill=10~14 | ||
|spd=11~13 | |spd=11~13 | ||
|luck=4~6 | |luck=4~6 | ||
|def= | |def=8~10 | ||
|res= | |res=2~4 | ||
|move=7 | |move=7 | ||
|con=9 | |con=9 | ||
| Line 318: | Line 802: | ||
==Strategy== | ==Strategy== | ||
{{Strategy}} | {{Strategy}} | ||
This chapter presents four new classes and two recruitable characters. The new possible members are [[Clarine]], a [[troubadour]], and [[Rutger]], a [[myrmidon]]. The [[troubadour]] girl will talk to [[Roy]] on her own, so the player does not have to send anyone to [[Rescue (command)|rescue]] or recruit her. In fact, [[Clarine]] can be used as a shield during this chapter, because most enemies will not attack her. The only exceptions to this are the [[pirate]]s and [[Erik]]. The other new unit, [[Rutger]], must be recruited with [[Clarine]]. | This chapter presents four new classes and two recruitable characters. The new possible members are [[Clarine]], a [[troubadour]], and [[Rutger]], a [[myrmidon]]. The [[troubadour]] girl will talk to [[Roy]] on her own, so the player does not have to send anyone to [[Rescue (command)|rescue]] or recruit her. In fact, [[Clarine]] can be used as a shield during this chapter, because most enemies will not attack her. The only exceptions to this are the [[pirate]]s and [[Erik]]. The other new unit, [[Rutger]], must be recruited with [[Clarine]]. | ||
The four new classes are [[troubadour]], [[myrmidon]], [[nomad]], and [[pirate]]. [[Troubadour]] is a [[cleric]] on a horse; they have great mobility, but sadly, they lack the Canto skill seen in the [[Jugdral]] and [[Tellius]] games. They must be treated carefully. [[Myrmidon]]s are a somewhat frail, but very fast [[sword]]-wielding class. Once they gain some levels, their speed and skill will cover for their poor [[strength]] and [[defense]]. [[Nomad]]s are quick and have a good avoid rate, but since they are locked to [[bow]]s, they can be surrounded and defeated. The last class, [[pirate]], uses [[axe]]s and its main trait is being able to cross water bodies. | The four new classes are [[troubadour]], [[myrmidon]], [[nomad]], and [[pirate]]. [[Troubadour]] is a [[cleric]] on a horse; they have great mobility, but sadly, they lack the Canto skill seen in the [[Jugdral]] and [[Tellius]] games. They must be treated carefully. [[Myrmidon]]s are a somewhat frail, but very fast [[sword]]-wielding class. Once they gain some levels, their speed and skill will cover for their poor [[strength]] and [[defense]]. [[Nomad]]s are quick and have a good avoid rate, but since they are locked to [[bow]]s, they can be surrounded and defeated. The last class, [[pirate]], uses [[axe]]s and its main trait is being able to cross water bodies. | ||
Now, onto the chapter at hand. This chapter's main difficulty is the high mobility of the enemies. They will reach [[Roy]]'s party soon, so it is recommended to put the units with the most defense on the first line. [[Elen]] and [[Shanna]] should not be on the second line, though, as the nomads can kill them in one or two hits. It is important to cover the three bridges near the party's starting point. | Now, onto the chapter at hand. This chapter's main difficulty is the high mobility of the enemies. They will reach [[Roy]]'s party soon, so it is recommended to put the units with the most defense on the first line. [[Elen]] and [[Shanna]] should not be on the second line, though, as the nomads can kill them in one or two hits. It is important to cover the three bridges near the party's starting point. | ||
Reinforcements will come from the southern forts and the castle: two [[pirate]]s after turns 4, 6, and 8, while [[Rutger]] and his team leaves the castle after turn 6. However, once the first wave of enemies has been cleared, the chapter becomes easier. The [[pirate]]s do not pose any threat; any unit with good avoid (for example, [[Chad]] or [[Lance (character)|Lance]]) can defeat them. | Reinforcements will come from the southern forts and the castle: two [[pirate]]s after turns 4, 6, and 8, while [[Rutger]] and his team leaves the castle after turn 6. However, once the first wave of enemies has been cleared, the chapter becomes easier. The [[pirate]]s do not pose any threat; any unit with good avoid (for example, [[Chad]] or [[Lance (character)|Lance]]) can defeat them. | ||
The player can send [[Marcus]] to the southern [[village]] and [[Merlinus]] to the nearest village; the northeastern village can wait until the first wave of enemies has been defeated and [[Shanna]] is free to go and visit it. | The player can send [[Marcus]] to the southern [[village]] and [[Merlinus]] to the nearest village; the northeastern village can wait until the first wave of enemies has been defeated and [[Shanna]] is free to go and visit it. | ||
[[Erik]] is quite easy to defeat. Recommended weapons are [[Roy]]'s [[rapier]], the [[poleax]] obtained in [[Latecomer's Sorrow|Chapter 3]], and [[Lugh]]'s [[Magic (element)|magic]]. Once [[Erik]] has been defeated, [[Roy]] can seize the castle and the chapter will end. | [[Erik]] is quite easy to defeat. Recommended weapons are [[Roy]]'s [[rapier]], the [[poleax]] obtained in [[Latecomer's Sorrow|Chapter 3]], and [[Lugh]]'s [[Magic (element)|magic]]. Once [[Erik]] has been defeated, [[Roy]] can seize the castle and the chapter will end. | ||
==Trivia== | ==Trivia== | ||
*This chapter's map is slightly modified and reused in [[False Friends| | *This chapter's map is slightly modified and reused in [[False Friends|Chapter 14]] of {{FE7}}. | ||
*In the attract mode of {{FE6}}, this map is depicted with fog, even though it has no weather conditions ingame. | |||
==Etymology and other languages== | ==Etymology and other languages== | ||
| Line 338: | Line 823: | ||
|eng-mean=Used in [[Unused content in Fire Emblem: The Blazing Blade#The Binding Blade data transfer leftovers|leftover text from the data transfer menu]] in the English version of {{FE7}}. | |eng-mean=Used in [[Unused content in Fire Emblem: The Blazing Blade#The Binding Blade data transfer leftovers|leftover text from the data transfer menu]] in the English version of {{FE7}}. | ||
|eng-fan-name=Crumbling League<br>Collapse of the Alliance | |eng-fan-name=Crumbling League<br>Collapse of the Alliance | ||
| | |jpn-name={{hover|同盟の崩壊|Dōmei no hōkai}} | ||
| | |jpn-mean=Collapse of the alliance | ||
}} | }} | ||
==Gallery== | ==Gallery== | ||
<gallery> | |||
Cm fe06 4.png|Map of the chapter | |||
</gallery> | |||
{{refbar}} | {{refbar}} | ||
Latest revision as of 13:52, 28 March 2024
| ||||||||||
|

| “ | You, blockade the highroad from Ostia. This Roy might just pass by. I want his head! | ” | — Narcian |
|---|
Crumbling League (Japanese: 同盟の崩壊 Collapse of the alliance) is the fourth chapter of Fire Emblem: The Binding Blade. While traveling to Ostia, Roy's army is attacked by Laus' forces, which are lead by none other than Marquess Laus himself.
Plot
- Main article:
Crumbling League/Script
Roy's forces enter Laus, the territory of Lord Erik, on their way toward Ostia. In the meantime, Narcian confers with Erik about the latter aligning himself with Bern. He also retrieves Erik's "gift" for him - an Etrurian noblewoman, Clarine. Narcian tries to talk to Clarine, but she only laughs at him and insults him. Their interaction is interrupted by a soldier who barges in to tell the Wyvern General that Slater has been defeated by Roy at Araphen. Narcian, annoyed by the interruption, orders Erik to imprison Clarine and to block the road toward Ostia, then leaves.
The battle begins, and during it, Rutger visits Clarine in her cell. He takes her away from the cell, and Clarine initially resists him, but she soon realizes that he is leading her out of the castle. He gives her a previously prepared horse and tells her to run, claiming that his actions are motivated by his hatred of Bern.
Clarine eventually makes it to Roy and talks to him, ordering him to protect her from Laus's soldiers. Merlinus protests against her joining the army, but she declares she can help by healing wounded allies, and Roy accepts her inclusion.
In the meantime, Rutger is ordered by Erik to prepare for battle and eventually enters the battlefield. After he is deployed, Clarine can talk to him. When she does, she convinces him to join Roy's side by revealing to him that Roy is fighting Bern, a nation Rutger hates.
The battle concludes with Erik's defeat. Roy expresses his disbelief that Erik would betray Lycia and fears there is no peaceful solution to this conflict, then asks Guinivere if she intends to return to Bern. Guinivere says she wants to stay, because she disagrees with her brother's method of 'freeing the world.' She must stop him somehow, even though he believes in his cause.
Chapter data
Normal Hard
| ||||||
|
| |||||
| Victory: Seize the castle gate | Player | Other | Enemy | |||
|---|---|---|---|---|---|---|
| Defeat: Roy dies | 14+2 | 0+1−1 | 16+10−1 | |||
| ||||||
Units are arranged based on their position in deployment order. If every unit is recruited and alive, the deployment order is: Roy, Marcus, Alen, Bors, Wolt, Lance, Merlinus, Elen, Ward, Lot, Dieck, Shanna, Chad, and Lugh.
Character data
| Characters | ||||||||||||||||||||||
|---|---|---|---|---|---|---|---|---|---|---|---|---|---|---|---|---|---|---|---|---|---|---|
New units
| ||||||||||||||||||||||
| ||||||||||||||||||||||
Required characters
| ||||||||||||||||||||||
Available characters
| ||||||||||||||||||||||


Item data
| |||||||||||||||||||||
|
Shop data
Swords Lances Axes Bows Anima Light Dark Staves Items Secret
| Name | Cost | |
|---|---|---|
| Iron Sword | 460 | |
| Slim Sword | 480 |
Enemy data
Normal Hard
| |||||||||||||||||||||||||||||||||||||||||||||||||||||||||||||||||||||||||||||||||||||||||||||||||||||||||||||||||||||||||||||||||||||||||||||||||||||||||||||||||||||||||||||||||||||||||||||||||||||||||||||||||||||||||||||||||||||||||||||||||||||||||||||||||||||||||||||||||||||||||||||
| |||||||||||||||||||||||||||||||||||||||||||||||||||||||||||||||||||||||||||||||||||||||||||||||||||||||||||||||||||||||||||||||||||||||||||||||||||||||||||||||||||||||||||||||||||||||||||||||||||||||||||||||||||||||||||||||||||||||||||||||||||||||||||||||||||||||||||||||||||||||||||||
| |||||||||||||||||||||||||||||||||||||||||||||||||||||||||||||||||||||||||||||||||||||||||||||||||||||||||||||||||||||||||||||||||||||||||||||||||||||||||||||||||||||||||||||||||||||||||||||||||||||||||||||||||||||||||||||||||||||||||||||||||||||||||||||||||||||||||||||||||||||||||||||
| |||||||||||||||||||||||||||||||||||||||||||||||||||||||||||||||||||||||||||||||||||||||||||||||||||||||||||||||||||||||||||||||||||||||||||||||||||||||||||||||||||||||||||||||||||||||||||||||||||||||||||||||||||||||||||||||||||||||||||||||||||||||||||||||||||||||||||||||||||||||||||||
Reinforcements
- Enemy phases of turns 4, 6, and 8; and enemy phases of turns 9 and 10 on Hard Mode
- Enemy phase of turn 6
- Enemy phase of turn 11 on Hard Mode
- Four Cavaliers from the eastern edge of the map
NPC data
| ||||||||||||||||||||||||||||||||||||||||||
| ||||||||||||||||||||||||||||||||||||||||||
Reinforcements
- Turn 3 other phase
- Clarine from northeast of the gate
Boss data
- Main article:
Erik - Stats with two figures separated by a ~ are presented as a range, representing stats that vary due to random growths. The figures to the left and right of the ~ are the stat's minimum and maximum possible values respectively.[1]
Normal Hard
|
|
| |||||||||||||||||||||||||||||||||||||||||||||||||

Strategy
| This section details unofficial strategies that may help with completion of the chapter. This may not work for everybody. |
This chapter presents four new classes and two recruitable characters. The new possible members are Clarine, a troubadour, and Rutger, a myrmidon. The troubadour girl will talk to Roy on her own, so the player does not have to send anyone to rescue or recruit her. In fact, Clarine can be used as a shield during this chapter, because most enemies will not attack her. The only exceptions to this are the pirates and Erik. The other new unit, Rutger, must be recruited with Clarine.
The four new classes are troubadour, myrmidon, nomad, and pirate. Troubadour is a cleric on a horse; they have great mobility, but sadly, they lack the Canto skill seen in the Jugdral and Tellius games. They must be treated carefully. Myrmidons are a somewhat frail, but very fast sword-wielding class. Once they gain some levels, their speed and skill will cover for their poor strength and defense. Nomads are quick and have a good avoid rate, but since they are locked to bows, they can be surrounded and defeated. The last class, pirate, uses axes and its main trait is being able to cross water bodies.
Now, onto the chapter at hand. This chapter's main difficulty is the high mobility of the enemies. They will reach Roy's party soon, so it is recommended to put the units with the most defense on the first line. Elen and Shanna should not be on the second line, though, as the nomads can kill them in one or two hits. It is important to cover the three bridges near the party's starting point.
Reinforcements will come from the southern forts and the castle: two pirates after turns 4, 6, and 8, while Rutger and his team leaves the castle after turn 6. However, once the first wave of enemies has been cleared, the chapter becomes easier. The pirates do not pose any threat; any unit with good avoid (for example, Chad or Lance) can defeat them.
The player can send Marcus to the southern village and Merlinus to the nearest village; the northeastern village can wait until the first wave of enemies has been defeated and Shanna is free to go and visit it.
Erik is quite easy to defeat. Recommended weapons are Roy's rapier, the poleax obtained in Chapter 3, and Lugh's magic. Once Erik has been defeated, Roy can seize the castle and the chapter will end.
Trivia
- This chapter's map is slightly modified and reused in Chapter 14 of Fire Emblem: The Blazing Blade.
- In the attract mode of Fire Emblem: The Binding Blade, this map is depicted with fog, even though it has no weather conditions ingame.
Etymology and other languages
| Names, etymology, and in other regions | ||
|---|---|---|
| Language | Name | Definition, etymology, and notes |
| English |
Federation Crumbling |
Used in leftover text from the data transfer menu in the English version of Fire Emblem: The Blazing Blade. |
| English (unofficial) |
Crumbling League |
-- |
| Japanese |
同盟の崩壊 |
Collapse of the alliance |
Gallery
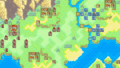
Map of the chapter
References
- ↑ Crumbling League, triangleattack.com, Retrieved: December 24, 2020
| ← Latecomer's Sorrow • | Crumbling League | • Fire Emblem → |
|---|