| Site News |
|---|
| Warning: This wiki contains spoilers. Read at your own risk! Social media: If you would like, please join our Discord server, and/or follow us on Twitter (X) or Tumblr! |
Together to the End/The Final Battle: Difference between revisions
m (→Enemy data: This seems to not be the case on Normal mode) |
RNGSOMEONE (talk | contribs) |
||
| Line 1,109: | Line 1,109: | ||
==Strategy== | ==Strategy== | ||
{{strategy}} | {{strategy}} | ||
The final map is here... and it's a doozy. | |||
Alm's party is immediately sent up against three mini-bosses; [[Cerberus]] and [[Naberius]], two [[Dread Fighter]]s with identical stats, and [[Hades]], a powerful [[Gold Knight]]. However, they don't come with any backup, and [[Alm]] has a grand total of 10 units (including himself) to take them out. Cerberus/Naberius will probably double anything that isn't a Dread Fighter as they have 23 AS each, and on Hard Mode they also have [[Silver Sword]]s. They also have decent mixed bulk exacerbated by the inability for most of your units to double them, though they go down quickly if multiple Bow-users and mages gang up on them. Hades, on the other hand, falls quickly to a strong, fast magic user due to low resistance and lower speed. His [[Silver Lance]] is no threat if attacked from range, or if nuked down with a [[Ridersbane]]. | |||
Celica's party instead has to contend with damaging terrain as well as swarms of [[Mogall]]s. Despite this being the final map (of the main story, at least), most of the map becomes Mogall spam after about five turns. Mogalls don't hit very hard, though they have rather good speed, to the point that anything that isn't a [[Dread Fighter]] is getting doubled, which can add up. Mogalls also divide, spawning more Mogalls, though unlike enemies summoned with Conjure, they don't despawn when their summoner is killed, so the map will soon be flooded if you don't take action. Also, they're immune to [[Expel]], so there's no easy solution except from killing them the hard way or going after Duma. [[Argentum]] and [[Aurum]] also charge you immediately, though their low speed (which is even lower on Hard Mode due to their [[Silver Bow]]s) means your [[Bow Knight]]s will probably double them. | |||
Once the initial wave is cleared, it's time to focus on Duma and his 'room', | |||
Jedah gatekeeps the path to Duma, and while he doesn't move nor attack, he is rather difficult to kill. He nullifies all attacks except every fourth round of combat, meaning you need to wastefully engage him three times to get a shot at attacking him for real. Since his [[Death (spell)|Death magic]] hits hard and his [[Animus Ring]] lets him counter from any range, it's best to burn his immunity with high-resistance units like Dread Fighters or by someone carrying a [[Dragon Shield]] or [[Hexlock Shield]]. Once he's no longer immune to attacks, nuke him with a powerful [[combat art]] like [[Dragonhaze]], [[Tigerstance]], [[Double Lion]] or [[Triangle Attack]] to try and take him out in one round. While he's not required, not removing him will just result in him spamming more Mogalls, which can be problematic. | |||
[[Marla]] and [[Hestia]] have the same stats, and the same purpose - they sit in the back and spam [[witch]]es. This is a problem, as the summoned witches are not only accurate, but deal surprisingly high damage to your low-res units, and their ability to teleport only makes it worse. While Marla and Hestia go down very quickly to Dread Fighters or Bow Knights, it isn't the easiest thing to warp someone in to fight them, since that unit needs to deal with Duma and probably a dozen Mogalls. They do have [[Aura]], so avoid engaging them at 1-2 range. | |||
[[Gharn]] has 1-5 range and doesn't move. However, he's too slow to double your units and he can't kill anything with more than 1 HP (though he sets them up for something else to kill your units). It's fairly easy to stay out of his range, though you might want to remove him before facing Duma, since he will [[Fortify]] if you fight Duma without killing Gharn first. | |||
[[Duma]] himself is also very slow. While he does possess over 3x the HP of anything you've fought, he also isn't too hard to deal with. He does move, though it's fairly easy to keep your units out of his range since Duma only has 2/3 (normal/hard) move. Have your strongest units wear him down slowly, and pull out to safety if things go south. Once his HP gets low (low enough that it no longer displays as ??), have everyone else pull out, leaving Alm and Celica to finish the job. From this point on, only Alm's Falchion (or a [[Cleric]]/[[Saint]]/[[Exemplar]] with [[Nosferatu]], an Alm [[amiibo]] originating from a file that has obtained the Falchion, a [[Marth]] amiibo or a [[Roy]] amiibo) can damage him. Celica's role is limited to healing and supporting Alm, and if using a Nosferatu user, she should be given the [[Hexlock Shield|Hexlock]] or [[Dracoshield|Draco]]-shields for damage mitigation. | |||
==Trivia== | ==Trivia== | ||
Revision as of 16:59, 21 May 2021
| ||||
|
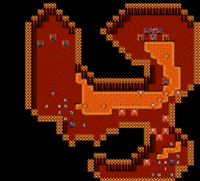
The Final Battle (Japanese: 最終決戦 Final Showdown) is the final map of the final act of Fire Emblem Gaiden and Fire Emblem Echoes: Shadows of Valentia.
Map data
Gaiden Echoes: Shadows of Valentia
Character data
Item data
| ||||||
|
- Note: There are no items to be found in Echoes: Shadows of Valentia. The item list above is for Gaiden.
Enemy data
Gaiden Echoes: Shadows of Valentia Normal Echoes: Shadows of Valentia Hard
| |||||||||||||||||||||||||||||||||||||||||||||||||||||||||||||||||||||||||||||||||||||||||||||||||||||||||||||||||||||||||||||||||||||||||||||||||||||||||||||||||||||||||||||||||||||||||||||||||||||||||||||||||||||||||||||||||||||||||||||||||||||||||||||||||||||||||||||||||||||||||||||||||
| |||||||||||||||||||||||||||||||||||||||||||||||||||||||||||||||||||||||||||||||||||||||||||||||||||||||||||||||||||||||||||||||||||||||||||||||||||||||||||||||||||||||||||||||||||||||||||||||||||||||||||||||||||||||||||||||||||||||||||||||||||||||||||||||||||||||||||||||||||||||||||||||||
| |||||||||||||||||||||||||||||||||||||||||||||||||||||||||||||||||||||||||||||||||||||||||||||||||||||||||||||||||||||||||||||||||||||||||||||||||||||||||||||||||||||||||||||||||||||||||||||||||||||||||||||||||||||||||||||||||||||||||||||||||||||||||||||||||||||||||||||||||||||||||||||||||
| |||||||||||||||||||||||||||||||||||||||||||||||||||||||||||||||||||||||||||||||||||||||||||||||||||||||||||||||||||||||||||||||||||||||||||||||||||||||||||||||||||||||||||||||||||||||||||||||||||||||||||||||||||||||||||||||||||||||||||||||||||||||||||||||||||||||||||||||||||||||||||||||||
Boss data
Main boss
- Main article:
Duma
Gaiden Echoes: Shadows of Valentia Normal Echoes: Shadows of Valentia Hard
Sub-bosses
- Main article:
Jedah
Gaiden Echoes: Shadows of Valentia Normal Echoes: Shadows of Valentia Hard
|
|
| |||||||||||||||||||||||||||||||||||||||||||||||
- Main article:
Gharn
Gaiden Echoes: Shadows of Valentia Normal Echoes: Shadows of Valentia Hard
- Main article:
Marla
Gaiden Echoes: Shadows of Valentia Normal Echoes: Shadows of Valentia Hard
- Main article:
Hestia
Gaiden Echoes: Shadows of Valentia Normal Echoes: Shadows of Valentia Hard
Strategy
| This section details unofficial strategies that may help with completion of the chapter. This may not work for everybody. |
The final map is here... and it's a doozy.
Alm's party is immediately sent up against three mini-bosses; Cerberus and Naberius, two Dread Fighters with identical stats, and Hades, a powerful Gold Knight. However, they don't come with any backup, and Alm has a grand total of 10 units (including himself) to take them out. Cerberus/Naberius will probably double anything that isn't a Dread Fighter as they have 23 AS each, and on Hard Mode they also have Silver Swords. They also have decent mixed bulk exacerbated by the inability for most of your units to double them, though they go down quickly if multiple Bow-users and mages gang up on them. Hades, on the other hand, falls quickly to a strong, fast magic user due to low resistance and lower speed. His Silver Lance is no threat if attacked from range, or if nuked down with a Ridersbane.
Celica's party instead has to contend with damaging terrain as well as swarms of Mogalls. Despite this being the final map (of the main story, at least), most of the map becomes Mogall spam after about five turns. Mogalls don't hit very hard, though they have rather good speed, to the point that anything that isn't a Dread Fighter is getting doubled, which can add up. Mogalls also divide, spawning more Mogalls, though unlike enemies summoned with Conjure, they don't despawn when their summoner is killed, so the map will soon be flooded if you don't take action. Also, they're immune to Expel, so there's no easy solution except from killing them the hard way or going after Duma. Argentum and Aurum also charge you immediately, though their low speed (which is even lower on Hard Mode due to their Silver Bows) means your Bow Knights will probably double them.
Once the initial wave is cleared, it's time to focus on Duma and his 'room',
Jedah gatekeeps the path to Duma, and while he doesn't move nor attack, he is rather difficult to kill. He nullifies all attacks except every fourth round of combat, meaning you need to wastefully engage him three times to get a shot at attacking him for real. Since his Death magic hits hard and his Animus Ring lets him counter from any range, it's best to burn his immunity with high-resistance units like Dread Fighters or by someone carrying a Dragon Shield or Hexlock Shield. Once he's no longer immune to attacks, nuke him with a powerful combat art like Dragonhaze, Tigerstance, Double Lion or Triangle Attack to try and take him out in one round. While he's not required, not removing him will just result in him spamming more Mogalls, which can be problematic.
Marla and Hestia have the same stats, and the same purpose - they sit in the back and spam witches. This is a problem, as the summoned witches are not only accurate, but deal surprisingly high damage to your low-res units, and their ability to teleport only makes it worse. While Marla and Hestia go down very quickly to Dread Fighters or Bow Knights, it isn't the easiest thing to warp someone in to fight them, since that unit needs to deal with Duma and probably a dozen Mogalls. They do have Aura, so avoid engaging them at 1-2 range.
Gharn has 1-5 range and doesn't move. However, he's too slow to double your units and he can't kill anything with more than 1 HP (though he sets them up for something else to kill your units). It's fairly easy to stay out of his range, though you might want to remove him before facing Duma, since he will Fortify if you fight Duma without killing Gharn first.
Duma himself is also very slow. While he does possess over 3x the HP of anything you've fought, he also isn't too hard to deal with. He does move, though it's fairly easy to keep your units out of his range since Duma only has 2/3 (normal/hard) move. Have your strongest units wear him down slowly, and pull out to safety if things go south. Once his HP gets low (low enough that it no longer displays as ??), have everyone else pull out, leaving Alm and Celica to finish the job. From this point on, only Alm's Falchion (or a Cleric/Saint/Exemplar with Nosferatu, an Alm amiibo originating from a file that has obtained the Falchion, a Marth amiibo or a Roy amiibo) can damage him. Celica's role is limited to healing and supporting Alm, and if using a Nosferatu user, she should be given the Hexlock or Draco-shields for damage mitigation.
Trivia
- The music that plays during this map is titled Twilight of the Gods.
- This map shares its name with the theme of the second part of the final chapter of The Sacred Stones.
Etymology and other languages
| Names, etymology, and in other regions | ||
|---|---|---|
| Language | Name | Definition, etymology, and notes |
| English |
The Final Battle |
-- |
| Spanish |
La batalla final |
The final battle |
| French |
Combat final |
Final battle |
| German |
Die letzte Schlacht |
The last Battle |
| Italian |
Battaglia finale |
Final battle |
| Dutch |
Het laatste gevecht |
The last battle |
| Simplified Chinese |
最终决战 |
Final battle |
| Traditional Chinese |
最終決戰 |
Final battle |
Gallery
This section has been marked as a stub. Please help improve the page by adding information.
| ← Duma Temple • | The Final Battle | • Archanea Seaway 2 Battle (Shadows of Valentia only) → |
|---|
| Fire Emblem Echoes: Shadows of Valentia | ||||||||||||||||||||||||||||||||||||||||||||||||||||||||||||||||||||||||||
|---|---|---|---|---|---|---|---|---|---|---|---|---|---|---|---|---|---|---|---|---|---|---|---|---|---|---|---|---|---|---|---|---|---|---|---|---|---|---|---|---|---|---|---|---|---|---|---|---|---|---|---|---|---|---|---|---|---|---|---|---|---|---|---|---|---|---|---|---|---|---|---|---|---|---|
| ||||||||||||||||||||||||||||||||||||||||||||||||||||||||||||||||||||||||||
