Which set of the next four chapters (and potentially sidquest) is played after this one depends on the combined experience of four units: if the sum of the experience gained by Shanna and Thea is greater than or equal to that of Sue and Sin, the Ilia route will be played; otherwise, the Sacae route will be played.
Roy's forces, guided by Douglas, arrive at the Tower of the Saint, currently under control of the bishop Windham. Windham has readied the tower's special weapon, the Heavenly Arrows, against the Lycian Army, even if they may also harm his own soldiers.
The Lycian Army defeats Windham and retrieve Aureola, the legendary weapon wielded by Saint Elimine during the Scouring. Roy initially wants to return it to the Elimine Church, but receives permission from either Douglas or the bishop Yoder to use it in the fight against Bern.
Later, Roy meets with Princess Guinivere. She accepts that, with Etruria safe, it is time for the Lycian Army to march on Bern itself. Guinivere gives Roy the Fire Emblem, which serves as the key to Hartmut's sword, with the expectation that Roy will use it to defeat Zephiel's dragon ally. Then, she expresses her regret at Zephiel's violent actions and at having betrayed her nation. Lastly, she asks Roy not to harm any civilians in Bern, and he promises not to do so.
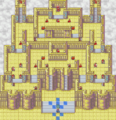
On each turn, magical arrows will deal 10 damage to all units in a random number of columns; the arrows can strike columns 5, 7, 9, 14, 15, 17, 18, 23, 25, and 27.
Stats with two figures separated by a ~ are presented as a range, representing stats that vary due to random growths. The figures to the left and right of the ~ are the stat's minimum and maximum possible values respectively.
Stats with two figures separated by a ~ are presented as a range, representing stats that vary due to random growths. The figures to the left and right of the ~ are the stat's minimum and maximum possible values respectively.[1]
This section details unofficial strategies that may help with completion of the chapter. This may not work for everybody.
Consult the map above to see where beams might damage units at the conclusion of the enemy's turn. The frequency of these beams is random—there may be one, two, or none. When activated, these beams inflict 10 damage on any unit in their path, including enemy units. Ensure your units are positioned outside these areas to prevent unnecessary damage.
Avoid deploying units with low resistance, as they are vulnerable to the numerous magic-wielding enemies on this map. Instead, utilize units with good movement, like Pegasus Knights and Nomads. If you have a unit that can use a Longbow, target the Sage positioned at the center of the map.
The most formidable challenge is the boss. He is equipped with a Berserk staff that can cause your allies to turn against each other. He has a large casting range, covering 15 spaces from his stationary position on the throne, encompassing nearly the entire top section of the map. To counteract him, consider placing a unit with high resistance close by to deplete his staff or advance strategically, utilizing the Barrier staff or Pure Waters. Remember, units with lower resistance are more susceptible to staves, irrespective of their evasion abilities.
Equip at least two different units with Restore staves to dispel any status effects inflicted on your team. If you rely on a single Restore staff, you may find yourself in a vulnerable position.
Lastly, using Douglas is not recommended due to his susceptibility to significant damage. Ensure he remains out of the magic attack range and use him only as a defensive barrier.