| Site News |
|---|
| Warning: This wiki contains spoilers. Read at your own risk! Social media: If you would like, please join our Discord server, and/or follow us on Twitter (X) or Tumblr! |
The Bow of Swift Wind: Difference between revisions
NewLight19 (talk | contribs) |
Anferensis (talk | contribs) m (→Strategy) |
||
| Line 1,194: | Line 1,194: | ||
==Strategy== | ==Strategy== | ||
{{strategy}} | |||
You only need to seize one specific gate to clear this chapter, but finding the right gate takes some trial and error. However, every time Roy seizes the wrong gate, reinforcements will show up. | You only need to seize one specific gate to clear this chapter, but finding the right gate takes some trial and error. However, every time Roy seizes the wrong gate, reinforcements will show up. | ||
Revision as of 22:00, 19 September 2023
| ||||||||
|

| “ | Watch your back. The Djute will give us everything they've got to avenge their clansmen. | ” | — Sin to Roy |
|---|
The Bow of Swift Wind (Japanese: 疾風の弓 Gale Bow) is chapter 20Bx of Fire Emblem: The Binding Blade. In order to play this chapter, the previous chapter must have been completed within 25 turns, and Sue, Sin, and Dayan must have been recruited and must be alive.
Plot
- Main article:
The Bow of Swift Wind/Script
This section has been marked as a stub. Please help improve the page by adding information.
Beginning log
Roy headed towards the ruins in Sacae, after the Divine Weapon. However, the remaining forces of the Djute clan were waiting for Roy in the ruins...
Chapter data
| ||||||
|
| |||||
| Victory: Seize the true castle gate | Player | Enemy | ||||
|---|---|---|---|---|---|---|
| Defeat: Roy dies | 1–14 | 34+29 | ||||
| ||||||
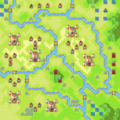
There are six gates on this chapter; however, only one will result in victory when seized. The remaining five will spring a trap when Roy seizes them and a group of reinforcements will appear. Which is the true gate and which are traps is determined randomly at the start of the chapter.
Character data
| Characters | |
|---|---|
New units
| |
| |
Required characters
| |
Available characters
| |
Item data
| |||||||||||||||||||||||||||||||||
|
Enemy data
- Stats with two figures separated by a ~ are presented as a range, representing stats that vary due to random growths. The figures to the left and right of the ~ are the stat's minimum and maximum possible values respectively.
Normal Hard
| |||||||||||||||||||||||||||||||||||||||||||||||||||||||||||||||||||||||||||||||||||||||||||||||||||||||||||||||||||||||||||||||||||||||||||||||||||||||||||||||||||||||||||||||||||||||||||||||||||||||||||||||||||||||||||||||||||||||||||||||||||||||||||||||||||||||||||||||||||||||||||||||||||||||||||||||||||||||||||||||||||||||||||||||||||||||||||||||||||||||||||||||||||||||||||||||||||||||||||||||||||||||||||||||||||||||||||||||||||||||||||||||||||||||||||||||||||||||||||||||||||||||||||||||||||||
| |||||||||||||||||||||||||||||||||||||||||||||||||||||||||||||||||||||||||||||||||||||||||||||||||||||||||||||||||||||||||||||||||||||||||||||||||||||||||||||||||||||||||||||||||||||||||||||||||||||||||||||||||||||||||||||||||||||||||||||||||||||||||||||||||||||||||||||||||||||||||||||||||||||||||||||||||||||||||||||||||||||||||||||||||||||||||||||||||||||||||||||||||||||||||||||||||||||||||||||||||||||||||||||||||||||||||||||||||||||||||||||||||||||||||||||||||||||||||||||||||||||||||||||||||||||
| |||||||||||||||||||||||||||||||||||||||||||||||||||||||||||||||||||||||||||||||||||||||||||||||||||||||||||||||||||||||||||||||||||||||||||||||||||||||||||||||||||||||||||||||||||||||||||||||||||||||||||||||||||||||||||||||||||||||||||||||||||||||||||||||||||||||||||||||||||||||||||||||||||||||||||||||||||||||||||||||||||||||||||||||||||||||||||||||||||||||||||||||||||||||||||||||||||||||||||||||||||||||||||||||||||||||||||||||||||||||||||||||||||||||||||||||||||||||||||||||||||||||||||||||||||||
| |||||||||||||||||||||||||||||||||||||||||||||||||||||||||||||||||||||||||||||||||||||||||||||||||||||||||||||||||||||||||||||||||||||||||||||||||||||||||||||||||||||||||||||||||||||||||||||||||||||||||||||||||||||||||||||||||||||||||||||||||||||||||||||||||||||||||||||||||||||||||||||||||||||||||||||||||||||||||||||||||||||||||||||||||||||||||||||||||||||||||||||||||||||||||||||||||||||||||||||||||||||||||||||||||||||||||||||||||||||||||||||||||||||||||||||||||||||||||||||||||||||||||||||||||||||
Reinforcements
Each trap gate that Roy seizes produces a number of reinforcements. Because one of the six gates ends the chapter, only up to five of the six sets of reinforcements can possibly be activated at once.
- Upon seizing the northeast, southeast, southernmost, or northernmost gates
- Upon seizing the middle gate
- Upon seizing the easternmost gate
Boss data
- Stats with two figures separated by a ~ are presented as a range, representing stats that vary due to random growths. The figures to the left and right of the ~ are the stat's minimum and maximum possible values respectively.[1]
- Main article:
Thoril
Normal Hard
|
|
| |||||||||||||||||||||||||||||||||||||||||||||||||

- Main article:
Brakul
Normal Hard
- Main article:
Kudoka
Normal Hard
|
|
| |||||||||||||||||||||||||||||||||||||||||||||||||
- Main article:
Marral
Normal Hard
- Main article:
Kabul
Normal Hard
|
|
| |||||||||||||||||||||||||||||||||||||||||||||||||
- Main article:
Chan
Normal Hard
Strategy
| This section details unofficial strategies that may help with completion of the chapter. This may not work for everybody. |
You only need to seize one specific gate to clear this chapter, but finding the right gate takes some trial and error. However, every time Roy seizes the wrong gate, reinforcements will show up.
Your army is split up from the start. Make sure the group on the top left is slightly stronger than the others. Use this group to either approach the gates at the bottom or support the central group. With Roy's group, include characters that can cross the river (like Pirates, Heroes, Swordmasters, and Nomads) to avoid detours. Don't neglect the team at the bottom. Decide whether they'll support Roy's group, head straight to the gates, or engage the Dragon Riders.
Be cautious with weaker units like clerics. Enemies have big movement ranges, and they can easily target your vulnerable units. It's recommended to use promoted characters with high evasion or carry multiple Vulneraries. Watch out for enemy Nomads — they have the ability to cross rivers, and some will certainly attempt it.
For the boss, it could be any character with a "face" icon. First, prioritize eliminating moving enemies. When facing Nomads, engage them up close so they can't counterattack. After attacking, you can rescue your unit, retreat, and then attack again. For Druids, use characters with strong attack and speed, and use Pure Waters. Make sure you have more than one Restore between multiple healers.
Etymology and other languages
| Names, etymology, and in other regions | ||
|---|---|---|
| Language | Name | Definition, etymology, and notes |
| English |
Bow of Hurricanes |
Used in leftover text from the data transfer menu in the English version of Fire Emblem: The Blazing Blade. Mulagir's title was translated as the "bow of swift wind" in Fire Emblem Heroes. |
| English (unofficial) |
The Tempest Bow |
-- |
| Japanese |
疾風の弓 |
Gale bow (lit. "bow of fast wind") |
| Spanish (Spain) |
El arco de las tormentas |
The bow of storms; metnioned in Heroes. |
| Spanish (Latin America) |
El arco del viento raudo |
The of of swift wind; mentioned in Heroes. |
| French |
L'arc du vent tumultueux |
The bow of tumultuous winds; mentioned in Heroes. |
| German |
Der Bogen des Sturmwindes |
The Bow of Storm Wind; mentioned in Heroes. |
| Italian |
L'arco del vento agile |
The bow of agile wind; mentioned in Heroes. |
| Portuguese |
O arco do vento ligeiro |
The bow of quick wind; mentioned in Heroes. |
| Traditional Chinese |
疾風之弓 |
Gale bow |
Gallery
Map of the chapter
References
- ↑ The Bow of Swift Wind, triangleattack.com, Retrieved: December 24, 2020
| ← The Silver Wolf • | The Bow of Swift Wind | • The Binding Blade → |
|---|