| Site News |
|---|
| Warning: This wiki contains spoilers. Read at your own risk! Social media: If you would like, please join our Discord server, and/or follow us on Twitter (X) or Tumblr! |
Biorhythm: Difference between revisions
m (→Type 6) |
mNo edit summary |
||
| (32 intermediate revisions by 9 users not shown) | |||
| Line 1: | Line 1: | ||
[[File:Ss fe10 biorhythm.gif|thumb|right|400px|[[ | [[File:Ss fe10 biorhythm.gif|thumb|right|400px|[[Nolan]]'s biorhythm (bottom right) moves as turns pass. As his biorhythm changes from good to bad, it has effects on his [[hit rate]] and [[avoid]] (top right). Additionally, green and red arrows (top left) indicate his current biorhythm state.]] | ||
'''Biorhythm''' (Japanese: {{ | '''Biorhythm''' (Japanese: {{hl|バイオリズム|Baiorizumu}} ''biorhythm'') is a mechanic applied to [[unit]]s which simulates how an individual's ability to fight to their fullest potential fluctuates as time goes on, making them perform better at some times and perform worse at others. A unit's biorhythm follows a pattern shaped like a [[wikipedia:Sine wave|sine wave]], advancing along the wave a little bit periodically, and as it follows the ups and downs of this wave, the biorhythm give bonuses or penalties to the unit's [[hit rate|accuracy]] and [[avoid|evasive ability]] during the course of a battle. | ||
At any given time, a unit's biorhythm puts them in one of five states: Best, Good, Normal, Bad, and Worst. A Good state or higher gives the unit small hit and avoid boosts, while a Bad state or lower gives small penalties to the same. The biorhythm chart can be viewed in each unit's stat screen to see their current state and where the biorhythm will put them in later turns, and their current biorhythm state is shown on the map when hovering the cursor over them, indicated by red and green arrows. | At any given time, a unit's biorhythm puts them in one of five states: Best, Good, Normal, Bad, and Worst. A Good state or higher gives the unit small hit and avoid boosts, while a Bad state or lower gives small penalties to the same. The biorhythm chart can be viewed in each unit's stat screen to see their current state and where the biorhythm will put them in later turns, and their current biorhythm state is shown on the map when hovering the cursor over them, indicated by red and green arrows. | ||
| Line 11: | Line 11: | ||
{{BiorhythmFE9}} | {{BiorhythmFE9}} | ||
In {{FE9}}, all units share the same biorhythm wave. Biorhythm moves in a 30-point cycle, after which it restarts from the beginning of the wave. | In {{FE9}}, all units share the same biorhythm wave. Biorhythm moves in a 30-point cycle, after which it restarts from the beginning of the wave. | ||
Biorhythm moves under two conditions: | Biorhythm moves under two conditions: | ||
* For every 10 rounds of attack the unit participates in (regardless of whether they initiate it or are capable of | * For every 10 rounds of attack the unit participates in (regardless of whether they initiate it or are capable of counterattacking), their biorhythm moves forward by one point. | ||
* For every chapter they participate in that gets cleared, their biorhythm moves forward by seven points. The four parts of [[Day Breaks|Chapter 17]] are not treated as individual chapters for the purposes of biorhythm advancement, but | * For every chapter they participate in that gets cleared, their biorhythm moves forward by seven points. The four parts of [[Day Breaks|Chapter 17]] are not treated as individual chapters for the purposes of biorhythm advancement, but [[Moment of Fate (stage 2)|the second part of Chapter 27]] is treated as a separate chapter. | ||
Almost all units, both playable and enemy, will start a map with their biorhythm at a completely random point, with the point being reset every time the player resets the game. However, several early-game units (10 playable, 2 bosses) will have their biorhythm start at a pre-set point when they first appear in their debut chapter. | Almost all units, both playable and enemy, will start a map with their biorhythm at a completely random point, with the point being reset every time the player resets the game. However, several early-game units (10 playable, 2 bosses) will have their biorhythm start at a pre-set point when they first appear in their debut chapter. | ||
{ | {{div col}} | ||
* [[Ike]] starts the [[Mercenaries|Prologue]] at biorhythm point 8 (Best) | |||
* [[Ike]] starts the [[Mercenaries|Prologue]] at biorhythm point 8 (Best) | * [[Oscar]] starts [[The Battle Begins|Chapter 1]] at biorhythm point 23 (Worst) | ||
* [[Oscar]] starts [[The Battle Begins|Chapter 1]] at biorhythm point 23 (Worst) | * [[Titania]] starts Chapter 1 at biorhythm point 30 (Normal) | ||
* [[Titania]] starts Chapter 1 at biorhythm point 30 (Normal) | * [[Shinon]] starts [[Pirates Aground|Chapter 3]] at biorhythm point 29 (Bad) | ||
* [[Gatrie]] starts Chapter 3 at biorhythm point 29 (Bad) | |||
* [[Shinon]] starts [[Pirates Aground|Chapter 3]] at biorhythm point 29 (Bad) | * [[Soren]] starts [[Roadside Battle|Chapter 4]] at biorhythm point 22 (Worst) | ||
* [[Gatrie]] starts Chapter 3 at biorhythm point 29 (Bad) | * [[Mia]] starts [[Shades of Evil|Chapter 7]] at biorhythm point 8 (Best) | ||
* [[Soren]] starts [[Roadside Battle|Chapter 4]] at biorhythm point 22 (Worst) | * [[Mist]] starts [[Gallia (chapter)|Chapter 9]] at biorhythm point 11 (Best) | ||
* [[Rolf]] starts Chapter 9 at biorhythm point 11 (Best) | |||
* [[Mia]] starts [[Shades of Evil|Chapter 7]] at biorhythm point 8 (Best) | * [[Boyd]], as an enemy in the Prologue, starts at biorhythm point 8 (Best) | ||
* [[Mist]] starts [[Gallia (chapter)|Chapter 9]] at biorhythm point 11 (Best) | * [[Greil]], the boss of the Prologue, starts at biorhythm point 8 (Best) | ||
* [[Rolf]] starts Chapter 9 at biorhythm point 11 (Best) | * [[Zawana]], the boss of Chapter 1, starts at biorhythm point 28 (Bad) | ||
{{div col end}} | |||
* [[Boyd]], as an enemy in the Prologue, starts at biorhythm point 8 (Best) | |||
* [[Greil]], the boss of the Prologue, starts at biorhythm point 8 (Best) | |||
* [[Zawana]], the boss of Chapter 1, starts at biorhythm point 28 (Bad) | |||
In terms of how this is handled internally, these starting biorhythms are actually counted up from how many chapters have elapsed since the "first chapter" in terms of the game's internal storage, which is actually [[Unused content in Fire Emblem: Path of Radiance#Debug map|the debug map]], with the Prologue being counted as #2 and the rest of the game's chapters proceeding from there. For instance, Mia's starting biorhythm is actually stored as 12 (Good), but since the player has progressed through eight chapters (counted as including the debug menu) by the time she first appears, the seven points awarded by clearing a chapter are applied eight times, bringing her to start with her biorhythm at 8 (Best).<ref>{{cite web|url=http://serenesforest.net/path-of-radiance/characters/biorhythm/|title=Biorhythm|author=VincentASM|site=Serenes Forest|retrieved=2016 | In terms of how this is handled internally, these starting biorhythms are actually counted up from how many chapters have elapsed since the "first chapter" in terms of the game's internal storage, which is actually [[Unused content in Fire Emblem: Path of Radiance#Debug map|the debug map]], with the Prologue being counted as #2 and the rest of the game's chapters proceeding from there. For instance, Mia's starting biorhythm is actually stored as 12 (Good), but since the player has progressed through eight chapters (counted as including the debug menu) by the time she first appears, the seven points awarded by clearing a chapter are applied eight times, bringing her to start with her biorhythm at 8 (Best).<ref>{{cite web|url=http://serenesforest.net/path-of-radiance/characters/biorhythm/|title=Biorhythm|author=VincentASM|site=Serenes Forest|retrieved=June 25, 2016}}</ref> | ||
===Calculations=== | ===Calculations=== | ||
The five biorhythm states award the following bonuses | The five biorhythm states award the following bonuses | ||
* '''Best:''' +5 [[hit rate]], +5 [[avoid]] | * '''Best:''' +5 [[hit rate]], +5 [[avoid]] | ||
* '''Good:''' +5 [[hit rate]], +5 [[avoid]] | * '''Good:''' +5 [[hit rate]], +5 [[avoid]] | ||
* '''Normal:''' No effect | * '''Normal:''' No effect | ||
* '''Bad:''' | * '''Bad:''' −5 [[hit rate]], −5 [[avoid]] | ||
* '''Worst:''' | * '''Worst:''' −5 [[hit rate]], −5 [[avoid]] | ||
===Skills affecting biorhythm=== | ===Skills affecting biorhythm=== | ||
{| | {| class="cellpadding-3 mw-collapsible mw-collapsed basic" style="border-width: 2px; width: 70%" | ||
!style=" | ! style="background: none" colspan="4" | Skills affecting biorhythm | ||
|- | |- | ||
! style="border-top-left-radius: 15px; width: 1%" | | |||
! style="width: 14%" | Item | |||
! style="width: 45%" | Effect | |||
!style=" | ! style="border-top-right-radius: 15px; width: 30%" | Games | ||
!style=" | |||
!style=" | |||
|- | |- | ||
| [[File:Is gcn tempest.png]] | |||
| [[Tempest]] | |||
| Doubles biorhythm effects. | |||
| {{title|Path of Radiance}} | |||
|- | |- | ||
| [[File:Is gcn serenity.png]] | |||
| [[Serenity]] | |||
| Halves biorhythm effects. | |||
| {{title|Path of Radiance}} | |||
|- | |- | ||
| | | style="border-bottom-left-radius: 15px; border-bottom-right-radius: 15px" colspan="4" | | ||
|} | |} | ||
==''Fire Emblem: Radiant Dawn''== | ==''Fire Emblem: Radiant Dawn''== | ||
===Biorhythm patterns=== | ===Biorhythm patterns=== | ||
There are ten different biorhythm waves in {{FE10}}, two of which are exclusive to enemy bosses. Playable units and major enemies are all assigned one specific biorhythm pattern, while generic enemies are assigned biorhythms at random (excluding types 8 and 9). | There are ten different biorhythm waves in {{FE10}}, two of which are exclusive to enemy bosses. Playable units and major enemies are all assigned one specific biorhythm pattern, while generic enemies are assigned biorhythms at random (excluding types 8 and 9). All ten waves move through a 25-point cycle, after which it restarts from the beginning of the wave. Every unit joins with their biorhythm starting at 1 regardless of their starting affiliation, and it advances at the end of their army's phase—for example, an enemy unit will change biorhythm at the end of enemy phase. A unit's biorhythm state is kept from map to map; for example, [[Zihark]] will join [[Raise the Standard (stage 1)|Part 1, Chapter 6]] with his biorhythm set at 6, since he spent 5 turns as a green unit in [[The Lost Heir|Part 1, Chapter 5]], and that chapter's ending trigger occurs before the biorhythm trigger. Meanwhile, [[Volug]] in the same chapter will be at 7 since he had 6 player phase end turns. [[Elincia]] will always start [[Elincia's Gambit|Part 2 ,Endgame]] at bad biorhythm, which will then become worst on the first turn of enemy phase. | ||
====Type 0==== | ====Type 0==== | ||
| Line 82: | Line 76: | ||
The type 0 biorhythm is a standard pattern, comparable to the ''Path of Radiance'' pattern. It is found on nine playable units, five bosses, and one NPC. | The type 0 biorhythm is a standard pattern, comparable to the ''Path of Radiance'' pattern. It is found on nine playable units, five bosses, and one NPC. | ||
{| style=" | {| class="cellpadding-1 basic" style="border-spacing: 1px; border-radius: 10px; border: 3px solid {{Color2}}" | ||
! style="border-top-left-radius: 10px; border-bottom-left-radius: 10px; width: 100px" | Player | |||
| style="width: 50px" | [[File:Small portrait nolan fe10.png]]<br>'''[[Nolan]]''' | |||
| style="width: 50px" | [[File:Small portrait vika fe10.png]]<br>'''[[Vika]]''' | |||
| style="width: 50px" | [[File:Small portrait elincia 01 fe10.png]]<br>'''[[Elincia]]''' | |||
| style="width:50px | | style="width: 50px" | [[File:Small portrait oscar fe10.png]]<br>'''[[Oscar]]''' | ||
| style="width:50px | | style="width: 50px" | [[File:Small portrait ranulf fe10.png]]<br>'''[[Ranulf]]''' | ||
| style="width:50px | | style="width: 50px" | [[File:Small portrait sigrun fe10.png]]<br>'''[[Sigrun]]''' | ||
| style="width:50px | | style="width: 50px" | [[File:Small portrait stefan fe10.png]]<br>'''[[Stefan]]''' | ||
| style="width:50px | | style="width: 50px" | [[File:Small portrait caineghis fe10.png]]<br>'''[[Caineghis]]''' | ||
| style="width:50px | | style="border-top-right-radius: 10px; border-bottom-right-radius: 10px; width: 50px" | [[File:Small portrait kurthnaga fe10.png]]<br>'''[[Kurthnaga]]''' | ||
| style="width:50px | |||
| style="width:50px | |||
| style=" | |||
|- | |- | ||
! style="border-top-left-radius: 10px; border-bottom-left-radius: 10px" | Bosses and NPCs | |||
| [[File:Small portrait isaiya fe10.png]]<br>'''[[Isaiya]]''' | |||
| [[File:Small portrait kurth fe10.png]]<br>'''[[Kurthnaga|Kurth]]''' | |||
| [[File:Small portrait burton fe10.png]]<br>'''[[Burton]]''' | |||
| [[File:Small portrait callum fe10.png]]<br>'''[[Callum]]''' | |||
| style=" | | style="border-top-right-radius: 10px; border-bottom-right-radius: 10px" | [[File:Small portrait yuma fe10.png]]<br>'''[[Yuma]]''' | ||
|} | |} | ||
| Line 108: | Line 99: | ||
{{Biorhythm1}} | {{Biorhythm1}} | ||
The type 1 biorhythm has very long Best and Worst points. | The type 1 biorhythm has very long Best and Worst points. It is found on nine playable units, five bosses, and one NPC. | ||
| | {| class="cellpadding-1 basic" style="border-spacing: 1px; border-radius: 10px; border: 3px solid {{Color2}}" | ||
| style="width:50px" | ! style="border-top-left-radius: 10px; border-bottom-left-radius: 10px; width: 100px" | Player | ||
| style=" | | style="width: 50px" | [[File:Small portrait micaiah light mage fe10.png]]<br>'''[[Micaiah]]''' | ||
| style="width: 50px" | [[File:Small portrait aran fe10.png]]<br>'''[[Aran]]''' | |||
| style="width: 50px" | [[File:Small portrait volug fe10.png]]<br>'''[[Volug]]''' | |||
| style="width: 50px" | [[File:Small portrait zihark fe10.png]]<br>'''[[Zihark]]''' | |||
| style="width: 50px" | [[File:Small portrait brom fe10.png]]<br>'''[[Brom]]''' | |||
| style="width: 50px" | [[File:Small portrait makalov fe10.png]]<br>'''[[Makalov]]''' | |||
| style="width: 50px" | [[File:Small portrait astrid fe10.png]]<br>'''[[Astrid]]''' | |||
| style="width: 50px" | [[File:Small portrait rhys fe10.png]]<br>'''[[Rhys]]''' | |||
| style="border-top-right-radius: 10px; border-bottom-right-radius: 10px; width: 50px" | [[File:Small portrait tanith fe10.png]]<br>'''[[Tanith]]''' | |||
|- | |- | ||
! style="border-top-left-radius: 10px; border-bottom-left-radius: 10px" | Bosses and NPCs | |||
| [[File:Small portrait zaitan fe10.png]]<br>'''[[Zaitan]]''' | |||
| [[File:Small portrait djur fe10.png]]<br>'''[[Djur]]''' | |||
| [[File:Small portrait istvan fe10.png]]<br>'''[[Istvan]]''' | |||
| [[File:Small portrait zelgius 01 fe10.png]]<br>'''[[Zelgius]]''' | |||
| [[File:Small portrait roark fe10.png]]<br>'''[[Roark]]''' | |||
| style=" | | style="border-top-right-radius: 10px; border-bottom-right-radius: 10px" colspan="2" | [[File:Small portrait black knight fe10.png]]<br>'''[[Black Knight (character)|Black Knight]]''' | ||
|} | |} | ||
| Line 143: | Line 127: | ||
The type 2 biorhythm has relatively stable and minor effects on units' stats, having neither Best nor Worst points. It is found on nine playable units and three bosses. | The type 2 biorhythm has relatively stable and minor effects on units' stats, having neither Best nor Worst points. It is found on nine playable units and three bosses. | ||
{| style=" | {| class="cellpadding-1 basic" style="border-spacing: 1px; border-radius: 10px; border: 3px solid {{Color2}}" | ||
! style="border-top-left-radius: 10px; border-bottom-left-radius: 10px; width: 100px" | Player | |||
| style="width: 50px" | [[File:Small portrait leonardo fe10.png]]<br>'''[[Leonardo]]''' | |||
| style="width: 50px" | [[File:Small portrait tauroneo fe10.png]]<br>'''[[Tauroneo]]''' | |||
| style="width:50px | | style="width: 50px" | [[File:Small portrait muarim fe10.png]]<br>'''[[Muarim]]''' | ||
| style="width:50px | | style="width: 50px" | [[File:Small portrait marcia fe10.png]]<br>'''[[Marcia]]''' | ||
| style="width:50px | | style="width: 50px" | [[File:Small portrait nephenee fe10.png]]<br>'''[[Nephenee]]''' | ||
| style="width:50px | | style="width: 50px" | [[File:Small portrait ulki fe10.png]]<br>'''[[Ulki]]''' | ||
| style="width:50px | | style="width: 50px" | [[File:Small portrait naesala fe10.png]]<br>'''[[Naesala]]''' | ||
| style="width:50px | | style="width: 50px" | [[File:Small portrait pelleas fe10.png]]<br>'''[[Pelleas]]''' | ||
| style="width:50px | | style="border-top-right-radius: 10px; border-bottom-right-radius: 10px; width: 50px" | [[File:Small portrait nasir fe10.png]]<br>'''[[Nasir]]''' | ||
| style="width:50px | |||
| style=" | |||
|- | |- | ||
! style="border-top-left-radius: 10px; border-bottom-left-radius: 10px" | Bosses and NPCs | |||
| [[File:Small portrait agony fe10.png]]<br>'''[[Agony]]''' | |||
| [[File:Small portrait tashoria fe10.png]]<br>'''[[Tashoria]]''' | |||
| style=" | | style="border-top-right-radius: 10px; border-bottom-right-radius: 10px" | [[File:Small portrait levail fe10.png]]<br>'''[[Levail]]''' | ||
|} | |} | ||
| Line 168: | Line 150: | ||
The type 3 biorhythm is somewhat erratic, spending relatively little time at Normal, Good, or Bad points. It is found on six playable units, five bosses, and one NPC. | The type 3 biorhythm is somewhat erratic, spending relatively little time at Normal, Good, or Bad points. It is found on six playable units, five bosses, and one NPC. | ||
{| style=" | {| class="cellpadding-1 basic" style="border-spacing: 1px; border-radius: 10px; border: 3px solid {{Color2}}" | ||
| | | style="border-top-left-radius: 10px; border-bottom-left-radius: 10px; width: 100px" | '''Player''' | ||
| style="width: 50px" | [[File:Small portrait heather fe10.png]]<br>'''[[Heather]]''' | |||
| style="width: 50px" | [[File:Small portrait kieran fe10.png]]<br>'''[[Kieran]]''' | |||
| style="width:50px | | style="width: 50px" | [[File:Small portrait boyd fe10.png]]<br>'''[[Boyd]]''' | ||
| style="width:50px | | style="width: 50px" | [[File:Small portrait lyre fe10.png]]<br>'''[[Lyre]]''' | ||
| style="width:50px | | style="width: 50px" | [[File:Small portrait skrimir fe10.png]]<br>'''[[Skrimir]]''' | ||
| style="width:50px | | style="border-top-right-radius: 10px; border-bottom-right-radius: 10px; width: 50px" | [[File:Small portrait oliver fe10.png]]<br>'''[[Oliver]]''' | ||
| style="width:50px | |||
| style=" | |||
|- | |- | ||
! style="border-top-left-radius: 10px; border-bottom-left-radius: 10px; width: 100px" | Bosses and NPCs | |||
| [[File:Small portrait aimee 02 fe10.png]]<br>'''[[Aimee]]''' | |||
| [[File:Small portrait pain fe10.png]]<br>'''[[Pain (character)|Pain]]''' | |||
| [[File:Small portrait rommit fe10.png]]<br>'''[[Rommit]]''' | |||
| [[File:Small portrait sergei fe10.png]]<br>'''[[Sergei]]''' | |||
| [[File:Small portrait valtome fe10.png]]<br>'''[[Valtome]]''' | |||
| style=" | | style="border-top-right-radius: 10px; border-bottom-right-radius: 10px" | [[File:Small portrait lekain fe10.png]]<br>'''[[Lekain]]''' | ||
|} | |} | ||
| Line 193: | Line 173: | ||
The type 4 biorhythm is very erratic and rapidly plunges between Best and Worst points. It is found on five playable units and seven bosses. | The type 4 biorhythm is very erratic and rapidly plunges between Best and Worst points. It is found on five playable units and seven bosses. | ||
{| style=" | {| class="cellpadding-1 basic" style="border-spacing: 1px; border-radius: 10px; border: 3px solid {{Color2}}" | ||
! style="border-top-left-radius: 10px; border-bottom-left-radius: 10px; width: 100px" | Player | |||
| style="width: 50px" | [[File:Small portrait jill fe10.png]]<br>'''[[Jill]]''' | |||
| style="width: 50px" | [[File:Small portrait calill fe10.png]]<br>'''[[Calill]]''' | |||
| style="width:50px | | style="width: 50px" | [[File:Small portrait soren fe10.png]]<br>'''[[Soren]]''' | ||
| style="width:50px | | style="width: 50px" | [[File:Small portrait shinon fe10.png]]<br>'''[[Shinon]]''' | ||
| style="width:50px | | style="border-top-right-radius: 10px; border-bottom-right-radius: 10px; width: 50px" | [[File:Small portrait kyza fe10.png]]<br>'''[[Kyza]]''' | ||
| style="width:50px | |||
| style=" | |||
|- | |- | ||
! style="border-top-left-radius: 10px; border-bottom-left-radius: 10px" | Bosses and NPCs | |||
| [[File:Small portrait pugo fe10.png]]<br>'''[[Pugo]]''' | |||
| [[File:Small portrait wystan fe10.png]]<br>'''[[Wystan]]''' | |||
| [[File:Small portrait yeardley fe10.png]]<br>'''[[Yeardley]]''' | |||
| [[File:Small portrait septimus fe10.png]]<br>'''[[Septimus]]''' | |||
| [[File:Small portrait numida fe10.png]]<br>'''[[Numida]]''' | |||
| style="width:50px | | style="width: 50px" | [[File:Small portrait izuka fe10.png]]<br>'''[[Izuka]]''' | ||
| style=" | | style="border-top-right-radius: 10px; border-bottom-right-radius: 10px; width: 50px" | [[File:Small portrait hetzel fe10.png]]<br>'''[[Hetzel]]''' | ||
|} | |} | ||
| Line 218: | Line 196: | ||
The type 5 biorhythm is somewhat erratic, spending relatively little time at Normal, Good, or Bad points. It is found on thirteen playable units and three bosses. | The type 5 biorhythm is somewhat erratic, spending relatively little time at Normal, Good, or Bad points. It is found on thirteen playable units and three bosses. | ||
{| style=" | {| class="cellpadding-1 basic" style="border-spacing: 1px; border-radius: 10px; border: 3px solid {{Color2}}" | ||
|- | |- | ||
! style="border-top-left-radius: 10px; border-bottom-left-radius: 10px; width: 100px" | Player | |||
| style="width:50px | | style="width: 50px" | [[File:Small portrait edward fe10.png]]<br>'''[[Edward]]''' | ||
| style="width:50px | | style="width: 50px" | [[File:Small portrait tormod fe10.png]]<br>'''[[Tormod]]''' | ||
| style="width:50px | | style="width: 50px" | [[File:Small portrait nealuchi fe10.png]]<br>'''[[Nealuchi]]''' | ||
| style="width:50px | | style="width: 50px" | [[File:Small portrait lethe fe10.png]]<br>'''[[Lethe]]''' | ||
| style="width:50px | | style="width: 50px" | [[File:Small portrait mordecai fe10.png]]<br>'''[[Mordecai]]''' | ||
| style="width:50px | | style="width: 50px" | [[File:Small portrait geoffrey fe10.png]]<br>'''[[Geoffrey]]''' | ||
| style="width:50px | | style="width: 50px" | [[File:Small portrait titania fe10.png]]<br>'''[[Titania]]''' | ||
| style="width:50px | | style="width: 50px" | [[File:Small portrait mist fe10.png]]<br>'''[[Mist]]''' | ||
| style="width:50px | | style="width: 50px" | [[File:Small portrait mia fe10.png]]<br>'''[[Mia]]''' | ||
| style="width:50px | | style="width: 50px" | [[File:Small portrait gatrie fe10.png]]<br>'''[[Gatrie]]''' | ||
| style="width:50px | | style="width: 50px" | [[File:Small portrait reyson fe10.png]]<br>'''[[Reyson]]''' | ||
| style="width:50px | | style="width: 50px" | [[File:Small portrait janaff fe10.png]]<br>'''[[Janaff]]''' | ||
| style=" | | style="border-top-right-radius: 10px; border-bottom-right-radius: 10px; width: 50px" | [[File:Small portrait sanaki fe10.png]]<br>'''[[Sanaki]]''' | ||
|- | |- | ||
! style="border-top-left-radius: 10px; border-bottom-left-radius: 10px" | Bosses and NPCs | |||
| [[File:Small portrait zeffren fe10.png]]<br>'''[[Zeffren]]''' | |||
| [[File:Small portrait ludveck fe10.png]]<br>'''[[Ludveck]]''' | |||
| style=" | | style="border-top-right-radius: 10px; border-bottom-right-radius: 10px" | [[File:Small portrait kezhda fe10.png]]<br>'''[[Kezhda]]''' | ||
|} | |} | ||
| Line 245: | Line 222: | ||
{{Biorhythm6}} | {{Biorhythm6}} | ||
The type 6 biorhythm is very stable, having neither Best nor Worst points and spending long periods of time in Good and Bad states. It is found on nine playable units and three bosses. | The type 6 biorhythm is very stable, having neither Best nor Worst points and spending long periods of time in Good and Bad states. It is found on nine playable units and three bosses. | ||
{| style=" | {| class="cellpadding-1 basic" style="border-spacing: 1px; border-radius: 10px; border: 3px solid {{Color2}}" | ||
|- | |- | ||
! style="border-top-left-radius: 10px; border-bottom-left-radius: 10px; width: 100px" | Player | |||
| style="width:50px | | style="width: 50px" | [[File:Small portrait sothe rogue fe10.png]]<br>'''[[Sothe]]''' | ||
| style="width:50px | | style="width: 50px" | [[File:Small portrait ilyana fe10.png]]<br>'''[[Ilyana]]''' | ||
| style="width:50px | | style="width: 50px" | [[File:Small portrait fiona fe10.png]]<br>'''[[Fiona]]''' | ||
| style="width:50px | | style="width: 50px" | [[File:Small portrait rafiel fe10.png]]<br>'''[[Rafiel]]''' | ||
| style="width:50px | | style="width: 50px" | [[File:Small portrait haar fe10.png]]<br>'''[[Haar]]''' | ||
| style="width:50px | | style="width: 50px" | [[File:Small portrait bastian fe10.png]]<br>'''[[Bastian]]''' | ||
| style="width:50px | | style="width: 50px" | [[File:Small portrait volke fe10.png]]<br>'''[[Volke]]''' | ||
| style="width:50px | | style="width: 50px" | [[File:Small portrait giffca fe10.png]]<br>'''[[Giffca]]''' | ||
| style="width:50px | | style="width: 50px" | [[File:Small portrait ena fe10.png]]<br>'''[[Ena]]''' | ||
| style=" | | style="border-top-right-radius: 10px; border-bottom-right-radius: 10px; width: 50px" | [[File:Small portrait sephiran fe10.png]]<br>'''[[Sephiran|Lehran]]''' | ||
|- | |- | ||
! style="border-top-left-radius: 10px; border-bottom-left-radius: 10px" | Bosses and NPCs | |||
| [[File:Small portrait maraj fe10.png]]<br>'''[[Maraj]]''' | |||
| [[File:Small portrait lombroso fe10.png]]<br>'''[[Lombroso]]''' | |||
| [[File:Small portrait dheginsea fe10.png]]<br>'''[[Dheginsea]]''' | |||
| style=" | | style="border-top-right-radius: 10px; border-bottom-right-radius: 10px" | [[File:Small portrait sephiran fe10.png]]<br>'''[[Sephiran]]''' | ||
|} | |} | ||
| Line 272: | Line 248: | ||
{{Biorhythm7}} | {{Biorhythm7}} | ||
The type 7 biorhythm has very long Best and Worst points and sharply shifts between them. | The type 7 biorhythm has very long Best and Worst points and sharply shifts between them. It is found on ten playable units and one boss. | ||
{| style=" | {| class="cellpadding-1 basic" style="border-spacing: 1px; border-radius: 10px; border: 3px solid {{Color2}}" | ||
! style="border-top-left-radius: 10px; border-bottom-left-radius: 10px" | Player | |||
| style="width: 50px" | [[File:Small portrait laura fe10.png]]<br>'''[[Laura]]''' | |||
| style="width: 50px" | [[File:Small portrait meg fe10.png]]<br>'''[[Meg]]''' | |||
| style="width:50px | | style="width: 50px" | [[File:Small portrait nailah fe10.png]]<br>'''[[Nailah]]''' | ||
| style="width:50px | | style="width: 50px" | [[File:Small portrait lucia 01 fe10.png]]<br>'''[[Lucia]]''' | ||
| style="width:50px | | style="width: 50px" | [[File:Small portrait danved fe10.png]]<br>'''[[Devdan|Danved]]''' | ||
| style="width:50px | | style="width: 50px" | [[File:Small portrait ike hero fe10.png]]<br>'''[[Ike]]''' | ||
| style="width:50px | | style="width: 50px" | [[File:Small portrait rolf fe10.png]]<br>'''[[Rolf]]''' | ||
| style="width:50px | | style="width: 50px" | [[File:Small portrait tibarn fe10.png]]<br>'''[[Tibarn]]''' | ||
| style="width:50px | | style="width: 50px" | [[File:Small portrait renning fe10.png]]<br>'''[[Renning]]''' | ||
| style="width:50px | | style="border-top-right-radius: 10px; border-bottom-right-radius: 10px; width: 50px" | [[File:Small portrait gareth fe10.png]]<br>'''[[Gareth]]''' | ||
| style="width:50px | |||
| style=" | |||
|- | |- | ||
! style="border-top-left-radius: 10px; border-bottom-left-radius: 10px" | Bosses and NPCs | |||
| style=" | | style="border-top-right-radius: 10px; border-bottom-right-radius: 10px" | [[File:Small portrait laverton fe10.png]]<br>'''[[Laverton]]''' | ||
|} | |} | ||
| Line 298: | Line 272: | ||
The type 8 biorhythm is completely neutral and gives no bonuses or penalties whatseover. It is exclusive to enemy bosses. | The type 8 biorhythm is completely neutral and gives no bonuses or penalties whatseover. It is exclusive to enemy bosses. | ||
{| style=" | {| class="cellpadding-1 basic" style="border-spacing: 1px; border-radius: 10px; border: 3px solid {{Color2}}" | ||
! style="border-top-left-radius: 10px; border-bottom-left-radius: 10px; width: 100px" | Bosses and NPCs | |||
| style="width: 50px" | [[File:Small portrait radmin fe10.png]]<br>'''[[Radmin]]''' | |||
| style="width: 50px" | [[File:Small portrait silvano fe10.png]]<br>'''[[Silvano]]''' | |||
| style="width:50px | | style="width: 50px" | [[File:Small portrait catalena fe10.png]]<br>'''[[Catalena]]''' | ||
| style="width:50px | | style="border-top-right-radius: 10px; border-bottom-right-radius: 10px; width: 50px" | [[File:Small portrait ashera fe10.png]]<br>'''[[Ashera]]''' | ||
| style="width:50px | |||
| style=" | |||
|} | |} | ||
| Line 313: | Line 285: | ||
The type 9 biorhythm is similar to type 0, except it never enters Worst points. It is exclusive to enemy bosses. | The type 9 biorhythm is similar to type 0, except it never enters Worst points. It is exclusive to enemy bosses. | ||
{| style=" | {| class="cellpadding-1 basic" style="border-spacing: 1px; border-radius: 10px; border: 3px solid {{Color2}}" | ||
! style="border-top-left-radius: 10px; border-bottom-left-radius: 10px; width: 100px" | Bosses and NPCs | |||
| style="width: 50px" | [[File:Small portrait jarod fe10.png]]<br>'''[[Jarod]]''' | |||
| style="width: 50px" | [[File:Small portrait veyona fe10.png]]<br>'''[[Veyona]]''' | |||
| style="width:50px | | style="border-top-right-radius: 10px; border-bottom-right-radius: 10px; width: 50px" | [[File:Small portrait goran fe10.png]]<br>'''[[Goran]]''' | ||
| style="width:50px | |||
| style=" | |||
|} | |} | ||
===Calculations=== | ===Calculations=== | ||
The five biorhythm states award the following bonuses | The five biorhythm states award the following bonuses | ||
* '''Best:''' +10 [[hit rate]], +10 [[avoid]], +10% chance of triggering [[skills]], +20% chance of successfully recovering [[hidden treasure]] | * '''Best:''' +10 [[hit rate]], +10 [[avoid]], +10% chance of triggering [[skills]], +20% chance of successfully recovering [[hidden treasure]] | ||
* '''Good:''' +5 [[hit rate]], +5 [[avoid]], +5% chance of triggering [[skills]], +10% chance of successfully recovering [[hidden treasure]] | * '''Good:''' +5 [[hit rate]], +5 [[avoid]], +5% chance of triggering [[skills]], +10% chance of successfully recovering [[hidden treasure]] | ||
* '''Normal:''' No effect | * '''Normal:''' No effect | ||
* '''Bad:''' | * '''Bad:''' −5 [[hit rate]], −5 [[avoid]], −5% chance of triggering [[skills]], −10% chance of successfully recovering [[hidden treasure]] | ||
* '''Worst:''' | * '''Worst:''' −10 [[hit rate]], −10 [[avoid]], −10% chance of triggering [[skills]], −20% chance of successfully recovering [[hidden treasure]] | ||
===Items and skills affecting biorhythm=== | ===Items and skills affecting biorhythm=== | ||
{| | {| class="cellpadding-3 mw-collapsible mw-collapsed basic" style="border-width: 2px; width: 70%" | ||
!style=" | ! style="background: none" colspan="4" | Items and skills affecting biorhythm | ||
|- | |- style="color: #fff" | ||
! style="border-top-left-radius: 15px; width: 1%" | | |||
! style="width: 14%" | Item | |||
!style=" | ! style="width: 45%" | Effect | ||
!style=" | ! style="border-top-right-radius: 15px; width: 30%" | Games | ||
!style=" | |||
!style=" | |||
|- | |- | ||
| [[File:Is wii matrona.png]] | |||
| [[Matrona]] | |||
| A staff that restores all HP to a distant target. It also raises the target's biorhythm to its peak. | |||
| {{title|Radiant Dawn}} | |||
|- | |- | ||
| [[File:Is wii galdrar.png]] | |||
| [[Galdrar]] | |||
| '''Bliss:''' Raise biorhythm to its highest point.<br>'''Sorrow:''' Lower biorhythm to its lowest point. | |||
| {{title|Radiant Dawn}} | |||
|- | |- | ||
| | ! style="border-bottom-left-radius: 15px; border-bottom-right-radius: 15px" colspan="4" | | ||
|} | |} | ||
==Trivia== | ==Trivia== | ||
* Although biorhythm as a mechanic is absent in all games after ''Radiant Dawn'', the Japanese names of the skills [[Odd Rhythm]] and [[Even Rhythm]] from {{title|Awakening}} refer to it and have similar effects, although their effects work on a much smaller scale. | * Although biorhythm as a mechanic is absent in all games after ''Radiant Dawn'', the Japanese names of the skills [[Odd Rhythm]] and [[Even Rhythm]] from {{title|Awakening}} refer to it and have similar effects, although their effects work on a much smaller scale. | ||
==Etymology and other languages== | ==Etymology and other languages== | ||
{{Names | {{Names | ||
|eng-name=Biorhythm | |eng-name=Biorhythm | ||
|eng-mean= | |eng-mean=[[wikipedia:Biorhythm (pseudoscience)|Biorhythm]] is a pseudoscientific theory that a person's life is affected by steady sinusoidal cycles in their physical, emotional, and intellectual states. | ||
| | |jpn-name={{h|バイオリズム|Baiorizumu}} | ||
| | |jpn-mean=Biorhythm | ||
|fren-name= | |span-name=Biorritmo | ||
|fren-mean= | |span-mean=Biorhythm | ||
|fren-name=Rythme biologique | |||
|fren-mean=Biological rhythm | |||
|ger-name=Biorhythm | |ger-name=Biorhythm | ||
|ger-mean=Biorhythm | |ger-mean=Biorhythm | ||
|ital-name=Biorhythm | |ital-name=Biorhythm | ||
|ital-mean=Biorhythm | |ital-mean=Biorhythm | ||
}} | }} | ||
{{ | ==Gallery== | ||
<gallery> | |||
Ss fe09 biorhythm.png|[[Mia]]'s biorhythm chart in {{title|Path of Radiance}}. She is currently at Good status. | |||
Ss fe10 biorhythm.gif|[[Nolan]]'s biorhythm chart in {{title|Radiant Dawn}}. | |||
Ss fe10 biorhythm map.png|In ''Radiant Dawn'', [[Edward]]'s current state (Best) is indicated by a green arrow in the corner of his HP box. | |||
</gallery> | |||
{{Refbar}} | |||
{{NavMech}} | {{NavMech}} | ||
Latest revision as of 17:37, 24 September 2023

Biorhythm (Japanese: バイオリズム biorhythm) is a mechanic applied to units which simulates how an individual's ability to fight to their fullest potential fluctuates as time goes on, making them perform better at some times and perform worse at others. A unit's biorhythm follows a pattern shaped like a sine wave, advancing along the wave a little bit periodically, and as it follows the ups and downs of this wave, the biorhythm give bonuses or penalties to the unit's accuracy and evasive ability during the course of a battle.
At any given time, a unit's biorhythm puts them in one of five states: Best, Good, Normal, Bad, and Worst. A Good state or higher gives the unit small hit and avoid boosts, while a Bad state or lower gives small penalties to the same. The biorhythm chart can be viewed in each unit's stat screen to see their current state and where the biorhythm will put them in later turns, and their current biorhythm state is shown on the map when hovering the cursor over them, indicated by red and green arrows.
Biorhythm is only present in Fire Emblem: Path of Radiance and Radiant Dawn.
Fire Emblem: Path of Radiance
Biorhythm pattern
| Biorhythm | |||||||||||||||||||||||||||||||
|---|---|---|---|---|---|---|---|---|---|---|---|---|---|---|---|---|---|---|---|---|---|---|---|---|---|---|---|---|---|---|---|
| Best | |||||||||||||||||||||||||||||||
| Good | |||||||||||||||||||||||||||||||
| Normal | |||||||||||||||||||||||||||||||
| Bad | |||||||||||||||||||||||||||||||
| Worst | |||||||||||||||||||||||||||||||
In Fire Emblem: Path of Radiance, all units share the same biorhythm wave. Biorhythm moves in a 30-point cycle, after which it restarts from the beginning of the wave.
Biorhythm moves under two conditions:
- For every 10 rounds of attack the unit participates in (regardless of whether they initiate it or are capable of counterattacking), their biorhythm moves forward by one point.
- For every chapter they participate in that gets cleared, their biorhythm moves forward by seven points. The four parts of Chapter 17 are not treated as individual chapters for the purposes of biorhythm advancement, but the second part of Chapter 27 is treated as a separate chapter.
Almost all units, both playable and enemy, will start a map with their biorhythm at a completely random point, with the point being reset every time the player resets the game. However, several early-game units (10 playable, 2 bosses) will have their biorhythm start at a pre-set point when they first appear in their debut chapter.
- Ike starts the Prologue at biorhythm point 8 (Best)
- Oscar starts Chapter 1 at biorhythm point 23 (Worst)
- Titania starts Chapter 1 at biorhythm point 30 (Normal)
- Shinon starts Chapter 3 at biorhythm point 29 (Bad)
- Gatrie starts Chapter 3 at biorhythm point 29 (Bad)
- Soren starts Chapter 4 at biorhythm point 22 (Worst)
- Mia starts Chapter 7 at biorhythm point 8 (Best)
- Mist starts Chapter 9 at biorhythm point 11 (Best)
- Rolf starts Chapter 9 at biorhythm point 11 (Best)
- Boyd, as an enemy in the Prologue, starts at biorhythm point 8 (Best)
- Greil, the boss of the Prologue, starts at biorhythm point 8 (Best)
- Zawana, the boss of Chapter 1, starts at biorhythm point 28 (Bad)
In terms of how this is handled internally, these starting biorhythms are actually counted up from how many chapters have elapsed since the "first chapter" in terms of the game's internal storage, which is actually the debug map, with the Prologue being counted as #2 and the rest of the game's chapters proceeding from there. For instance, Mia's starting biorhythm is actually stored as 12 (Good), but since the player has progressed through eight chapters (counted as including the debug menu) by the time she first appears, the seven points awarded by clearing a chapter are applied eight times, bringing her to start with her biorhythm at 8 (Best).[1]
Calculations
The five biorhythm states award the following bonuses
- Best: +5 hit rate, +5 avoid
- Good: +5 hit rate, +5 avoid
- Normal: No effect
- Bad: −5 hit rate, −5 avoid
- Worst: −5 hit rate, −5 avoid
Skills affecting biorhythm
| Skills affecting biorhythm | |||
|---|---|---|---|
| Item | Effect | Games | |
| Tempest | Doubles biorhythm effects. | Path of Radiance | |
| Serenity | Halves biorhythm effects. | Path of Radiance | |
Fire Emblem: Radiant Dawn
Biorhythm patterns
There are ten different biorhythm waves in Fire Emblem: Radiant Dawn, two of which are exclusive to enemy bosses. Playable units and major enemies are all assigned one specific biorhythm pattern, while generic enemies are assigned biorhythms at random (excluding types 8 and 9). All ten waves move through a 25-point cycle, after which it restarts from the beginning of the wave. Every unit joins with their biorhythm starting at 1 regardless of their starting affiliation, and it advances at the end of their army's phase—for example, an enemy unit will change biorhythm at the end of enemy phase. A unit's biorhythm state is kept from map to map; for example, Zihark will join Part 1, Chapter 6 with his biorhythm set at 6, since he spent 5 turns as a green unit in Part 1, Chapter 5, and that chapter's ending trigger occurs before the biorhythm trigger. Meanwhile, Volug in the same chapter will be at 7 since he had 6 player phase end turns. Elincia will always start Part 2 ,Endgame at bad biorhythm, which will then become worst on the first turn of enemy phase.
Type 0
| Biorhythm | ||||||||||||||||||||||||||
|---|---|---|---|---|---|---|---|---|---|---|---|---|---|---|---|---|---|---|---|---|---|---|---|---|---|---|
| Best | ||||||||||||||||||||||||||
| Good | ||||||||||||||||||||||||||
| Normal | ||||||||||||||||||||||||||
| Bad | ||||||||||||||||||||||||||
| Worst | ||||||||||||||||||||||||||
The type 0 biorhythm is a standard pattern, comparable to the Path of Radiance pattern. It is found on nine playable units, five bosses, and one NPC.
| Player |  Nolan |
 Vika |
 Elincia |
 Oscar |
 Ranulf |
 Sigrun |
 Stefan |
 Caineghis |
 Kurthnaga |
|---|---|---|---|---|---|---|---|---|---|
| Bosses and NPCs |  Isaiya |
 Kurth |
 Burton |
 Callum |
 Yuma |
Type 1
| Biorhythm | ||||||||||||||||||||||||||
|---|---|---|---|---|---|---|---|---|---|---|---|---|---|---|---|---|---|---|---|---|---|---|---|---|---|---|
| Best | ||||||||||||||||||||||||||
| Good | ||||||||||||||||||||||||||
| Normal | ||||||||||||||||||||||||||
| Bad | ||||||||||||||||||||||||||
| Worst | ||||||||||||||||||||||||||
The type 1 biorhythm has very long Best and Worst points. It is found on nine playable units, five bosses, and one NPC.
| Player |  Micaiah |
 Aran |
 Volug |
 Zihark |
 Brom |
 Makalov |
 Astrid |
 Rhys |
 Tanith |
|---|---|---|---|---|---|---|---|---|---|
| Bosses and NPCs |  Zaitan |
 Djur |
 Istvan |
 Zelgius |
 Roark |
 Black Knight | |||
Type 2
| Biorhythm | ||||||||||||||||||||||||||
|---|---|---|---|---|---|---|---|---|---|---|---|---|---|---|---|---|---|---|---|---|---|---|---|---|---|---|
| Best | ||||||||||||||||||||||||||
| Good | ||||||||||||||||||||||||||
| Normal | ||||||||||||||||||||||||||
| Bad | ||||||||||||||||||||||||||
| Worst | ||||||||||||||||||||||||||
The type 2 biorhythm has relatively stable and minor effects on units' stats, having neither Best nor Worst points. It is found on nine playable units and three bosses.
| Player |  Leonardo |
 Tauroneo |
 Muarim |
 Marcia |
 Nephenee |
 Ulki |
 Naesala |
 Pelleas |
 Nasir |
|---|---|---|---|---|---|---|---|---|---|
| Bosses and NPCs |  Agony |
 Tashoria |
 Levail |
Type 3
| Biorhythm | ||||||||||||||||||||||||||
|---|---|---|---|---|---|---|---|---|---|---|---|---|---|---|---|---|---|---|---|---|---|---|---|---|---|---|
| Best | ||||||||||||||||||||||||||
| Good | ||||||||||||||||||||||||||
| Normal | ||||||||||||||||||||||||||
| Bad | ||||||||||||||||||||||||||
| Worst | ||||||||||||||||||||||||||
The type 3 biorhythm is somewhat erratic, spending relatively little time at Normal, Good, or Bad points. It is found on six playable units, five bosses, and one NPC.
| Player |  Heather |
 Kieran |
 Boyd |
 Lyre |
 Skrimir |
 Oliver |
| Bosses and NPCs |  Aimee |
 Pain |
 Rommit |
 Sergei |
 Valtome |
 Lekain |
|---|
Type 4
| Biorhythm | ||||||||||||||||||||||||||
|---|---|---|---|---|---|---|---|---|---|---|---|---|---|---|---|---|---|---|---|---|---|---|---|---|---|---|
| Best | ||||||||||||||||||||||||||
| Good | ||||||||||||||||||||||||||
| Normal | ||||||||||||||||||||||||||
| Bad | ||||||||||||||||||||||||||
| Worst | ||||||||||||||||||||||||||
The type 4 biorhythm is very erratic and rapidly plunges between Best and Worst points. It is found on five playable units and seven bosses.
| Player |  Jill |
 Calill |
 Soren |
 Shinon |
 Kyza | ||
|---|---|---|---|---|---|---|---|
| Bosses and NPCs |  Pugo |
 Wystan |
 Yeardley |
 Septimus |
 Numida |
 Izuka |
 Hetzel |
Type 5
| Biorhythm | ||||||||||||||||||||||||||
|---|---|---|---|---|---|---|---|---|---|---|---|---|---|---|---|---|---|---|---|---|---|---|---|---|---|---|
| Best | ||||||||||||||||||||||||||
| Good | ||||||||||||||||||||||||||
| Normal | ||||||||||||||||||||||||||
| Bad | ||||||||||||||||||||||||||
| Worst | ||||||||||||||||||||||||||
The type 5 biorhythm is somewhat erratic, spending relatively little time at Normal, Good, or Bad points. It is found on thirteen playable units and three bosses.
| Player |  Edward |
 Tormod |
 Nealuchi |
 Lethe |
 Mordecai |
 Geoffrey |
 Titania |
 Mist |
 Mia |
 Gatrie |
 Reyson |
 Janaff |
 Sanaki |
|---|---|---|---|---|---|---|---|---|---|---|---|---|---|
| Bosses and NPCs |  Zeffren |
 Ludveck |
 Kezhda |
Type 6
| Biorhythm | ||||||||||||||||||||||||||
|---|---|---|---|---|---|---|---|---|---|---|---|---|---|---|---|---|---|---|---|---|---|---|---|---|---|---|
| Best | ||||||||||||||||||||||||||
| Good | ||||||||||||||||||||||||||
| Normal | ||||||||||||||||||||||||||
| Bad | ||||||||||||||||||||||||||
| Worst | ||||||||||||||||||||||||||
The type 6 biorhythm is very stable, having neither Best nor Worst points and spending long periods of time in Good and Bad states. It is found on nine playable units and three bosses.
| Player |  Sothe |
 Ilyana |
 Fiona |
 Rafiel |
 Haar |
 Bastian |
 Volke |
 Giffca |
 Ena |
 Lehran |
|---|---|---|---|---|---|---|---|---|---|---|
| Bosses and NPCs |  Maraj |
 Lombroso |
 Dheginsea |
Sephiran |
Type 7
| Biorhythm | ||||||||||||||||||||||||||
|---|---|---|---|---|---|---|---|---|---|---|---|---|---|---|---|---|---|---|---|---|---|---|---|---|---|---|
| Best | ||||||||||||||||||||||||||
| Good | ||||||||||||||||||||||||||
| Normal | ||||||||||||||||||||||||||
| Bad | ||||||||||||||||||||||||||
| Worst | ||||||||||||||||||||||||||
The type 7 biorhythm has very long Best and Worst points and sharply shifts between them. It is found on ten playable units and one boss.
| Player |  Laura |
 Meg |
 Nailah |
 Lucia |
 Danved |
 Ike |
 Rolf |
 Tibarn |
 Renning |
 Gareth |
|---|---|---|---|---|---|---|---|---|---|---|
| Bosses and NPCs |  Laverton |
Type 8
| Biorhythm | ||||||||||||||||||||||||||
|---|---|---|---|---|---|---|---|---|---|---|---|---|---|---|---|---|---|---|---|---|---|---|---|---|---|---|
| Best | ||||||||||||||||||||||||||
| Good | ||||||||||||||||||||||||||
| Normal | ||||||||||||||||||||||||||
| Bad | ||||||||||||||||||||||||||
| Worst | ||||||||||||||||||||||||||
The type 8 biorhythm is completely neutral and gives no bonuses or penalties whatseover. It is exclusive to enemy bosses.
| Bosses and NPCs |  Radmin |
 Silvano |
 Catalena |
 Ashera |
|---|
Type 9
| Biorhythm | ||||||||||||||||||||||||||
|---|---|---|---|---|---|---|---|---|---|---|---|---|---|---|---|---|---|---|---|---|---|---|---|---|---|---|
| Best | ||||||||||||||||||||||||||
| Good | ||||||||||||||||||||||||||
| Normal | ||||||||||||||||||||||||||
| Bad | ||||||||||||||||||||||||||
| Worst | ||||||||||||||||||||||||||
The type 9 biorhythm is similar to type 0, except it never enters Worst points. It is exclusive to enemy bosses.
| Bosses and NPCs |  Jarod |
 Veyona |
 Goran |
|---|
Calculations
The five biorhythm states award the following bonuses
- Best: +10 hit rate, +10 avoid, +10% chance of triggering skills, +20% chance of successfully recovering hidden treasure
- Good: +5 hit rate, +5 avoid, +5% chance of triggering skills, +10% chance of successfully recovering hidden treasure
- Normal: No effect
- Bad: −5 hit rate, −5 avoid, −5% chance of triggering skills, −10% chance of successfully recovering hidden treasure
- Worst: −10 hit rate, −10 avoid, −10% chance of triggering skills, −20% chance of successfully recovering hidden treasure
Items and skills affecting biorhythm
| Items and skills affecting biorhythm | |||
|---|---|---|---|
| Item | Effect | Games | |
| Matrona | A staff that restores all HP to a distant target. It also raises the target's biorhythm to its peak. | Radiant Dawn | |
| Galdrar | Bliss: Raise biorhythm to its highest point. Sorrow: Lower biorhythm to its lowest point. |
Radiant Dawn | |
Trivia
- Although biorhythm as a mechanic is absent in all games after Radiant Dawn, the Japanese names of the skills Odd Rhythm and Even Rhythm from Awakening refer to it and have similar effects, although their effects work on a much smaller scale.
Etymology and other languages
| Names, etymology, and in other regions | ||
|---|---|---|
| Language | Name | Definition, etymology, and notes |
| English |
Biorhythm |
Biorhythm is a pseudoscientific theory that a person's life is affected by steady sinusoidal cycles in their physical, emotional, and intellectual states. |
| Japanese |
バイオリズム |
Biorhythm |
| Spanish |
Biorritmo |
Biorhythm |
| French |
Rythme biologique |
Biological rhythm |
| German |
Biorhythm |
Biorhythm |
| Italian |
Biorhythm |
Biorhythm |
Gallery
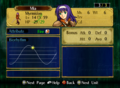
Mia's biorhythm chart in Path of Radiance. She is currently at Good status.

Nolan's biorhythm chart in Radiant Dawn.
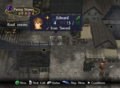
In Radiant Dawn, Edward's current state (Best) is indicated by a green arrow in the corner of his HP box.

