| Site News |
|---|
| Warning: This wiki contains spoilers. Read at your own risk! Social media: If you would like, please join our Discord server, and/or follow us on Twitter (X) or Tumblr! |
Clash of Queens: Difference between revisions
(→Chapter data: Added Maddening mode data, corrected some mistakes in Hard mode's data) |
mNo edit summary |
||
| Line 1: | Line 1: | ||
{{Chapter Infobox | {{Chapter Infobox | ||
|image=[[File:Cm fe17fx 4.png|200px]] | |||
|location=Frigid Forest | |location=Frigid Forest | ||
|boss=[[Ivy]], [[Timerra]] | |boss=[[Ivy]], [[Timerra]] | ||
| Line 38: | Line 37: | ||
|enemy=18{{h|+19|Reinforcements}} | |enemy=18{{h|+19|Reinforcements}} | ||
|third=23{{h|+15|Reinforcements}} | |third=23{{h|+15|Reinforcements}} | ||
|map=[[File:Cm fe17fx 4.png]] | |map=[[File:Cm fe17fx 4.png|200px]] | ||
|col=30 | |col=30 | ||
|row=22 | |row=22 | ||
| Line 48: | Line 47: | ||
|enemy=23{{h|+36|Reinforcements}} | |enemy=23{{h|+36|Reinforcements}} | ||
|third=30{{h|+34|Reinforcements}} | |third=30{{h|+34|Reinforcements}} | ||
|map=[[File:Cm fe17fx 4 h.png]] | |map=[[File:Cm fe17fx 4 h.png|200px]] | ||
|col=30 | |col=30 | ||
|row=22 | |row=22 | ||
| Line 58: | Line 57: | ||
|enemy=24{{h|+48|Reinforcements}} | |enemy=24{{h|+48|Reinforcements}} | ||
|third=34{{h|+52|Reinforcements}} | |third=34{{h|+52|Reinforcements}} | ||
|map=[[File:Cm fe17fx 4 m.png]] | |map=[[File:Cm fe17fx 4 m.png|200px]] | ||
|col=30 | |col=30 | ||
|row=22 | |row=22 | ||
| Line 2,810: | Line 2,809: | ||
*The Elusian army is the only army in the Fell Xenologue to use a generic enemy phase theme since Elusia has no unique, dynamic battle theme of its own. | *The Elusian army is the only army in the Fell Xenologue to use a generic enemy phase theme since Elusia has no unique, dynamic battle theme of its own. | ||
*Timerra is the only boss across the Fell Xenologues to not have the [[Veteran+]] skill on Maddening mode. | *Timerra is the only boss across the Fell Xenologues to not have the [[Veteran+]] skill on Maddening mode. | ||
* In the Japanese script, the alternate Ivy states that she was in love with Zelkov and attempted to seduce Kagetsu in her battle dialogues against them.<ref name="japanese retainers">[[:File:FEE Clash of Queens Japanese Ivy and retainers.jpg]]</ref> Details of Ivy's relationships with her retainers are more vague in the English script. | **This is due to the code preventing ally/third army units from having more than one non-class skill (Timerra has [[Dignity of Solm]] as her non-class skill, thus preventing Veteran+ from appearing on her) | ||
*In the Japanese script, the alternate Ivy states that she was in love with Zelkov and attempted to seduce Kagetsu in her battle dialogues against them.<ref name="japanese retainers">[[:File:FEE Clash of Queens Japanese Ivy and retainers.jpg]]</ref> Details of Ivy's relationships with her retainers are more vague in the English script. | |||
==Etymology and other languages== | ==Etymology and other languages== | ||
Latest revision as of 16:36, 16 April 2024
| ||||||||
|

Clash of Queens is the fourth chapter of the Fire Emblem Engage expansion Fell Xenologue. In this chapter, Alear, Nel, Nil, and the Four Winds work to defeat both the armies of Elusia and Solm in one battle outside of Destinea Cathedral.
After completing this chapter, the player is immediately sent into the next. It is not possible to return to the world map or the Somniel during the next chapter.
Plot
- Main article:
Clash of Queens/Script
In a dream, Nel recalls a memory of her meeting with her world's Alear before waking up. Nil leads the current Alear and their group into Elusia, where Gregory questions how easy it was for them to enter. Nil and Alear then ask for Nel's thoughts, but she leaves in a hurry. Zelestia then arrives with Madeline, a member of the Four Winds who had been spying on Elusia, who introduces herself to Alear. Gregory and Madeline then mention Mauvier, whom Zelestia explains defected from Sombron's army after his superior, one of Sombron's children, died; Mauvier then founded the Four Winds. After a brief spat between the group, Madeline reveals that Elusia Castle is empty, and that its queen, Ivy, is performing a ritual in Hasaude Cathedral, possibly to revive Sombron.
Suddenly, Mauvier arrives bringing news that the queen of Solm, Timerra, has also left her palace to invade Elusia, and that he followed her there. With the two armies likely to clash, Madeline leads the group forward, while Alear briefly hangs back to introduce themself to Mauvier. At Hasaude Cathedral, the group finds the two armies already clashing with Emblem Bracelets in tow. Nel suggests attacking the queens directly to reclaim the bracelets, while Mauvier intends to disrupt the ritual in the cathedral. The group agrees to the plan and begins their assault on the two armies.
With Ivy and Timerra defeated, Nel orders the two to relinquish their bracelets. Mauvier then arrives and confirms that he has stopped the ritual at the cathedral. Infuriated, Ivy and Timerra refuse to give up their bracelets. Nel then transforms into a dragon and kills the two of them in response, regaining the bracelets, and horrifying Alear in the process.
Soon after, Nel and Nil send the bracelets' Emblems, Soren and Camilla, to slumber. Alear then admonishes Nel for killing two nations' rulers, but she responds by explaining that the two royals—and all the other royals and soldiers they fought in this world—were Corrupted. The Four Winds and Nil express their despondence upon hearing this. Alear chastises Nel for not telling anyone sooner, and she replies that she would rather not put such a burden on them. The two apologize to each other, which causes Nel to briefly recall a memory of her world's Alear. She laments the loss of her world's Alear, declares her love for them, and tells Alear that their mere presence reminds her more of hers, which she manifests by distancing herself from them. As she leaves to clear her head, Nil asks that the Four Winds watch over her while he stays behind. Alone with Alear, Nil tells them what he knows about Nel's habits. He then reveals that he has awakened Emblem Tiki from her slumber, and threatens to kill Alear.
Sometime in the past, a younger Nil is ecstatic over his newfound ability to rouse Emblems. Before he can tell Nel, however, Sombron arrives and tells him that he should hide his powers, and muses that Nil may be a worthy heir to him.
Beginning log
The party learns of suspicious developments in Elusia. Three bracelets remain.
Chapter data
Normal Hard Maddening


Character data
| Characters | |||||||||||
|---|---|---|---|---|---|---|---|---|---|---|---|
New units
| |||||||||||
| |||||||||||
Required characters
| |||||||||||
Available characters
| |||||||||||

Emblem Ring data
| Characters | |
|---|---|
New units
| |
| |
Required characters
| |
Available characters
| |
Additionally, Emblem Energy appears in the following locations:
- Column 7, row 13: Near the southwestern mountains
- Column 11, row 9: West of a pair of cemeteries
- Column 14, row 11: South of a pair of cemeteries
- Column 23, row 9: South of a one-tile-wide cemetery
- Column 27, row 18: Just west of a Solmic Sniper south of the southeasternmost cemetery
- Column 29, row 20: Near the southeast corner of the map
- Column 30, row 13: Near the woods south of Timerra's starting position
Enemy data
- Every enemy is
 weak to attacks that are effective against Corrupted units.
Normal Hard Maddening
| |||||||||||||||||||||||||||||||||||||||||||||||||||||||||||||||||||||||||||||||||||||||||||||||||||||||||||||||||||||||||||||||||||||||||||||||||||||||||||||||||||||||||||||||||||||||||||||||||||||||||||||||||||||||||||||||||||||||||||||||||||||||||||||||||||||||||||||||||||||||||||||||||||||||||||||||||
| |||||||||||||||||||||||||||||||||||||||||||||||||||||||||||||||||||||||||||||||||||||||||||||||||||||||||||||||||||||||||||||||||||||||||||||||||||||||||||||||||||||||||||||||||||||||||||||||||||||||||||||||||||||||||||||||||||||||||||||||||||||||||||||||||||||||||||||||||||||||||||||||||||||||||||||||||
| |||||||||||||||||||||||||||||||||||||||||||||||||||||||||||||||||||||||||||||||||||||||||||||||||||||||||||||||||||||||||||||||||||||||||||||||||||||||||||||||||||||||||||||||||||||||||||||||||||||||||||||||||||||||||||||||||||||||||||||||||||||||||||||||||||||||||||||||||||||||||||||||||||||||||||||||||
| |||||||||||||||||||||||||||||||||||||||||||||||||||||||||||||||||||||||||||||||||||||||||||||||||||||||||||||||||||||||||||||||||||||||||||||||||||||||||||||||||||||||||||||||||||||||||||||||||||||||||||||||||||||||||||||||||||||||||||||||||||||||||||||||||||||||||||||||||||||||||||||||||||||||||||||||||
Reinforcements
- Turns 2, 4, 6 (all difficulties), and 7 (Maddening only)
- 1 Mage Knight from north of the westernmost cemetery
- 1 (Normal)/2 (Hard/Maddening) Wolf Knight(s) from north of the westernmost cemetery
- 1 Great Knight from north of the westernmost cemetery
- Turns 3, 7 (all difficulties), and 8 (Maddening only)
- 2 (Normal)/3 (Hard/Maddening) Wyvern Knights with Steel Axes from near the northwest corner of the map
- 1 Wyvern Knight with a Steel Lance from near the northwest corner of the map
- Turn 5
- 2 (Normal)/4 (Hard/Maddening) Corrupted Wyverns from the southwestern mountains
- Turn 7
- 2 (Normal)/3 (Hard)/4 (Maddening) Griffin Knights from south of Ivy's starting position
- Turns 8–10 (Hard/Maddening only)
- 1 Wyvern Knight with a Steel Axe from west of ally starting positions
- 1 (Hard)/2 (Maddening) Griffin Knight(s) from west of ally starting positions
- 1 Wyvern Knight with a Steel Lance from west of ally starting positions
- Note: With the exception of the turn 5 reinforcements, all reinforcements are halted when Ivy is defeated.
Third army data
- Every third army enemy is weak to attacks that are effective against Corrupted units.
Normal Hard Maddening
| |||||||||||||||||||||||||||||||||||||||||||||||||||||||||||||||||||||||||||||||||||||||||||||||||||||||||||||||||||||||||||||||||||||||||||||||||||||||||||||||||||||||||||||||||||||||||||||||||||||||||||||||||||||||||||||||||||||||||||||||||||||||||||||||||||||||||||||||||||||||||||||||||||||||||||||||||||||||||||||||||||||||||||||||||||||||||||||||||||||||||||||||||||||||||||||||||||||||||||||||||||||||||||||||||||||
| |||||||||||||||||||||||||||||||||||||||||||||||||||||||||||||||||||||||||||||||||||||||||||||||||||||||||||||||||||||||||||||||||||||||||||||||||||||||||||||||||||||||||||||||||||||||||||||||||||||||||||||||||||||||||||||||||||||||||||||||||||||||||||||||||||||||||||||||||||||||||||||||||||||||||||||||||||||||||||||||||||||||||||||||||||||||||||||||||||||||||||||||||||||||||||||||||||||||||||||||||||||||||||||||||||||
| |||||||||||||||||||||||||||||||||||||||||||||||||||||||||||||||||||||||||||||||||||||||||||||||||||||||||||||||||||||||||||||||||||||||||||||||||||||||||||||||||||||||||||||||||||||||||||||||||||||||||||||||||||||||||||||||||||||||||||||||||||||||||||||||||||||||||||||||||||||||||||||||||||||||||||||||||||||||||||||||||||||||||||||||||||||||||||||||||||||||||||||||||||||||||||||||||||||||||||||||||||||||||||||||||||||
| |||||||||||||||||||||||||||||||||||||||||||||||||||||||||||||||||||||||||||||||||||||||||||||||||||||||||||||||||||||||||||||||||||||||||||||||||||||||||||||||||||||||||||||||||||||||||||||||||||||||||||||||||||||||||||||||||||||||||||||||||||||||||||||||||||||||||||||||||||||||||||||||||||||||||||||||||||||||||||||||||||||||||||||||||||||||||||||||||||||||||||||||||||||||||||||||||||||||||||||||||||||||||||||||||||||
Reinforcements
- Turns 3 and 5
- 1 Sniper from west of the northeasternmost cemetery
- 1 General with a Spear from west of the northeasternmost cemetery (Hard/Maddening only)
- 1 (Normal/Hard)/2 (Maddening) General(s) with Ridersbane(s) from west of the northeasternmost cemetery
- 1 Halberdier from west of the northeasternmost cemetery
- 1 Sage from west of the northeasternmost cemetery (Hard/Maddening only)
- Turns 4 and 6
- 2 (Normal/Hard)/3 (Maddening) Sages from south of the northeasternmost cemetery
- 1 (Normal)/2 (Hard/Maddening) General(s) with Steel Lance(s) from south of the northeasternmost cemetery
- Turns 4 (Normal/Hard)/2, 4, and 8 (Maddening only)
- 2 Snipers from near the southeast corner of the map
- 1 (Normal)/2 (Hard/Maddening) Swordmaster(s) from near the southeast corner of the map
- 1 General with a Steel Sword from near the southeast corner of the map (Maddening only)
- Turns 8–10 (Hard/Maddening only)
- 1 (Hard)/2 (Maddening) Berserker(s) from the northern border of the map
- 1 Sniper from the northern border of the map
- 1 Swordmaster from the northern border of the map
- 1 General with a Steel Axe from the northern border of the map
- Note: All reinforcements are halted when Timerra is defeated.
Boss data
- Main article:
Ivy
Normal Hard Maddening
- Main article:
Timerra
Normal Hard/Maddening
|
| |||||||||||||||||||||||||||||||||||||||||||||||||||||||||||
Strategy
| This section details unofficial strategies that may help with completion of the chapter. This may not work for everybody. |
This section has been marked as a stub. Please help improve the page by adding information.
Trivia
- This is the only chapter in Fire Emblem Engage to have a third army force.
- The Elusian army is the only army in the Fell Xenologue to use a generic enemy phase theme since Elusia has no unique, dynamic battle theme of its own.
- Timerra is the only boss across the Fell Xenologues to not have the Veteran+ skill on Maddening mode.
- This is due to the code preventing ally/third army units from having more than one non-class skill (Timerra has Dignity of Solm as her non-class skill, thus preventing Veteran+ from appearing on her)
- In the Japanese script, the alternate Ivy states that she was in love with Zelkov and attempted to seduce Kagetsu in her battle dialogues against them.[1] Details of Ivy's relationships with her retainers are more vague in the English script.
Etymology and other languages
This section has been marked as a stub. Please help improve the page by adding information.
| Names, etymology, and in other regions | ||
|---|---|---|
| Language | Name | Definition, etymology, and notes |
| English |
Clash of Queens |
-- |
Gallery
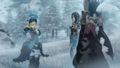
Madeline regroups with Nil and Nel

Corrupted Ivy and Corrupted Timerra in battle
Corrupted Ivy and Corrupted Timerra with their Emblems

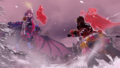
Nel about to attack Corrupted Ivy and Corrupted Timerra


References
| ← Path to War • | Clash of Queens | • The Fell Heir → |
|---|