- This article is about the chapter from The Binding Blade. For the skill appearing in 'Heroes, see Laws of Sacae.
| The Laws of Sacae
|
|
|
|
|
|
| “
|
Lure them into our territory as planned. We shall show them our strength.
|
”
|
— Monke
|
The Laws of Sacae (Japanese: サカの掟 Law of Sacae) is chapter 18B of Fire Emblem: The Binding Blade.
Plot
- Main article: The Laws of Sacae/Script
This section has been marked as a stub. Please help improve the page by adding information.
Beginning log
After defeating Arcardo, Roy crossed the border and entered the land of Sacae.
The Djute clan, the most powerful clan in Sacae, had joined Bern after suffering defeat. Not standing a chance against the joint force, the other clans were quickly decimated. Although Dayan, the chief of the Kutolah clan known as the "Silver Wolf," was fighting back with guerilla tactics, the situation looked grim. Sacae had become a territory of Bern.
As Roy entered the plains of Sacae, the warriors of the Djute clan stood in his path.
Chapter data
|
|
|
|
|
| Victory: Seize the castle gate
|
Player
|
Partner
|
Other
|
Enemy
|
Third
|
| Defeat: Roy dies
|
1–15
|
{{{partner}}}
|
{{{other}}}
|
31+18+∞
|
{{{third}}}
|
|
|
|
|
Character data
Item data
Shop data
Armories and vendors
Swords Lances Axes Bows Anima Light Dark Staves Items Secret
Enemy data
- Stats with two figures separated by a ~ are presented as a range, representing stats that vary due to random growths. The figures to the left and right of the ~ are the stat's minimum and maximum possible values respectively.
|
|
|
|
Name
|
Class
|
Lv
|
#
|
HP
|
Str/Mag
|
Mag
|
Skill
|
Spd
|
Lck
|
Prf
|
Def
|
Res
|
Cha
|
Lck
|
Con
|
Mov
|
Inventory and Skills
|

|
Monke
|
Nomadic Trooper
|
9
|
1
|
42
|
15
|
16
|
20
|
12
|
13
|
13
|
8
|
8
|
 Brave Bow • Brave Bow •  Brave Sword • Brave Sword •  Elixir Elixir
|
| Does not move; stands on the gate, the chapter's seize point.
|

|
Djute
|
Myrmidon
|
15
|
1
|
24~28
|
8~10
|
13~16
|
13~16
|
3~5
|
3~5
|
2~3
|
8
|
5
|
 Steel Sword Steel Sword
|
| Moves to attack units in range.
|
|
|
Djute
|
Myrmidon
|
15
|
1
|
24~28
|
8~10
|
13~16
|
13~16
|
3~5
|
3~5
|
2~3
|
8
|
5
|
Steel Sword • Elixir
|
| Moves to attack units in range.
|

|
Djute
|
Shaman
|
18
|
2
|
23~26
|
9~12
|
5~8
|
6~8
|
2~4
|
3~4
|
9~12
|
5
|
5
|
 Flux Flux
|
| Moves to attack units in range.
|
|
|
Djute
|
Myrmidon
|
17
|
1
|
25~29
|
8~11
|
14~17
|
14~17
|
4~6
|
4~5
|
2~4
|
8
|
5
|
 Armorslayer • Armorslayer •  Vulnerary Vulnerary
|
| --
|
|
|
Djute
|
Myrmidon
|
17
|
1
|
25~29
|
8~11
|
14~17
|
14~17
|
4~6
|
4~5
|
2~4
|
8
|
5
|
 Lancereaver Lancereaver
|
| --
|

|
Djute
|
Nomad
|
18
|
5
|
25~29
|
9~11
|
9~12
|
11~14
|
4~6
|
5~7
|
2~3
|
7
|
7
|
 Short Bow Short Bow
|
| The southernmost one begins moving unprovoked when he can attack a unit within two turns.
|
|
|
Djute
|
Nomad
|
18
|
2
|
25~29
|
9~11
|
9~12
|
11~14
|
4~6
|
5~7
|
2~3
|
7
|
7
|
Short Bow • Vulnerary
|
| The southern one begins moving unprovoked when he can attack a unit within two turns.
|
|
|
Djute
|
Nomad
|
18
|
2
|
25~29
|
9~11
|
9~12
|
11~14
|
4~6
|
5~7
|
2~3
|
7
|
7
|
Short Bow • Elixir
|
• The northern one moves to attack units in range.
• The southern one begins moving unprovoked when he can attack a unit within two turns.
|
|
|
Djute
|
Nomad
|
17
|
2
|
25~28
|
9~11
|
9~12
|
11~14
|
4~6
|
5~7
|
2~3
|
7
|
7
|
Short Bow
|
| The western one begins moving unprovoked when he can attack a unit within two turns.
|
|
|
Djute
|
Nomadic Trooper
|
6
|
6
|
32~38
|
12~15
|
11~15
|
13~17
|
5~8
|
8~11
|
4~7
|
8
|
8
|
Short Bow • Steel Sword
|
• The one near the gate moves to attack units in range.
• The one southwest of the gate begins moving unprovoked when he can attack a unit within two turns.
|
|
|
Djute
|
Nomad
|
19
|
1
|
26~30
|
9~12
|
10~13
|
12~15
|
4~7
|
5~7
|
2~4
|
7
|
7
|
Short Bow
|
| --
|
|
|
Djute
|
Myrmidon
|
15
|
1
|
24~28
|
8~10
|
13~16
|
13~16
|
3~5
|
3~5
|
2~3
|
8
|
5
|
 Killing Edge Killing Edge
|
| --
|
|
|
Djute
|
Myrmidon
|
16
|
1
|
25~28
|
8~10
|
14~16
|
14~16
|
3~6
|
3~5
|
2~3
|
8
|
5
|
Lancereaver
|
| Moves to attack units in range.
|

|
Djute
|
Druid
|
6
|
1
|
27~32
|
17~22
|
8~12
|
9~12
|
3~7
|
5~8
|
11~14
|
6
|
6
|
 Eclipse • Eclipse •  Physic Physic
|
| Moves to attack units in range.
|

|
Bern
|
Wyvern Rider
|
16
|
1
|
30~34
|
12~15
|
7~9
|
8~11
|
3~5
|
11~13
|
1~2
|
10
|
7
|
 Steel Lance Steel Lance
|
| Begins moving unprovoked when he can attack a unit within two turns.
|
|
|
Bern
|
Wyvern Rider
|
16
|
1
|
30~34
|
12~15
|
7~9
|
8~11
|
3~5
|
11~13
|
1~2
|
10
|
7
|
Steel Lance •  Javelin Javelin
|
| Begins moving unprovoked when he can attack a unit within two turns.
|

|
Bern
|
Wyvern Lord
|
5
|
1
|
39~46
|
16~20
|
10~14
|
10~13
|
3~6
|
13~16
|
2~4
|
11
|
8
|
 Axereaver • Elixir Axereaver • Elixir
|
| Begins moving unprovoked when he can attack a unit within two turns.
|
|
|
|
|
|
|
|
|
|
Name
|
Class
|
Lv
|
#
|
HP
|
Str/Mag
|
Mag
|
Skill
|
Spd
|
Lck
|
Prf
|
Def
|
Res
|
Cha
|
Lck
|
Con
|
Mov
|
Inventory and Skills
|
|
|
Monke
|
Nomadic Trooper
|
9
|
1
|
48~51
|
17~19
|
19~21
|
23~25
|
14~16
|
14~16
|
14~15
|
8
|
8
|
Brave Bow • Brave Sword • Elixir
|
| Does not move; stands on the gate, the chapter's seize point.
|
|
|
Djute
|
Myrmidon
|
15
|
1
|
31~38
|
11~15
|
17~20
|
17~20
|
6~10
|
4~8
|
3~6
|
8
|
5
|
Steel Sword
|
| Moves to attack units in range.
|
|
|
Djute
|
Myrmidon
|
15
|
1
|
31~38
|
11~15
|
17~20
|
17~20
|
6~10
|
4~8
|
3~6
|
8
|
5
|
Steel Sword • Elixir
|
| Moves to attack units in range.
|
|
|
Djute
|
Shaman
|
18
|
2
|
28~33
|
14~19
|
8~13
|
9~13
|
4~7
|
4~6
|
12~17
|
5
|
5
|
Flux
|
| Moves to attack units in range.
|
|
|
Djute
|
Myrmidon
|
17
|
1
|
32~39
|
11~16
|
18~20
|
18~20
|
7~11
|
5~8
|
3~7
|
8
|
5
|
Armorslayer • Vulnerary
|
| --
|
|
|
Djute
|
Myrmidon
|
17
|
1
|
32~39
|
11~16
|
18~20
|
18~20
|
7~11
|
5~8
|
3~7
|
8
|
5
|
Lancereaver
|
| --
|
|
|
Djute
|
Nomad
|
18
|
5
|
31~38
|
12~16
|
13~18
|
15~20
|
7~11
|
6~9
|
3~6
|
7
|
7
|
Short Bow
|
| The southernmost one begins moving unprovoked when he can attack a unit within two turns.
|
|
|
Djute
|
Nomad
|
18
|
2
|
31~38
|
12~16
|
13~18
|
15~20
|
7~11
|
6~9
|
3~6
|
7
|
7
|
Short Bow • Vulnerary
|
| The southern one begins moving unprovoked when he can attack a unit within two turns.
|
|
|
Djute
|
Nomad
|
18
|
2
|
31~38
|
12~16
|
13~18
|
15~20
|
7~11
|
6~9
|
3~6
|
7
|
7
|
Short Bow • Elixir
|
• The northern one moves to attack units in range.
• The southern one begins moving unprovoked when he can attack a unit within two turns.
|
|
|
Djute
|
Nomad
|
17
|
2
|
31~37
|
12~16
|
13~18
|
15~20
|
7~11
|
6~9
|
3~6
|
7
|
7
|
Short Bow
|
| The western one begins moving unprovoked when he can attack a unit within two turns.
|
|
|
Djute
|
Nomadic Trooper
|
6
|
6
|
38~47
|
14~19
|
14~20
|
16~22
|
7~12
|
9~14
|
5~9
|
8
|
8
|
Short Bow • Steel Sword
|
• The one near the gate moves to attack units in range.
• The one southwest of the gate begins moving unprovoked when he can attack a unit within two turns.
|
|
|
Djute
|
Nomad
|
19
|
1
|
32~39
|
12~17
|
14~19
|
16~20
|
7~12
|
6~9
|
3~7
|
7
|
7
|
Short Bow
|
| --
|
|
|
Djute
|
Myrmidon
|
15
|
1
|
31~38
|
11~15
|
17~20
|
17~20
|
6~10
|
4~8
|
3~6
|
8
|
5
|
Killing Edge
|
| --
|
|
|
Djute
|
Myrmidon
|
16
|
1
|
32~38
|
11~15
|
18~20
|
18~20
|
6~11
|
4~8
|
3~6
|
8
|
5
|
Lancereaver
|
| Moves to attack units in range.
|
|
|
Djute
|
Druid
|
6
|
1
|
31~39
|
22~29
|
11~17
|
11~16
|
5~10
|
6~10
|
13~18
|
6
|
6
|
Eclipse • Physic
|
| Moves to attack units in range.
|
|
|
Bern
|
Wyvern Rider
|
16
|
1
|
38~45
|
16~20
|
10~14
|
11~16
|
5~9
|
13~17
|
2~4
|
10
|
7
|
Steel Lance
|
| Begins moving unprovoked when he can attack a unit within two turns.
|
|
|
Bern
|
Wyvern Rider
|
16
|
1
|
38~45
|
16~20
|
10~14
|
11~16
|
5~9
|
13~17
|
2~4
|
10
|
7
|
Steel Lance • Javelin
|
| Begins moving unprovoked when he can attack a unit within two turns.
|
|
|
Bern
|
Wyvern Lord
|
5
|
1
|
46~57
|
20~26
|
13~19
|
12~16
|
5~9
|
15~19
|
2~5
|
11
|
8
|
Axereaver • Elixir
|
| Begins moving unprovoked when he can attack a unit within two turns.
|
|
|
|
|
|
Reinforcements
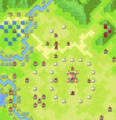
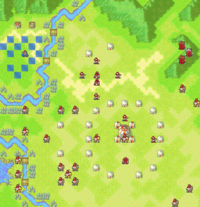
- Each enemy phase after entering the circle of huts surrounding the castle gate (columns 14–22, rows 17–23; and columns 15–21, rows 16 and 24)
- Nomads and Nomadic Troopers randomly appear from the huts—Nomads appear from the east seven huts and the left of the top one; level 6 Nomadic Troopers appear from the west five huts, the middle of the top three, and the left of the bottom two
- Enemy phase of turns 10, 15, and 20
- Enemy phase of turns 12, 17, 22
- Enemy phase of turns 13 and 23
Boss data
- Main article: Monke
- Stats with two figures separated by a ~ are presented as a range, representing stats that vary due to random growths. The figures to the left and right of the ~ are the stat's minimum and maximum possible values respectively.[1]
Strategy
Ch18B is the second Sacae chapter, and the first chapter to feature the trademark Nomad swarms present in the route.
Nomads, and their promoted counterparts, Nomad Troopers, all have high Avo due to high SPD. However, they lack STR, and their love for the 5-MT Short Bow severely limits their abilities to deal with high-DEF foes. As such, units like Douglas or Delphi Shield!Melady can easily wall them with little difficulty. However, these bulky units can only retaliate against Nomads' bow shots with inaccurate Javelins and Hand Axes, and coupled with the aforementioned high Avo, makes killing them on Enemy Phase basically impossible. Furthermore, the only units that can counterattack them for high damage are Snipers or Anima casters that have low DEF and as such are especially vulnerable to being swarmed by Nomads. This map's main threat comes from squishier units getting swarmed in open terrain, and as such, it is imperative to prevent that from happening.
The player starts in an area that is separated from the rest of the map by a river and 2 bridges. Block both bridge with high-DEF units to stop the Nomad swarm from reaching your squishier units. When able, bait in the Myrmidons and Shamans and clear them out; they (one Myrmidon has an Armorslayer) are the only threats to any Generals that are on wall duty. Beware of Nomad Troopers, as they can cross rivers and kill anyone squishy left in range. It is best to try and 2HKO them with Anima tomes, using mounted units to rescue mages to safety.
The Wyvern squad will aggro when they can attack something in 2 turns. It is possible to completely avoid them by sticking to a southern path, though Wyvern reinforcements do spawn and are aggressive, so anti-Wyvern countermeasures still need to be brought. Other reinforcements include additional Nomads and Nomad Troopers from the south.
The real challenge of this map is getting Roy to the seize point. Roy is quite weak, lacks both SPD and DEF and has poor movement. As such, he will get demolished and killed if he is exposed to Nomad fire. Furthermore, once someone ends their turn inside the ring of huts, more Nomads and Nomad Troopers start randomly spawning from them, which can easily kill Roy as he nears the gate. Once these spawns start, they don't stop until the boss dies, and hence it is important to kill the boss quickly or the player can easily get overwhelmed by dozens of Nomads who just won't die.
One solution is to rush a bosskiller directly to the gate from beyond the ring, using Larum/Elffin to do so, and bank on the boss dying in a single round. This can be risky, as Monke has high SPD and Avo and a failure to bring him down in one round usually results in the bosskiller getting swarmed and killed. Another solution is to keep the rest of the party in the starting area, and instead have a single, bulky unit rescue Roy and try to make it to the gate by themselves. Since rescue does not decrease DEF, bulky units like Douglas or Melady have no trouble tanking huge swarms of Nomads. However, they will struggle to actually make progress towards the throne as they struggle to wade through a sea of Nomads with halved SKL to hit enemies with, to the point where running out of weapons whilst surrounded becomes a real concern.
Etymology and other languages
Gallery
References