| Site News |
|---|
| Warning: This wiki contains spoilers. Read at your own risk! Social media: If you would like, please join our Discord server, and/or follow us on Twitter (X) or Tumblr! |
Latecomer's Sorrow: Difference between revisions
mNo edit summary |
Thecornerman (talk | contribs) m (Text replacement - "|Fire|link=Fire (tome)" to "|Fire") |
||
| (20 intermediate revisions by 6 users not shown) | |||
| Line 1: | Line 1: | ||
{{Chapter Infobox | {{Chapter Infobox | ||
|image=[[File:Cm fe06 3.png|200px]] | |image=[[File:Cm fe06 3.png|200px]] | ||
|location=[[ | |location=Castle [[Araphen]] and surroundings | ||
|new units=[[Chad]], [[Lugh]] | |new units=[[Chad]], [[Lugh]] | ||
|boss=[[Slater]] | |boss=[[Slater]] | ||
|previous=[[Princess of Bern]] | |||
|next=[[Crumbling League]] | |||
}} | }} | ||
{{Quote|We must recapture Castle Araphen for all of our sakes. | {{Quote|We must recapture Castle Araphen for all of our sakes. ...And for Lilina's sake...|[[Roy]]}} | ||
'''Latecomer's Sorrow''' (Japanese: {{hl|後れてきた者|Okurete kita mono}} ''One who arrived late'') is the third chapter in {{FE6}}. In this chapter, [[Roy]] must retake [[Araphen|Castle Araphen]], which was attacked and captured by two of Bern's elite generals, [[Brunnya]] and [[Narcian]]. | '''Latecomer's Sorrow''' (Japanese: {{hl|後れてきた者|Okurete kita mono}} ''One who arrived late'') is the third chapter in {{FE6}}. In this chapter, [[Roy]] must retake [[Araphen|Castle Araphen]], which was attacked and captured by two of Bern's elite generals, [[Brunnya]] and [[Narcian]]. | ||
| Line 12: | Line 14: | ||
==Plot== | ==Plot== | ||
{{main|Latecomer's Sorrow/Script}} | {{main|Latecomer's Sorrow/Script}} | ||
On his way to Araphen to meet with Hector, [[Roy]] learns from a messenger that the Bernese generals [[Brunnya]] and [[Narcian]] have decimated the Lycian army. This lowers the morale of his troops, but Roy continues toward the castle anyway, as he wants to assess the situation and find survivors. | |||
Meanwhile, in Araphen, King [[Zephiel]] meets Hector, who was captured during the battle. He tells Hector that he plans to "liberate the world," then throws Hector into the dungeon and leaves him there to die. Afterwards, Brunnya tells Zephiel that she is heading to Sacae, but also brings up the fact that the soldiers fear the [[Idunn | dark priestess]] Zephiel has aligned himself with. Zephiel dismisses Brunnya's concerns and she apologizes for bringing up the subject before leaving. | |||
Roy arrives in Araphen and learns from [[Chad]] that Hector is alive, but being held prisoner in the castle. The lord wants to free Hector, and although Chad sees this as suicide, he joins Roy's army just to fight Bern. | |||
The battle begins, and in the midst of it, a bishop of the Elimine Church visits the local village to take in some orphans. [[Lugh]] thanks the bishop for this act, but remains in the village himself. When Roy's forces visit that village, Lugh joins Roy's army. If Chad talks to Lugh, Chad is mortified to learn that Lugh wants to fight Bern and tries to dissuade the mage from joining Roy, but Lugh is not swayed and Chad gives in. | |||
As the battle continues, King Zephiel takes note. He declares that he is returning to Bern and orders Narcian to kill anyone who opposes his troops. After Zephiel and Idunn leave, Narcian orders [[Slater]] to take care of the Lycian remnants before leaving himself to meet an [[Clarine | Etrurian noblewoman]]. | |||
The fight eventually ends with Slater losing and Roy meeting Hector in the dungeon. Hector is almost dead and beyond saving, but before he dies, he tells Roy what happened and what he should do next. Lycia lost the battle at Araphen because Bern deployed dragons - the same dragons as the ones from [[The Scouring]]. Roy should now go to [[Ostia]], not only to protect it, but also to obtain a dragonslaying weapon that is in the area. | |||
==Chapter data== | ==Chapter data== | ||
{{ChapData | {{Tab | ||
|width=100% | |||
|tab1=Normal | |||
|tab2=Hard | |||
|content1={{ChapData | |||
|victory=Seize | |||
|defeat=[[Roy]] dies | |||
|ally=14 | |||
|enemy=18{{h|+7|Reinforcements}} | |||
|map=[[File:Cm fe06 3.png]] | |||
}} | |||
|content2={{ChapData | |||
|victory=Seize | |victory=Seize | ||
|defeat=[[Roy]] dies | |defeat=[[Roy]] dies | ||
|ally=14 | |ally=14 | ||
|enemy=18{{ | |enemy=18{{h|+13|Reinforcements}} | ||
|map=[[File:Cm fe06 3.png]] | |map=[[File:Cm fe06 3.png]] | ||
}} | |||
}} | }} | ||
Units are arranged based on their position in deployment order. If every unit is alive, the deployment order is: [[Roy]], [[Marcus]], [[Alen]], [[Bors]], [[Wolt]], [[Lance (character)|Lance]], [[Merlinus]], [[Elen]], [[Ward (character)|Ward]], [[Lot]], [[Dieck]], and [[Shanna]]. | |||
===Character data=== | ===Character data=== | ||
{{ChapChars | {{ChapChars | ||
|game#=06 | |game#=06 | ||
|newunit1={{NewUnit | |newunit1={{NewUnit | ||
|name=Chad | |name=Chad | ||
| Line 50: | Line 58: | ||
|HP=16 | |HP=16 | ||
|lv=1 | |lv=1 | ||
|inventory={{Item|6|Iron Sword}}<br>{{Item|6|Lockpick}} | |||
|recruitment method=Automatically from turn 1 | |recruitment method=Automatically from turn 1 | ||
}} | }} | ||
| Line 58: | Line 67: | ||
|HP=16 | |HP=16 | ||
|lv=1 | |lv=1 | ||
|inventory={{Item|6|Fire}}<br>{{Item|6|Vulnerary}} | |||
|recruitment method=Visit the northern [[village]] | |recruitment method=Visit the northern [[village]] | ||
}} | }} | ||
|return1= | |forced1=roy | ||
|return2= | |return1=marcus | ||
|return3= | |return2=alen | ||
|return4=lance | |return3=bors | ||
| | |return4=wolt | ||
| | |return5=lance | ||
| | |return5article=Lance (character) | ||
| | |return6=merlinus | ||
| | |return7=elen | ||
|return9= | |return8=ward | ||
|return10= | |return8article=Ward (character) | ||
|return11 | |return9=lot | ||
|return10=dieck | |||
|return11=shanna | |||
}} | }} | ||
| Line 80: | Line 91: | ||
|item1=Mend | |item1=Mend | ||
|obtain1=Visiting the southern [[village]] | |obtain1=Visiting the southern [[village]] | ||
|item2=Poleax | |item2=Vulnerary | ||
| | |obtain2=Steal from enemy [[Knight]] | ||
| | |item3=Poleax | ||
| | |obtain3=Open left [[chest]] | ||
| | |itemlast=3,000G | ||
| | |itemlastarticle=Gold | ||
|itemlastimage=gold | |||
|obtainlast=Open right [[chest]] | |||
}} | }} | ||
===Enemy data=== | ===Enemy data=== | ||
{{ | :''Stats with two figures separated by a ~ are presented as a range, representing stats that vary due to random growths. The figures to the left and right of the ~ are the stat's minimum and maximum possible values respectively.'' | ||
|platform=gba | {{Tab | ||
| | |width=100% | ||
| | |tab1=Normal | ||
| | |tab2=Hard | ||
|#1= | |content1={{ChapUnitHdr|type=Enemy|platform=gba}} | ||
| | {{ChapUnitCellGBA | ||
| | |name=Bern | ||
| | |class=Knight | ||
| | |lv=2 | ||
| | |#=1 | ||
|#2=1 | |hp=17~18 | ||
| | |str=5~6 | ||
| | |skill=2~3 | ||
| | |spd=0~1 | ||
| | |lck=0~1 | ||
| | |def=9~10 | ||
|#3=1 | |res=0~1 | ||
| | |con=13 | ||
| | |mov=4 | ||
| | |inventory={{Item|6|Iron Lance}} | ||
| | |notes=Moves to attack units in range. | ||
| | }} | ||
|#4= | {{ChapUnitCellGBA | ||
| | |name=Bern | ||
| | |class=Knight | ||
| | |lv=3 | ||
| | |#=1 | ||
| | |hp=18~19 | ||
|#5= | |str=5~6 | ||
| | |skill=2~3 | ||
| | |spd=0~1 | ||
| | |lck=0~1 | ||
| | |def=9~10 | ||
| | |res=0~1 | ||
|# | |con=13 | ||
| | |mov=4 | ||
| | |inventory={{Item|6|Iron Lance}} | ||
| | |notes=Moves to attack units in range. | ||
| | }} | ||
| | {{ChapUnitCellGBA | ||
|# | |name=Bern | ||
| | |class=Knight | ||
| | |lv=3 | ||
| | |#=1 | ||
| | |hp=18~19 | ||
| | |str=5~6 | ||
|# | |skill=2~3 | ||
| | |spd=0~1 | ||
|lck=0~1 | |||
| | |def=9~10 | ||
| | |res=0~1 | ||
| | |con=13 | ||
|#9=2 | |mov=4 | ||
| | |inventory={{Item|6|Iron Lance}} • {{Item|6|Javelin}} • {{Item|6|Vulnerary}} | ||
| | |notes=Does not move, except to heal. | ||
| | }} | ||
| | {{ChapUnitCellGBA | ||
| | |name=Bern | ||
| | |class=Soldier | ||
| | |lv=5 | ||
| | |#=3 | ||
| | |hp=22~24 | ||
| | |str=4~6 | ||
| | |skill=1~2 | ||
|# | |spd=1~2 | ||
| | |lck=0~2 | ||
|def=0~1 | |||
| | |res=0~1 | ||
| | |con=6 | ||
| | |mov=5 | ||
|# | |inventory={{Item|6|Javelin}} | ||
| | }} | ||
{{ChapUnitCellGBA | |||
|name=Bern | |||
|class=Soldier | |||
|lv=5 | |||
|#=9 | |||
|hp=22~24 | |||
|str=4~6 | |||
|skill=1~2 | |||
|spd=1~2 | |||
|lck=0~2 | |||
|def=0~1 | |||
|res=0~1 | |||
|con=6 | |||
|mov=5 | |||
|inventory={{Item|6|Iron Lance}} | |||
|notes=The westernmost one within the castle and the one southwest of the throne and northwest of the chests move to attack units in range. | |||
}} | |||
{{ChapUnitCellGBA | |||
|name=Bern | |||
|class=Soldier | |||
|lv=3 | |||
|#=1 | |||
|hp=21~22 | |||
|str=3~5 | |||
|skill=0~1 | |||
|spd=1~2 | |||
|lck=0~1 | |||
|def=0~1 | |||
|res=0~1 | |||
|con=6 | |||
|mov=5 | |||
|inventory={{Item|6|Iron Lance}} | |||
}} | |||
{{ChapUnitCellGBA | |||
|name=Bern | |||
|class=Archer | |||
|lv=2 | |||
|#=2 | |||
|hp=18~19 | |||
|str=4~5 | |||
|skill=3~4 | |||
|spd=3~4 | |||
|lck=0~1 | |||
|def=3~4 | |||
|res=0~1 | |||
|con=7 | |||
|mov=5 | |||
|inventory={{Item|6|Iron Bow}} | |||
|notes=Moves to attack units in range. | |||
|last=y | |||
}} | |||
{{ChapUnitReinf|type=Enemy|platform=gba}} | |||
{{ChapUnitCellGBA | |||
|name=[[Slater]] | |||
|class=Knight | |||
|lv=7 | |||
|#=1 | |||
|hp=26 | |||
|str=10 | |||
|skill=3 | |||
|spd=3 | |||
|lck=1 | |||
|def=11 | |||
|res=0 | |||
|con=13 | |||
|mov=4 | |||
|inventory={{Item|6|Steel Lance}} • {{Item|6|Javelin}} | |||
|notes=Does not move; stands on a [[Terrain/Game Boy Advance games#Fire Emblem: The Binding Blade|throne]], the chapter's seize point. | |||
}} | |||
{{ChapUnitCellGBA | |||
|name=Bern | |||
|class=Fighter | |||
|lv=4 | |||
|#=1 | |||
|hp=22~23 | |||
|str=6~7 | |||
|skill=2~4 | |||
|spd=4~6 | |||
|lck=0~1 | |||
|def=2~3 | |||
|res=0~1 | |||
|con=11 | |||
|mov=5 | |||
|inventory={{Item|6|Hand Axe}} | |||
|notes=Moves to attack units in range. | |||
}} | |||
{{ChapUnitCellGBA | |||
|name=Bern | |||
|class=Fighter | |||
|lv=4 | |||
|#=1 | |||
|hp=22~23 | |||
|str=6~7 | |||
|skill=2~4 | |||
|spd=4~6 | |||
|lck=0~1 | |||
|def=2~3 | |||
|res=0~1 | |||
|con=11 | |||
|mov=5 | |||
|inventory={{Item|6|Iron Axe}} | |||
|notes=Moves to attack units in range. | |||
}} | |||
{{ChapUnitCellGBA | |||
|name=Bern | |||
|class=Cavalier | |||
|lv=1 | |||
|#=2 | |||
|hp=20 | |||
|str=5 | |||
|skill=2 | |||
|spd=5 | |||
|lck=0 | |||
|def=6 | |||
|res=0 | |||
|con=9 | |||
|mov=7 | |||
|inventory={{Item|6|Iron Sword}} | |||
}} | |||
{{ChapUnitCellGBA | |||
|name=Bern | |||
|class=Cavalier | |||
|lv=1 | |||
|#=2 | |||
|hp=20 | |||
|str=5 | |||
|skill=2 | |||
|spd=5 | |||
|lck=0 | |||
|def=6 | |||
|res=0 | |||
|con=9 | |||
|mov=7 | |||
|inventory={{Item|6|Javelin}} | |||
|last=y | |||
}} | |||
{{ChapUnitFtr}} | |||
|content2={{ChapUnitHdr|type=Enemy|platform=gba}} | |||
{{ChapUnitCellGBA | |||
|name=Bern | |||
|class=Knight | |||
|lv=2 | |||
|#=1 | |||
|hp=23~28 | |||
|str=7~12 | |||
|skill=4~7 | |||
|spd=0~3 | |||
|lck=2~5 | |||
|def=11~14 | |||
|res=0~3 | |||
|con=13 | |||
|mov=4 | |||
|inventory={{Item|6|Iron Lance}} | |||
|notes=Moves to attack units in range. | |||
}} | |||
{{ChapUnitCellGBA | |||
|name=Bern | |||
|class=Knight | |||
|lv=3 | |||
|#=1 | |||
|hp=24~29 | |||
|str=7~12 | |||
|skill=4~7 | |||
|spd=0~3 | |||
|lck=2~5 | |||
|def=11~14 | |||
|res=0~3 | |||
|con=13 | |||
|mov=4 | |||
|inventory={{Item|6|Iron Lance}} • {{Item|6|Javelin}} • {{Item|6|Vulnerary}} | |||
|notes=Does not move, except to heal. | |||
}} | |||
{{ChapUnitCellGBA | |||
|name=Bern | |||
|class=Soldier | |||
|lv=5 | |||
|#=3 | |||
|hp=28~34 | |||
|str=8~12 | |||
|skill=3~6 | |||
|spd=1~6 | |||
|lck=2~6 | |||
|def=0~3 | |||
|res=0~3 | |||
|con=6 | |||
|mov=5 | |||
|inventory={{Item|6|Javelin}} | |||
}} | |||
{{ChapUnitCellGBA | |||
|name=Bern | |||
|class=Soldier | |||
|lv=5 | |||
|#=9 | |||
|hp=28~34 | |||
|str=8~12 | |||
|skill=3~6 | |||
|spd=1~6 | |||
|lck=2~6 | |||
|def=0~3 | |||
|res=0~3 | |||
|con=6 | |||
|mov=5 | |||
|inventory={{Item|6|Iron Lance}} | |||
|notes=The westernmost one within the castle and the one southwest of the throne and northwest of the chests move to attack units in range. | |||
}} | |||
{{ChapUnitCellGBA | |||
|name=Bern | |||
|class=Soldier | |||
|lv=3 | |||
|#=1 | |||
|hp=27~32 | |||
|str=7~11 | |||
|skill=2~5 | |||
|spd=1~6 | |||
|lck=2~5 | |||
|def=0~3 | |||
|res=0~3 | |||
|con=6 | |||
|mov=5 | |||
|inventory={{Item|6|Iron Lance}} | |||
}} | |||
{{ChapUnitCellGBA | |||
|name=Bern | |||
|class=Archer | |||
|lv=2 | |||
|#=2 | |||
|hp=24~27 | |||
|str=6~9 | |||
|skill=5~10 | |||
|spd=5~8 | |||
|lck=2~5 | |||
|def=3~6 | |||
|res=0~3 | |||
|con=7 | |||
|mov=5 | |||
|inventory={{Item|6|Iron Bow}} | |||
|notes=Moves to attack units in range. | |||
|last=y | |||
}} | |||
{{ChapUnitReinf|type=Enemy|platform=gba}} | |||
{{ChapUnitCellGBA | |||
|name=[[Slater]] | |||
|class=Knight | |||
|lv=7 | |||
|#=1 | |||
|hp=29~31 | |||
|str=11~13 | |||
|skill=4~5 | |||
|spd=3~4 | |||
|lck=2~3 | |||
|def=12~13 | |||
|res=0~1 | |||
|con=13 | |||
|mov=4 | |||
|inventory={{Item|6|Steel Lance}} • {{Item|6|Javelin}} | |||
|notes=Does not move; stands on a [[Terrain/Game Boy Advance games#Fire Emblem: The Binding Blade|throne]], the chapter's seize point. | |||
}} | |||
{{ChapUnitCellGBA | |||
|name=Bern | |||
|class=Fighter | |||
|lv=4 | |||
|#=1 | |||
|hp=25~28 | |||
|str=8~11 | |||
|skill=3~6 | |||
|spd=5~8 | |||
|lck=0~2 | |||
|def=2~4 | |||
|res=0~2 | |||
|con=11 | |||
|mov=5 | |||
|inventory={{Item|6|Hand Axe}} | |||
|notes=Moves to attack units in range. | |||
}} | |||
{{ChapUnitCellGBA | |||
|name=Bern | |||
|class=Fighter | |||
|lv=4 | |||
|#=1 | |||
|hp=25~28 | |||
|str=8~11 | |||
|skill=3~6 | |||
|spd=5~8 | |||
|lck=0~2 | |||
|def=2~4 | |||
|res=0~2 | |||
|con=11 | |||
|mov=5 | |||
|inventory={{Item|6|Iron Axe}} | |||
|notes=Moves to attack units in range. | |||
}} | |||
{{ChapUnitCellGBA | |||
|name=Bern | |||
|class=Cavalier | |||
|lv=1 | |||
|#=5 | |||
|hp=23~25 | |||
|str=6~7 | |||
|skill=3~5 | |||
|spd=6~7 | |||
|lck=1~2 | |||
|def=6~7 | |||
|res=0~1 | |||
|con=9 | |||
|mov=7 | |||
|inventory={{Item|6|Iron Sword}} | |||
}} | |||
{{ChapUnitCellGBA | |||
|name=Bern | |||
|class=Cavalier | |||
|lv=1 | |||
|#=5 | |||
|hp=23~25 | |||
|str=6~7 | |||
|skill=3~5 | |||
|spd=6~7 | |||
|lck=1~2 | |||
|def=6~7 | |||
|res=0~1 | |||
|con=9 | |||
|mov=7 | |||
|inventory={{Item|6|Javelin}} | |||
|last=y | |||
}} | |||
{{ChapUnitFtr}} | |||
}} | }} | ||
====Reinforcements==== | |||
*On turn 3 enemy phase<!--Absent from the map and added on turn 3, not present and covered; aside from enemy count, indistinguishable on Normal Mode, but affects Hard Mode bonuses--> | |||
**[[Slater]] and 2 [[Fighter]]s from within the throne room | |||
*Turn 3 enemy phase and enemy phase after [[Lugh]] is recruited; and turns 5, 10, and 15 enemy phases on Hard Mode | |||
**2 [[Cavalier]]s from southwest of the throne | |||
===Boss data=== | ===Boss data=== | ||
{{main|Slater}} | {{main|Slater}} | ||
:''Stats with two figures separated by a ~ are presented as a range, representing stats that vary due to random growths. The figures to the left and right of the ~ are the stat's minimum and maximum possible values respectively.''<ref>{{cite web|url=https://fe6.triangleattack.com/chapters/latecomers_sorrow|title=Latecomer's Sorrow|site=triangleattack.com|retrieved=December 24, 2020}}</ref> | |||
{{Tab | {{Tab | ||
|tab1=Normal | |tab1=Normal | ||
| Line 207: | Line 567: | ||
|la=y | |la=y | ||
}} | }} | ||
}} | }} | ||
==Strategy== | ==Strategy== | ||
{{Strategy}} | {{Strategy}} | ||
This chapter presents two new units and two new classes: [[Chad]], a [[thief]], and [[Lugh]], a [[mage]]. [[Thief|Thieves]] can use [[lockpick]]s to open [[chest]]s and doors, as well as [[steal]] items from enemies' inventories. However, unlike {{title|Thracia 776}} and {{title|Radiant Dawn}}, [[Thief|thieves]] here cannot [[steal]] weapons. The other new class, [[mage]], is quite useful; most enemies in this game lack [[Resistance|magical defense]], so [[Lugh]] can wreak havoc even at his low starting level. Also, [[Lugh]] is the first new unit that can be missed (if the player does not visit the northern [[village]]). | This chapter presents two new units and two new classes: [[Chad]], a [[thief]], and [[Lugh]], a [[mage]]. [[Thief|Thieves]] can use [[lockpick]]s to open [[chest]]s and doors, as well as [[steal]] items from enemies' inventories. However, unlike {{title|Thracia 776}} and {{title|Radiant Dawn}}, [[Thief|thieves]] here cannot [[steal]] weapons. The other new class, [[mage]], is quite useful; most enemies in this game lack [[Resistance|magical defense]], so [[Lugh]] can wreak havoc even at his low starting level. Also, [[Lugh]] is the first new unit that can be missed (if the player does not visit the northern [[village]]). | ||
The most difficult part of this chapter might be the beginning, as there are four [[soldier]]s and an [[archer]] near the starting point who will attack right away. One of these [[soldier]]s has a [[javelin]]; units with less defense, such as [[Elen]] or [[Chad]], should be kept away until the first wave of enemies has been defeated. The player should send any of the [[cavalier]]s, [[Marcus]], or [[Shanna]] to the northern [[village]] and recruit [[Lugh]]. | The most difficult part of this chapter might be the beginning, as there are four [[soldier]]s and an [[archer]] near the starting point who will attack right away. One of these [[soldier]]s has a [[javelin]]; units with less defense, such as [[Elen]] or [[Chad]], should be kept away until the first wave of enemies has been defeated. The player should send any of the [[cavalier]]s, [[Marcus]], or [[Shanna]] to the northern [[village]] and recruit [[Lugh]]. | ||
Once the first wave has been dealt with, this chapter becomes quite straightforward. The castle's walls will help; given the few space, enemies cannot attack en masse. Units with the most defense in the front, ranged attackers behind - that's all there is to it. | Once the first wave has been dealt with, this chapter becomes quite straightforward. The castle's walls will help; given the few space, enemies cannot attack en masse. Units with the most defense in the front, ranged attackers behind - that's all there is to it. | ||
Reinforcements will arrive after Turn 3 and on the turn after [[Lugh]] has been recruited. The only problem with them may be their good mobility, as all of them are [[cavalier]]s | Reinforcements will arrive after Turn 3 and on the turn after [[Lugh]] has been recruited. The only problem with them may be their good mobility, as all of them are [[cavalier]]s. | ||
[[Slater]] is a bit stronger than [[Ruud]], but if the player forces him to use his [[javelin]], the fight will be easier. [[Elen]] can heal, but she must be rescued. Recommended weapons are [[Roy]]'s [[rapier]], the [[armorslayer]], [[Ward (character)|Ward]]'s [[hammer]], and [[Magic (element)|magic]] as well. Once [[Slater]] falls, [[Roy]] can seize the throne and the chapter will end. | |||
<!-- | |||
==Trivia== | ==Trivia== | ||
--> | |||
==Etymology and other languages== | ==Etymology and other languages== | ||
{{Names | {{Names | ||
|eng-name=The Latecomer | |eng-name=The Latecomer | ||
| Line 230: | Line 589: | ||
|eng-fan-name=Late Arrival<br>Latecomer's Sorrow | |eng-fan-name=Late Arrival<br>Latecomer's Sorrow | ||
|eng-fan-mean=-- | |eng-fan-mean=-- | ||
| | |jpn-name={{hover|後れてきた者|Okurete kita mono}} | ||
| | |jpn-mean=One who arrived late | ||
}} | }} | ||
==Gallery== | ==Gallery== | ||
<gallery> | |||
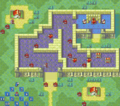
Cm fe06 3.png|Map of the chapter | |||
</gallery> | |||
{{refbar}} | {{refbar}} | ||
Latest revision as of 19:43, 28 May 2023
| ||||||||||
|

| “ | We must recapture Castle Araphen for all of our sakes. ...And for Lilina's sake... | ” | — Roy |
|---|
Latecomer's Sorrow (Japanese: 後れてきた者 One who arrived late) is the third chapter in Fire Emblem: The Binding Blade. In this chapter, Roy must retake Castle Araphen, which was attacked and captured by two of Bern's elite generals, Brunnya and Narcian.
Plot
- Main article:
Latecomer's Sorrow/Script
On his way to Araphen to meet with Hector, Roy learns from a messenger that the Bernese generals Brunnya and Narcian have decimated the Lycian army. This lowers the morale of his troops, but Roy continues toward the castle anyway, as he wants to assess the situation and find survivors.
Meanwhile, in Araphen, King Zephiel meets Hector, who was captured during the battle. He tells Hector that he plans to "liberate the world," then throws Hector into the dungeon and leaves him there to die. Afterwards, Brunnya tells Zephiel that she is heading to Sacae, but also brings up the fact that the soldiers fear the dark priestess Zephiel has aligned himself with. Zephiel dismisses Brunnya's concerns and she apologizes for bringing up the subject before leaving.
Roy arrives in Araphen and learns from Chad that Hector is alive, but being held prisoner in the castle. The lord wants to free Hector, and although Chad sees this as suicide, he joins Roy's army just to fight Bern.
The battle begins, and in the midst of it, a bishop of the Elimine Church visits the local village to take in some orphans. Lugh thanks the bishop for this act, but remains in the village himself. When Roy's forces visit that village, Lugh joins Roy's army. If Chad talks to Lugh, Chad is mortified to learn that Lugh wants to fight Bern and tries to dissuade the mage from joining Roy, but Lugh is not swayed and Chad gives in.
As the battle continues, King Zephiel takes note. He declares that he is returning to Bern and orders Narcian to kill anyone who opposes his troops. After Zephiel and Idunn leave, Narcian orders Slater to take care of the Lycian remnants before leaving himself to meet an Etrurian noblewoman.
The fight eventually ends with Slater losing and Roy meeting Hector in the dungeon. Hector is almost dead and beyond saving, but before he dies, he tells Roy what happened and what he should do next. Lycia lost the battle at Araphen because Bern deployed dragons - the same dragons as the ones from The Scouring. Roy should now go to Ostia, not only to protect it, but also to obtain a dragonslaying weapon that is in the area.
Chapter data
Normal Hard
| ||||||
|
| |||||
| Victory: Seize | Player | Enemy | ||||
|---|---|---|---|---|---|---|
| Defeat: Roy dies | 14 | 18+7 | ||||
| ||||||
Units are arranged based on their position in deployment order. If every unit is alive, the deployment order is: Roy, Marcus, Alen, Bors, Wolt, Lance, Merlinus, Elen, Ward, Lot, Dieck, and Shanna.
Character data
| Characters | ||||||||||||||||||||||
|---|---|---|---|---|---|---|---|---|---|---|---|---|---|---|---|---|---|---|---|---|---|---|
New units
| ||||||||||||||||||||||
| ||||||||||||||||||||||
Required characters
| ||||||||||||||||||||||
Available characters
| ||||||||||||||||||||||


Item data
| |||||||||||||||
|
Enemy data
- Stats with two figures separated by a ~ are presented as a range, representing stats that vary due to random growths. The figures to the left and right of the ~ are the stat's minimum and maximum possible values respectively.
Normal Hard
| ||||||||||||||||||||||||||||||||||||||||||||||||||||||||||||||||||||||||||||||||||||||||||||||||||||||||||||||||||||||||||||||||||||||||||||||||||||||||||||||||||||||||||||||||||||||||||||||||||||||||||||
| ||||||||||||||||||||||||||||||||||||||||||||||||||||||||||||||||||||||||||||||||||||||||||||||||||||||||||||||||||||||||||||||||||||||||||||||||||||||||||||||||||||||||||||||||||||||||||||||||||||||||||||
| ||||||||||||||||||||||||||||||||||||||||||||||||||||||||||||||||||||||||||||||||||||||||||||||||||||||||||||||||||||||||||||||||||||||||||||||||||||||||||||||||||||||||||||||||||||||||||||||||||||||||||||
| ||||||||||||||||||||||||||||||||||||||||||||||||||||||||||||||||||||||||||||||||||||||||||||||||||||||||||||||||||||||||||||||||||||||||||||||||||||||||||||||||||||||||||||||||||||||||||||||||||||||||||||
Reinforcements
- On turn 3 enemy phase
- Turn 3 enemy phase and enemy phase after Lugh is recruited; and turns 5, 10, and 15 enemy phases on Hard Mode
- 2 Cavaliers from southwest of the throne
Boss data
- Main article:
Slater - Stats with two figures separated by a ~ are presented as a range, representing stats that vary due to random growths. The figures to the left and right of the ~ are the stat's minimum and maximum possible values respectively.[1]
Normal Hard
|
|
| |||||||||||||||||||||||||||||||||||||||||||||||||

Strategy
| This section details unofficial strategies that may help with completion of the chapter. This may not work for everybody. |
This chapter presents two new units and two new classes: Chad, a thief, and Lugh, a mage. Thieves can use lockpicks to open chests and doors, as well as steal items from enemies' inventories. However, unlike Thracia 776 and Radiant Dawn, thieves here cannot steal weapons. The other new class, mage, is quite useful; most enemies in this game lack magical defense, so Lugh can wreak havoc even at his low starting level. Also, Lugh is the first new unit that can be missed (if the player does not visit the northern village).
The most difficult part of this chapter might be the beginning, as there are four soldiers and an archer near the starting point who will attack right away. One of these soldiers has a javelin; units with less defense, such as Elen or Chad, should be kept away until the first wave of enemies has been defeated. The player should send any of the cavaliers, Marcus, or Shanna to the northern village and recruit Lugh.
Once the first wave has been dealt with, this chapter becomes quite straightforward. The castle's walls will help; given the few space, enemies cannot attack en masse. Units with the most defense in the front, ranged attackers behind - that's all there is to it.
Reinforcements will arrive after Turn 3 and on the turn after Lugh has been recruited. The only problem with them may be their good mobility, as all of them are cavaliers.
Slater is a bit stronger than Ruud, but if the player forces him to use his javelin, the fight will be easier. Elen can heal, but she must be rescued. Recommended weapons are Roy's rapier, the armorslayer, Ward's hammer, and magic as well. Once Slater falls, Roy can seize the throne and the chapter will end.
Etymology and other languages
| Names, etymology, and in other regions | ||
|---|---|---|
| Language | Name | Definition, etymology, and notes |
| English |
The Latecomer |
Used in leftover text from the data transfer menu in the English version of Fire Emblem: The Blazing Blade. |
| English (unofficial) |
Late Arrival |
-- |
| Japanese |
後れてきた者 |
One who arrived late |
Gallery
Map of the chapter
References
- ↑ Latecomer's Sorrow, triangleattack.com, Retrieved: December 24, 2020
| ← Princess of Bern • | Latecomer's Sorrow | • Crumbling League → |
|---|