| Site News |
|---|
| Warning: This wiki contains spoilers. Read at your own risk! Social media: If you would like, please join our Discord server, and/or follow us on Twitter (X) or Tumblr! |
User:SuperAlpaca/Sandbox: Difference between revisions
m (Text replacement - "Color2}}" align="right"" to "Color2}}; text-align:right"") Tags: Mobile edit Mobile web edit |
mNo edit summary |
||
| (22 intermediate revisions by 2 users not shown) | |||
| Line 1: | Line 1: | ||
==Navbox== | ==Navbox== | ||
===Manga=== | ===Manga=== | ||
{| class="mw-collapsible mw-collapsed" | {| class="mw-collapsible mw-collapsed" style="width:100%; margin:auto; border-radius: 15px; background:{{Color3}}; border: 2px solid #6d6a47;" | ||
|- | |- | ||
! style="background: #6d6a47; | ! style="background: #6d6a47; border-radius: 15px;" align="center;" | '''''[[:Category:Manga|<font color="#d9d9d9">''Fire Emblem'' manga</font>]]''''' | ||
|- | |- | ||
| | | | ||
{| | {| style="width:100%; margin:auto; border-radius: 15px; background:#white;" | ||
|- | |- | ||
! style=" | ! style="border-top-left-radius: 15px;; background: #6d6a47;" width=15% align="center" rowspan="3"| '''''[[Fire Emblem: Hasha no Tsurugi|<font color="#d9d9d9">Hasha no Tsurugi</font>]]''''' | ||
| style="background: #6d6a47;" width=5% align="center"| Chapters | | style="background: #6d6a47;" width=5% align="center"| Chapters | ||
| Brave Youth • Graizel Prison • Chad's Revenge • Castle of Betrayal • Promise • The Princess who Rode a Pegasus • World's Finest Knight • I | | Brave Youth • Graizel Prison • Chad's Revenge • Castle of Betrayal • Promise • The Princess who Rode a Pegasus • World's Finest Knight • I Won't Let Anybody Die • The Mercenary Kruzard • For Lycia! • The False Decisive Battle • Friends Will, Someday… • Cross the Sea • The Depths of Hell • Mass Escape • The Swordsman Kilmar • Governor-General's Offense and Defense • "A Man Who Isn't a Man" • Twin Swords of a Vow • Dominion • Shining Castle • Fire Emblem • The Price of Power • A Ray of Hope • Towards the Utopia!! • The Sage's Examination • Resurrection • Shaken Kingdom • Battle in the Holy Royal Palace • Deathmatch in the Sky, Agony on the Ground • The Last Lie • Inviting Nightmare • Father and Mother • Spear of Vengeance • Eternal Siblings • Rapier • Royal Palace's Assault Team • Sword of Seals • Dragon's Roar • Indelible Flame • Invitation from the Shadows • Father and Child • A Mother's Wish • One Heart • Separate Ways | ||
|- | |- | ||
| style="background: #6d6a47;" width=5% align="center"| Characters | | style="background: #6d6a47;" width=5% align="center"| Characters | ||
| [[Al]] • [[Bors]] • [[Cecilia]] • [[Chad]] • [[Danann]] • [[Dieck]] • [[Douglas]] • [[ | | [[Al]] • [[Bors]] • [[Cecilia]] • [[Chad]] • [[Danann]] • [[Dieck]] • [[Douglas]] • [[Echidna]] • [[Eliwood]] • [[Elffin]] • [[Fae]] • [[Gant]] • [[Kilmar]] • [[Kruzard]] • [[Lance (character)|Lance]] • [[Lilina]] • [[Murdock]] • [[Nacien]] • [[Niime]] • [[Percival]] • [[Ranward]] • [[Roy]] • [[Sophia]] • [[Tiena]] • [[Youzen]] • [[Zeed]] • [[Zephiel]] | ||
|- | |- | ||
| style="background: #6d6a47;" width=5% align="center"| Locations | | style="background: #6d6a47;" width=5% align="center"| Locations | ||
| ... | | ... | ||
|- | |- | ||
! style="background: #6d6a47;" width=20% align="center" colspan="2"| '''''[[Fire Emblem: Genealogy of the Holy War (Ōsawa manga)|<font color="#d9d9d9"> | ! style="background: #6d6a47;" width=20% align="center" colspan="2"| '''''[[Fire Emblem: Genealogy of the Holy War (Ōsawa manga)|<font color="#d9d9d9">Fire Emblem: Genealogy of the Holy War (Ōsawa)</font>]]''''' | ||
| ... | | ... | ||
|- | |- | ||
! style="background: #6d6a47;" width=20% align="center" colspan="2"| '''''[[Fire Emblem: Genealogy of the Holy War (Fujimori manga)|<font color="#d9d9d9"> | ! style="background: #6d6a47;" width=20% align="center" colspan="2"| '''''[[Fire Emblem: Genealogy of the Holy War (Fujimori manga)|<font color="#d9d9d9">Fire Emblem: Genealogy of the Holy War (Fujimori)</font>]]''''' | ||
| ... | | ... | ||
|- | |- | ||
! style="background: #6d6a47;" width=20% align="center" colspan="2"| '''''[[Fire Emblem: Shadow Dragon & the Blade of Light (Hakoda manga)|<font color="#d9d9d9"> | ! style="background: #6d6a47;" width=20% align="center" colspan="2"| '''''[[Fire Emblem: Shadow Dragon & the Blade of Light (Hakoda manga)|<font color="#d9d9d9">Fire Emblem: Shadow Dragon & the Blade of Light (Hakoda)</font>]]''''' | ||
| ....... | | ....... | ||
|- | |- | ||
! style="background: #6d6a47;" width=20% align="center" colspan="2"| '''''[[Fire Emblem: Thracia 776 (Hino manga)|<font color="#d9d9d9">Thracia 776</font>]]''''' | ! style="background: #6d6a47;" width=20% align="center" colspan="2"| '''''[[Fire Emblem: Thracia 776 (Hino manga)|<font color="#d9d9d9">Fire Emblem: Thracia 776 (Hino)</font>]]''''' | ||
| ....... | | ....... | ||
|- | |- | ||
! style="background: #6d6a47;" width=20% align="center" colspan="2"| '''''[[Fire Emblem: Thracia 776 (Takanagi manga)|<font color="#d9d9d9">Thracia 776</font>]]''''' | ! style="background: #6d6a47;" width=20% align="center" colspan="2"| '''''[[Fire Emblem: Thracia 776 (Takanagi manga)|<font color="#d9d9d9">Fire Emblem: Thracia 776 (Takanagi)</font>]]''''' | ||
| ....... | | ....... | ||
|- | |- | ||
! style="background: #6d6a47;" width=20% align="center" colspan="2"| '''''[[Fire Emblem: | ! style="background: #6d6a47;" width=20% align="center" colspan="2"| '''''[[Fire Emblem: Heir of Light|<font color="#d9d9d9">Heir of Light</font>]]''''' | ||
| ....... | | ....... | ||
|- | |- | ||
! style="background: #6d6a47;" width=20% align="center" colspan="2"| '''''[[Fire Emblem: Mystery of the Emblem (manga)|<font color="#d9d9d9"> | ! style="background: #6d6a47;" width=20% align="center" colspan="2"| '''''[[Fire Emblem: Mystery of the Emblem (manga)|<font color="#d9d9d9">Fire Emblem: Mystery of the Emblem</font>]]''''' | ||
| ....... | | ....... | ||
|- | |- | ||
! style="background: #6d6a47;" width=20% align="center" colspan="2"| '''''[[Fire Emblem Gaiden (manga)|<font color="#d9d9d9">Gaiden</font>]]''''' | ! style="background: #6d6a47;" width=20% align="center" colspan="2"| '''''[[Fire Emblem Gaiden (manga)|<font color="#d9d9d9">Fire Emblem Gaiden</font>]]''''' | ||
| ....... | | ....... | ||
|- | |- | ||
! style="background: #6d6a47;" width=20% align="center" colspan="2"| '''''[[Fire Emblem: | ! style="background: #6d6a47;" width=20% align="center" colspan="2"| '''''[[Fire Emblem: Wind Mage|<font color="#d9d9d9">Fire Emblem: Wind Mage</font>]]''''' | ||
| .......風の魔道士 (Wind Mage) | | .......風の魔道士 (Wind Mage) | ||
|- | |- | ||
! style="background: #6d6a47;" width=20% align="center" colspan="2"| '''''[[Fire Emblem (Shimada)|<font color="#d9d9d9">Fire Emblem</font>]]''''' | ! style="background: #6d6a47;" width=20% align="center" colspan="2"| '''''[[Fire Emblem (Shimada manga)|<font color="#d9d9d9">Fire Emblem (Shimada)</font>]]''''' | ||
| ....... | | ....... | ||
|- | |- | ||
! style="background: #6d6a47; | ! style="background: #6d6a47;border-bottom-left-radius: 15px; border-bottom-right-radius: 15px;" width=20% align="center" colspan="2"| '''''[[Fire Emblem (Sano and Watanabe manga)|<font color="#d9d9d9">Fire Emblem (Sano and Watanabe)</font>]]''''' | ||
| ... | | ... | ||
|} | |} | ||
| Line 55: | Line 55: | ||
===Hasha no Tsurugi=== | ===Hasha no Tsurugi=== | ||
{| class="mw-collapsible mw-collapsed" | {| class="mw-collapsible mw-collapsed" style="width:100%; margin:auto; border-radius: 15px; background:{{Color3}}; border: 2px solid #6d6a47;" | ||
|- | |- | ||
! style="background: #6d6a47; | ! style="background: #6d6a47; border-radius: 15px;" align="center;" | '''''[[Fire Emblem: Hasha no Tsurugi|<font color="#d9d9d9">Hasha no Tsurugi</font>]]''''' | ||
|- | |- | ||
| | | | ||
{| | {| style="width:100%; margin:auto; border-radius: 15px; background:#white;" | ||
|- | |- | ||
! style=" | ! style="border-top-left-radius: 15px;;background: #6d6a47;" width=20% align="center" colspan="2"| '''Chapters''' | ||
| 1: | | 1: Brave Youth • 2: Graizel Prison • 3: Chad's Revenge • 4: Castle of Betrayal • 5: Promise • 6: The Princess who Rode a Pegasus • 7: World's Finest Knight • 8: I Won't Let Anybody Die • 9: The Mercenary Kruzard • 10: For Lycia! • 11: The False Decisive Battle • 12: Friends Will, Someday... • 13: Cross the Sea • 14: The Depths of Hell • 15: Mass Escape • 16: The Swordsman Kilmar • 17: Governor-General's Offense and Defense • 18: "A Man Who Isn't a Man" • 19: Twin Swords of a Vow • 20: Dominion • 21: Shining Castle • 22: Fire Emblem • 23: The Price of Power • 24: A Ray of Hope • 25: Towards the Utopia!! • 26: The Sage's Examination • 27: Resurrection • 28: Shaken Kingdom • 29: Battle in the Holy Royal Palace • 30: Deathmatch in the Sky, Agony on the Ground • 31: The Last Lie • 32: Inviting Nightmare • 33: Father and Mother • 34: Spear of Vengeance • 35: Eternal Siblings • 36: Rapier • 37: Royal Palace's Assault Team • 38: Sword of Seals • 39: Dragon's Roar • 40: Indelible Flame • 41: Invitation from the Shadows • 42: Father and Child • 43: A Mother's Wish • 44: One Heart • 45: Separate Ways | ||
|- | |- | ||
! style="background: #6d6a47;" width=20% align="center" colspan="2"| '''Characters''' | ! style="background: #6d6a47;" width=20% align="center" colspan="2"| '''Characters''' | ||
| [[Al]] • [[Audamorze]] • [[Bors]] • [[Cecilia]] • [[Chad]] • [[ | | [[Al]] • [[Audamorze]] • [[Bors]] • [[Cecilia]] • [[Celdia]] • [[Chad]] • [[Danan (Hasha no Tsurugi)|Danan]] • [[Dieck]] • [[Douglas]] • [[Echidna]] • [[Eliwood]] • [[Elffin]] • [[Fae]] • [[Gant]] • [[Guinevere]] • [[Jemmie]] • [[Kilmar]] • [[Kruzard]] • [[Lance (character)|Lance]] • [[Lilina]] • [[Magough]] • [[Murdock]] • [[Nacien]] • [[Niime]] • [[Percival]] • [[Ranward]] • [[Roy]] • [[Sophia]] • [[Tiena]] • [[Youzen]] • [[Zeed]] • [[Zephiel]] | ||
|- | |- | ||
! style="background: #6d6a47; | ! style="background: #6d6a47;border-bottom-left-radius: 15px; border-bottom-right-radius: 15px;" width=20% align="center" colspan="2"| '''Locations''' | ||
| [[Aquleia]] • [[Bern]] • [[Elibe]] • [[Etruria]] • [[Fibernia]] • [[Graizel]] • [[Jutes]] • [[Lycia]] • [[Mine]] • [[Nabata]] • [[Olst]] • [[Ostia]] • [[Ragna]] • [[Resistance Hideout]] • [[Tania]] • [[ | | [[Aquleia]] • [[Bern]] • [[Elibe]] • [[Etruria]] • [[Fibernia]] • [[Graizel]] • [[Jutes]] • [[Lycia]] • [[Mine]] • [[Nabata]] • [[Olst]] • [[Ostia]] • [[Ragna]] • [[Resistance Hideout]] • [[Tania]] • [[Worde]] | ||
|} | |} | ||
|} | |} | ||
| Line 75: | Line 75: | ||
==Group peoples== | ==Group peoples== | ||
{| style="border-spacing: 1px; | {| style="border-spacing: 1px; border-radius: 10px;; background:{{Color3}}; border:3px solid {{Color2}};" class="cellpadding-1" align="center" | ||
|- style="text-align:center;" | |- style="text-align:center;" | ||
| colspan="10" | | | colspan="10" | | ||
{| style="border-spacing: 1px; | {| style="border-spacing: 1px; border-radius: 10px;; background:{{Color3}}; border:1px solid {{Color3}};" class="cellpadding-1" align="center" | ||
|- | |- | ||
| <center>'''{{{group name|{{PAGENAME}}}}}'''</center> | | <center>'''{{{group name|{{PAGENAME}}}}}'''</center> | ||
| Line 98: | Line 98: | ||
==Stuff from MetW== | ==Stuff from MetW== | ||
<choose><option>{{#vardefine:A|fearht}}</option><option>{{#vardefine:A|feg}}</option><option>{{#vardefine:A|femn}}</option><option>{{#vardefine:A|fesk}}</option><option>{{#vardefine:A|fe776}}</option><option>{{#vardefine:A|feft}}</option><option>{{#vardefine:A|ferk}}</option><option>{{#vardefine:A|fess}}</option><option>{{#vardefine:A|fepr}}</option><option>{{#vardefine:A|ferd}}</option><option>{{#vardefine:A|fesd}}</option><option>{{#vardefine:A|fesmn}}</option></choose> | <choose><option>{{#vardefine:A|fearht}}</option><option>{{#vardefine:A|feg}}</option><option>{{#vardefine:A|femn}}</option><option>{{#vardefine:A|fesk}}</option><option>{{#vardefine:A|fe776}}</option><option>{{#vardefine:A|feft}}</option><option>{{#vardefine:A|ferk}}</option><option>{{#vardefine:A|fess}}</option><option>{{#vardefine:A|fepr}}</option><option>{{#vardefine:A|ferd}}</option><option>{{#vardefine:A|fesd}}</option><option>{{#vardefine:A|fesmn}}</option></choose> | ||
{| width="250px" class="cellpadding-3" style="border-spacing: 0; | {| width="250px" class="cellpadding-3" style="border-spacing: 0; border-radius: 20px; border: 2px solid {{Color2}}; background:{{Color1}}; font-size: 11px; margin-bottom:10px; float: right; clear: right;" | ||
| | | | ||
{| width="100%" class="cellpadding-3" style="border-spacing: 0; align:center; | {| width="100%" class="cellpadding-3" style="border-spacing: 0; align:center; border-radius: 15px;" | ||
! style=" | ! style="border-top-left-radius: 15px; border-top-right-radius: 15px;; border-left:1px solid {{Color2}}; border-right:1px solid {{Color2}}; border-top:1px solid {{Color2}}; background:{{Color1}}; font-size: 13px;"| {{PAGENAME}} | ||
|- | |- | ||
! colspan="2 | ! colspan="2" style="vertical-align:middle; align:center; border-bottom-left-radius: 15px; border-bottom-right-radius: 15px;; border:1px solid {{Color2}}; background:{{Color3}}" {{!}} <div style="float:center;"><br />{{#switch:{{#var:A}} | ||
|fearht=[[File:FEARHT Marth.png|200px]] | |fearht=[[File:FEARHT Marth.png|200px]] | ||
|feg=[[File:FEG Alm.png|200px]] | |feg=[[File:FEG Alm.png|200px]] | ||
| Line 134: | Line 134: | ||
|- | |- | ||
| | | | ||
{| width="100%" class="cellpadding-3" style="border-spacing: 0; align:center; | {| width="100%" class="cellpadding-3" style="border-spacing: 0; align:center; border-radius: 15px;; border:1px solid {{Color2}}; background:{{Color3}}" | ||
! style="width: 30%; border-right: 1px solid {{Color2}}; text-align:right" {{!}} Gender | ! style="width: 30%; border-right: 1px solid {{Color2}}; text-align:right" {{!}} Gender | ||
{{!}} | {{!}} | ||
| Line 191: | Line 191: | ||
==Class change== | ==Class change== | ||
===Normal=== | ===Normal=== | ||
{|align=center style=" | {|align=center style="border-radius: 15px;; border:2px solid {{Color2}}; background:{{Color1}}; text-align: center" | ||
!width=120px style=" | !width=120px style="border-top-left-radius: 15px;; background-color:{{Color1}}; border:2px solid {{Color2}};"|Basic class | ||
!width=210px style="background-color:{{Color1}}; border:2px solid {{Color2}};"|Promotion method | !width=210px style="background-color:{{Color1}}; border:2px solid {{Color2}};"|Promotion method | ||
!width=120px style=" | !width=120px style="border-top-right-radius: 15px;; background-color:{{Color1}}; border:2px solid {{Color2}};"|Promoted class | ||
|- | |- | ||
| | | style="text-align:center; background:{{Color3}}; border: 1px solid {{Color2}};" | {{{sprite1|[[File:Bs fe06 wolt archer bow.png]]}}} | ||
| | | style="text-align:center; background:{{Color3}}" rowspan="2" | {{{promotion method|Using an Orion's Bolt after reaching Level 10.}}} | ||
| | | style="text-align:center; background:{{Color3}}; border: 1px solid {{Color2}};" | {{{sprite2|[[File:Bs fe06 wolt sniper bow.png]]}}} | ||
|- | |- | ||
| | | style="text-align:center; border-bottom-left-radius: 15px;; border: 1px solid {{Color2}};" | [[{{{class1|Archer}}}]] | ||
| | | style="text-align:center; border-bottom-right-radius: 15px;; border: 1px solid {{Color2}};" | [[{{{class2|Sniper}}}]] | ||
|} | |} | ||
====Neo-Normal==== | ====Neo-Normal==== | ||
{|align=center style=" | {|align=center style="border-radius: 15px;; border:2px solid {{Color2}}; background:{{Color1}}; text-align: center" | ||
!width=120px style=" | !width=120px style="border-top-left-radius: 15px;; background-color:{{Color1}}; border:2px solid {{Color2}};"|Basic class | ||
!width=210px style="background-color:{{Color1}}; border:2px solid {{Color2}};"|Promotion method | !width=210px style="background-color:{{Color1}}; border:2px solid {{Color2}};"|Promotion method | ||
!width=120px style=" | !width=120px style="border-top-right-radius: 15px;; background-color:{{Color1}}; border:2px solid {{Color2}};"|Promoted class | ||
|- | |- | ||
| | | | ||
{|align="center" | {|align="center" style="width:100%" height="100%; border-bottom-left-radius: 15px;; border:1px solid {{Color2}}; background:{{Color1}}; text-align: center" | ||
| {{{sprite1|[[File:Bs fe06 wolt {{lc:{{{class|archer}}}}} bow.png]]}}} | | {{{sprite1|[[File:Bs fe06 wolt {{lc:{{{class|archer}}}}} bow.png]]}}} | ||
|- | |- | ||
| | |style="margin:auto; border-bottom-left-radius: 15px;; border-top: 1px solid {{Color2}}; background:{{Color3}}; text-align: center" | [[{{{class1|Archer}}}]] | ||
|} | |} | ||
| | | style="text-align:center; background:{{Color3}};" rowspan="2" | {{{promotion method|Using an Orion's Bolt after reaching Level 10.}}} | ||
| | | | ||
{|align="center" | {|align="center" style="width:100%" height="100%; border-bottom-right-radius: 15px;; border:1px solid {{Color2}}; background:{{Color3}}; text-align: center" | ||
| {{{sprite1|[[File:Bs fe06 wolt {{lc:{{{class2|sniper}}}}} bow.png]]}}} | | {{{sprite1|[[File:Bs fe06 wolt {{lc:{{{class2|sniper}}}}} bow.png]]}}} | ||
|- | |- | ||
| | | style="text-align:center; border-bottom-right-radius: 15px;; border-top:1px solid {{Color2}}; background:{{Color1}}; text-align: center" | [[{{{class2|Sniper}}}]] | ||
|} | |} | ||
|} | |} | ||
===Three=== | ===Three=== | ||
{|align=center style=" | {|align=center style="border-radius: 15px;; border:2px solid {{Color2}}; background:{{Color1}}; text-align: center" | ||
!width=120px style=" | !width=120px style="border-top-left-radius: 15px;; background-color:{{Color1}}; border:2px solid {{Color2}};"|Trainee class | ||
!width=210px style="background-color:{{Color1}}; border:2px solid {{Color2}};"|Promotion method | !width=210px style="background-color:{{Color1}}; border:2px solid {{Color2}};"|Promotion method | ||
!width=120px style="background-color:{{Color1}}; border:2px solid {{Color2}};"|Basic class | !width=120px style="background-color:{{Color1}}; border:2px solid {{Color2}};"|Basic class | ||
!width=210px style="background-color:{{Color1}}; border:2px solid {{Color2}};"|Promotion method | !width=210px style="background-color:{{Color1}}; border:2px solid {{Color2}};"|Promotion method | ||
!width=120px style=" | !width=120px style="border-top-right-radius: 15px;; background-color:{{Color1}}; border:2px solid {{Color2}};"|Promoted class | ||
|- | |- | ||
| | | style="text-align:center; background:{{Color3}}; border: 1px solid {{Color2}};" | {{{sprite1|[[File:Bs fe08 ewan pupil anima.png]]}}} | ||
| | | style="text-align:center; background:{{Color3}}" rowspan="2" | {{{promotion method|Reaching level 10, and choosing at beginning of next battle.}}} | ||
| | | style="text-align:center; background:{{Color3}}; border: 1px solid {{Color2}};" | {{{sprite2|[[File:Bs fe08 ewan mage anima.png]]}}} | ||
| | | style="text-align:center; background:{{Color3}}" rowspan="2" | {{{promotion method|Using a Guiding Ring after reaching Level 10.}}} | ||
| | | style="text-align:center; background:{{Color3}}; border: 1px solid {{Color2}};" | {{{sprite3|[[File:Bs fe08 ewan sage anima.png]]}}} | ||
|- | |- | ||
| | | style="text-align:center; border-bottom-left-radius: 15px;; border: 1px solid {{Color2}};" | [[{{{class1|Pupil}}}]] | ||
| | | style="text-align:center; border: 1px solid {{Color2}};" | [[{{{class2|Mage}}}]] | ||
| | | style="text-align:center; border-bottom-right-radius: 15px;; border: 1px solid {{Color2}};" | [[{{{class3|Sage}}}]] | ||
|} | |} | ||
===Split=== | ===Split=== | ||
{|align=center style=" | {|align=center style="border-radius: 15px;; border:2px solid {{Color2}}; background:{{Color1}}; text-align: center" | ||
!width=120px style=" | !width=120px style="border-top-left-radius: 15px;; background-color:{{Color1}}; border:2px solid {{Color2}};"|Basic class | ||
!width=210px style="background-color:{{Color1}}; border:2px solid {{Color2}};"|Promotion method | !width=210px style="background-color:{{Color1}}; border:2px solid {{Color2}};"|Promotion method | ||
!width=120px style=" | !width=120px style="border-top-right-radius: 15px;; background-color:{{Color1}}; border:2px solid {{Color2}};"|Promoted classes | ||
|- | |- | ||
| | | style="text-align:center; background:{{Color3}}; border: 1px solid {{Color2}};" rowspan="3" | {{{sprite1|[[File:Bs fe08 neimi archer bow.png]]}}} | ||
| | | style="text-align:center; background:{{Color3}}" rowspan="4" | {{{promotion method|Using an Orion's Bolt after reaching Level 10.}}} | ||
| | | style="text-align:center; background:{{Color3}}; border: 1px solid {{Color2}};" | {{{sprite2|[[File:Bs fe08 neimi sniper bow.png]]}}} | ||
|- | |- | ||
| | | style="text-align:center; border: 1px solid {{Color2}};" | [[{{{class2|Sniper}}}]] | ||
|- | |- | ||
| | | style="text-align:center; background:{{Color3}}; border: 1px solid {{Color2}};" | {{{sprite3|[[File:Bs fe08 neimi ranger bow.png]]}}} | ||
|- | |- | ||
| | | style="text-align:center; border-bottom-left-radius: 15px;; border: 1px solid {{Color2}};" | [[{{{class1|Archer}}}]] | ||
| | | style="text-align:center; border-bottom-right-radius: 15px;; border: 1px solid {{Color2}};" | [[{{{class3|Ranger}}}]] | ||
|} | |} | ||
===Merge=== | ===Merge=== | ||
{|align=center style=" | {|align=center style="border-radius: 15px;; border:2px solid {{Color2}}; background:{{Color1}}; text-align: center" | ||
!width=120px style=" | !width=120px style="border-top-left-radius: 15px;; background-color:{{Color1}}; border:2px solid {{Color2}};"|Basic classes | ||
!width=210px style="background-color:{{Color1}}; border:2px solid {{Color2}};"|Promotion method | !width=210px style="background-color:{{Color1}}; border:2px solid {{Color2}};"|Promotion method | ||
!width=120px style=" | !width=120px style="border-top-right-radius: 15px;; background-color:{{Color1}}; border:2px solid {{Color2}};"|Promoted class | ||
|- | |- | ||
| | | style="text-align:center; background:{{Color3}}; border: 1px solid {{Color2}};" | {{{sprite1|[[File:Bs fe07 lucius monk light.png]]}}} | ||
| | | style="text-align:center; background:{{Color3}}" rowspan="4" | {{{promotion method|Using a Guiding Ring after reaching Level 10.}}} | ||
| | | style="text-align:center; background:{{Color3}}; border: 1px solid {{Color2}};" rowspan="3" | {{{sprite3|[[File:Bs fe07 serra bishop magic.png]]}}} | ||
|- | |- | ||
| | | style="text-align:center; border: 1px solid {{Color2}};" | [[{{{class1|Monk}}}]] | ||
|- | |- | ||
| | | style="text-align:center; background:{{Color3}}; border: 1px solid {{Color2}};" | {{{sprite2|[[File:Bs fe07 serra cleric staff.png]]}}} | ||
|- | |- | ||
| | | style="text-align:center; border-bottom-left-radius: 15px;; border: 1px solid {{Color2}};" | [[{{{class2|Cleric}}}]] | ||
| | | style="text-align:center; border-bottom-right-radius: 15px;; border: 1px solid {{Color2}};" | [[{{{class3|Bishop}}}]] | ||
|} | |} | ||
===FE10=== | ===FE10=== | ||
{|align=center style=" | {|align=center style="border-radius: 15px;; border:2px solid {{Color2}}; background:{{Color1}}; text-align: center" | ||
!width=120px style=" | !width=120px style="border-top-left-radius: 15px;; background-color:{{Color1}}; border:2px solid {{Color2}};"|Basic class | ||
!width=210px style="background-color:{{Color1}}; border:2px solid {{Color2}};"|Promotion method | !width=210px style="background-color:{{Color1}}; border:2px solid {{Color2}};"|Promotion method | ||
!width=120px style="background-color:{{Color1}}; border:2px solid {{Color2}};"|Promoted class | !width=120px style="background-color:{{Color1}}; border:2px solid {{Color2}};"|Promoted class | ||
!width=210px style="background-color:{{Color1}}; border:2px solid {{Color2}};"|Promotion method | !width=210px style="background-color:{{Color1}}; border:2px solid {{Color2}};"|Promotion method | ||
!width=120px style=" | !width=120px style="border-top-right-radius: 15px;; background-color:{{Color1}}; border:2px solid {{Color2}};"|Promoted class | ||
|- | |- | ||
| | | style="text-align:center; background:{{Color3}}; border: 1px solid {{Color2}};" | {{{sprite1|[[File:Bs fe08 ewan pupil anima.png]]}}} | ||
| | | style="text-align:center; background:{{Color3}}" rowspan="2" | {{{promotion method|Reaching level 10, and choosing at beginning of next battle.}}} | ||
| | | style="text-align:center; background:{{Color3}}; border: 1px solid {{Color2}};" | {{{sprite2|[[File:Bs fe08 ewan mage anima.png]]}}} | ||
| | | style="text-align:center; background:{{Color3}}" rowspan="2" | {{{promotion method|Using a Guiding Ring after reaching Level 10.}}} | ||
| | | style="text-align:center; background:{{Color3}}; border: 1px solid {{Color2}};" | {{{sprite3|[[File:Bs fe08 ewan sage anima.png]]}}} | ||
|- | |- | ||
| | | style="text-align:center; border-bottom-left-radius: 15px;; border: 1px solid {{Color2}};" | [[{{{class1|Pupil}}}]] | ||
| | | style="text-align:center; border: 1px solid {{Color2}};" | [[{{{class2|Mage}}}]] | ||
| | | style="text-align:center; border-bottom-right-radius: 15px;; border: 1px solid {{Color2}};" | [[{{{class3|Sage}}}]] | ||
|} | |} | ||
===Fourway=== | ===Fourway=== | ||
{|align=center style=" | {|align=center style="border-radius: 15px;; border:2px solid {{Color2}}; background:{{Color1}}; text-align: center" | ||
!width=120px style=" | !width=120px style="border-top-left-radius: 15px;; background-color:{{Color1}}; border:2px solid {{Color2}};"|Trainee class | ||
!width=210px style="background-color:{{Color1}}; border:2px solid {{Color2}};"|Promotion method | !width=210px style="background-color:{{Color1}}; border:2px solid {{Color2}};"|Promotion method | ||
!width=120px style="background-color:{{Color1}}; border:2px solid {{Color2}};"|Basic class | !width=120px style="background-color:{{Color1}}; border:2px solid {{Color2}};"|Basic class | ||
| Line 304: | Line 304: | ||
!width=120px style="background-color:{{Color1}}; border:2px solid {{Color2}};"|Promoted class | !width=120px style="background-color:{{Color1}}; border:2px solid {{Color2}};"|Promoted class | ||
!width=210px style="background-color:{{Color1}}; border:2px solid {{Color2}};"|Promotion method | !width=210px style="background-color:{{Color1}}; border:2px solid {{Color2}};"|Promotion method | ||
!width=120px style=" | !width=120px style="border-top-right-radius: 15px;; background-color:{{Color1}}; border:2px solid {{Color2}};"|Promoted class | ||
|- | |- | ||
| | | style="text-align:center; background:{{Color3}}; border: 1px solid {{Color2}};" | {{{sprite1|[[File:Bs fe02 villager sword.png]]}}} | ||
| | | style="text-align:center; background:{{Color3}}" rowspan="2" | {{{promotion method|...}}} | ||
| | | style="text-align:center; background:{{Color3}}; border: 1px solid {{Color2}};" | {{{sprite2|[[File:Bs fe02 cavalier lance 01.png]]}}} | ||
| | | style="text-align:center; background:{{Color3}}" rowspan="2" | {{{promotion method|...}}} | ||
| | | style="text-align:center; background:{{Color3}}; border: 1px solid {{Color2}};" | {{{sprite3|[[File:Bs fe02 paladin lance 01.png]]}}} | ||
| | | style="text-align:center; background:{{Color3}}" rowspan="2" | {{{promotion method|...}}} | ||
| | | style="text-align:center; background:{{Color3}}; border: 1px solid {{Color2}};" | {{{sprite4|[[File:Bs fe02 gold knight lance 01.png]]}}} | ||
|- | |- | ||
| | | style="text-align:center; border-bottom-left-radius: 15px;; border: 1px solid {{Color2}};" | [[{{{class1|Villager}}}]] | ||
| | | style="text-align:center; border: 1px solid {{Color2}};" | [[{{{class2|Cavalier}}}]] | ||
| | | style="text-align:center; border: 1px solid {{Color2}};" | [[{{{class3|Paladin}}}]] | ||
| | | style="text-align:center; border-bottom-right-radius: 15px;; border: 1px solid {{Color2}};" | [[{{{class4|Gold Knight}}}]] | ||
|} | |} | ||
===Amelia-like=== | ===Amelia-like=== | ||
{|align=center style=" | {|align=center style="border-radius: 15px;; border:2px solid {{Color2}}; background:{{Color1}}; text-align: center" | ||
!width=120px style=" | !width=120px style="border-top-left-radius: 15px;; background-color:{{Color1}}; border:2px solid {{Color2}};"|Trainee class | ||
!width=210px style="background-color:{{Color1}}; border:2px solid {{Color2}};"|Promotion method | !width=210px style="background-color:{{Color1}}; border:2px solid {{Color2}};"|Promotion method | ||
!width=120px style="background-color:{{Color1}}; border:2px solid {{Color2}};"|Promoted classes | !width=120px style="background-color:{{Color1}}; border:2px solid {{Color2}};"|Promoted classes | ||
!width=210px style="background-color:{{Color1}}; border:2px solid {{Color2}};"|Promotion method | !width=210px style="background-color:{{Color1}}; border:2px solid {{Color2}};"|Promotion method | ||
!width=120px style=" | !width=120px style="border-top-right-radius: 15px;; background-color:{{Color1}}; border:2px solid {{Color2}};"|Promoted classes | ||
|- | |- | ||
| | | style="text-align:center; background:{{Color3}}; border: 1px solid {{Color2}};" rowspan="5" | {{{sprite1|[[File:Bs fe08 amelia recruit lance.png]]}}} | ||
| | | style="text-align:center; background:{{Color3}}" rowspan="6" | {{{promotion method|Reaching level 10, and choosing at beginning of next battle.}}} | ||
| | | style="text-align:center; background:{{Color3}}; border: 1px solid {{Color2}};" rowspan="2"| {{{sprite2|[[File:Bs fe08 amelia knight lance.png]]}}} | ||
| | | style="text-align:center; background:{{Color3}}" rowspan="6" | {{{promotion method|Reaching level 10, and choosing at beginning of next battle.}}} | ||
| | | style="text-align:center; background:{{Color3}}; border: 1px solid {{Color2}};" | {{{sprite2|[[File:Bs fe08 amelia general lance.png]]}}} | ||
|- | |- | ||
| | | style="text-align:center; border: 1px solid {{Color2}};" | [[{{{class4|General}}}]] | ||
|- | |- | ||
| | | style="text-align:center; border: 1px solid {{Color2}};" | [[{{{class2|Knight}}}]] | ||
| | | style="text-align:center; background:{{Color3}}; border: 1px solid {{Color2}};" | {{{sprite2|[[File:Bs fe08 amelia great knight lance.png]]}}} | ||
|- | |- | ||
| | | style="text-align:center; background:{{Color3}}; border: 1px solid {{Color2}};" rowspan="2" | {{{sprite3|[[File:Bs fe08 amelia cavalier lance.png]]}}} | ||
| | | style="text-align:center; border: 1px solid {{Color2}};" | [[{{{class1|Great Knight}}}]] | ||
|- | |- | ||
| | | style="text-align:center; background:{{Color3}}; border: 1px solid {{Color2}};" | {{{sprite2|[[File:Bs fe08 amelia paladin lance.png]]}}} | ||
|- | |- | ||
| | | style="text-align:center; border-bottom-left-radius: 15px;; border: 1px solid {{Color2}};" | [[{{{class1|Recruit}}}]] | ||
| | | style="text-align:center; border: 1px solid {{Color2}};" | [[{{{class3|Cavalier}}}]] | ||
| | | style="text-align:center; border-bottom-right-radius: 15px;; border: 1px solid {{Color2}};" | [[{{{class1|Paladin}}}]] | ||
|} | |} | ||
====Amelia-like test==== | ====Amelia-like test==== | ||
{|align=center style=" | {|align=center style="border-radius: 15px;; border:2px solid {{Color2}}; background:{{Color1}}; text-align: center" | ||
!width=120px style=" | !width=120px style="border-top-left-radius: 15px;; background-color:{{Color1}}; border:2px solid {{Color2}};"|Trainee class | ||
!width=210px style="background-color:{{Color1}}; border:2px solid {{Color2}};"|Promotion method | !width=210px style="background-color:{{Color1}}; border:2px solid {{Color2}};"|Promotion method | ||
!width=120px style="background-color:{{Color1}}; border:2px solid {{Color2}};"|Promoted classes | !width=120px style="background-color:{{Color1}}; border:2px solid {{Color2}};"|Promoted classes | ||
!width=210px style="background-color:{{Color1}}; border:2px solid {{Color2}};"|Promotion method | !width=210px style="background-color:{{Color1}}; border:2px solid {{Color2}};"|Promotion method | ||
!width=120px style=" | !width=120px style="border-top-right-radius: 15px;; background-color:{{Color1}}; border:2px solid {{Color2}};"|Promoted classes | ||
|- | |- | ||
| | | style="text-align:center; background:{{Color3}}; border: 1px solid {{Color2}};" rowspan="11" | {{{sprite1|[[File:Bs fe08 amelia recruit lance.png]]}}} | ||
| | | style="text-align:center; background:{{Color3}}" rowspan="12" | {{{promotion method|Reaching level 10, and choosing at beginning of next battle.}}} | ||
| | | style="text-align:center; background:{{Color3}}; border: 1px solid {{Color2}};" rowspan="5"| {{{sprite2|[[File:Bs fe08 amelia knight lance.png]]}}} | ||
| | | style="text-align:center; background:{{Color3}}" rowspan="12" | {{{promotion method|Reaching level 10, and choosing at beginning of next battle.}}} | ||
| | | style="text-align:center; background:{{Color3}}; border: 1px solid {{Color2}};" rowspan="3" | {{{sprite2|[[File:Bs fe08 amelia general lance.png]]}}} | ||
|- | |- | ||
| | | | ||
| Line 368: | Line 368: | ||
| | | | ||
|- | |- | ||
| | | style="text-align:center; border: 1px solid {{Color2}};" | [[{{{class4|General}}}]] | ||
|- | |- | ||
| | | style="text-align:center; background:{{Color3}}; border: 1px solid {{Color2}};" rowspan="3" | {{{sprite2|[[File:Bs fe08 amelia great knight lance.png]]}}} | ||
|- | |- | ||
| | | style="text-align:center; border: 1px solid {{Color2}};" | [[{{{class2|Knight}}}]] | ||
|- | |- | ||
| | | style="text-align:center; background:{{Color3}}; border: 1px solid {{Color2}};" rowspan="5" | {{{sprite3|[[File:Bs fe08 amelia cavalier lance.png]]}}} | ||
|- | |- | ||
| | | style="text-align:center; border: 1px solid {{Color2}};" | [[{{{class1|Great Knight}}}]] | ||
|- | |- | ||
| | | style="text-align:center; background:{{Color3}}; border: 1px solid {{Color2}};" rowspan="3" | {{{sprite2|[[File:Bs fe08 amelia paladin lance.png]]}}} | ||
|- | |- | ||
| | | | ||
| Line 384: | Line 384: | ||
| | | | ||
|- | |- | ||
| | | style="text-align:center; border-bottom-left-radius: 15px;; border: 1px solid {{Color2}};"| [[{{{class1|Recruit}}}]] | ||
| | | style="text-align:center; border: 1px solid {{Color2}};" | [[{{{class3|Cavalier}}}]] | ||
| | | style="text-align:center; border-bottom-right-radius: 15px;; border: 1px solid {{Color2}};" | [[{{{class1|Paladin}}}]] | ||
|} | |} | ||
| Line 408: | Line 408: | ||
==project idea== | ==project idea== | ||
{| | {| style="margin:auto; background: {{Color1}}; border: 3px solid {{Color2}}; width: 100%; border-radius: 80px;" | ||
|- | |- | ||
| width="60px" style=" | | width="60px" style="border-radius: 80px; background:{{Color3}}" | [[File:Project Classes.png|100px]] | ||
| <big><big>'''Project Classes'''</big></big><br>'''Leader:''' [[User:SuperAlpaca|SuperAlpaca]]<br>[[Fire Emblem Wiki:Project Classes|Main]] - [[Fire Embem Wiki talk:Project Classes|Talk]]<br>[[FIre Emblem Wiki:Project Classes/Destubbing Progress|Destubbing progress]] - [[Fire Emblem Wiki:Project Classes/Wanted Pages|Wanted pages]] - Link | | <big><big>'''Project Classes'''</big></big><br>'''Leader:''' [[User:SuperAlpaca|SuperAlpaca]]<br>[[Fire Emblem Wiki:Project Classes|Main]] - [[Fire Embem Wiki talk:Project Classes|Talk]]<br>[[FIre Emblem Wiki:Project Classes/Destubbing Progress|Destubbing progress]] - [[Fire Emblem Wiki:Project Classes/Wanted Pages|Wanted pages]] - Link | ||
|} | |} | ||
| Line 417: | Line 417: | ||
==Week 1: [[Eirika]] v. [[Ephraim]]== | ==Week 1: [[Eirika]] v. [[Ephraim]]== | ||
{|style="width:100%; | {|style="width:100%; border-radius: 15px;; background:{{Color3}}; border:solid {{Color2}} 2px;" | ||
|- | |- | ||
|colspan="2" style=" | |colspan="2" style="border-top-left-radius: 15px;; width:30%; background:{{Color1}}; border:solid {{Color2}} 3px;"|[[File:FESS Eirika.png|165px|center]] | ||
|colspan="2" style="width:40%; background:{{Color3}}; text-align:center" valign="top"|<font | |colspan="2" style="width:40%; background:{{Color3}}; text-align:center" valign="top"|<font | ||
size=5>'''Winner!!'''</font><br><font size=3>'''''Eirika'''''[[File:FESS Eirika.png|160px|center]]<br>''15 > 13½''</font><br> | size=5>'''Winner!!'''</font><br><font size=3>'''''Eirika'''''[[File:FESS Eirika.png|160px|center]]<br>''15 > 13½''</font><br> | ||
|colspan="2" style=" | |colspan="2" style="border-top-right-radius: 15px;; width:30%; background:{{Color1}}; border:solid {{Color2}} 3px;"|[[File:FESS Ephraim.png|165px|center]] | ||
|- | |- | ||
|style="width:100%; border: solid {{Color2}} 1px; background:{{Color1}}; padding:5px" colspan="6"|The main siblings from ''The Sacred Stones''. Which should become the ruler of Renais? | |style="width:100%; border: solid {{Color2}} 1px; background:{{Color1}}; padding:5px" colspan="6"|The main siblings from ''The Sacred Stones''. Which should become the ruler of Renais? | ||
| Line 449: | Line 449: | ||
<!-- DO NOT ADD COMMENTS OR EDIT ANYTHING BELOW THIS LINE!!! --> | <!-- DO NOT ADD COMMENTS OR EDIT ANYTHING BELOW THIS LINE!!! --> | ||
|- | |- | ||
|colspan=6 style=" | |colspan=6 style="border-bottom-left-radius: 15px; border-bottom-right-radius: 15px;; background:{{Color1}}; padding:5px;"| | ||
===Comments=== | ===Comments=== | ||
| Line 460: | Line 460: | ||
==Locations== | ==Locations== | ||
{| class="cellpadding-3" style="border-spacing: 0; | {| class="cellpadding-3" style="border-spacing: 0; border-radius: 20px;; border:3px solid {{Color2}}; background-color: {{Color3}}; text-align: center" | ||
|- style=" | |- style="border-top-left-radius: 15px; border-top-right-radius: 15px; background:{{Color1}}; text-decoration: underline; font-style:italic" | ||
!width=125px style=" | !width=125px style="border-top-left-radius: 15px;; border:none"|Method | ||
!width=250px style=" | !width=250px style="border-top-right-radius: 15px;; border:none"|Data | ||
|- | |- | ||
{{#if:{{{game1|}}}| | {{#if:{{{game1|}}}| | ||
| Line 469: | Line 469: | ||
{{!-}} | {{!-}} | ||
{{#if: {{{method1|}}}| | {{#if: {{{method1|}}}| | ||
{{!}} style=" | {{!}} style="background: {{Color3}}" {{!}} {{{1method1|}}} | ||
{{!}} style=" | {{!}} style="background: {{Color3}}" {{!}} {{{1data1|}}} | }} | ||
{{!-}} | {{!-}} | ||
{{#if: {{{method2|}}}| | {{#if: {{{method2|}}}| | ||
{{!}} style=" | {{!}} style="background: {{Color3}}" {{!}} {{{1method2|}}} | ||
{{!}} style=" | {{!}} style="background: {{Color3}}" {{!}} {{{1data2|}}} | }} | ||
{{!-}} | {{!-}} | ||
{{#if: {{{method3|}}}| | {{#if: {{{method3|}}}| | ||
{{!}} style=" | {{!}} style="background: {{Color3}}" {{!}} {{{1method3|}}} | ||
{{!}} style="border: none background: {{Color3}}" {{!}} {{{1data3|}}} | }} | {{!}} style="border: none background: {{Color3}}" {{!}} {{{1data3|}}} | }} | ||
{{!-}} | {{!-}} | ||
{{#if: {{{method4|}}}| | {{#if: {{{method4|}}}| | ||
{{!}} style=" | {{!}} style="background: {{Color3}}" {{!}} {{{1method4|}}} | ||
{{!}} style=" | {{!}} style="background: {{Color3}}" {{!}} {{{1data4|}}} | }} | ||
{{!-}} | {{!-}} | ||
{{#if: {{{method5|}}}| | {{#if: {{{method5|}}}| | ||
{{!}} style=" | {{!}} style="background: {{Color3}}" {{!}} {{{1method5|}}} | ||
{{!}} style=" | {{!}} style="background: {{Color3}}" {{!}} {{{1data5|}}} | }} | ||
{{!-}} | {{!-}} | ||
{{#if: {{{method6|}}}| | {{#if: {{{method6|}}}| | ||
{{!}} style=" | {{!}} style="background: {{Color3}}" {{!}} {{{1method6|}}} | ||
{{!}} style=" | {{!}} style="background: {{Color3}}" {{!}} {{{1data6|}}} | }} | ||
{{!-}} | {{!-}} | ||
{{#if: {{{method7|}}}| | {{#if: {{{method7|}}}| | ||
{{!}} style=" | {{!}} style="background: {{Color3}}" {{!}} {{{1method7|}}} | ||
{{!}} style=" | {{!}} style="background: {{Color3}}" {{!}} {{{1data7|}}} | }} | ||
{{!-}} | {{!-}} | ||
{{#if: {{{method8|}}}| | {{#if: {{{method8|}}}| | ||
{{!}} style=" | {{!}} style="background: {{Color3}}" {{!}} {{{1method8|}}} | ||
{{!}} style=" | {{!}} style="background: {{Color3}}" {{!}} {{{1data8|}}} | }} | ||
{{!-}} | {{!-}} | ||
{{#if: {{{method9|}}}| | {{#if: {{{method9|}}}| | ||
{{!}} style=" | {{!}} style="background: {{Color3}}" {{!}} {{{1method9|}}} | ||
{{!}} style=" | {{!}} style="background: {{Color3}}" {{!}} {{{1data9|}}} | }} | ||
{{!-}} | {{!-}} | ||
{{#if: {{{method10|}}}| | {{#if: {{{method10|}}}| | ||
{{!}} style=" | {{!}} style="background: {{Color3}}" {{!}} {{{1method10|}}} | ||
{{!}} style="border: none background: {{Color3}}" {{!}} {{{1data10|}}} | }}}} | {{!}} style="border: none background: {{Color3}}" {{!}} {{{1data10|}}} | }}}} | ||
|- | |- | ||
| Line 576: | Line 576: | ||
{{!}}style="background-color:{{Color1}}" {{!}} {{{game11|}}}}} | {{!}}style="background-color:{{Color1}}" {{!}} {{{game11|}}}}} | ||
{{#if:{{{notes11|}}}| | {{#if:{{{notes11|}}}| | ||
{{!}}style=" | {{!}}style="border-bottom-right-radius: 15px;; background-color:{{Color1}}" {{!}} {{{notes11|}}}}} | ||
|- | |- | ||
{{#if:{{{game12|}}}| | {{#if:{{{game12|}}}| | ||
| Line 588: | Line 588: | ||
{{!}}style="text-align:left; background-color:{{Color3}}" colspan="2" {{!}} {{{game13|}}} | {{!}}style="text-align:left; background-color:{{Color3}}" colspan="2" {{!}} {{{game13|}}} | ||
{{!-}} | {{!-}} | ||
{{!}}style=" | {{!}}style="border-bottom-left-radius: 15px;; background-color:{{Color1}}" {{!}} {{{game13|}}}}} | ||
{{#if:{{{notes13|}}}| | {{#if:{{{notes13|}}}| | ||
{{!}}style=" | {{!}}style="border-bottom-right-radius: 15px;; background-color:{{Color1}}" {{!}} {{{notes13|}}}}} | ||
|- | |- | ||
{{#if:{{{gameo|}}}| | {{#if:{{{gameo|}}}|<includeonly>[[Category:Pages using gameo or gamee]]</includeonly> | ||
{{!}}style="text-align:left; background-color:{{Color3}}" colspan="2" {{!}} {{{gameo|}}} | {{!}}style="text-align:left; background-color:{{Color3}}" colspan="2" {{!}} {{{gameo|}}} | ||
{{!-}} | {{!-}} | ||
{{!}}style=" | {{!}}style="border-bottom-left-radius: 15px;; background-color:{{Color1}}" {{!}} {{{gameo|}}}}} | ||
{{#if:{{{noteso|}}}| | {{#if:{{{noteso|}}}| | ||
{{!}}style=" | {{!}}style="border-bottom-right-radius: 15px;; background-color:{{Color1}}" {{!}} {{{noteso|}}}}} | ||
|- | |- | ||
{{#if:{{{gamee|}}}| | {{#if:{{{gamee|}}}|<includeonly>[[Category:Pages using gameo or gamee]]</includeonly> | ||
{{!}}style="text-align:left; background-color:{{Color3}}" colspan="2" {{!}} {{{gamee|}}} | {{!}}style="text-align:left; background-color:{{Color3}}" colspan="2" {{!}} {{{gamee|}}} | ||
{{!-}} | {{!-}} | ||
{{!}}style=" | {{!}}style="border-bottom-left-radius: 15px;; background:{{Color1}}" {{!}} {{{gamee|}}}}} | ||
{{#if:{{{notese|}}}| | {{#if:{{{notese|}}}| | ||
{{!}}style=" | {{!}}style="border-bottom-right-radius: 15px;; background-color:{{Color1}}" {{!}} {{{notese|}}}}} | ||
|} | |} | ||
=Main page= | =Main page= | ||
{| class="cellpadding-5" align="center" | {| class="cellpadding-5" align="center" style="width:100%; border-spacing: 5px; border-radius: 10px;; background:{{Color1}}; border: 2px solid {{Color2}}" | ||
| class="bgimage" style=" | | class="bgimage" style="border-top-left-radius: 10px; border-top-right-radius: 10px; background-color: {{Color3}}; border: 1px solid {{Color2}};" colspan="2" width=100%" | | ||
{| style="float:center; background: transparent;" | {| style="float:center; background: transparent;" | ||
| <div style="font-size:200%;border:none;text-align:center;margin: 0;padding:.1em"> | | <div style="font-size:200%;border:none;text-align:center;margin: 0;padding:.1em"> | ||
| Line 618: | Line 618: | ||
| | | | ||
* [[:Category:Characters|Characters]] | * [[:Category:Characters|Characters]] | ||
* [[:Category:Supports|Supports]] | * [[:Category:Supports|Supports]] | ||
| | | | ||
| Line 651: | Line 650: | ||
<center>{{title|Ankoku Ryuu to Hikari no Tsurugi}} ~ [[Fire Emblem Gaiden|''Gaiden'']] ~ {{title|Monshou no Nazo}} ~ {{title|Seisen no Keifu}} ~ {{title|Thracia 776}} ~ {{title|Fuuin no Tsurugi}}<br>{{FE7}} ~ {{title|The Sacred Stones}} ~ {{title|Path of Radiance}} ~ {{title|Radiant Dawn}} ~ {{title|Shadow Dragon}}<br>{{title|Shin Monshou no Nazo, Hikari to Kage no Eiyuu}} ~ {{title|Awakening}}</center> | <center>{{title|Ankoku Ryuu to Hikari no Tsurugi}} ~ [[Fire Emblem Gaiden|''Gaiden'']] ~ {{title|Monshou no Nazo}} ~ {{title|Seisen no Keifu}} ~ {{title|Thracia 776}} ~ {{title|Fuuin no Tsurugi}}<br>{{FE7}} ~ {{title|The Sacred Stones}} ~ {{title|Path of Radiance}} ~ {{title|Radiant Dawn}} ~ {{title|Shadow Dragon}}<br>{{title|Shin Monshou no Nazo, Hikari to Kage no Eiyuu}} ~ {{title|Awakening}}</center> | ||
|- | |- | ||
| style="background: {{Color3}}; border: 1px solid {{Color2}};" width="385px" valign="top" | <div | | style="background: {{Color3}}; border: 1px solid {{Color2}};" width="385px" valign="top" | <div style="text-align:center; font-size:20px;">'''News'''</div> | ||
{{News}} | {{News}} | ||
| style="background: {{Color3}}; border: 1px solid {{Color2}};" width="385px" valign="top" | <div | | style="background: {{Color3}}; border: 1px solid {{Color2}};" width="385px" valign="top" | <div style="text-align:center; font-size:20px;">'''Featured Article'''</div> | ||
{{FeaturedArticle}} | {{FeaturedArticle}} | ||
|- | |- | ||
| style="background: {{Color3}}; border: 1px solid {{Color2}};" width="385px" valign="top" | <div | | style="background: {{Color3}}; border: 1px solid {{Color2}};" width="385px" valign="top" | <div style="text-align:center; font-size:20px;">'''Poll'''</div> | ||
{{Poll}} | {{Poll}} | ||
| style="background: {{Color3}}; border: 1px solid {{Color2}};" width="385px" valign="top" | <div | | style="background: {{Color3}}; border: 1px solid {{Color2}};" width="385px" valign="top" | <div style="text-align:center; font-size:20px;">'''Help Fire Emblem Wiki!'''</div><br> | ||
{{Help}} | {{Help}} | ||
|- | |- | ||
| colspan="2" style=" | | colspan="2" style="border-bottom-left-radius: 10px; border-bottom-right-radius: 10px; border: 1px solid {{Color2}};background: {{Color3}};" | | ||
{{NIWA}} | {{NIWA}} | ||
|} | |} | ||
Latest revision as of 22:07, 22 June 2022
Manga
| Fire Emblem manga | ||||||||||||||||||||||||||||||||||||||||
|---|---|---|---|---|---|---|---|---|---|---|---|---|---|---|---|---|---|---|---|---|---|---|---|---|---|---|---|---|---|---|---|---|---|---|---|---|---|---|---|---|
| ||||||||||||||||||||||||||||||||||||||||
Hasha no Tsurugi
| Hasha no Tsurugi | |||||||||
|---|---|---|---|---|---|---|---|---|---|
| |||||||||
Group peoples
|
| ||||||||||
Lilina |
Lilina |
Lilina |
Lilina |
Lilina | ||||||
Lilina |
Lilina |
Lilina |
Lilina |
Lilina | ||||||
Stuff from MetW
| ||||
| ||||

Class change
Normal
| Basic class | Promotion method | Promoted class |
|---|---|---|
| Using an Orion's Bolt after reaching Level 10. | ||
| Archer | Sniper |
Neo-Normal
| Basic class | Promotion method | Promoted class | ||||
|---|---|---|---|---|---|---|
|
Using an Orion's Bolt after reaching Level 10. |
|
Three
| Trainee class | Promotion method | Basic class | Promotion method | Promoted class |
|---|---|---|---|---|
| Reaching level 10, and choosing at beginning of next battle. | Using a Guiding Ring after reaching Level 10. | |||
| Pupil | Mage | Sage |
Split
| Basic class | Promotion method | Promoted classes |
|---|---|---|
| Using an Orion's Bolt after reaching Level 10. | ||
| Sniper | ||
| Archer | Ranger |
Merge
| Basic classes | Promotion method | Promoted class |
|---|---|---|
| Using a Guiding Ring after reaching Level 10. | ||
| Monk | ||
| Cleric | Bishop |
FE10
| Basic class | Promotion method | Promoted class | Promotion method | Promoted class |
|---|---|---|---|---|
| Reaching level 10, and choosing at beginning of next battle. | Using a Guiding Ring after reaching Level 10. | |||
| Pupil | Mage | Sage |
Fourway
| Trainee class | Promotion method | Basic class | Promotion method | Promoted class | Promotion method | Promoted class |
|---|---|---|---|---|---|---|
| ... | ... | ... | 
| |||
| Villager | Cavalier | Paladin | Gold Knight |
Amelia-like
| Trainee class | Promotion method | Promoted classes | Promotion method | Promoted classes |
|---|---|---|---|---|
| Reaching level 10, and choosing at beginning of next battle. | Reaching level 10, and choosing at beginning of next battle. | |||
| General | ||||
| Knight | ||||
| Great Knight | ||||
| Recruit | Cavalier | Paladin |
Amelia-like test
| Trainee class | Promotion method | Promoted classes | Promotion method | Promoted classes |
|---|---|---|---|---|
| Reaching level 10, and choosing at beginning of next battle. | Reaching level 10, and choosing at beginning of next battle. | |||
| General | ||||
| Knight | ||||
| Great Knight | ||||
| Recruit | Cavalier | Paladin |
Test
|
| ||||||||||||||
|---|---|---|---|---|---|---|---|---|---|---|---|---|---|---|
| ||||||||||||||

project idea

|
Project Classes Leader: SuperAlpaca Main - Talk Destubbing progress - Wanted pages - Link |
The Arena
Week 1: Eirika v. Ephraim
 |
Winner!! Eirika 15 > 13½ |
 | |||
| The main siblings from The Sacred Stones. Which should become the ruler of Renais? | |||||
Votes for EirikaAnonymous Votes
|
Votes for Ephraim
Anonymous Votes
| ||||
CommentsOMFG COMMENTS!
| |||||
Locations
| Method | Data |
|---|
Main page
Fire Emblem: The Blazing Blade ~ The Sacred Stones ~ Path of Radiance ~ Radiant Dawn ~ Shadow Dragon Shin Monshou no Nazo, Hikari to Kage no Eiyuu ~ Awakening | |||||||||||||||||||
News
|
Featured Article
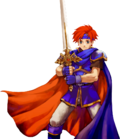 Roy (pronounced /ɹɔɪ/[key]; Japanese: ロイ Roy) is the son of Marquess Eliwood of Lycia's House Pherae. In the Disturbance of Bern, he was entrusted with the leadership of Pherae's army in opposing the invading Kingdom of Bern in lieu of Eliwood's illness, later becoming the leader of the Lycian army as a whole following the death of Hector of Ostia, and ultimately assuming command of the Etrurian army. He sought to assist Bern's Princess Guinivere in finding a peaceful resolution to the war, to prevent King Zephiel's ambitions of exterminating humans and returning Elibe to the rule of dragons. Roy is the main character of Fire Emblem: The Binding Blade, also appearing briefly as a child in the extended epilogue of Fire Emblem: The Blazing Blade and as a bonus character in Fire Emblem Awakening. He is also a playable character in Super Smash Bros. Melee, Super Smash Bros. for Nintendo 3DS and Wii U as downloadable content, and Super Smash Bros. Ultimate. Read more... | ||||||||||||||||||
Poll
|
Help Fire Emblem Wiki! Fire Emblem Wiki needs a lot of help and assistance.
1,523 pages are stubs!
| ||||||||||||||||||
| |||||||||||||||||||


