Tempest of Swords and Shields/Protecting Garreg Mach
| ||||||||
|
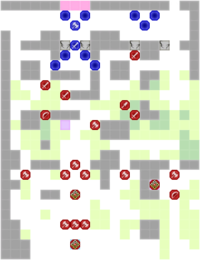
Protecting Garreg Mach (Japanese: ガルグ=マク籠城戦 Siege Battle of Garg Mach) is the main battle map of the fifteenth chapter of the Crimson Flower route in Fire Emblem: Three Houses. In this map, the Black Eagle Strike Force defends Garreg Mach Monastery from being retaken from the Knights of Seiros.
Beginning log
Absorbing the Alliance brings the Empire one step closer to a unified Fódlan. The Black Eagle Strike Force returns to Garreg Mach to plan its invasion of the Kingdom, unaware of the enemy lurking in the shadows.
Map data
Normal Hard Maddening
Flayn only needs to be defeated if she appears; if the other three bosses are defeated before then, the map will end as normal.
Character data
| Characters | |
|---|---|
New units
| |
| |
Required characters
| |
 
| |
Available characters
| |
                            
|
Item data
| ||||||||||||
|
Enemy data
Normal Hard Maddening
| |||||||||||||||||||||||||||||||||||||||||||||||||||||||||||||||||||||||||||||||||||||||||||||||||||||||||||||||||||||||||||||||||||||||||||||||||||||||||||||||||||||||||||||||||||||||||||||||||||||||||||||||||||||||||||||||||||||||||||||||||||||||||||||||||||||||||||||||||||||||||||||||||||||||||||||||||||||||||||||||||||||||||||||||||||||||||||||||||||||||||||||||||||||||||||||||||||||||||||||||||||||||||||||||||||||||||||||||||||||||||||||||||||
| |||||||||||||||||||||||||||||||||||||||||||||||||||||||||||||||||||||||||||||||||||||||||||||||||||||||||||||||||||||||||||||||||||||||||||||||||||||||||||||||||||||||||||||||||||||||||||||||||||||||||||||||||||||||||||||||||||||||||||||||||||||||||||||||||||||||||||||||||||||||||||||||||||||||||||||||||||||||||||||||||||||||||||||||||||||||||||||||||||||||||||||||||||||||||||||||||||||||||||||||||||||||||||||||||||||||||||||||||||||||||||||||||||
| |||||||||||||||||||||||||||||||||||||||||||||||||||||||||||||||||||||||||||||||||||||||||||||||||||||||||||||||||||||||||||||||||||||||||||||||||||||||||||||||||||||||||||||||||||||||||||||||||||||||||||||||||||||||||||||||||||||||||||||||||||||||||||||||||||||||||||||||||||||||||||||||||||||||||||||||||||||||||||||||||||||||||||||||||||||||||||||||||||||||||||||||||||||||||||||||||||||||||||||||||||||||||||||||||||||||||||||||||||||||||||||||||||
Reinforcements
- After (Normal/Hard)/Upon (Maddening) reaching the third fence from the center (entering columns 6–12, rows 10–16), or upon defeating both Alois and Shamir or their replacements
- 1 (Normal/Hard)/2 (Maddening) Fortress Knight(s) from north of the center edifice
- 1 Hero from north of the center edifice (Hard only)
- 1 Warrior from left of the western Onager
- 1 Fortress Knight from south of the western Onager (Hard only)
- 1 Sniper from the center of the map (Hard/Maddening only)
- 1 Warlock from the center of the map
- 1 Pegasus Knight from the center of the map
- 1 Warlock with a battalion from the center of the map (Maddening only)
- After (Normal/Hard)/Upon (Maddening) reaching the cracked roads on the east (entering columns 13–20, rows 10–16), or upon defeating both Alois and Shamir or their replacements; will not appear if Flayn has already appeared to the south
- Flayn from the eastern thickets
- 1 Assassin from north of the center edifice (Hard/Maddening only)
- 1 Hero from the eastern forests
- 1 Warrior from the central forests
- 1 Pegasus Knight just north of Flayn
- 1 Sniper from east of the center edifice
- 1 Warlock from south of Flayn (Hard and Maddening)
- 1 Pegasus Knight from east of the center edifice (Hard and Maddening)
- 1 Bishop from southwest of Flayn (Maddening only)
- 1 Assassin with a battalion from north of Flayn (Maddening only)
- After (Normal/Hard)/Upon (Maddening) passing the southern ramparts (entering rows 18–26); will not appear if Flayn has already appeared to the east
- Flayn from forests northeast of Seteth
- 1 Assassin from northwest of Flayn (Hard/Maddening)
- 1 Hero from southeast of Flayn
- 1 Warrior from west of Flayn
- 1 Pegasus Knight from northwest of Flayn
- 1 Sniper form northeast of Flayn
- 1 Warlock from southeast of Flayn (Hard/Maddening)
- 1 Pegasus Knight from southeast of Flayn (Hard/Maddening)
- 1 Bishop from east of Flayn (Maddening only)
- 1 Assassin with a battalion from south of Flayn (Maddening only)
Boss data
- Main article:
Seteth
Normal Hard Maddening
|
|
| |||||||||||||||||||||||||||||||||||||||||||||||||||||||||||||||||||||||||||||||||||
- Main article:
Flayn
Normal Hard Maddening
|
|
| |||||||||||||||||||||||||||||||||||||||||||||||||||||||||||||||||||||||||||||||||||
If Alois was not recruited If Alois was recruited
- Main article:
Alois
Normal Hard Maddening
|
|
| |||||||||||||||||||||||||||||||||||||||||||||||||||||||||||||||||||||||||||||||||||
If Shamir was not recruited If Shamir was recruited
- Main article:
Shamir
Normal Hard Maddening
|
|
| |||||||||||||||||||||||||||||||||||||||||||||||||||||||||||||||||||||||||||||||||||
Strategy
Maddening
Maddening strategy (can be completed on a normal play through without NG+):
Recommended personnel: Byleth (default), Edelgard (default), Jeritza, Snipers x2 (preferably both will have Hunter’s Volley), Dancer x1, Healer x1, Assassin/High Avoid Unit x1, Dark Bishop/Gremory/Warlock x1, Secondary Healer x1 (someone with long-range healing abilities, Mercedes, Dorothea, Manuela, etc.)
Recommended equipment/gambits/combat arts: Deadeye/Meteor/Bolting, Hunter’s Volley (mastered Sniper class), Warp/Rescue, Sword of the Creator (fully repaired), Draw Back/Reposition/Swap (for two or three characters), Evasion Ring, Accuracy Rings
If you have Leonie and Lindhardt and have yet to complete The Legend of the Lake paralogue, then you’ll need to defeat both Flayn and Seteth with Byleth in order to keep this paralogue. This strategy will proceed with the plan of Byleth defeating both. During the second turn, Hubert will warn of enemies transporting large quantities of flammable materials and that the enemy may be thinking to use a large fire attack on our heroes (this will occur on the 12th turn). This strategy will also prevent this from occurring. Lastly, it should be noted that none of the items carried by Seteth or Flayn can be stolen.
The battle will begin with a warning from Hubert on the layout of the enemies and the possibility of hidden enemies (we’re going to avoid this as long as possible). Edelgard will then state to form a defensive line and repel all attackers, which is what we will do with our group on the left.
For the group on your right, consider deploying Jeritza, your high avoid character, and your Warp/Rescue character (this may also be your healer). When the battle begins move Byleth to the group on the right as Flayn is hiding on the right side of the map. Following the initial attacks from the enemies on the left, move one of your Snipers to your group on the right.
Heed Edelgard’s advice and have your left group focus on defeating all approaching enemies but do so while staying within the nearby fences and avoiding the wooded area in the middle of the map (if you enter this area, a large group of reinforcements will appear). A good tactic to employ for later chapters is to have someone with a long-range attack available (Deadeye, Meteor, Bolting). These abilities can be used on an enemy who will only approach when you move within their range or they’re attacked. Attacked does not mean the ability you use needs to actually hit the enemy, which is where Deadeye can become invaluable as the attack doesn’t usually hit but can aggro enemies towards your larger group and with bows cheap and in large supply you can use this combat art without expending the use of a valuable spell like Meteor.
The right side of the map looks deceptively empty but if one of your character lands on one of the spaces just south of where the road/sidewalk ends, Flayn will appear with a large group of reinforcements that contains Pegasus Knights, Heroes, Assassins, and a Warlock. To not leave one of your characters on an island, either Warp a character that is not impeded by terrain (Byleth as the Enlightened One, Petra as an Assassin, etc.) to this spot or move a character there and then use the Rescue spell to bring them back to safety. If neither one of these tactics is available, you can also use the Impregnable Wall gambit on this unit prior to moving them to this space. This hidden group that appears is automatically aggro, so move all of your units just outside of their attack range and dispatch of them as you see fit (it helps to have one of your Hunter’s Volley archers with this group at this point). Remember to defeat Flayn with Byleth if you still want to play The Legend of the Lake paralogue. Lastly, make sure to not move any of these character to the wooded area in the middle of the map.
Flayn isn’t difficult and will usually go down with one hit from Sublime Heaven. However, if she does not or Miracle activates, use Divine Pulse, take an action with a different unit (move, use a gambit, attack a different enemy, etc.) then try Sublime Heaven again.
Once the hidden enemies on the right and Flayn are all defeated, move your group on the right further south as our focus now is defeating Alois (or if he was recruited, a enemy War Master) stationed at the onager. The group on the left will continue to hold their position and defeat any enemies that approach. Once again, avoid the wooded area in the center of the map.
As you approach Alois/War Master you will take a hit or two from the onager. Make sure your lower defense units are outside of its range as it can kill them on a single hit. Utilize the defensive terrain as you approach to increase your chances of the onager missing. Alois is not difficult to defeat as he has no ranged attack options. Two hits from the Sword of the Creator should be enough.
This part is extremely important. Once the onager is secured, use it to kill Shamir/Boss Sniper just north of Seteth. It will likely take two hits to do this. Once Shamir/Sniper is defeated, Seteth will announce that his ambush plans have been thwarted. All hidden enemies will then appear and the fire attack will not occur (this is extremely satisfying). On the next enemy turn, all remaining enemies, including Seteth, will approach the nearest character to them. Use one of your characters to aggro Seteth near Byleth, then attack him until he can be defeated by Byleth.
Etymology and other languages
| Names, etymology, and in other regions | ||
|---|---|---|
| Language | Name | Definition, etymology, and notes |
| English |
Protecting Garreg Mach |
-- |
| Japanese |
ガルグ=マク籠城戦 |
Siege Battle of Garg Mach |
| Spanish |
La defensa de Garreg Mach |
The defense of Garreg Mach |
| French |
Le siège de Garreg Mach |
The siege of Garreg Mach |
| German |
Verteidigung Garreg Machs |
Defending Garreg Mach |
| Italian |
Assedio al Garreg Mach |
Siege of Garreg Mach |
| Korean |
가르그 마크 농성전 |
Garreg mach defense |
| Simplified Chinese |
加尔古·玛库围城战 |
Garreg Mach siege battle |
| Traditional Chinese |
加爾古‧瑪庫圍城戰 |
Garreg Mach siege battle |
Gallery
This section has been marked as a stub. Please help improve the page by adding information.
| ← Capturing Derdriu • | Protecting Garreg Mach | • The Siege of Arianrhod → |
|---|


