| This page has been marked as a stub. Please help improve the page by adding information.
|
| The Fiend's Lair
|
|
|
|
|
|
| “
|
All right. Farden, kill the children who have escaped. Show the people who are still left what will happen if they try to run.
|
”
|
— Raydrik to Farden
|
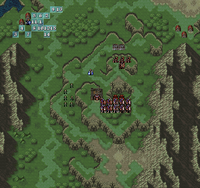
The Palace of Evil (Japanese: 魔王の城 The Demon King's Castle) is the twenty-third chapter of Fire Emblem: Thracia 776.
Plot
- Main article: The Palace of Evil/Script
Leif's army approaches Munster as its citizens try to flee, but even though Ced is in the city, he cannot protect those citizens himself. He leaves the task to Saias, who volunteers to help, and also asks Saias to give Leif the Bragi Sword, as he will need it to break Raydrik's defenses of the Loptr Sword. Raydrik sends Farden to hunt down the citizens escorted by Saias, and in the chaos, Altena and Coulter arrive, with Coulter carrying out an immediate attempt to seize Munster as per King Travant's orders. Altena tries to protest and change her father's mind, but to no avail.
Eventually, Leif reaches Munster, and as he does, Ced kills Alphand – the Loptian defending the castle – and seizes the gates in preparation for Leif's arrival. Leif can then talk to Ced, and if he does, Ced joins his forces. Saias also gives Leif the Bragi Sword either during the battle, if Leif talks to him, or after the battle, if Leif does not talk to him. Once the battle ends, Saias leaves for the Tower of Bragi and promises to pray for Leif – but if Leif did not recruit Ced, Saias instead stays with his army to help it for some time.
Chapter data
|
|
|
|
|
| Victory: Seize the gate
|
Player
|
Partner
|
Other
|
Enemy
|
Third
|
| Defeat: Leif or Ced dies
|
8–16+2
|
{{{partner}}}
|
6+1-1
|
17+107
|
{{{third}}}
|
|
|
|
|
Units are arranged based on their position in deployment order after Leif.
Character data
- Saias does not receive bonuses from authority from Leif's forces, nor does he provide them. He does receive and provide bonuses in the following chapters.
- If Ced is recruited or any of the Civilians are killed or captured, Saias will leave at the end of the chapter.
Item data
|
|
|
|
Name
|
Obtainment Method
|

|
Vulnerary
|
Visit left house
|

|
Pure Water
|
Visit middle house
|

|
Physic
|
Visit right house
|

|
Bragi Sword
|
Talk to Saias with Leif, or at the end of the chapter if Leif did not talk to Saias and Saias is alive and uncaptured
|
|
Enemy data
- Stats with two figures separated by a ~ are presented as a range, representing stats that vary due to random growths. The figures to the left and right of the ~ are the stat's minimum and maximum possible values respectively.
- Enemies will not attack the civilians, except to capture them.
Reinforcements
- Turn 2; halted if a player unit enters the plateau surrounding the castle (columns 14–24, rows 12–19)
- Turn 3
- One Thief from the northeast corner of the map
- Turns 3–10
- One Great Knight from the left fortress
- One Duke Knight from the right fortress
- Up to ten Dark Mages, each with a 25% chance to appear each turn, from various spots on the map:
- From near the western mountains (column 3, row 23)
- From south of the player's starting location (column 4, row 12)
- From the southern edge of the cliffs (column 10, row 26)
- From the southern edge of the map (column 17, row 28)
- From near the gate (column 16, row 16)
- From south of the Poison Ballistae (column 18, row 11)
- From east of the Ballistae (column 23, row 10)
- From northwest of the eastern houses (column 23, row 2)
- From west of the eastern houses (column 26, row 6)
- From east of the player's starting location (column 13, row 5)
NPC data
Reinforcements
- After a unit enters the plateau surrounding the castle (columns 14–24, rows 12–19); halted upon Alphand being defeated
Boss data
- Main article: Alphand
Strategy
| This section details unofficial strategies that may help with completion of the chapter. This may not work for everybody.
|
At the start of this chapter, the High Priest named Saias, whom you previously saw as an enemy in earlier chapters, is now on your side, volunteering to escort six NPC civilians to safety at the request of Ced. Compared to when he was an enemy unit (where he had 10 leadership stars granting a whopping +30 hit and avoid to everyone in the army), Saias only has five (three after this chapter) leadership stars as a playable character, granting only +15 (later +9) hit/avoid. Saias's main objective during this chapter is to speak to Leif, so that he can give him the Bragi Sword, a sacred blade which negates the damage-halving effect of Raydrik's Loptr Sword. Saias starts very close to the enemy forces, most of whom are cavalry, meaning they can quickly reach him and the civilians. If you want Saias to stay in your party, you also have the additional task of keeping all of the NPC civilians alive and uncaptured; Saias cannot defend the chokepoint to block their advance on his own, as he is very liable to being one-shotted. It is highly recommended to warp your strongest unit to block the chokepoint so that Saias and the civilians can flee to safety. You can also use a Rescue staff to bring Saias over to Leif to get him out of harm's way.
There are two Dark Mages wielding Sleep staves on this map. Use your own status staves to sleep/silence them to prevent them from interfering. Dark Mage reinforcements will also appear in random undiscernible spots around the map. The boss Alphand will get a Poison tome starting from turn 5, so don't dawdle too much.
If a player unit enters a certain range surrounding the castle, a scripted event will trigger, in which Ced will kill Alphand with a critical hit from his Forseti. After that, he will remain on the gate for the remainder of the map. While he is in range of the ballista, the defense and avoid bonuses granted by the gate (even before accounting for the +10 speed offered by Forseti) makes it nigh impossible for him to be scratched. Saias starts close enough to the castle that he can trigger the event, however, it is not recommended for him to trigger it, as he will not only be standing within range of the ballistae, but it will also provoke the squad of Thracian Wyvern Lords waiting at the eastern mountain range to attack, making it more likely for them to capture the civilians and kill Saias before he can reach Leif's party.
During this chapter, you have a choice to have only one of two units to accompany you for the rest of your journey: Saias or Ced. Ced is a Wind-specialist Sage armed with the powerful Forseti tome, making him bar-none one of the strongest combat units in the game and is a solid support unit in his own right with his A rank in staves; recruiting him will make Saias leave however, so it is recommended to give Saias's inventory to someone else if you decide to recruit Ced. Saias is a High Priest who, while his combat is not even close to matching Ced's, offers multiple leadership stars to boost the hit/avoid of everyone in your team. Saias will also provide a hint in the next chapter on how you can recruit Galzus if he stays. If you desire to keep Saias, then you need someone to move Ced out of the way via rescuing, since he is occupying the gate that Leif needs to seize to complete the chapter.
Note that this is the last map in the game that takes place outdoors. This is something important to note, as all of your mounted units will be forced to permanently dismount in the next chapter onwards, undoing the main advantage that they have over infantry units: high movement and Canto. Additionally, as a result of the enforced dismounting, all of your mounted units who specialize in using axes or lances will be forced to use only swords for the remainder of the game; most of them have very low weapon ranks in swords, which may harm their combat capabilities.
Etymology and other languages
| Names, etymology, and in other regions
|
| Language
|
Name
|
Definition, etymology, and notes
|
English
(unofficial)
|
• The Palace of Evil
• The Fiend's Lair
|
• Used in FireLizard's translation.
• Used in the Lil' Manster fan translation patch.
|
| Japanese
|
魔王の城
|
The Demon King's Castle
|
|
|
Gallery
This section has been marked as a stub. Please help improve the page by adding information.
