| Site News |
|---|
| Warning: This wiki contains spoilers. Read at your own risk! Social media: If you would like, please join our Discord server, and/or follow us on Twitter (X) or Tumblr! |
The Ostian Revolt: Difference between revisions
m (→Gallery) |
Thecornerman (talk | contribs) m (Text replacement - "([Ll])evel (\d+)" to "$1evel $2") |
||
| (78 intermediate revisions by 15 users not shown) | |||
| Line 1: | Line 1: | ||
{{Chapter Infobox | {{Chapter Infobox | ||
|image=[[File:Cm fe06 7.png|200px]] | |||
|image=[[File: | |||
|location=[[Ostia]] | |location=[[Ostia]] | ||
|new units=[[ | |new units=[[Zelot]], [[Trec]], [[Noah]] | ||
|boss=[[ | |boss=[[Debias]] | ||
|previous=[[Ensnared]] | |||
|next=[[Reunion (The Binding Blade)|Reunion]] | |||
}} | |||
''' | {{Quote|Get ready for combat, soldiers! We will retake Ostia!|[[Roy]]}} | ||
'''The Ostian Revolt''' (Japanese: {{hl|オスティアの反乱|Osutia no hanran}} ''Ostian revolt'') is the seventh chapter in {{FE6}}. In this chapter, the Lycian League Army must make its way through the city of [[Ostia]] to reach its castle, taken by the rebels. | |||
==Plot== | ==Plot== | ||
{{main| | {{main|The Ostian Revolt/Script}} | ||
[[Roy]]'s forces enter [[Ostia]] after he learns of a rebellion orchestrated by General [[Leygance]] and his lieutenant, [[Debias]]. [[Lilina]] is kept hostage inside the castle, and is the primary motivation for Roy coming here. | |||
Leygance | As Roy's troops arrive, Leygance and Debias discuss a group of [[Hector]]'s Ilian mercenaries that keeps fighting them. They intend to beat the mercenaries into submission and potentially use Lilina's hostage status as a last resort. Leygance then enters the castle interior, leaving Debias behind. | ||
[[Merlinus]] tells Roy that even though most Ostian troops have joined the rebellion out of fear, a group of Ilian mercenaries remains loyal to Hector, as Ilian mercenaries have a code of never betraying their employers. Merlinus has also learned that one of [[Bern]]'s Wyvern Generals is going to arrive in Ostia alongside a legion of wyvern riders. Roy realizes they have no hope of fighting a Wyvern General on their own and suggests asking the Etrurian Mage General, [[Cecilia]], for help, as she is his former tactics teacher and will most likely answer the call. Merlinus claims that doing so will put Lycia in a bad political position, but Roy counters by saying Lycia may not have a future if they do not successfully defend it now. He then reveals that he has already written a letter to Cecilia, but has yet to send it. Merlinus caves in and sends it. | |||
The battle begins, and as it starts, the Ilian mercenaries [[Trec]] and [[Zelot]] appear to fight alongside Roy. Soon after, a third mercenary – [[Noah]] – has a conversation with [[Fir]], whom he had just beaten at the arena. Fir overconfidently challenged him and refused to surrender, but Noah spared her anyway, prompting her to thank him and making her declare that she will learn from this. Fir tells Noah that she will travel to the [[Western Isles]] to train against the miners there, and that she is traveling the world to better her sword skills, like [[Karla|her mother]] before her. Fir then leaves, and Noah joins the battle. | |||
The battle eventually ends with Debias dead and the city in control of the Lycian Army. Roy muses about the fact Bern was powerful enough to wipe out Hector's army, even though Hector was known to be a great general. He also wonders why a dragonslaying weapon would be in Ostia, but knowing that he will have to ask Lilina, he focuses his efforts on storming the castle and rescuing her for now. | |||
==Chapter data== | |||
{{Tab | |||
|tab1=Normal | |||
|tab2=Hard | |||
|content1={{ChapData | |||
|victory=Seize the throne | |||
|defeat=[[Roy]] dies | |||
|ally=1–13{{h|+3|Upon Zelot, Trec, and Noah being recruited}} | |||
|other=0{{h|+3|Reinforcements}}{{h|−3|Upon Zelot, Trec, and Noah being recruited}} | |||
|enemy=22{{h|+12|Reinforcements}} | |||
|map=[[File:Cm fe06 7.png]] | |||
}} | |||
|content2={{ChapData | |||
|victory=Seize the throne | |||
|defeat=[[Roy]] dies | |||
|ally=1–13{{h|+3|Upon Zelot, Trec, and Noah being recruited}} | |||
|other=0{{h|+3|Reinforcements}}{{h|−3|Upon Zelot, Trec, and Noah being recruited}} | |||
|enemy=27{{h|+20|Reinforcements}} | |||
|map=[[File:Cm fe06 7 h.png]] | |||
}} | |||
}} | |||
== | ===Character data=== | ||
{{ChapChars | {{ChapChars | ||
|game#=06 | |game#=06 | ||
|newunit1={{NewUnit | |newunit1={{NewUnit | ||
|name= | |name=Zelot | ||
|portrait=[[File: | |portrait=[[File:Portrait zelot fe06.png]] | ||
|class=Paladin | |class=Paladin | ||
|HP=35 | |HP=35 | ||
|lv=1 | |lv=1 | ||
|recruitment method= | |inventory={{Item|6|Steel Sword}}<br>{{Item|6|Steel Lance}}<br>{{Item|6|Javelin}} | ||
|recruitment method=[[NPC]], talk to with [[Roy]], [[Trec]], or [[Noah]] | |||
}} | |||
|newunit2={{NewUnit | |newunit2={{NewUnit | ||
|name=Trec | |name=Trec | ||
|portrait=[[File: | |portrait=[[File:Portrait trec fe06.png]] | ||
|class=Cavalier | |class=Cavalier | ||
|HP=25 | |HP=25 | ||
|lv=4 | |lv=4 | ||
|recruitment method= | |inventory={{Item|6|Iron Lance}}<br>{{Item|6|Javelin}}<br>{{Item|6|Vulnerary}} | ||
|recruitment method=[[NPC]], talk to with [[Roy]] or [[Zelot]] | |||
}} | |||
|newunit3={{NewUnit | |newunit3={{NewUnit | ||
|name=Noah | |name=Noah | ||
|portrait=[[File: | |portrait=[[File:Portrait noah fe06.png]] | ||
|class=Cavalier | |class=Cavalier | ||
|HP=27 | |HP=27 | ||
|lv=7 | |lv=7 | ||
|recruitment method= | |inventory={{Item|6|Steel Sword}}<br>{{Item|6|Iron Lance}}<br>{{Item|6|Vulnerary}} | ||
| | |recruitment method=[[NPC]], talk to with [[Roy]] or [[Zelot]] | ||
|return1= | }} | ||
|return2= | |forced1=roy | ||
|return3= | |return1=marcus | ||
|return4=lance | |return2=alen | ||
| | |return3=bors | ||
|return6= | |return4=wolt | ||
|return7= | |return5=lance | ||
|return8= | |return5article=Lance (character) | ||
|return9= | |return6=merlinus | ||
|return10= | |return7=elen | ||
|return11= | |return8=ward | ||
|return12= | |return8article=Ward (character) | ||
|return13= | |return9=lot | ||
|return14= | |return10=dieck | ||
|return15= | |return11=shanna | ||
|return16= | |return12=chad | ||
|return17= | |return13=lugh | ||
|return18= | |return14=clarine | ||
|return15=rutger | |||
|return16=saul | |||
|return17=dorothy | |||
|return18=sue | |||
}} | |||
===Item data=== | |||
{{ChapItems | {{ChapItems | ||
|platform=gba | |platform=gba | ||
|item1= | |item1=Red Gem | ||
|obtain1= | |obtain1=Steal from enemy [[Wyvern Rider]] | ||
|item2= | |item2=Vulnerary | ||
|obtain2= | |obtain2=Steal from enemy [[Priest]] | ||
|item3= | |item3=Vulnerary | ||
|obtain3= | |obtain3=Steal from enemy [[Priest]] | ||
|item4= | |item4=Vulnerary | ||
|obtain4= | |obtain4=Steal from enemy [[Knight]] | ||
|item5= | |item5=Vulnerary | ||
|obtain5= | |obtain5=Steal from enemy [[Knight]] | ||
|item6= | |item6=Vulnerary | ||
|obtain6= | |obtain6=Steal from enemy [[Soldier]] | ||
|item7= | |item7=Vulnerary | ||
|obtain7= | |obtain7=Steal from enemy [[Soldier]] | ||
|item8= | |item8=Torch | ||
|obtain8=Visit the | |item8image=torch staff | ||
|item9= | |item8article=Torch (staff) | ||
|obtain9= | |obtain8=Visit the lower west [[village]] | ||
|item10= | |item9=Longbow | ||
|obtain10= | |obtain9=Visit the upper west [[village]] | ||
|item11= | |item10=Killing Edge | ||
|obtain11= | |obtain10=Visit the lowest of the east [[village]]s | ||
|item12= | |item11=Physic | ||
|obtain12= | |obtain11=Visit the left of the middle-lower western [[village]]s | ||
|item13= | |item12=Hero Crest | ||
|obtain13= | |obtain12=Visit the right of the middle-lower western [[village]]s | ||
|item14= | |item13=Red Gem | ||
|obtain14= | |obtain13=Visit the middle-upper of the western [[village]]s | ||
|item15= | |item14=Elixir | ||
|obtain15= | |obtain14=Visit the left of the uppermost western [[village]]s | ||
|item16= | |item15=Ridersbane | ||
|obtain16= | |obtain15=Visit the right of the uppermost western [[village]]s | ||
|itemlast= | |item16=Rapier | ||
|obtainlast= | |obtain16=Open left northeastern [[chest]] | ||
|itemlast=Barrier | |||
|obtainlast=Open right northeastern [[chest]] | |||
}} | |||
===Shop data=== | |||
{{ChapShop GBA | {{ChapShop GBA | ||
|sword1=Slim Sword | |sword1=Slim Sword | ||
| Line 134: | Line 150: | ||
|sword4=Iron Blade | |sword4=Iron Blade | ||
|swcost4=980 | |swcost4=980 | ||
|lance1=Slim Lance | |lance1=Slim Lance | ||
|lacost1=450 | |lacost1=450 | ||
| Line 148: | Line 158: | ||
|lance4=Javelin | |lance4=Javelin | ||
|lacost4=400 | |lacost4=400 | ||
|axe1=Iron Axe | |||
|axcost1=270 | |||
|axe2=Steel Axe | |||
|axcost2=360 | |||
|axe3=Hand Axe | |||
|axcost3=300 | |||
|bow1=Iron Bow | |bow1=Iron Bow | ||
|bocost1=540 | |bocost1=540 | ||
| Line 165: | Line 181: | ||
|itcost2=50 | |itcost2=50 | ||
|item3=Chest Key | |item3=Chest Key | ||
|itcost3=1,500}} | |itcost3=1,500 | ||
{{ | }} | ||
| | |||
| | ===Enemy data=== | ||
| | :''Stats with two figures separated by a ~ are presented as a range, representing stats that vary due to random growths. The figures to the left and right of the ~ are the stat's minimum and maximum possible values respectively.'' | ||
| | {{Tab | ||
| | |width=100% | ||
| | |tab1=Normal | ||
| | |tab2=Hard | ||
| | |content1={{ChapUnitHdr|type=Enemy|platform=gba}} | ||
| | {{ChapUnitCellGBA | ||
| | |name=[[Debias]] | ||
| | |class=Knight | ||
| | |lv=13 | ||
| | |#=1 | ||
| | |hp=33 | ||
| | |str=11 | ||
| | |skill=6 | ||
|spd=5 | |||
| | |lck=4 | ||
| | |def=12 | ||
| | |res=1 | ||
| | |con=14 | ||
| | |mov=4 | ||
| | |inventory={{Item|6|Spear|image=spear fe06}} | ||
| | |notes=Does not move; stands on a [[Terrain/Game Boy Advance games#Fire Emblem: The Binding Blade|throne]], the chapter's seize point. | ||
| | }} | ||
| | {{ChapUnitCellGBA | ||
| | |name=Bern | ||
| | |class=Wyvern Rider | ||
| | |lv=9 | ||
| | |#=1 | ||
| | |hp=27~30 | ||
| | |str=10~12 | ||
| | |skill=7~9 | ||
| | |spd=8~9 | ||
|# | |lck=3~5 | ||
| | |def=10~12 | ||
| | |res=0~1 | ||
| | |con=10 | ||
| | |mov=7 | ||
| | |inventory={{Item|6|Steel Lance}} | ||
| | |notes=Begins moving unprovoked when he can attack a unit within two turns. | ||
| | }} | ||
| | {{ChapUnitCellGBA | ||
| | |name=Bern | ||
| | |class=Wyvern Rider | ||
| | |lv=10 | ||
| | |#=1 | ||
| | |hp=28~31 | ||
| | |str=10~12 | ||
|# | |skill=7~9 | ||
| | |spd=8~10 | ||
| | |lck=3~5 | ||
| | |def=10~12 | ||
| | |res=0~2 | ||
| | |con=10 | ||
| | |mov=7 | ||
| | |inventory={{Item|6|Steel Lance}} • {{Item|6|Red Gem}} | ||
| | |notes=Moves to attack units in range. | ||
| | }} | ||
| | {{ChapUnitCellGBA | ||
| | |name=Rebel | ||
| | |class=Priest | ||
| | |lv=7 | ||
| | |#=2 | ||
| | |hp=20~22 | ||
| | |str=2~4 | ||
| | |skill=2~4 | ||
| | |spd=3~5 | ||
| | |lck=2~4 | ||
| | |def=1~2 | ||
| | |res=7~9 | ||
| | |con=5 | ||
| | |mov=5 | ||
| | |inventory={{Item|6|Physic}} • {{Item|6|Vulnerary}} | ||
|# | }} | ||
| | {{ChapUnitCellGBA | ||
| | |name=Rebel | ||
| | |class=Mercenary | ||
| | |lv=6 | ||
| | |#=2 | ||
| | |hp=21~23 | ||
| | |str=5~7 | ||
| | |skill=9~11 | ||
| | |spd=9~10 | ||
| | |lck=1~2 | ||
| | |def=4~6 | ||
| | |res=0~1 | ||
| | |con=9 | ||
| | |mov=5 | ||
| | |inventory={{Item|6|Iron Sword}} | ||
| | }} | ||
| | {{ChapUnitCellGBA | ||
| | |name=Rebel | ||
| | |class=Knight | ||
| | |lv=7 | ||
| | |#=1 | ||
| | |hp=21~23 | ||
| | |str=7~8 | ||
| | |skill=3~5 | ||
|spd=0~2 | |||
| | |lck=1~2 | ||
| | |def=10~11 | ||
| | |res=0~1 | ||
|# | |con=13 | ||
| | |mov=4 | ||
| | |inventory={{Item|6|Javelin}} | ||
| | }} | ||
| | {{ChapUnitCellGBA | ||
| | |name=Rebel | ||
| | |class=Knight | ||
| | |lv=6 | ||
| | |#=1 | ||
| | |hp=20~22 | ||
| | |str=6~8 | ||
| | |skill=3~4 | ||
| | |spd=0~1 | ||
| | |lck=1~2 | ||
| | |def=10~11 | ||
| | |res=0~1 | ||
| | |con=13 | ||
| | |mov=4 | ||
| | |inventory={{Item|6|Steel Lance}} | ||
| | }} | ||
| | {{ChapUnitCellGBA | ||
| | |name=Rebel | ||
|class=Knight | |||
|lv=6 | |||
|#=1 | |||
|hp=20~22 | |||
|str=6~8 | |||
|skill=3~4 | |||
|spd=0~1 | |||
|lck=1~2 | |||
|def=10~11 | |||
|res=0~1 | |||
|con=13 | |||
|mov=4 | |||
|inventory={{Item|6|Javelin}} • {{Item|6|Vulnerary}} | |||
|notes=Begins moving unprovoked when he can attack a unit within two turns. | |||
}} | |||
{{ChapUnitCellGBA | |||
|name=Rebel | |||
|class=Knight | |||
|lv=6 | |||
|#=1 | |||
|hp=20~22 | |||
|str=6~8 | |||
|skill=3~4 | |||
|spd=0~1 | |||
|lck=1~2 | |||
|def=10~11 | |||
|res=0~1 | |||
|con=13 | |||
|mov=4 | |||
|inventory={{Item|6|Steel Lance}} • {{Item|6|Vulnerary}} | |||
|notes=Begins moving unprovoked when he can attack a unit within two turns. | |||
}} | |||
{{ChapUnitCellGBA | |||
|name=Rebel | |||
|class=Mage | |||
|lv=6 | |||
|#=1 | |||
|hp=18~20 | |||
|str=3~5 | |||
|skill=3~5 | |||
|spd=4~5 | |||
|lck=0~2 | |||
|def=3~4 | |||
|res=4~5 | |||
|con=6 | |||
|mov=5 | |||
|inventory={{Item|6|Elfire}} | |||
}} | |||
{{ChapUnitCellGBA | |||
|name=Rebel | |||
|class=Mage | |||
|lv=6 | |||
|#=1 | |||
|hp=18~20 | |||
|str=3~5 | |||
|skill=3~5 | |||
|spd=4~5 | |||
|lck=0~2 | |||
|def=3~4 | |||
|res=4~5 | |||
|con=6 | |||
|mov=5 | |||
|inventory={{Item|6|Thunder}} | |||
}} | |||
{{ChapUnitCellGBA | |||
|name=Rebel | |||
|class=Cavalier | |||
|lv=9 | |||
|#=2 | |||
|hp=25~27 | |||
|str=7~9 | |||
|skill=4~6 | |||
|spd=6~8 | |||
|lck=2~3 | |||
|def=7~8 | |||
|res=0~2 | |||
|con=9 | |||
|mov=7 | |||
|inventory={{Item|6|Steel Sword}} • {{Item|6|Javelin}} | |||
|notes=Moves to attack units in range. | |||
}} | |||
{{ChapUnitCellGBA | |||
|name=Rebel | |||
|class=Cavalier | |||
|lv=7 | |||
|#=1 | |||
|hp=23~26 | |||
|str=6~8 | |||
|skill=4~5 | |||
|spd=6~7 | |||
|lck=1~3 | |||
|def=6~8 | |||
|res=0~1 | |||
|con=9 | |||
|mov=7 | |||
|inventory={{Item|6|Iron Sword}} • {{Item|6|Javelin}} | |||
}} | |||
{{ChapUnitCellGBA | |||
|name=Rebel | |||
|class=Soldier | |||
|lv=11 | |||
|#=2 | |||
|hp=27~29 | |||
|str=7~9 | |||
|skill=2~4 | |||
|spd=2~4 | |||
|lck=2~3 | |||
|def=1~2 | |||
|res=0~2 | |||
|con=6 | |||
|mov=5 | |||
|inventory={{Item|6|Javelin}} • {{Item|6|Vulnerary}} | |||
}} | |||
{{ChapUnitCellGBA | |||
|name=Rebel | |||
|class=Archer | |||
|lv=7 | |||
|#=1 | |||
|hp=21~23 | |||
|str=5~7 | |||
|skill=5~6 | |||
|spd=4~6 | |||
|lck=1~3 | |||
|def=3~5 | |||
|res=0~1 | |||
|con=7 | |||
|mov=5 | |||
|inventory={{Item|6|Steel Bow}} | |||
|notes=Moves to attack units in range. | |||
}} | |||
{{ChapUnitCellGBA | |||
|name=Rebel | |||
|class=Archer | |||
|lv=8 | |||
|#=1 | |||
|hp=22~24 | |||
|str=6~7 | |||
|skill=5~7 | |||
|spd=4~6 | |||
|lck=2~3 | |||
|def=3~5 | |||
|res=0~1 | |||
|con=7 | |||
|mov=5 | |||
|inventory={{Item|6|Steel Bow}} | |||
|notes=Moves to attack units in range. | |||
}} | |||
{{ChapUnitCellGBA | |||
|name=Rebel | |||
|class=Archer | |||
|lv=10 | |||
|#=1 | |||
|hp=23~26 | |||
|str=6~8 | |||
|skill=6~8 | |||
|spd=5~7 | |||
|lck=2~4 | |||
|def=4~5 | |||
|res=0~2 | |||
|con=7 | |||
|mov=5 | |||
|inventory={{Item|6|Iron Bow}} | |||
}} | |||
{{ChapUnitCellGBA | |||
|name=Rebel | |||
|class=Archer | |||
|lv=9 | |||
|#=1 | |||
|hp=22~25 | |||
|str=6~8 | |||
|skill=5~7 | |||
|spd=5~6 | |||
|lck=2~4 | |||
|def=4~5 | |||
|res=0~1 | |||
|con=7 | |||
|mov=5 | |||
|inventory={{Item|6|Iron Bow}} | |||
|last=y | |||
}} | |||
{{ChapUnitReinf|type=Enemy|platform=gba}} | |||
{{ChapUnitCellGBA | |||
|name=Rebel | |||
|class=Cavalier | |||
|lv=15 | |||
|#=1 | |||
|hp=29~32 | |||
|str=9~11 | |||
|skill=6~9 | |||
|spd=8~10 | |||
|lck=3~5 | |||
|def=7~9 | |||
|res=1~2 | |||
|con=9 | |||
|mov=7 | |||
|inventory={{Item|6|Silver Lance}} | |||
}} | |||
{{ChapUnitCellGBA | |||
|name=Rebel | |||
|class=Cavalier | |||
|lv=7 | |||
|#=1 | |||
|hp=23~26 | |||
|str=6~8 | |||
|skill=4~5 | |||
|spd=6~7 | |||
|lck=1~3 | |||
|def=6~8 | |||
|res=0~1 | |||
|con=9 | |||
|mov=7 | |||
|inventory={{Item|6|Iron Lance}} • {{Item|6|Javelin}} | |||
}} | |||
{{ChapUnitCellGBA | |||
|name=Rebel | |||
|class=Cavalier | |||
|lv=5 | |||
|#=2 | |||
|hp=22~24 | |||
|str=6~7 | |||
|skill=3~4 | |||
|spd=5~7 | |||
|lck=1~2 | |||
|def=6~7 | |||
|res=0~1 | |||
|con=9 | |||
|mov=7 | |||
|inventory={{Item|6|Steel Lance}} | |||
}} | |||
{{ChapUnitCellGBA | |||
|name=Rebel | |||
|class=Mage | |||
|lv=7 | |||
|#=1 | |||
|hp=18~20 | |||
|str=3~5 | |||
|skill=4~5 | |||
|spd=4~6 | |||
|lck=1~2 | |||
|def=3~4 | |||
|res=4~6 | |||
|con=6 | |||
|mov=5 | |||
|inventory={{Item|6|Elfire}} | |||
}} | |||
{{ChapUnitCellGBA | |||
|name=Rebel | |||
|class=Archer | |||
|lv=9 | |||
|#=1 | |||
|hp=22~25 | |||
|str=6~8 | |||
|skill=5~7 | |||
|spd=5~6 | |||
|lck=2~4 | |||
|def=4~5 | |||
|res=0~1 | |||
|con=7 | |||
|mov=5 | |||
|inventory={{Item|6|Steel Bow}} | |||
}} | |||
{{ChapUnitCellGBA | |||
|name=Rebel | |||
|class=Soldier | |||
|lv=11 | |||
|#=2 | |||
|hp=27~29 | |||
|str=7~9 | |||
|skill=2~4 | |||
|spd=2~4 | |||
|lck=2~3 | |||
|def=1~2 | |||
|res=0~2 | |||
|con=6 | |||
|mov=5 | |||
|inventory={{Item|6|Steel Lance}} • {{Item|6|Javelin}} | |||
}} | |||
{{ChapUnitCellGBA | |||
|name=Rebel | |||
|class=Soldier | |||
|lv=11 | |||
|#=2 | |||
|hp=27~29 | |||
|str=7~9 | |||
|skill=2~4 | |||
|spd=2~4 | |||
|lck=2~3 | |||
|def=1~2 | |||
|res=0~2 | |||
|con=6 | |||
|mov=5 | |||
|inventory={{Item|6|Steel Lance}} | |||
}} | |||
{{ChapUnitCellGBA | |||
|name=Rebel | |||
|class=Mage | |||
|lv=7 | |||
|#=1 | |||
|hp=18~20 | |||
|str=3~5 | |||
|skill=4~5 | |||
|spd=4~6 | |||
|lck=1~2 | |||
|def=3~4 | |||
|res=4~6 | |||
|con=6 | |||
|mov=5 | |||
|inventory={{Item|6|Thunder}} | |||
}} | |||
{{ChapUnitCellGBA | |||
|name=Rebel | |||
|class=Archer | |||
|lv=7 | |||
|#=1 | |||
|hp=21~23 | |||
|str=5~7 | |||
|skill=5~6 | |||
|spd=4~6 | |||
|lck=1~3 | |||
|def=3~5 | |||
|res=0~1 | |||
|con=7 | |||
|mov=5 | |||
|inventory={{Item|6|Steel Bow}} | |||
|last=y | |||
}} | |||
{{ChapUnitFtr}} | |||
|content2={{ChapUnitHdr|type=Enemy|platform=gba}} | |||
{{ChapUnitCellGBA | |||
|name=[[Debias]] | |||
|class=Knight | |||
|lv=13 | |||
|#=1 | |||
|hp=37~40 | |||
|str=13~15 | |||
|skill=8~9 | |||
|spd=5~7 | |||
|lck=5~6 | |||
|def=13~15 | |||
|res=1~2 | |||
|con=14 | |||
|mov=4 | |||
|inventory={{Item|6|Spear|image=spear fe06}} | |||
|notes=Does not move; stands on a [[Terrain/Game Boy Advance games#Fire Emblem: The Binding Blade|throne]], the chapter's seize point. | |||
}} | |||
{{ChapUnitCellGBA | |||
|name=Bern | |||
|class=Wyvern Rider | |||
|lv=9 | |||
|#=1 | |||
|hp=31~37 | |||
|str=12~16 | |||
|skill=9~12 | |||
|spd=9~12 | |||
|lck=4~7 | |||
|def=11~14 | |||
|res=0~2 | |||
|con=10 | |||
|mov=7 | |||
|inventory={{Item|6|Steel Lance}} | |||
|notes=Begins moving unprovoked when he can attack a unit within two turns. | |||
}} | |||
{{ChapUnitCellGBA | |||
|name=Bern | |||
|class=Wyvern Rider | |||
|lv=10 | |||
|#=1 | |||
|hp=32~38 | |||
|str=12~16 | |||
|skill=9~12 | |||
|spd=9~13 | |||
|lck=4~7 | |||
|def=11~14 | |||
|res=0~3 | |||
|con=10 | |||
|mov=7 | |||
|inventory={{Item|6|Steel Lance}} • {{Item|6|Red Gem}} | |||
|notes=Moves to attack units in range. | |||
}} | |||
{{ChapUnitCellGBA | |||
|name=Rebel | |||
|class=Priest | |||
|lv=7 | |||
|#=2 | |||
|hp=23~26 | |||
|str=3~7 | |||
|skill=4~7 | |||
|spd=4~8 | |||
|lck=4~8 | |||
|def=1~3 | |||
|res=10~13 | |||
|con=5 | |||
|mov=5 | |||
|inventory={{Item|6|Physic}} • {{Item|6|Vulnerary}} | |||
}} | |||
{{ChapUnitCellGBA | |||
|name=Rebel | |||
|class=Mercenary | |||
|lv=6 | |||
|#=2 | |||
|hp=25~30 | |||
|str=7~11 | |||
|skill=11~15 | |||
|spd=10~13 | |||
|lck=2~5 | |||
|def=5~8 | |||
|res=0~3 | |||
|con=9 | |||
|mov=5 | |||
|inventory={{Item|6|Iron Sword}} | |||
}} | |||
{{ChapUnitCellGBA | |||
|name=Rebel | |||
|class=Knight | |||
|lv=7 | |||
|#=3 | |||
|hp=25~30 | |||
|str=9~12 | |||
|skill=5~8 | |||
|spd=0~4 | |||
|lck=2~4 | |||
|def=11~14 | |||
|res=0~2 | |||
|con=13 | |||
|mov=4 | |||
|inventory={{Item|6|Javelin}} | |||
|notes=The eastern two move to attack units in range. | |||
}} | |||
{{ChapUnitCellGBA | |||
|name=Rebel | |||
|class=Knight | |||
|lv=6 | |||
|#=1 | |||
|hp=24~29 | |||
|str=8~12 | |||
|skill=5~7 | |||
|spd=0~3 | |||
|lck=2~4 | |||
|def=11~14 | |||
|res=0~2 | |||
|con=13 | |||
|mov=4 | |||
|inventory={{Item|6|Steel Lance}} | |||
}} | |||
{{ChapUnitCellGBA | |||
|name=Rebel | |||
|class=Knight | |||
|lv=6 | |||
|#=1 | |||
|hp=24~29 | |||
|str=8~12 | |||
|skill=5~7 | |||
|spd=0~3 | |||
|lck=2~4 | |||
|def=11~14 | |||
|res=0~2 | |||
|con=13 | |||
|mov=4 | |||
|inventory={{Item|6|Javelin}} • {{Item|6|Vulnerary}} | |||
|notes=Begins moving unprovoked when he can attack a unit within two turns. | |||
}} | |||
{{ChapUnitCellGBA | |||
|name=Rebel | |||
|class=Knight | |||
|lv=6 | |||
|#=1 | |||
|hp=24~29 | |||
|str=8~12 | |||
|skill=5~7 | |||
|spd=0~3 | |||
|lck=2~4 | |||
|def=11~14 | |||
|res=0~2 | |||
|con=13 | |||
|mov=4 | |||
|inventory={{Item|6|Steel Lance}} • {{Item|6|Vulnerary}} | |||
|notes=Begins moving unprovoked when he can attack a unit within two turns. | |||
}} | |||
{{ChapUnitCellGBA | |||
|name=Rebel | |||
|class=Mage | |||
|lv=6 | |||
|#=1 | |||
|hp=21~25 | |||
|str=6~10 | |||
|skill=5~9 | |||
|spd=6~8 | |||
|lck=1~4 | |||
|def=3~5 | |||
|res=6~8 | |||
|con=6 | |||
|mov=5 | |||
|inventory={{Item|6|Elfire}} | |||
}} | |||
{{ChapUnitCellGBA | |||
|name=Rebel | |||
|class=Mage | |||
|lv=6 | |||
|#=1 | |||
|hp=21~25 | |||
|str=6~10 | |||
|skill=5~9 | |||
|spd=6~8 | |||
|lck=1~4 | |||
|def=3~5 | |||
|res=6~8 | |||
|con=6 | |||
|mov=5 | |||
|inventory={{Item|6|Thunder}} | |||
}} | |||
{{ChapUnitCellGBA | |||
|name=Rebel | |||
|class=Cavalier | |||
|lv=9 | |||
|#=2 | |||
|hp=29~33 | |||
|str=9~12 | |||
|skill=6~10 | |||
|spd=7~11 | |||
|lck=3~6 | |||
|def=7~10 | |||
|res=0~3 | |||
|con=9 | |||
|mov=7 | |||
|inventory={{Item|6|Steel Sword}} • {{Item|6|Javelin}} | |||
|notes=Moves to attack units in range. | |||
}} | |||
{{ChapUnitCellGBA | |||
|name=Rebel | |||
|class=Cavalier | |||
|lv=7 | |||
|#=3 | |||
|hp=27~32 | |||
|str=8~11 | |||
|skill=6~9 | |||
|spd=7~10 | |||
|lck=2~6 | |||
|def=6~10 | |||
|res=0~2 | |||
|con=9 | |||
|mov=7 | |||
|inventory={{Item|6|Iron Sword}} • {{Item|6|Javelin}} | |||
}} | |||
{{ChapUnitCellGBA | |||
|name=Rebel | |||
|class=Soldier | |||
|lv=11 | |||
|#=2 | |||
|hp=31~36 | |||
|str=10~13 | |||
|skill=3~7 | |||
|spd=3~6 | |||
|lck=3~5 | |||
|def=1~3 | |||
|res=0~3 | |||
|con=6 | |||
|mov=5 | |||
|inventory={{Item|6|Javelin}} • {{Item|6|Vulnerary}} | |||
}} | |||
{{ChapUnitCellGBA | |||
|name=Rebel | |||
|class=Archer | |||
|lv=7 | |||
|#=1 | |||
|hp=25~29 | |||
|str=7~10 | |||
|skill=7~10 | |||
|spd=5~9 | |||
|lck=3~6 | |||
|def=3~7 | |||
|res=0~2 | |||
|con=7 | |||
|mov=5 | |||
|inventory={{Item|6|Steel Bow}} | |||
|notes=Moves to attack units in range. | |||
}} | |||
{{ChapUnitCellGBA | |||
|name=Rebel | |||
|class=Archer | |||
|lv=8 | |||
|#=1 | |||
|hp=26~30 | |||
|str=8~10 | |||
|skill=7~11 | |||
|spd=5~9 | |||
|lck=4~6 | |||
|def=3~7 | |||
|res=0~2 | |||
|con=7 | |||
|mov=5 | |||
|inventory={{Item|6|Steel Bow}} | |||
|notes=Moves to attack units in range. | |||
}} | |||
{{ChapUnitCellGBA | |||
|name=Rebel | |||
|class=Archer | |||
|lv=10 | |||
|#=1 | |||
|hp=27~32 | |||
|str=8~11 | |||
|skill=8~12 | |||
|spd=6~10 | |||
|lck=4~7 | |||
|def=4~7 | |||
|res=0~3 | |||
|con=7 | |||
|mov=5 | |||
|inventory={{Item|6|Iron Bow}} | |||
}} | |||
{{ChapUnitCellGBA | |||
|name=Rebel | |||
|class=Archer | |||
|lv=9 | |||
|#=1 | |||
|hp=26~31 | |||
|str=8~11 | |||
|skill=7~11 | |||
|spd=6~9 | |||
|lck=4~7 | |||
|def=4~7 | |||
|res=0~2 | |||
|con=7 | |||
|mov=5 | |||
|inventory={{Item|6|Iron Bow}} | |||
}} | |||
{{ChapUnitCellGBA | |||
|name=Bern | |||
|class=Wyvern Rider | |||
|lv=8 | |||
|#=1 | |||
|hp=30~36 | |||
|str=11~15 | |||
|skill=9~11 | |||
|spd=8~12 | |||
|lck=4~6 | |||
|def=11~13 | |||
|res=0~2 | |||
|con=10 | |||
|mov=7 | |||
|inventory={{Item|6|Steel Lance}} • {{Item|6|Javelin}} | |||
|notes=Begins moving unprovoked when he can attack a unit within two turns. | |||
|last=y | |||
}} | |||
{{ChapUnitReinf|type=Enemy|platform=gba}} | |||
{{ChapUnitCellGBA | |||
|name=Rebel | |||
|class=Cavalier | |||
|lv=15 | |||
|#=3 | |||
|hp=33~38 | |||
|str=11~14 | |||
|skill=8~13 | |||
|spd=9~13 | |||
|lck=4~8 | |||
|def=7~11 | |||
|res=1~3 | |||
|con=9 | |||
|mov=7 | |||
|inventory={{Item|6|Silver Lance}} | |||
}} | |||
{{ChapUnitCellGBA | |||
|name=Rebel | |||
|class=Cavalier | |||
|lv=7 | |||
|#=3 | |||
|hp=27~32 | |||
|str=8~11 | |||
|skill=6~9 | |||
|spd=7~10 | |||
|lck=2~6 | |||
|def=6~10 | |||
|res=0~2 | |||
|con=9 | |||
|mov=7 | |||
|inventory={{Item|6|Iron Lance}} • {{Item|6|Javelin}} | |||
}} | |||
{{ChapUnitCellGBA | |||
|name=Rebel | |||
|class=Cavalier | |||
|lv=5 | |||
|#=6 | |||
|hp=26~30 | |||
|str=8~10 | |||
|skill=5~8 | |||
|spd=6~10 | |||
|lck=2~5 | |||
|def=6~9 | |||
|res=0~2 | |||
|con=9 | |||
|mov=7 | |||
|inventory={{Item|6|Steel Lance}} | |||
}} | |||
{{ChapUnitCellGBA | |||
|name=Rebel | |||
|class=Mage | |||
|lv=7 | |||
|#=1 | |||
|hp=21~25 | |||
|str=6~10 | |||
|skill=6~9 | |||
|spd=6~9 | |||
|lck=2~4 | |||
|def=3~5 | |||
|res=6~9 | |||
|con=6 | |||
|mov=5 | |||
|inventory={{Item|6|Elfire}} | |||
}} | |||
{{ChapUnitCellGBA | |||
|name=Rebel | |||
|class=Archer | |||
|lv=9 | |||
|#=1 | |||
|hp=26~31 | |||
|str=8~11 | |||
|skill=7~11 | |||
|spd=6~9 | |||
|lck=4~7 | |||
|def=4~7 | |||
|res=0~2 | |||
|con=7 | |||
|mov=5 | |||
|inventory={{Item|6|Steel Bow}} | |||
}} | |||
{{ChapUnitCellGBA | |||
|name=Rebel | |||
|class=Soldier | |||
|lv=11 | |||
|#=2 | |||
|hp=31~36 | |||
|str=10~13 | |||
|skill=3~7 | |||
|spd=3~6 | |||
|lck=3~5 | |||
|def=1~3 | |||
|res=0~3 | |||
|con=6 | |||
|mov=5 | |||
|inventory={{Item|6|Steel Lance}} • {{Item|6|Javelin}} | |||
}} | |||
{{ChapUnitCellGBA | |||
|name=Rebel | |||
|class=Soldier | |||
|lv=11 | |||
|#=2 | |||
|hp=31~36 | |||
|str=10~13 | |||
|skill=3~7 | |||
|spd=3~6 | |||
|lck=3~5 | |||
|def=1~3 | |||
|res=0~3 | |||
|con=6 | |||
|mov=5 | |||
|inventory={{Item|6|Steel Lance}} | |||
}} | |||
{{ChapUnitCellGBA | |||
|name=Rebel | |||
|class=Mage | |||
|lv=7 | |||
|#=1 | |||
|hp=21~25 | |||
|str=6~10 | |||
|skill=6~9 | |||
|spd=6~9 | |||
|lck=2~4 | |||
|def=3~5 | |||
|res=6~9 | |||
|con=6 | |||
|mov=5 | |||
|inventory={{Item|6|Thunder}} | |||
}} | |||
{{ChapUnitCellGBA | |||
|name=Rebel | |||
|class=Archer | |||
|lv=7 | |||
|#=1 | |||
|hp=25~29 | |||
|str=7~10 | |||
|skill=7~10 | |||
|spd=5~9 | |||
|lck=3~6 | |||
|def=3~7 | |||
|res=0~2 | |||
|con=7 | |||
|mov=5 | |||
|inventory={{Item|6|Steel Bow}} | |||
|last=y | |||
}} | |||
{{ChapUnitFtr}} | |||
}} | |||
====Reinforcements==== | |||
*Turn 10 other phase; and enemy phase turns 15 and 20 in Hard Mode | |||
**4 [[Cavalier]]s—one with a [[Silver Lance]], one an [[Iron Lance]] and a [[Javelin]], two with [[Steel Lance]]s—from the southern edge of the map | |||
*Enemy phase after any player unit passes the main wall (row 7) or northeast of its door (columns 6–9, row 8), if [[Debias]] is alive | |||
**1 [[Mage]] with [[Elfire]], 1 level 9 [[Archer]], 2 [[Soldier]]s with [[Steel Lance]]s and [[Javelin]]s, 2 Soldiers with just Steel Lances, 1 [[Mage]] with [[Thunder]], and 1 level 7 Archer from north of the throne | |||
===NPC data=== | |||
{{ChapUnitHdr|type=NPC|platform=gba}} | |||
{{ChapUnitCellGBA | |||
|name=[[Zelot]] | |||
|class=Paladin | |||
|type=other | |||
|lv=1 | |||
|#=1 | |||
|hp=35 | |||
|str=10 | |||
|skill=12 | |||
|spd=13 | |||
|lck=5 | |||
|def=11 | |||
|res=7 | |||
|con=11 | |||
|mov=8 | |||
|inventory={{Item|6|Steel Sword}} • {{Item|6|Steel Lance}} • {{Item|6|Javelin}} | |||
}} | |||
{{ChapUnitCellGBA | |||
|name=[[Trec]] | |||
|class=Cavalier | |||
|type=other | |||
|lv=4 | |||
|#=1 | |||
|hp=25 | |||
|str=8 | |||
|skill=6 | |||
|spd=7 | |||
|lck=5 | |||
|def=8 | |||
|res=0 | |||
|con=9 | |||
|mov=7 | |||
|inventory={{Item|6|Iron Lance}} • {{Item|6|Javelin}} • {{Item|6|Vulnerary}} | |||
}} | |||
{{ChapUnitCellGBA | |||
|name=[[Noah]] | |||
|class=Cavalier | |||
|type=other | |||
|lv=7 | |||
|#=1 | |||
|hp=27 | |||
|str=8 | |||
|skill=7 | |||
|spd=9 | |||
|lck=6 | |||
|def=7 | |||
|res=1 | |||
|con=10 | |||
|mov=7 | |||
|inventory={{Item|6|Steel Sword}} • {{Item|6|Iron Lance}} • {{Item|6|Vulnerary}} | |||
|last=y | |||
}} | |||
{{ChapUnitFtr}} | |||
====Reinforcements==== | |||
*Turn 2 | |||
**[[Zelot]] and [[Trec]] from the top-left of the eastern [[village]]s | |||
*Turn 3 | |||
**[[Noah]] from south of the arena | |||
==Boss data== | ===Boss data=== | ||
{{Main|Debias}} | |||
:''Stats with two figures separated by a ~ are presented as a range, representing stats that vary due to random growths. The figures to the left and right of the ~ are the stat's minimum and maximum possible values respectively.''<ref>{{cite web|url=https://fe6.triangleattack.com/chapters/the_ostian_revolt|title=The Ostian Revolt|site=triangleattack.com|retrieved=December 24, 2020}}</ref> | |||
{{Tab | {{Tab | ||
|tab1=Normal | |tab1=Normal | ||
|tab2=Hard | |tab2=Hard | ||
|content1= | |content1={{BossStats FE6 | ||
{{BossStats | |portrait=[[File:Portrait debias fe06.png]] | ||
|portrait=[[File: | |sprite=knight enemy | ||
|class=Knight | |class=Knight | ||
|lv=13 | |lv=13 | ||
| Line 317: | Line 1,189: | ||
|con=14 | |con=14 | ||
|aid=13 | |aid=13 | ||
|inventory= | |inventory={{Item|6|Spear|image=spear fe06}} | ||
|content2= | |la=y | ||
{{BossStats | }} | ||
|portrait=[[File: | |content2={{BossStats FE6 | ||
|portrait=[[File:Portrait debias fe06.png]] | |||
|sprite=knight enemy | |||
|class=Knight | |class=Knight | ||
|lv=13 | |lv=13 | ||
|HP= | |HP=37~40 | ||
|str= | |str=13~15 | ||
|skill=9 | |skill=8~9 | ||
|spd= | |spd=5~7 | ||
|luck=5 | |luck=5~6 | ||
|def= | |def=13~15 | ||
|res=1 | |res=1~2 | ||
|move=4 | |move=4 | ||
|con=14 | |con=14 | ||
|aid=13 | |aid=13 | ||
|inventory= | |inventory={{Item|6|Spear|image=spear fe06}} | ||
|la=y | |||
}} | |||
}} | |||
==Strategy== | ==Strategy== | ||
{{Strategy}} | {{Strategy}} | ||
Roy's army has finally reached Ostia, and the Lycia arc is about to end. The player should bring their best units to this chapter; mounted units will come in handy for visiting all eight houses. There | [[Roy]]'s army has finally reached [[Ostia]], and the [[Lycia]] arc is about to end. The player should bring their best units to this chapter; mounted units will come in handy for visiting all eight houses. There is no need to hurry, though; there are no [[Thief|Thieves]] or [[Brigand]]s who could destroy the houses, so it is recommended first to defeat the nearest enemies and then collect items. | ||
The most challenging aspect of this chapter is to keep alive | The most challenging aspect of this chapter is to keep alive [[Zelot]] and [[Trec]]. [[Noah]] is not a problem, as he arrives after turn two, and [[Roy]] should be already there to recruit him. If the player is interested in the other two units, they should send two strong mounted units to rescue them, such as [[Marcus]], [[Alen]] or [[Lance (character)|Lance]] (the last two only if they have been trained.) [[Shanna]] is not a good option due to the three [[archer]]s who are surrounding the area. | ||
The left side of the player's army should claim the trees there as soon as possible. The right party will face the biggest problems, as most enemies will come from this side. If needed, the player should advance slowly and take their time. The best strategy should be to rescue | The left side of the player's army should claim the trees there as soon as possible. The right party will face the biggest problems, as most enemies will come from this side. If needed, the player should advance slowly and take their time. The best strategy should be to rescue [[Zelot]] and [[Trec]], and to bring them to [[Roy]], instead of sending the lord to the fray. Given that most enemies use [[lance]]s, the probabilities of [[Roy]] leaving the battlefield without a scratch are quite low. | ||
The first arena of the game is located here; it is the | The first [[arena]] of the game is located here; it is the building that [[Noah]] comes from. The player should keep in mind that units who are defeated here cannot be used any longer (in other words, they die) and all units will use iron weapons to fight. A way to measure how strong the enemies there can be is the amount of money the dealer asks to bet. If it is more than 800 [[gold]], it is better to leave the arena. | ||
After turn 10, four | After turn 10, four [[Cavalier]]s will arrive from the south, so the player should either advance quickly or leave some units behind to deal with them. The most dangerous of them is at level fifteen and has a [[Silver Lance]]; the rest are quite similar to the original enemies. The other batch of reinforcements will arrive after any unit crosses either the doors or the small open square in the same wall, with eight enemy units appearing next to the boss. Most of them can attack from a distance, so the player should try to play the open spaces to their advantage, creating a choke point. | ||
The boss is quite easy; Roy's | The boss is quite easy; [[Roy]]'s [[Rapier]], the [[Hammer]], the [[Armorslayer]], or [[Magic (element)|magic]] spells will make short work of him. As a side note, [[Debias]] is the first boss with whom someone can have a special conversation—in this case, [[Bors]]. Once the boss has been defeated, [[Roy]] can seize the gate, and the chapter will end. | ||
==Trivia== | |||
*This chapter's layout bears a striking resemblance to [[The Escape|Chapter 6]] of {{title|Thracia 776}}. | |||
*This is one of the only three chapters in ''The Binding Blade'' to have additional enemies on turn 1 in hard mode, the others being [[The Binding Blade (chapter) | Chapter 21]] and [[Unattained Dream | Chapter 22]]. | |||
==Etymology and other languages== | |||
{{Names | |||
|eng-name=Ostia's Rebellion | |||
|eng-mean=Used in [[Unused content in Fire Emblem: The Blazing Blade#The Binding Blade data transfer leftovers|leftover text from the data transfer menu]] in the English version of {{FE7}}. | |||
|eng-fan-name=The Ostian Revolt | |||
|eng-fan-mean=-- | |||
|jpn-name={{hover|オスティアの反乱|Osutia no hanran}} | |||
|jpn-mean=Ostian revolt | |||
}} | |||
==Gallery== | ==Gallery== | ||
<gallery> | |||
Cm fe06 7.png|Map of the chapter | |||
</gallery> | |||
{{refbar}} | |||
{{ChapterNav | {{ChapterNav | ||
|prechapter= | |prechapter=Ensnared | ||
|nextchapter=Reunion ( | |nextchapter=Reunion (The Binding Blade){{!}}Reunion | ||
}} | |||
{{Nav6}} | {{Nav6}} | ||
[[Category:Chapters of Fire Emblem: | {{DEFAULTSORT:Ostian Revolt, The}} | ||
[[Category:Chapters of Fire Emblem: The Binding Blade]] | |||
Latest revision as of 21:18, 28 March 2024
| ||||||||||
|

| “ | Get ready for combat, soldiers! We will retake Ostia! | ” | — Roy |
|---|
The Ostian Revolt (Japanese: オスティアの反乱 Ostian revolt) is the seventh chapter in Fire Emblem: The Binding Blade. In this chapter, the Lycian League Army must make its way through the city of Ostia to reach its castle, taken by the rebels.
Plot
- Main article:
The Ostian Revolt/Script
Roy's forces enter Ostia after he learns of a rebellion orchestrated by General Leygance and his lieutenant, Debias. Lilina is kept hostage inside the castle, and is the primary motivation for Roy coming here.
As Roy's troops arrive, Leygance and Debias discuss a group of Hector's Ilian mercenaries that keeps fighting them. They intend to beat the mercenaries into submission and potentially use Lilina's hostage status as a last resort. Leygance then enters the castle interior, leaving Debias behind.
Merlinus tells Roy that even though most Ostian troops have joined the rebellion out of fear, a group of Ilian mercenaries remains loyal to Hector, as Ilian mercenaries have a code of never betraying their employers. Merlinus has also learned that one of Bern's Wyvern Generals is going to arrive in Ostia alongside a legion of wyvern riders. Roy realizes they have no hope of fighting a Wyvern General on their own and suggests asking the Etrurian Mage General, Cecilia, for help, as she is his former tactics teacher and will most likely answer the call. Merlinus claims that doing so will put Lycia in a bad political position, but Roy counters by saying Lycia may not have a future if they do not successfully defend it now. He then reveals that he has already written a letter to Cecilia, but has yet to send it. Merlinus caves in and sends it.
The battle begins, and as it starts, the Ilian mercenaries Trec and Zelot appear to fight alongside Roy. Soon after, a third mercenary – Noah – has a conversation with Fir, whom he had just beaten at the arena. Fir overconfidently challenged him and refused to surrender, but Noah spared her anyway, prompting her to thank him and making her declare that she will learn from this. Fir tells Noah that she will travel to the Western Isles to train against the miners there, and that she is traveling the world to better her sword skills, like her mother before her. Fir then leaves, and Noah joins the battle.
The battle eventually ends with Debias dead and the city in control of the Lycian Army. Roy muses about the fact Bern was powerful enough to wipe out Hector's army, even though Hector was known to be a great general. He also wonders why a dragonslaying weapon would be in Ostia, but knowing that he will have to ask Lilina, he focuses his efforts on storming the castle and rescuing her for now.
Chapter data
Normal Hard
| ||||||
|
| |||||
| Victory: Seize the throne | Player | Other | Enemy | |||
|---|---|---|---|---|---|---|
| Defeat: Roy dies | 1–13+3 | 0+3−3 | 22+12 | |||
| ||||||

Character data
| Characters | |||||||||||||||||||||||||||||||||
|---|---|---|---|---|---|---|---|---|---|---|---|---|---|---|---|---|---|---|---|---|---|---|---|---|---|---|---|---|---|---|---|---|---|
New units
| |||||||||||||||||||||||||||||||||
| |||||||||||||||||||||||||||||||||
Required characters
| |||||||||||||||||||||||||||||||||
Available characters
| |||||||||||||||||||||||||||||||||


Item data
| ||||||||||||||||||||||||||||||||||||||||||||||||||||||
|
Shop data
Swords Lances Axes Bows Anima Light Dark Staves Items Secret
| Name | Cost | |
|---|---|---|
| Slim Sword | 480 | |
| Iron Sword | 460 | |
| Steel Sword | 600 | |
| Iron Blade | 980 |
Enemy data
- Stats with two figures separated by a ~ are presented as a range, representing stats that vary due to random growths. The figures to the left and right of the ~ are the stat's minimum and maximum possible values respectively.
Normal Hard
| |||||||||||||||||||||||||||||||||||||||||||||||||||||||||||||||||||||||||||||||||||||||||||||||||||||||||||||||||||||||||||||||||||||||||||||||||||||||||||||||||||||||||||||||||||||||||||||||||||||||||||||||||||||||||||||||||||||||||||||||||||||||||||||||||||||||||||||||||||||||||||||||||||||||||||||||||||||||||||||||||||||||||||||||||||||||||||||||||||||||||||||||||||||||||||||||||||||||||||||||||||||||||||||||||||||||||||||||||||||||||||||||||||||||||||||||||||||||||||||||||||||||||||||||||||||
| |||||||||||||||||||||||||||||||||||||||||||||||||||||||||||||||||||||||||||||||||||||||||||||||||||||||||||||||||||||||||||||||||||||||||||||||||||||||||||||||||||||||||||||||||||||||||||||||||||||||||||||||||||||||||||||||||||||||||||||||||||||||||||||||||||||||||||||||||||||||||||||||||||||||||||||||||||||||||||||||||||||||||||||||||||||||||||||||||||||||||||||||||||||||||||||||||||||||||||||||||||||||||||||||||||||||||||||||||||||||||||||||||||||||||||||||||||||||||||||||||||||||||||||||||||||
| |||||||||||||||||||||||||||||||||||||||||||||||||||||||||||||||||||||||||||||||||||||||||||||||||||||||||||||||||||||||||||||||||||||||||||||||||||||||||||||||||||||||||||||||||||||||||||||||||||||||||||||||||||||||||||||||||||||||||||||||||||||||||||||||||||||||||||||||||||||||||||||||||||||||||||||||||||||||||||||||||||||||||||||||||||||||||||||||||||||||||||||||||||||||||||||||||||||||||||||||||||||||||||||||||||||||||||||||||||||||||||||||||||||||||||||||||||||||||||||||||||||||||||||||||||||
| |||||||||||||||||||||||||||||||||||||||||||||||||||||||||||||||||||||||||||||||||||||||||||||||||||||||||||||||||||||||||||||||||||||||||||||||||||||||||||||||||||||||||||||||||||||||||||||||||||||||||||||||||||||||||||||||||||||||||||||||||||||||||||||||||||||||||||||||||||||||||||||||||||||||||||||||||||||||||||||||||||||||||||||||||||||||||||||||||||||||||||||||||||||||||||||||||||||||||||||||||||||||||||||||||||||||||||||||||||||||||||||||||||||||||||||||||||||||||||||||||||||||||||||||||||||
Reinforcements
- Turn 10 other phase; and enemy phase turns 15 and 20 in Hard Mode
- 4 Cavaliers—one with a Silver Lance, one an Iron Lance and a Javelin, two with Steel Lances—from the southern edge of the map
- Enemy phase after any player unit passes the main wall (row 7) or northeast of its door (columns 6–9, row 8), if Debias is alive
NPC data
| ||||||||||||||||||||||||||||||||||||||||||||||||||||||||||||||||||||||||||||||||||||||||||||||||
| ||||||||||||||||||||||||||||||||||||||||||||||||||||||||||||||||||||||||||||||||||||||||||||||||
Reinforcements
Boss data
- Main article:
Debias - Stats with two figures separated by a ~ are presented as a range, representing stats that vary due to random growths. The figures to the left and right of the ~ are the stat's minimum and maximum possible values respectively.[1]
Normal Hard

Strategy
| This section details unofficial strategies that may help with completion of the chapter. This may not work for everybody. |
Roy's army has finally reached Ostia, and the Lycia arc is about to end. The player should bring their best units to this chapter; mounted units will come in handy for visiting all eight houses. There is no need to hurry, though; there are no Thieves or Brigands who could destroy the houses, so it is recommended first to defeat the nearest enemies and then collect items.
The most challenging aspect of this chapter is to keep alive Zelot and Trec. Noah is not a problem, as he arrives after turn two, and Roy should be already there to recruit him. If the player is interested in the other two units, they should send two strong mounted units to rescue them, such as Marcus, Alen or Lance (the last two only if they have been trained.) Shanna is not a good option due to the three archers who are surrounding the area.
The left side of the player's army should claim the trees there as soon as possible. The right party will face the biggest problems, as most enemies will come from this side. If needed, the player should advance slowly and take their time. The best strategy should be to rescue Zelot and Trec, and to bring them to Roy, instead of sending the lord to the fray. Given that most enemies use lances, the probabilities of Roy leaving the battlefield without a scratch are quite low.
The first arena of the game is located here; it is the building that Noah comes from. The player should keep in mind that units who are defeated here cannot be used any longer (in other words, they die) and all units will use iron weapons to fight. A way to measure how strong the enemies there can be is the amount of money the dealer asks to bet. If it is more than 800 gold, it is better to leave the arena.
After turn 10, four Cavaliers will arrive from the south, so the player should either advance quickly or leave some units behind to deal with them. The most dangerous of them is at level fifteen and has a Silver Lance; the rest are quite similar to the original enemies. The other batch of reinforcements will arrive after any unit crosses either the doors or the small open square in the same wall, with eight enemy units appearing next to the boss. Most of them can attack from a distance, so the player should try to play the open spaces to their advantage, creating a choke point.
The boss is quite easy; Roy's Rapier, the Hammer, the Armorslayer, or magic spells will make short work of him. As a side note, Debias is the first boss with whom someone can have a special conversation—in this case, Bors. Once the boss has been defeated, Roy can seize the gate, and the chapter will end.
Trivia
- This chapter's layout bears a striking resemblance to Chapter 6 of Thracia 776.
- This is one of the only three chapters in The Binding Blade to have additional enemies on turn 1 in hard mode, the others being Chapter 21 and Chapter 22.
Etymology and other languages
| Names, etymology, and in other regions | ||
|---|---|---|
| Language | Name | Definition, etymology, and notes |
| English |
Ostia's Rebellion |
Used in leftover text from the data transfer menu in the English version of Fire Emblem: The Blazing Blade. |
| English (unofficial) |
The Ostian Revolt |
-- |
| Japanese |
オスティアの反乱 |
Ostian revolt |
Gallery
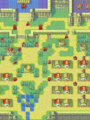
Map of the chapter
References
- ↑ The Ostian Revolt, triangleattack.com, Retrieved: December 24, 2020
| ← Ensnared • | The Ostian Revolt | • Reunion → |
|---|