The Hero of the West
The Hero of the West (Japanese: 西方の勇者 Hero of the west) is Chapter 11A of Fire Emblem: The Binding Blade; the player gets this for their eleventh chapter if they visited the village that gives the player a Killer Bow in Chapter 9 and thus went north toward Mount Eburacum.
| ||||||||||
|

| “ | I want to help the people here. Even if it means that we'll be going against Etruria... | ” | — Roy |
|---|
Plot
- Main article:
The Hero of the West/Script
Roy's Lycian Army arrives at Eburacum to support the resistance force of the Western Isles. During his trip, Roy sends a letter to Cecilia to inform her of the situation. Meanwhile, the overseer of the Eburacum mine – Bishop Orlo of the Elimine Church – speaks with Melady, who has arrived in search of Princess Guinivere. He informs her that he has no information about the princess's location. However, after Melady leaves, Orlo consults with his soldiers and reveals that he knows Guinivere is in Aquileia, the Etrurian capital. He also knows that the sudden death of Prince Myrddin was an assassination and that High Chancellor Roartz was involved in. The soldier he talks to then tells him that he knows where the leader of the resistance is hiding, and Orlo orders him to attack that place immediately.
In the meantime, Roy's army prepares for battle. Roy thinks it best to wait for General Cecilia's response, but he is pushed into action when he learns that the local Etrurian troops are attacking a village. With no time for Roy to waste, the battle begins.
At the start of the battle, Galle and Melady fly in and discuss Princess Guinivere's whereabouts. Melady admits that she has no leads and apologizes to Galle for roping him into this, but he does not mind and says he will ask Narcian for help. Melady brings up the fact it was Narcian who prevented Galle from becoming Wyvern General by arguing that Galle was not a Bern native and therefore did not deserve the position, but Galle does not mind, as he feels grateful for what he already possesses. After this interaction, Galle and Melady leave the area.
Later, Klein and Thea arrive in the south-east, each with a contingent of troops. Klein had been sent by Lord Arcardo to deal with the Lycian Army, which had supposedly betrayed Etruria. He has a brief conversation with Thea about their siblings, then orders Thea to be careful before sending her off. Thea later returns to the battlefield to strike from the north-west, but before she can order a charge, one of her soldiers tells her there are rumors of Etrurians finding their group disposable. Thea pays no heed to the rumors, as she trusts that Commander Klein would not simply sacrifice her and her Pegasus Knights.
Soon after, Echidna is cornered in one of the villages, and orders the villagers to rush to safety as she starts fighting the surrounding enemies. Not long afterward, Orlo wonders why his forces have not dealt with Echidna yet, only to learn that the resistance has received the Lycian Army's help. However, he also learns that Lord Arcardo now officially wants Roy and his army dead, and that he has sent reinforcements.
Clarine or Roy can talk to Klein, convincing him that Etruria is exploiting the villagers, prompting Klein to join the Lycian Army. Then, Klein or Shanna can convince Thea to switch sides as well. Additionally, Larum can talk to Echidna, confirming her survival, and Echidna joins the Lycian Army, because their causes align.
Once Orlo and his army are defeated, Roy meets with Elffin, a member of the resistance force. Elffin tests Roy by telling him that Lords Arcardo and Roartz may have lured the Lycian Army away from Lycia on purpose, and that they are cooperating with Bern. However, Roy realizes that the people of the Western Isles have nobody else to rely on, while Pherae and all of Lycia have Eliwood and Cecilia defending them. Therefore, he chooses to stay on the Western Isles, and by making that decision, he passes Elffin's test of level-headedness. Next, Roy plans to head to Juteaux, the capital of the Western Isles and the center of the local corruption.
Chapter data
Normal Hard
| ||||||
|
| |||||
| Victory: Seize the castle gate | Player | Other | Enemy | |||
|---|---|---|---|---|---|---|
| Defeat: Roy dies | 1–12+4 | 0+10−2 | 22+30−10 | |||
| ||||||
Character data
| Characters | ||||||||||||||||||||||||||||||||||||||||||||
|---|---|---|---|---|---|---|---|---|---|---|---|---|---|---|---|---|---|---|---|---|---|---|---|---|---|---|---|---|---|---|---|---|---|---|---|---|---|---|---|---|---|---|---|---|
New units
| ||||||||||||||||||||||||||||||||||||||||||||
| ||||||||||||||||||||||||||||||||||||||||||||
Required characters
| ||||||||||||||||||||||||||||||||||||||||||||
Available characters
| ||||||||||||||||||||||||||||||||||||||||||||


Item data
| |||||||||||||||||||||||||||||||||||||||
|
Shop data
Swords Lances Axes Bows Anima Light Dark Staves Items Secret
None
Enemy data
- Stats with two figures separated by a ~ are presented as a range, representing stats that vary due to random growths. The figures to the left and right of the ~ are the stat's minimum and maximum possible values respectively.
Normal Hard
| ||||||||||||||||||||||||||||||||||||||||||||||||||||||||||||||||||||||||||||||||||||||||||||||||||||||||||||||||||||||||||||||||||||||||||||||||||||||||||||||||||||||||||||||||||||||||||||||||||||||||||||||||||||||||||||||||||||||||||||||||||||||||||||||||||||||||||||||||||||||||||||||||||||||||||||||||||||||||||||||||||||||||||||||||||||||||||||||||||||||||||||||||||||||||||||||||||||||||||||||||||||||||||||||||||||||||||||||||||||||||||||||||||||||||||||||||||||||||||
| ||||||||||||||||||||||||||||||||||||||||||||||||||||||||||||||||||||||||||||||||||||||||||||||||||||||||||||||||||||||||||||||||||||||||||||||||||||||||||||||||||||||||||||||||||||||||||||||||||||||||||||||||||||||||||||||||||||||||||||||||||||||||||||||||||||||||||||||||||||||||||||||||||||||||||||||||||||||||||||||||||||||||||||||||||||||||||||||||||||||||||||||||||||||||||||||||||||||||||||||||||||||||||||||||||||||||||||||||||||||||||||||||||||||||||||||||||||||||||
| ||||||||||||||||||||||||||||||||||||||||||||||||||||||||||||||||||||||||||||||||||||||||||||||||||||||||||||||||||||||||||||||||||||||||||||||||||||||||||||||||||||||||||||||||||||||||||||||||||||||||||||||||||||||||||||||||||||||||||||||||||||||||||||||||||||||||||||||||||||||||||||||||||||||||||||||||||||||||||||||||||||||||||||||||||||||||||||||||||||||||||||||||||||||||||||||||||||||||||||||||||||||||||||||||||||||||||||||||||||||||||||||||||||||||||||||||||||||||||
| ||||||||||||||||||||||||||||||||||||||||||||||||||||||||||||||||||||||||||||||||||||||||||||||||||||||||||||||||||||||||||||||||||||||||||||||||||||||||||||||||||||||||||||||||||||||||||||||||||||||||||||||||||||||||||||||||||||||||||||||||||||||||||||||||||||||||||||||||||||||||||||||||||||||||||||||||||||||||||||||||||||||||||||||||||||||||||||||||||||||||||||||||||||||||||||||||||||||||||||||||||||||||||||||||||||||||||||||||||||||||||||||||||||||||||||||||||||||||||
Reinforcements
- Enemy phase of turn 5
- Enemy phase of turn 6 if Orlo is alive, and of turns 12–15
- Enemy phase of turn 7
- Thea and 4 Pegasus Knights—two with Steel Lances, two with Iron Lances and Javelins
- Enemy phase of turn 8
- 3 Fighters—one at level 17, two at level 15—from around the house east of the arena
- Enemy phase of turn 10 if Orlo is alive
- 7 Cavaliers—one with a Killer Lance, four with Iron Lances and Javelins, two with Iron Lances—from the northwest part of the map
- Enemy phase of turn 14 if Orlo is alive (Hard Mode only)
- Roberts and 6 Cavaliers—four with Iron Lances and Javelins, two with Iron Lances—from the southeast forests
NPC data
- Stats with two figures separated by a ~ are presented as a range, representing stats that vary due to random growths. The figures to the left and right of the ~ are the stat's minimum and maximum possible values respectively.
Normal Hard
| |||||||||||||||||||||||||||||||||||||||||||||||||||||||||||||||||||||||||||||||||||||||||||||||||||||||||||||||||||||||||||||||||||||||||||||||||||||||||||||||||||||||||||||||||
| |||||||||||||||||||||||||||||||||||||||||||||||||||||||||||||||||||||||||||||||||||||||||||||||||||||||||||||||||||||||||||||||||||||||||||||||||||||||||||||||||||||||||||||||||
Reinforcements
- When Klein is recruited
- 4 Archers that arrive with Klein switch from enemies to NPCs
- When Shanna talks to Thea after Klein is recruited but not before
- Thea switches from an enemy to an NPC
- When Thea is recruited or becomes an NPC
- 4 Pegasus Knights that arrive with Thea switch from enemies to NPCs
- Enemy phase of turn 8
- Echidna from the house east of the arena
Boss data
- Stats with two figures separated by a ~ are presented as a range, representing stats that vary due to random growths. The figures to the left and right of the ~ are the stat's minimum and maximum possible values respectively.[1]
- Main article:
Orlo
Normal Hard

- Main article:
Roberts
|
|
| |||||||||||||||||||||||||||||||||||||||||||||||||

Strategy
| This section details unofficial strategies that may help with completion of the chapter. This may not work for everybody. |
This chapter can be challenging, especially if you're aiming to collect every item. Deploy your strongest and highest-level units, ideally those with high mobility and powerful weapons. Utilize Larum to give your units an extra move during your turn. You have multiple strategies at your disposal. One involves using Shanna to rescue a strong sword-user. Move her slightly, refresh her with Larum, and then drop the sword-user near houses 7 or 8. Have this unit clear out nearby enemies, wait in the forest, and visit the houses to prevent them from being destroyed by reinforcements.
Alternatively, use Marcus and Zealot. Since they can't be carried by Shanna, send them along with two other fast units to destroy the weak wall above, near house 7. These walls have 100HP, so equip your most powerful weapons like Javelins and Hand Axes to take them down in two or three turns. Your remaining units should move downward to visit the villages, preferably taking the shorter right path. Be aware of when reinforcements will appear. Klein and Thea are among these reinforcements. Klein is easier to recruit with Clarine due to her high movement, although Roy can also speak to him. Once recruited, his Archer squad will turn into allied units.
Thea and her Pegasus Knights appears on turn 7 armed with Javelins. To recruit her, try not to have any unit within her range. Alternatively, position a high-defense unit at the top of the map to attract her attention, but ensure this unit is unarmed. Then have Klein (or Shanna) talk to Thea. Be cautious about staying where you started, as more reinforcements arrive on turn 10. Also, the game might randomly decide whether Klein and Thea move, so you may need to restart the chapter or lure them with your units if needed.
Note that the villages near the mountain caves (5 and 8) will be destroyed on turn 7 unless you visit them. If you recruit Thea and Klein but don't move them, they may attack the boss and get killed. Lastly, Echidna appears between houses 6 and 7 on a green square during turn 8, along with three enemy fighters. Her stats are not very strong, and you must talk to her with Larum to recruit her. It's not a significant loss if she dies.
In summary, focus on high-mobility and strong units, be aware of reinforcements, and act quickly to visit all houses and recruit all characters. If you don't, you may miss out on valuable items and potential allies.
Etymology and other languages
| Names, etymology, and in other regions | ||
|---|---|---|
| Language | Name | Definition, etymology, and notes |
| English |
Hero of the West |
Used in leftover text from the data transfer menu in the English version of Fire Emblem: The Blazing Blade. |
| English (unofficial) |
•The Hero of the West |
The title refers to Roy and how he frees the inhabitants of Eburacum (in the Western Isles) from slavery. |
| Japanese |
西方の勇者 |
Hero of the west |
Gallery
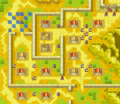
Map of the chapter
References
- ↑ The Hero of the West, triangleattack.com, Retrieved: December 24, 2020
| ← Western Resistance • | The Hero of the West | • The True Enemy → |
|---|