| Site News |
|---|
| Warning: This wiki contains spoilers. Read at your own risk! Social media: If you would like, please join our Discord server, and/or follow us on Twitter (X) or Tumblr! |
The Golden Scheme/Taking Fort Merceus: Difference between revisions
mNo edit summary |
m (→Character data) |
||
| Line 100: | Line 100: | ||
|return32=balthus 02 | |return32=balthus 02 | ||
|return32article=Balthus | |return32article=Balthus | ||
|return33=constance | |return33=constance 04 | ||
|return33article=Constance | |return33article=Constance | ||
|return34=hapi 02 | |return34=hapi 02 | ||
Revision as of 02:50, 1 April 2020
| ||||
|

Taking Fort Merceus is the main battle map of the eighteenth chapter on the Verdant Wind route in Fire Emblem: Three Houses. In this map, Claude leads an sneak attack against Fort Merceus, bringing along unfamiliar allies to aid him.
Map data
Normal Hard/Maddening
| ||||||
|
| |||||
| Victory: Defeat the Death Knight | Player | Other | Enemy | |||
|---|---|---|---|---|---|---|
| Defeat: Byleth or Claude dies*, the player's army is routed*, or the Death Knight escapes | 11 | 0+5 | 30+∞ | |||
| ||||||


Character data
| Characters | |
|---|---|
New units
| |
| |
Available characters
| |
                                 
|
Item data
| ||||||||||||||||||||||||
|
Enemy data
Normal Hard Maddening
| |||||||||||||||||||||||||||||||||||||||||||||||||||||||||||||||||||||||||||||||||||||||||||||||||||||||||||||||||||||||||||||||||||||
| |||||||||||||||||||||||||||||||||||||||||||||||||||||||||||||||||||||||||||||||||||||||||||||||||||||||||||||||||||||||||||||||||||||
| |||||||||||||||||||||||||||||||||||||||||||||||||||||||||||||||||||||||||||||||||||||||||||||||||||||||||||||||||||||||||||||||||||||
|
Reinforcements
- Each turn, a random combination of the following will appear:
- 1 Paladin from the northwest corner of the map
- 1 Armored Knight from the northern border of the map
- 1 Dark Mage from the southwest corner of the map
- 1 Fortress Knight from the southern border of the map
- Note: Reinforcements are halted if a player unit reaches the spaces where they come from.
NPC data
| ||||||||||||||||||||||||||||
| ||||||||||||||||||||||||||||
| ||||||||||||||||||||||||||||
|
Reinforcements
- At the start of turn 1
Boss data
- Main article:
Death Knight
Normal Hard Maddening
|
|
| |||||||||||||||||||||||||||||||||||||||||||||||||||||||||||||||||||||||||||||||||||

Sub-bosses
- Main article:
Linhardt
Normal Hard Maddening
|
|
| |||||||||||||||||||||||||||||||||||||||||||||||||||||||||||||||||||||||||||||||||||

- Main article:
Caspar
Normal Hard Maddening
|
|
| |||||||||||||||||||||||||||||||||||||||||||||||||||||||||||||||||||||||||||||||||||

Strategy
| This section details unofficial strategies that may help with completion of the chapter. This may not work for everybody. |
This section has been marked as a stub. Please help improve the page by adding information.
Trivia
Etymology and other languages
This section has been marked as a stub. Please help improve the page by adding information.
| Names, etymology, and in other regions | ||
|---|---|---|
| Language | Name | Definition, etymology, and notes |
| English |
Taking Fort Merceus |
-- |
Gallery
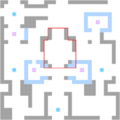
Entering the area outlined in red will trigger the Death Knight's movement.

| ← To War at Gronder • | Taking Fort Merceus | • The Enbarr Infiltration → |
|---|