| Site News |
|---|
| Warning: This wiki contains spoilers. Read at your own risk! Social media: If you would like, please join our Discord server, and/or follow us on Twitter (X) or Tumblr! |
The Frozen River
The Frozen River (Japanese: 凍てつく河 Frozen River) is Chapter 18A of Fire Emblem: The Binding Blade.
| ||||||||
|

| “ | I order you. Use the spell book and create rainfall. Make it rain so that the rivers will overflow and push back the advancing Etrurian Army. | ” | — Martel to Niime |
|---|
Plot
- Main article:
The Frozen River/Script
After Arcado's defeat, the Etrurian Army continues its march deeper into Ilia. They arrive in a forest under the control of the bishop Martel. Before the battle, Roy confronts Guinivere about the rumors saying Zephiel murdered his own father. Guinivere cannot answer, and asks for more time.
Once she leaves, Merlinus gives Roy the report that Martel has recruited a powerful dark mage named Niime. She shows off her abilities by turning all the rivers in the forest to ice during the fight against Martel. Despite the changing weather, the Etrurian Army defeats Martel and rescues Niime from his control.
Niime reveals that she joined with Bern to study dragons, which draws Roy's attention. Because of her research, Niime concludes that Bern resurrected the Demon Dragon, the leader of the dragons defeated by the hero Hartmut. Additionally, this dragon has the ability to create more dragons, explaining the many manaketes the Etrurian Army fought until this point.
Finally, Niime joins the Etrurian Army, and they continue toward Edessa together.
Chapter data
Normal Hard
| ||||||
|
| |||||
| Victory: Seize the castle gate | Player | Enemy | ||||
|---|---|---|---|---|---|---|
| Defeat: Roy dies | 1–15 | 32+26 | ||||
| ||||||

On the enemy phase of turn 7, the river freezes and becomes traversable to units who otherwise cannot cross rivers. This will not happen if Martel is already dead.
Character data
| Characters | |
|---|---|
New units
| |
| |
Required characters
| |
Available characters
| |
Item data
| ||||||||||||
|
Enemy data
- Stats with two figures separated by a ~ are presented as a range, representing stats that vary due to random growths. The figures to the left and right of the ~ are the stat's minimum and maximum possible values respectively.
Normal Hard
| ||||||||||||||||||||||||||||||||||||||||||||||||||||||||||||||||||||||||||||||||||||||||||||||||||||||||||||||||||||||||||||||||||||||||||||||||||||||||||||||||||||||||||||||||||||||||||||||||||||||||||||||||||||||||||||||||||||||||||||||||||||||||||||||||||||||||||||||||||||||||||||||||||||||||||||||||||||||||||||||||||||||||||||||||||||||||||||||||||||||||||||||||||||||||||||||||||||||||||||||||||||||||||||||||||||||||||||||||||||||||||||||||||||||||||||||||||||||||||||||||||||||||||||||||||||||||||||||||||||||||||||||||||||||||||||||||||||||||||||||||||||||||||||||||||||||
| ||||||||||||||||||||||||||||||||||||||||||||||||||||||||||||||||||||||||||||||||||||||||||||||||||||||||||||||||||||||||||||||||||||||||||||||||||||||||||||||||||||||||||||||||||||||||||||||||||||||||||||||||||||||||||||||||||||||||||||||||||||||||||||||||||||||||||||||||||||||||||||||||||||||||||||||||||||||||||||||||||||||||||||||||||||||||||||||||||||||||||||||||||||||||||||||||||||||||||||||||||||||||||||||||||||||||||||||||||||||||||||||||||||||||||||||||||||||||||||||||||||||||||||||||||||||||||||||||||||||||||||||||||||||||||||||||||||||||||||||||||||||||||||||||||||||
| ||||||||||||||||||||||||||||||||||||||||||||||||||||||||||||||||||||||||||||||||||||||||||||||||||||||||||||||||||||||||||||||||||||||||||||||||||||||||||||||||||||||||||||||||||||||||||||||||||||||||||||||||||||||||||||||||||||||||||||||||||||||||||||||||||||||||||||||||||||||||||||||||||||||||||||||||||||||||||||||||||||||||||||||||||||||||||||||||||||||||||||||||||||||||||||||||||||||||||||||||||||||||||||||||||||||||||||||||||||||||||||||||||||||||||||||||||||||||||||||||||||||||||||||||||||||||||||||||||||||||||||||||||||||||||||||||||||||||||||||||||||||||||||||||||||||
| ||||||||||||||||||||||||||||||||||||||||||||||||||||||||||||||||||||||||||||||||||||||||||||||||||||||||||||||||||||||||||||||||||||||||||||||||||||||||||||||||||||||||||||||||||||||||||||||||||||||||||||||||||||||||||||||||||||||||||||||||||||||||||||||||||||||||||||||||||||||||||||||||||||||||||||||||||||||||||||||||||||||||||||||||||||||||||||||||||||||||||||||||||||||||||||||||||||||||||||||||||||||||||||||||||||||||||||||||||||||||||||||||||||||||||||||||||||||||||||||||||||||||||||||||||||||||||||||||||||||||||||||||||||||||||||||||||||||||||||||||||||||||||||||||||||||
Reinforcements
- Enemy phase of turns 5–9
- On Normal Mode, enemy phase of even turns 10–16; on Hard Mode, enemy phase of turns 10–20
- 2 Pegasus Knights—one without a Javelin—from the north edge of the map
- On Normal Mode, enemy phase of odd turns 11–17; on Hard Mode, enemy phase of turns 10–20
- 2 Pegasus Knights—one without a Javelin—from the east edge of the map
Boss data

Strategy
| This section details unofficial strategies that may help with completion of the chapter. This may not work for everybody. |
For this map, bring foot soldiers, flying units, and Nomads. Avoid using Knights, Cavaliers, or armored units, as the dense forests will slow them down. Be wary of the Ballistae. Ensure you eliminate the Archers operating them before moving your flying units forward. Utilize the forests to enhance your units' evasion.
On turn 3, expect an assault from the Wyvern Riders. Positioning a competent bow-user at the edge of their attack range, ensuring no other units are close by, will be your best strategy. The Wyvern Riders will attempt long-range attacks, and your bow-user will counter and defeat them.
A note of caution: one of the Priests wields a Berserk staff. Either eliminate him quickly or carry Restore staves on multiple units for safety.
Two groups of Pegasus Knights are present on the map. The one near the Ballista guarded by two Mercenaries will remain stationary until you approach closely. Have your bow-users prepared. The other group will not move until you enter their attack range.
On turn 7, all the rivers freeze over, allowing any unit to cross. But be cautious: since this happens at the start of the enemy's turn, an enemy can cross a previously impassable river to strike any of your units positioned close by.
There are three villages to visit. The northeast village will be razed by turn 9 and the southeast one by turn 11. While the southeast and northwest villages are easily accessible—especially the northwest town for flying units—the northeast one poses a challenge. Either dispatch your strongest units to clear the enemies or employ a baiting strategy to draw them out.
Lastly, the boss wields a potent Purge spell. Avoid positioning fragile units within its 10-square range. Clear out the nearest threats first. Then, if you have a high-level Pegasus Knight, send her in for the kill. Otherwise, deploy a unit with robust strength, HP, and speed to handle the boss.
Etymology and other languages
| Names, etymology, and in other regions | ||
|---|---|---|
| Language | Name | Definition, etymology, and notes |
| English |
Frozen River |
Used in leftover text from the data transfer menu in the English version of Fire Emblem: The Blazing Blade. |
| English (unofficial) |
The Frozen River |
-- |
| Japanese |
凍てつく河 |
Frozen River |
Gallery
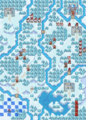
Map of the chapter
References
- ↑ The Frozen River, triangleattack.com, Retrieved: December 24, 2020
| ← Ocean's Parting • | The Frozen River | • Bitter Cold → |
|---|