|
|
| Line 619: |
Line 619: |
| {{Names | | {{Names |
| |eng-name=The Forgotten | | |eng-name=The Forgotten |
| |jap-name=<!--{{hover|-->持たざる者たち<!--|?}}--> | | |jap-name={{hover|持たざる者たち|Motazarumono-tachi}} |
| |jap-mean=Those Who Don't Have | | |jap-mean=Those who don't have |
| }} | | }} |
|
| |
|
Revision as of 20:53, 23 November 2019
| The Forgotten
|
|
|
|
| Location
|
Kingdom Territory, near Gautier
|
| Boss(es)
|
Thief Leaders
|
|
| “
|
I have to wonder though... What if it was the other way around? If he had the Crest and I didn't... Would I be the one my father thought was worth forgetting? Or would my fate have been wholly unlike his?
|
”
|
— Sylvain
|
The Forgotten (Japanese: 持たざる者たち Those Who Don't Have) is a paralogue chapter in Fire Emblem: Three Houses. It is available from Chapter 7 to Chapter 11. In order to attempt this paralogue, the player must have recruited Sylvain, and he must not have fallen in battle previously. In this chapter, Miklan's band of thieves surfaces in Gautier territory and Sylvain is tasked with clearing them out, a task for which he asks Byleth for help.
Plot
- Main article: The Forgotten/Script
Sylvain approaches Byleth and reveals that Miklan's old group of thieves is now causing chaos in Gautier territory and he has been ordered by his father to put them down. In defiance of his orders to do so alone, Sylvain asks Byleth and their students to accompany him.
After the battle, Sylvain reveals that his father' goal was to have Sylvain claim the Lance of Ruin as his own. Sylvain recounts how Miklan hated him from the moment he found out he had a Crest and wonders what their lives would have been like had Miklan had a Crest and he didn't. He further explains that instability caused by border conflicts with Sreng to the north has driven many to banditry to survive and that the current regent of Faerghus, Rufus, is too busy chasing skirts to govern properly.
Beginning log
Sylvain is unable to stand idly by when he learns that the band of thieves once led by his brother, Miklan, are again causing trouble in Margrave Gautier's territory.
Map data
This section has been marked as a stub. Please help improve the page by adding information.
|
|
|
|
|
| Victory: Rout the enemy
|
Player
|
Partner
|
Other
|
Enemy
|
Third
|
Defeat: Byleth or Edelgard  /Dimitri /Dimitri  /Claude /Claude  dies*, the player's army is routed*, or Sylvain dies dies*, the player's army is routed*, or Sylvain dies
|
11
|
{{{partner}}}
|
{{{other}}}
|
29
|
{{{third}}}
|
|
|
|
|
|
|
|
|
|
| Victory: Rout the enemy
|
Player
|
Partner
|
Other
|
Enemy
|
Third
|
| Defeat: Byleth or Edelgard /Dimitri /Claude dies*, the player's army is routed*, or Sylvain dies
|
11
|
{{{partner}}}
|
{{{other}}}
|
32
|
{{{third}}}
|
|
|
|
|
Character data
Black Eagles Blue Lions Golden Deer
Item data
Enemy data
|
|
|
|
|
|
|
|
Name
|
Class
|
Lv
|
#
|
Inventory and Skills
|
Notes
|
|
|
|
|
|
Name
|
Class
|
Lv
|
#
|
Inventory and Skills
|
Notes
|
|
|
Thief
|
Thief
|
14
|
1
|
 Steel Sword • Steel Sword •  Energy Drop Energy Drop
 Steal • Steal •  Locktouch • Locktouch •  Sword Prowess Lv 2 Sword Prowess Lv 2
 Thieves Lv 3: Thieves Lv 3:  Disturbance Disturbance
|
Immobile until turn 4 or any unit enters within three tiles of the Onager; ignores combat and moves to escape.
|
|
|
Thief
|
Thief
|
14
|
1
|
Steel Sword •  Magic Staff Magic Staff
Steal • Locktouch • Sword Prowess Lv 2
Thieves Lv 3: Disturbance
|
Immobile until turn 4 or any unit enters within three tiles of the Onager; ignores combat and moves to escape.
|
|
|
Thief
|
Thief
|
14
|
1
|
Steel Sword •  Short Spear Short Spear
Steal • Locktouch • Sword Prowess Lv 2
Thieves Lv 3: Disturbance
|
Immobile until turn 4 or any unit enters within three tiles of the Onager; ignores combat and moves to escape.
|
|
|
Thief
|
Thief
|
14
|
1
|
Steel Sword •  Goddess Ring Goddess Ring
Steal • Locktouch • Sword Prowess Lv 2
Thieves Lv 3: Disturbance
|
Immobile until turn 4 or any unit enters within three tiles of the Onager; ignores combat and moves to escape.
|
|
|
Thief
|
Thief
|
14
|
1
|
Steel Sword • Speedwing
Steal • Locktouch • Sword Prowess Lv 2
Thieves Lv 3: Disturbance
|
Immobile until turn 4 or any unit enters within three tiles of the Onager; ignores combat and moves to escape.
|
|
|
Thief
|
Thief
|
14
|
1
|
Steel Sword •  Advanced Seal Advanced Seal
Steal • Locktouch • Sword Prowess Lv 2
Thieves Lv 3: Disturbance
|
Immobile until turn 4 or any unit enters within three tiles of the Onager; ignores combat and moves to escape.
|
|
|
Thief
|
Archer
|
14
|
3
|
 Steel Bow Steel Bow
 Bowrange +1 • Bowrange +1 •  Bow Prowess Lv 1 Bow Prowess Lv 1
|
Begin moving if the Archer commander is killed.
|
|
|
Thief
|
Mercenary
|
14
|
5
|
Steel Sword
Sword Prowess Lv 2
|
• The western one and northern one begin moving if the Archer commander is killed.
• The southwest two begin moving if they or any of the southeast enemies, the Armored Knights, Brigand, Mage or Brawler, are provoked, or if the Armored Knight commander is killed.
• The southeast one begins moving if the Dark Mage commander is killed.
|
|
|
Thief
|
Armored Knight
|
14
|
4
|
 Steel Axe Steel Axe
 Axe Prowess Lv 2 Axe Prowess Lv 2
|
• The southwest two begin moving if they or any of the southeast enemies, the Mercenaries, Brigand, Mage or Brawler, are provoked, or if the Armored Knight commander is killed.
• The southeast one begins moving if the Dark Mage commander is killed.
• The northern one begins moving if the Archer commander is killed.
|
|
|
Thief
|
Brigand
|
14
|
4
|
Steel Axe
Axe Prowess Lv 2
|
• The southwest one begins moving if he or any of the southeast enemies, the Mercenaries, Armored Knights, Mage or Brawler, are provoked, or if the Armored Knight commander is killed.
• The northeast two begin moving if the Brigand commander is killed.
• The southeast one begins moving if the Dark Mage commander is killed.
|
|
|
Thief
|
Mage
|
14
|
3
|
 Fire Fire
 Fire • Fire •  Reason Lv 2 Reason Lv 2
|
• The southwest one begins moving if he or any of the southeast enemies, the Mercenaries, Armored Knights, Brigand or Brawler, are provoked, or if the Armored Knight commander is killed.
• The southeast two begin moving if the Dark Mage commander is killed.
|
|
|
Thief
|
Brawler
|
14
|
3
|
 Steel Gauntlets • Unarmed Steel Gauntlets • Unarmed
 Unarmed Combat • Unarmed Combat •  Brawling Prowess Lv 2 Brawling Prowess Lv 2
|
• The southwest one begins moving if he or any of the southeast enemies, the Mercenaries, Armored Knights, Brigand or Mage, are provoked, or if the Armored Knight commander is killed.
• The northeast two begin moving if the Brigand commander is killed.
|
|
|
Thief Leader
|
Archer
|
16
|
1
|
Steel Bow •  Iron Shield Iron Shield
Bowrange +1 • Bow Prowess Lv 1 •  HP +5 • HP +5 •  Strength +2 • Strength +2 •  Defense +2 Defense +2
Thieves Lv 3: Disturbance
|
• Immobile; stands on a Stronghold.
• Upon defeat, the northwest escape route closes.
|
|
|
Thief Leader
|
Armored Knight
|
16
|
1
|
Steel Axe • Iron Shield
 Axe Prowess Lv 1 • HP +5 • Strength +2 • Defense +2 Axe Prowess Lv 1 • HP +5 • Strength +2 • Defense +2
Thieves Lv 3: Disturbance
|
• Immobile; stands on a Stronghold.
• Upon defeat, the southern escape route closes.
|
|
|
Thief Leader
|
Brigand
|
16
|
1
|
Steel Axe • Iron Shield
Axe Prowess Lv 1 • HP +5 • Strength +2 • Defense +2
Thieves Lv 3: Disturbance
|
• Immobile; stands on a Stronghold.
• Upon defeat, the northeast escape route closes.
|
|
|
Thief Leader
|
Dark Mage
|
16
|
1
|
Banshee Θ • Iron Shield • Miasma Δ
 Miasma Δ • Miasma Δ •  Reason Lv 1 • HP +5 • Reason Lv 1 • HP +5 •  Magic +2 • Defense +2 Magic +2 • Defense +2
Thieves Lv 3: Disturbance
|
• Immobile; stands on a Stronghold.
• Upon defeat, the southeast escape route closes.
|
|
|
|
|
|
Name
|
Class
|
Lv
|
#
|
Inventory and Skills
|
Notes
|
|
- All units that begin to move when one of the commanders is defeated will retreat when at low HP after that boss is defeated; they will move to the escape route that commander was responsible for and ignore combat.
Boss data
|
|
|
|
|
|
|
Skill Levels

|

|

|

|

|

|

|

|

|

|

|

|
| E
|
E
|
E
|
C
|
E
|
E
|
E
|
E
|
E
|
E
|
E
|

|
|
|
|
|
|
|
|
|
|
Skill Levels
|
|
|
|
|
|
|
|
|
|
|
|
|
| E
|
E
|
E
|
C
|
E
|
E
|
E
|
E
|
E
|
E
|
E
|
|
|
|
|
|
|
|
|
|
|
Skill Levels
|
|
|
|
|
|
|
|
|
|
|
|

|
| E
|
E
|
C
|
E
|
E
|
E
|
E
|
E
|
D
|
E
|
E
|
|
|
|
|
|
|
|
|
|
|
Skill Levels
|
|
|
|
|
|
|
|
|
|
|
|
|
| E
|
E
|
C
|
E
|
E
|
E
|
E
|
E
|
D
|
E
|
E
|
|
|
|
|
|
|
|
|
|
|
Skill Levels
|
|
|
|
|
|
|
|
|
|
|
|

|
| E
|
E
|
C
|
E
|
E
|
E
|
E
|
E
|
E
|
E
|
E
|
|
|
|
|
|
|
|
|
|
|
Skill Levels
|
|
|
|
|
|
|
|
|
|
|
|
|
| E
|
E
|
C
|
E
|
E
|
E
|
E
|
E
|
E
|
E
|
E
|
|
|
|
|
|
|
|
|
|
|
Skill Levels
|
|
|
|
|
|
|
|
|
|
|
|

|
| E
|
E
|
E
|
E
|
E
|
C
|
E
|
E
|
E
|
E
|
E
|
|
|
|
|
|
|
|
|
|
|
Skill Levels
|
|
|
|
|
|
|
|
|
|
|
|
|
| E
|
E
|
E
|
E
|
E
|
C
|
E
|
E
|
E
|
E
|
E
|
|
|
|
Strategy
| This section details unofficial strategies that may help with completion of the chapter. This may not work for everybody.
|
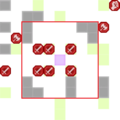
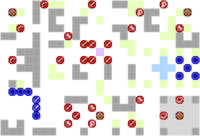
You get rewards for every thief you defeat, so make sure to kill every last one of them. Your first objective is to capture the four strongholds so that the thieves with all the yummy loot can't escape. The northern strongholds are poorly defended and should buckle to one or two decent units, but the southern ones are more fortified and will require a concentrated push. Once any of the bosses are downed, the surrounding enemies will begin attacking. Once they are reduced to low HP, they will begin retreating to an escape route; counterintuitively, they will only retreat to the point their respective boss was responsible for, but will only begin retreating after that boss was defeated. Once you've wiped out all four strongholds, it shouldn't be too much trouble to clean up the remaining thieves in the center. The thieves with the loot will all run away like chickens with their heads cut off - surround them and take them down.
Trivia
Etymology and other languages
This section has been marked as a stub. Please help improve the page by adding information.
| Names, etymology, and in other regions
|
| Language
|
Name
|
Definition, etymology, and notes
|
| English
|
The Forgotten
|
--
|
|
|
Gallery
Entering the area outlined in red will trigger the Thieves's movement.
References