The Baron in Black: Difference between revisions
mNo edit summary |
|||
| (74 intermediate revisions by 10 users not shown) | |||
| Line 1: | Line 1: | ||
{{Chapter Infobox | |||
{{Chapter Infobox | |||
|image=[[File:Cm fe05 24.png|200px]] | |image=[[File:Cm fe05 24.png|200px]] | ||
|location=[[ | |location=[[Munster]] | ||
|new units=[[Galzus]] | |new units=[[Galzus]] | ||
|boss=[[Raydrik]] | |boss=[[Raydrik]] | ||
| | |previous=[[The Fiend's Lair]] | ||
|next=*[[Sworn Upon a Sword]] | |||
*[[The Loptrian Altar]] <small>(side quest)</small> | |||
|sidequest=[[Kia]] was obtained and Sara is recruited and alive | |||
}} | }} | ||
{{Quote|We | |||
'''The Baron in Black''' (Japanese: {{ | {{Quote|We don't have enough men... August, why did you divide our troops into three squads?|[[Leif]] to [[August]]}} | ||
'''The Baron in Black''' (Japanese: {{hl|黒衣の男爵|Kokui no danshaku}} ''The Black-Clad Baron'') is the twenty-fourth chapter of {{FE5}}. In order to play [[The Loptrian Altar|the side quest after]], the player must obtain the [[Kia Staff]] in this chapter and [[Sara]] must have been recruited, uncaptured, and alive. | |||
==Plot== | ==Plot== | ||
{{main|The Baron in Black/Script}} | {{main|The Baron in Black/Script}} | ||
[[Leif]] storms Castle Munster in a final confrontation with [[Raydrik]]. During the battle, he also fights [[Galzus]], but if [[Mareeta]] is on the battlefield, she recognizes Galzus as someone who rescued her in the past and he joins Leif's army to help save [[Eyvel]], Mareeta's other caretaker. | |||
After the battle ends, if [[Sara]] is in Leif's army, Leif heads toward the petrified Eyvel's location in order to undo the spell affecting her with the [[Kia]] staff. If Sara is not present, Leif's forces instead move into the Loptian temple underneath the castle in order to eliminate [[Veld]], the man responsible for Eyvel's petrification and for the child hunts around Munster. | |||
After | |||
==Chapter data== | ==Chapter data== | ||
| Line 23: | Line 24: | ||
|victory=Seize the throne | |victory=Seize the throne | ||
|defeat=[[Leif]] dies | |defeat=[[Leif]] dies | ||
|ally= | |ally=10–18{{h|+2|Upon Saias or Ced appearing, and Galzus being recruited}} | ||
|other=8 | |other=8 | ||
|enemy=40{{ | |enemy=40{{h|+42|Reinforcements}}{{h|+∞|Reinforcements (infinite)}} | ||
|map=[[File:Cm fe05 24.png]] | |map=[[File:Cm fe05 24.png]] | ||
}} | }} | ||
Units are arranged based on their position in deployment order after Leif. If [[Saias]] or [[Ced]] were recruited, they appear in a fixed position above Leif. | |||
===Character data=== | The center-north door cannot be opened like a standard door. Instead, it can only be opened by one of the [[Civilian]]s; which one can open it is determined randomly from the four boys on turn 5. | ||
{{ChapChars | |||
|game#=05 | ===Character data=== | ||
{{ChapChars | |||
|newunit1={{NewUnit | |game#=05 | ||
|newunit1={{NewUnit | |||
|name=Galzus | |name=Galzus | ||
|portrait=[[File:portrait galzus fe05.png]] | |portrait=[[File:portrait galzus fe05.png]] | ||
| Line 39: | Line 42: | ||
|HP=54 | |HP=54 | ||
|lv=20 | |lv=20 | ||
|recruitment method= | |inventory={{Item|5|Meisterschwert}}<br>{{Item|5|Flame Sword}}<br>{{Item|5|Vulnerary}}<br>{{Item|5|Vulnerary}}<br>{{Item|5|Master Axe}} | ||
|recruitment method=Enemy, talk to with [[Mareeta]] | |||
}} | }} | ||
|return1= | |forced1=leif | ||
|return2= | |return1=lifis | ||
|return3= | |return2=fergus | ||
|return4= | |return3=karin | ||
|return5= | |return4=brighton | ||
|return6= | |return5=machyua | ||
|return7= | |return6=lara | ||
|return8= | |return7=dalsin | ||
|return9= | |return8=asbel | ||
|return10= | |return9=nanna | ||
|return11= | |return10=hicks | ||
|return12= | |return11=finn | ||
|return13= | |return12=safy | ||
|return14= | |return13=shiva | ||
|return15= | |return14=osian | ||
|return16= | |return15=halvan | ||
|return17= | |return16=ronan | ||
|return18= | |return17=carrion | ||
|return19= | |return18=marty | ||
|return20= | |return19=dagdar | ||
|return21= | |return20=tanya | ||
|return22= | |return21=selphina | ||
| | |return22=cain | ||
| | |return22article=Cain (Thracia 776) | ||
| | |return23=alva | ||
| | |return23article=Alva (Thracia 776) | ||
| | |return24=robert | ||
|return26= | |return25=fred | ||
|return27= | |return26=olwen | ||
|return28= | |return27=mareeta | ||
|return29= | |return28=salem | ||
|return30= | |return29=perne | ||
|return31= | |return30=troude | ||
|return32= | |return31=tina | ||
|return33= | |return32=glade | ||
|return34= | |return33=deen | ||
|return35= | |return33article=Deen (Thracia 776) | ||
|return36= | |return34=eda | ||
|return37= | |return35=homer | ||
|return38= | |return36=linoan | ||
|return39= | |return37=ralf | ||
|return40= | |return38=ilios | ||
|return41= | |return39=sleuf | ||
|return42= | |return40=misha | ||
|return43= | |return41=shannam | ||
|return44= | |return42=miranda | ||
|return45= | |return43=sara | ||
|return46= | |return44=xavier | ||
|return47= | |return45=amalda | ||
|return48= | |return46=conomor | ||
|return49 | |return47=diarmuid | ||
|return48=saias | |||
|return49=ced | |||
}} | }} | ||
If they were recruited, Saias or Ced are not available in the [[preparations]] menu, and their inventory cannot be managed from preparations. They will join the battle on turn 1. | |||
===Item data=== | ===Item data=== | ||
{{ChapItems | {{ChapItems | ||
|platform=snes03 | |platform=snes03 | ||
|itemlast=Kia | |itemlast=Kia | ||
| Line 103: | Line 108: | ||
}} | }} | ||
===Shop data=== | ===Shop data=== | ||
{{ChapShop SNES03 | |||
|secret1=Life Ring | |||
|secost1=8,000 | |||
|secret2=Speed Ring | |||
|secost2=8,000 | |||
|secret3=Skill Ring | |||
|secost3=8,000 | |||
|secret4=Power Ring | |||
|secost4=8,000 | |||
|secret5=Shield Ring | |||
|secost5=8,000 | |||
}} | |||
:''The secret shop is located in the isolated top-right chamber; requires [[Warp]] or [[Rewarp]] and unlocking the door.'' | |||
===Enemy data=== | ===Enemy data=== | ||
{{ | :''Stats with two figures separated by a ~ are presented as a range, representing stats that vary due to random growths. The figures to the left and right of the ~ are the stat's minimum and maximum possible values respectively.'' | ||
|platform=snes03 | {{ChapUnitHdr|type=Enemy|platform=snes03}} | ||
| | {{ChapUnitCellFE5 | ||
| | |name=Loptrian | ||
| | |class=Dark Mage | ||
|# | |lv=18 | ||
| | |#=14 | ||
| | |hp=24~44 | ||
| | |str=0~20 | ||
| | |mag=5~20 | ||
| | |skill=4~20 | ||
| | |spd=3~20 | ||
| | |lck=0~20 | ||
|def=4~20 | |||
| | |con=5~20 | ||
| | |mov=6~7 | ||
| | |inventory={{Item|5|Jormungand}} | ||
|# | }} | ||
| | {{ChapUnitCellFE5 | ||
| | |name=Loptrian | ||
| | |class=Dark Mage | ||
| | |lv=18 | ||
| | |#=1 | ||
| | |hp=24~44 | ||
| | |str=0~20 | ||
| | |mag=5~20 | ||
|skill=4~20 | |||
| | |spd=3~20 | ||
| | |lck=0~20 | ||
|# | |def=4~20 | ||
| | |con=5~20 | ||
| | |mov=6~7 | ||
| | |inventory={{Item|5|Silence|link=Silence (staff)}} • {{Item|5|Heal}} | ||
| | }} | ||
| | {{ChapUnitCellFE5 | ||
| | |name=Loptrian | ||
| | |class=Dark Mage | ||
| | |lv=18 | ||
|#=1 | |||
| | |hp=24~44 | ||
| | |str=0~20 | ||
|# | |mag=5~20 | ||
| | |skill=4~20 | ||
| | |spd=3~20 | ||
| | |lck=0~20 | ||
| | |def=4~20 | ||
| | |con=5~20 | ||
| | |mov=6~7 | ||
| | |inventory={{Item|5|Restore}} • {{Item|5|Heal}} | ||
| | }} | ||
| | {{ChapUnitCellFE5 | ||
| | |name=Loptrian | ||
| | |class=Dark Mage | ||
|# | |lv=18 | ||
| | |#=1 | ||
| | |hp=24~44 | ||
|str=0~20 | |||
| | |mag=5~20 | ||
| | |skill=4~20 | ||
| | |spd=3~20 | ||
| | |lck=0~20 | ||
| | |def=4~20 | ||
|con=5~20 | |||
| | |mov=6~7 | ||
| | |inventory={{Item|5|Rescue|link=Rescue (staff)}} • {{Item|5|Heal}} | ||
|# | }} | ||
| | {{ChapUnitCellFE5 | ||
|name=Loptrian | |||
| | |class=Dark Mage | ||
| | |lv=18 | ||
| | |#=1 | ||
| | |hp=24~44 | ||
| | |str=0~20 | ||
| | |mag=5~20 | ||
| | |skill=4~20 | ||
| | |spd=3~20 | ||
| | |lck=0~20 | ||
| | |def=4~20 | ||
| | |con=5~20 | ||
|mov=6~7 | |||
| | |inventory={{Item|5|Magic Up}} • {{Item|5|Heal}} | ||
| | }} | ||
| | {{ChapUnitCellFE5 | ||
|# | |name=Loptrian | ||
| | |class=Dark Mage | ||
| | |lv=18 | ||
| | |#=1 | ||
| | |hp=24~44 | ||
| | |str=0~20 | ||
| | |mag=5~20 | ||
| | |skill=4~20 | ||
| | |spd=3~20 | ||
|lck=0~20 | |||
| | |def=4~20 | ||
| | |con=5~20 | ||
|# | |mov=6~7 | ||
| | |inventory={{Item|5|Fortify}} • {{Item|5|Heal}} | ||
| | |notes=Capable of using [[Thief (staff)|Thief]]. | ||
| | }} | ||
| | {{ChapUnitCellFE5 | ||
| | |name=Loptrian | ||
| | |class=Dark Mage | ||
| | |lv=18 | ||
| | |#=1 | ||
| | |hp=24~44 | ||
| | |str=0~20 | ||
| | |mag=5~20 | ||
|# | |skill=4~20 | ||
| | |spd=3~20 | ||
| | |lck=0~20 | ||
|def=4~20 | |||
| | |con=5~20 | ||
| | |mov=6~7 | ||
| | |inventory={{Item|5|Fenrir}} • {{Item|5|Heal}} | ||
| | }} | ||
{{ChapUnitCellFE5 | |||
| | |name=Loptrian | ||
| | |class=Dark Mage | ||
| | |lv=18 | ||
| | |#=1 | ||
| | |hp=24~44 | ||
| | |str=0~20 | ||
| | |mag=5~20 | ||
| | |skill=4~20 | ||
| | |spd=3~20 | ||
| | |lck=0~20 | ||
| | |def=4~20 | ||
| | |con=5~20 | ||
| | |mov=6~7 | ||
| | |inventory={{Item|5|Berserk|link=Berserk (staff)}} • {{Item|5|Heal}} | ||
| | }} | ||
| | {{ChapUnitCellFE5 | ||
|name=Loptrian | |||
| | |class=Dark Mage | ||
| | |lv=18 | ||
| | |#=1 | ||
|# | |hp=24~44 | ||
| | |str=0~20 | ||
| | |mag=5~20 | ||
| | |skill=4~20 | ||
| | |spd=3~20 | ||
| | |lck=0~20 | ||
| | |def=4~20 | ||
| | |con=5~20 | ||
| | |mov=6~7 | ||
| | |inventory={{Item|5|Hel|link=Hel (tome)}} • {{Item|5|Heal}} | ||
}} | |||
| | {{ChapUnitCellFE5 | ||
|name=Loptrian | |||
|class=Dark Mage | |||
|lv=18 | |||
|#=1 | |||
|hp=24~44 | |||
|str=0~20 | |||
|mag=5~20 | |||
| | |skill=4~20 | ||
|spd=3~20 | |||
|lck=0~20 | |||
|def=4~20 | |||
|con=5~20 | |||
|mov=6~7 | |||
| | |inventory={{Item|5|Sleep|link=Sleep (staff)}} • {{Item|5|Heal}} | ||
}} | |||
{{ChapUnitCellFE5 | |||
|name=Mercenary | |||
|class=Mercenary | |||
|lv=14 | |||
|#=1 | |||
|hp=24~40 | |||
|str=6~20 | |||
|mag=1~17 | |||
|skill=7~20 | |||
|spd=8~20 | |||
|lck=0~16 | |||
|def=5~20 | |||
|con=8~20 | |||
|mov=6~7 | |||
|inventory={{Item|5|Sleep Sword}} | |||
|notes='''Authority:''' Raydrik<br>'''Action:''' ★★★{{h|*|Has four stars during preparations}}<br>Moves to attack units in range. | |||
}} | |||
{{ChapUnitCellFE5 | |||
|name=Mercenary | |||
|class=Mercenary | |||
|lv=15 | |||
|#=1 | |||
|hp=24~41 | |||
|str=6~20 | |||
|mag=1~18 | |||
|skill=7~20 | |||
|spd=8~20 | |||
|lck=0~17 | |||
|def=5~20 | |||
|con=8~20 | |||
|mov=6~7 | |||
|inventory={{Item|5|Berserk Sword}} | |||
|notes='''Authority:''' Raydrik<br>'''Action:''' ★★★<br>Moves to attack units in range. | |||
}} | |||
{{ChapUnitCellFE5 | |||
|name=Loptrian | |||
|class=Dark Mage | |||
|lv=18 | |||
|#=4 | |||
|hp=24~44 | |||
|str=0~20 | |||
|mag=5~20 | |||
|skill=4~20 | |||
|spd=3~20 | |||
|lck=0~20 | |||
|def=4~20 | |||
|con=5~20 | |||
|mov=6~7 | |||
|inventory={{Item|5|Jormungand}} • {{Item|5|Hel|link=Hel (tome)}} | |||
}} | |||
{{ChapUnitCellFE5 | |||
|name=Mercenary | |||
|class=Mercenary | |||
|lv=16 | |||
|#=1 | |||
|hp=24~42 | |||
|str=6~20 | |||
|mag=1~19 | |||
|skill=7~20 | |||
|spd=8~20 | |||
|lck=0~18 | |||
|def=5~20 | |||
|con=8~20 | |||
|mov=6~7 | |||
|inventory={{Item|5|Master Axe}} • {{Item|5|Killing Edge}} | |||
|notes='''Authority:''' Raydrik | |||
}} | |||
{{ChapUnitCellFE5 | |||
|name=Mercenary | |||
|class=Mercenary | |||
|lv=16 | |||
|#=1 | |||
|hp=24~42 | |||
|str=6~20 | |||
|mag=1~19 | |||
|skill=7~20 | |||
|spd=8~20 | |||
|lck=0~18 | |||
|def=5~20 | |||
|con=8~20 | |||
|mov=6~7 | |||
|inventory={{Item|5|Flame Sword}} • {{Item|5|Armorslayer}} | |||
|notes='''Authority:''' Raydrik | |||
}} | |||
{{ChapUnitCellFE5 | |||
|name=Mercenary | |||
|class=Mercenary | |||
|lv=16 | |||
|#=1 | |||
|hp=24~42 | |||
|str=6~20 | |||
|mag=1~19 | |||
|skill=7~20 | |||
|spd=8~20 | |||
|lck=0~18 | |||
|def=5~20 | |||
|con=8~20 | |||
|mov=6~7 | |||
|inventory={{Item|5|Meisterschwert}} • {{Item|5|Hammer}} | |||
|notes='''Authority:''' Raydrik | |||
}} | |||
{{ChapUnitCellFE5 | |||
|name=Mercenary | |||
|class=Mercenary | |||
|lv=16 | |||
|#=1 | |||
|hp=24~42 | |||
|str=6~20 | |||
|mag=1~19 | |||
|skill=7~20 | |||
|spd=8~20 | |||
|lck=0~18 | |||
|def=5~20 | |||
|con=8~20 | |||
|mov=6~7 | |||
|inventory={{Item|5|Lightning Sword}} • {{Item|5|Poison Axe}} | |||
|notes='''Authority:''' Raydrik | |||
}} | |||
{{ChapUnitCellFE5 | |||
|name=Sniper | |||
|class=Sniper | |||
|lv=18 | |||
|#=2 | |||
|hp=22~42 | |||
|str=5~20 | |||
|mag=1~20 | |||
|skill=6~20 | |||
|spd=7~20 | |||
|lck=0~20 | |||
|def=3~20 | |||
|con=7~20 | |||
|mov=7~8 | |||
|inventory={{Item|5|Meisterbogen}} • {{Item|5|Poison Bow}} | |||
|notes='''Authority:''' Raydrik | |||
}} | |||
{{ChapUnitCellFE5 | |||
|name=[[Raydrik]] | |||
|class=Baron | |||
|lv=20 | |||
|#=1 | |||
|hp=56 | |||
|str=16 | |||
|mag=8{{h|+20|Granted by Loptr Sword}} | |||
|skill=12 | |||
|spd=9 | |||
|lck=6 | |||
|def=16 | |||
|con=20 | |||
|mov=6 | |||
|inventory={{Item|5|Loptr Sword}}<br>{{Item|5|Pavise}} | |||
|notes='''Authority:''' ★★★★<br>'''Action:''' ★<br>Does not move; stands on a [[Terrain/Super Famicom games#Fire Emblem: Thracia 776|throne]], the chapter's seize point. | |||
}} | |||
{{ChapUnitCellFE5 | |||
|name=Loptrian | |||
|class=Dark Mage | |||
|lv=18 | |||
|#=1 | |||
|hp=24~44 | |||
|str=0~20 | |||
|mag=5~20 | |||
|skill=4~20 | |||
|spd=3~20 | |||
|lck=0~20 | |||
|def=4~20 | |||
|con=5~20 | |||
|mov=6~7 | |||
|inventory={{Item|5|Jormungand}} • {{Item|5|Door Key}} | |||
}} | |||
{{ChapUnitCellFE5 | |||
|name=Munster | |||
|class=Bishop | |||
|lv=20 | |||
|#=2 | |||
|hp=20~42 | |||
|str=0~20 | |||
|mag=5~20 | |||
|skill=2~20 | |||
|spd=2~20 | |||
|lck=0~20 | |||
|def=1~20 | |||
|con=4~20 | |||
|mov=5~6 | |||
|inventory={{Item|5|Restore}} • {{Item|5|Physic}} • {{Item|5|Pure Water}} | |||
|notes='''Authority:''' Raydrik | |||
}} | |||
{{ChapUnitCellFE5 | |||
|name=[[Galzus]] | |||
|class=Mercenary | |||
|lv=20 | |||
|#=1 | |||
|hp=54 | |||
|str=20 | |||
|mag=9 | |||
|skill=20 | |||
|spd=20 | |||
|lck=17 | |||
|def=14 | |||
|con=18 | |||
|mov=7 | |||
|inventory={{Item|5|Meisterschwert}} • {{Item|5|Flame Sword}} • {{Item|5|Vulnerary}} • {{Item|5|Vulnerary}} • {{Item|5|Master Axe}}<br>{{Item|5|Luna}} • {{Item|5|Astra}} | |||
|notes='''Authority:''' Raydrik<br>'''Action:''' ★★★★★<br>• Not present during preparations. Not present if he was killed or [[capture]]d in Chapters [[Mother and Daughter|5]] or [[The Escape|6]].<br>• Does retaliate against [[Mareeta]]; Mareeta does not retaliate against him. | |||
|last=y | |||
}} | |||
{{ChapUnitReinf|type=Enemy|platform=snes03}} | |||
{{ChapUnitCellFE5 | |||
|name=Munster | |||
|class=Soldier | |||
|lv=20 | |||
|#=8 | |||
|hp=20~42 | |||
|str=3~20 | |||
|mag=0~20 | |||
|skill=0~20 | |||
|spd=0~20 | |||
|lck=0~20 | |||
|def=1~20 | |||
|con=6~20 | |||
|mov=5~6 | |||
|inventory={{Item|5|Great Lance}} | |||
|notes='''Authority:''' Raydrik | |||
}} | |||
{{ChapUnitCellFE5 | |||
|name=Loptrian | |||
|class=Dark Mage | |||
|lv=20 | |||
|#=1 | |||
|hp=24~46 | |||
|str=0~20 | |||
|mag=5~20 | |||
|skill=4~20 | |||
|spd=3~20 | |||
|lck=0~20 | |||
|def=4~20 | |||
|con=5~20 | |||
|mov=6~7 | |||
|inventory={{Item|5|Jormungand}} • {{Item|5|Unlock}} | |||
}} | |||
{{ChapUnitCellFE5 | |||
|name=Loptrian | |||
|class=Dark Mage | |||
|lv=16 | |||
|#=22 | |||
|hp=24~42 | |||
|str=0~18 | |||
|mag=5~20 | |||
|skill=4~20 | |||
|spd=3~20 | |||
|lck=0~18 | |||
|def=4~20 | |||
|con=5~20 | |||
|mov=6~7 | |||
|inventory={{Item|5|Jormungand}} | |||
}} | |||
{{ChapUnitCellFE5 | |||
|name=Thief | |||
|class=Thief | |||
|lv=20 | |||
|#=1 | |||
|hp=16~38 | |||
|str=1~20 | |||
|mag=0~3 | |||
|skill=1~20 | |||
|spd=6~20 | |||
|lck=0~20 | |||
|def=0~20 | |||
|con=5~20 | |||
|mov=7~8 | |||
|inventory={{Item|5|Killing Edge}} • {{Item|5|Lockpick}}<br>{{Item|5|Steal}} | |||
|notes='''Authority:''' Raydrik<br>Ignores combat; moves to open [[chest]]s, then moves to escape via the northeast stairs. | |||
}} | |||
{{ChapUnitCellFE5 | |||
|name=Loptrian | |||
|class=Dark Mage | |||
|lv=20 | |||
|#=∞ | |||
|hp=24~46 | |||
|str=0~20 | |||
|mag=5~20 | |||
|skill=4~20 | |||
|spd=3~20 | |||
|lck=0~20 | |||
|def=4~20 | |||
|con=5~20 | |||
|mov=6~7 | |||
|inventory={{Item|5|Jormungand}} • {{Item|5|Hel|link=Hel (tome)}} | |||
|notes=Moves to attack units in range. | |||
|last=y | |||
}} | }} | ||
{{ChapUnitFtr}} | |||
====Reinforcements==== | ====Reinforcements==== | ||
*Turns 2–5 | |||
* Two [[Dark Mage | **Two [[Soldier]]s appear from the eastern corridor, south of the northeast player group's starting location | ||
*Turn 8 | |||
**One [[Dark Mage]] with [[Unlock]] from north of [[Raydrik]] | |||
*Turns 10–20 | |||
**Two Dark Mages with only [[Jormungand]] from left and right of Raydrik | |||
*Turn 20 | |||
**One [[Thief]] from the northeast stairs | |||
*Every turn after the center-north door is opened | |||
**Two Dark Mages appear in the upper-most room | |||
===NPC data=== | ===NPC data=== | ||
{{ | {{ChapUnitHdr|type=NPC|platform=snes03}} | ||
|platform=snes03 | {{ChapUnitCellFE5 | ||
| | |name=Civilian | ||
| | |class=Civilian | ||
| | |version=boy | ||
|# | |type=other | ||
| | |lv=1 | ||
}} | |#=4 | ||
|hp=10 | |||
|str=0 | |||
|mag=0 | |||
|skill=0 | |||
|spd=0 | |||
|lck=0 | |||
|def=0 | |||
|con=0 | |||
|mov=2 | |||
|notes=Moves randomly until turn 5, at which point all but one begin moving to escape northwest; on turn 5, one randomly moves to the center-north door, then moves to escape northwest once it is open. | |||
}} | |||
{{ChapUnitCellFE5 | |||
|name=Civilian | |||
|class=Civilian | |||
|version=girl | |||
|type=other | |||
|lv=1 | |||
|#=4 | |||
|hp=10 | |||
|str=0 | |||
|mag=0 | |||
|skill=0 | |||
|spd=0 | |||
|lck=0 | |||
|def=0 | |||
|con=0 | |||
|mov=2 | |||
|notes=Moves randomly until turn 5, at which point they begin moving to escape northwest. | |||
|last=y | |||
}} | |||
{{ChapUnitFtr}} | |||
===Boss data=== | ===Boss data=== | ||
{{Main|Raydrik}} | {{Main|Raydrik}} | ||
{{BossStats FE5 | {{BossStats FE5 | ||
|portrait=[[File:Portrait raydrik fe05.png]] | |portrait=[[File:Portrait raydrik fe05.png]] | ||
|sprite=baron enemy | |||
|class=Baron | |class=Baron | ||
|movestars=★ | |||
|authority=★★★★ | |||
|lv=20 | |lv=20 | ||
|HP=56 | |HP=56 | ||
|str=16 | |str=16 | ||
|mag=8+20 | |mag=8{{h|+20|Granted by Loptr Sword}} | ||
|skill=12 | |skill=12 | ||
|spd=9 | |spd=9 | ||
|luck=6 | |luck=6 | ||
|def=16 | |def=16 | ||
|FCM=0 | |||
|build=20 | |build=20 | ||
|move= | |move=6 | ||
|inventory={{Item|5|Loptr Sword}} | |||
|skills={{Item|5|Pavise}} | |||
|sw=A | |sw=A | ||
|la=A | |la=A | ||
| Line 333: | Line 656: | ||
|bo=A | |bo=A | ||
|st=A | |st=A | ||
|fi | |fi=A | ||
|th=A | |th=A | ||
|wi=C | |wi=C | ||
}} | }} | ||
==Strategy== | |||
{{strategy}} | |||
The player's army is split into three groups for the chapter: | |||
* The middle group must defeat [[Raydrik]] and seize the throne | |||
* The left group can protect the 8 NPC units and obtain the [[Kia Staff]] | |||
* The right group can neutralize the group of [[Dark Mage]]s in the bottom-right room | |||
The middle group needs 1 [[Door Key]]. [[Galzus]] can only be recruited by the middle group, and only by [[Mareeta]]. If Mareeta was assigned to either the left or right groups, she will need to be warped or rescued to the middle squad to recruit Galzus. If Galzus is not recruited, he is dangerous to engage in combat – even with [[Ced]] he is best incapacitated with a [[Sleep (staff)|Sleep]] staff. The [[Bragi Sword]] is incredibly useful for defeating Raydrik, as it deals [[bonus damage]] to him and negates the [[attack (stat)|attack]]-halving effect of his [[Loptr Sword]]. Alternatively, a unit with the [[Steal]] command can use it to forcibly give Raydrik a 2-range weapon, as to force him to unequip his Loptr Sword and become vulnerable to attack by leaving a unit for him to attack at 2-range. With [[brave weapon]]s, Mareeta and Galzus can also power through by proccing [[Astra]] then getting [[Luna]]-criticals to break through Raydrik's defense with raw damage. The unarmed Bishops can be easily captured for staves. | |||
The left group needs at least 3 Door Keys, ideally carried by different units as to ensure they can engage the enemies there as soon as possible to protect the NPC units. The enemies prioritize capturing NPCs, but if they cannot reach a tile adjacent to an NPC to capture one, they will instead attack at 2-range and kill them, so it is important to ensure that NPC units are somewhat spaced out and to kill any enemy holding an NPC as soon as possible. Once the Kia Staff room is open, two units from this group can block the staircases to stop reinforcements from appearing. | |||
The door in the upper center of the map that leads to the room with the [[Kia Staff]] chest cannot be opened through conventional means. In order to open it, one of the child NPCs must be able to reach the door, after which they will open it on their turn in a short cut-scene. The NPC who goes to open the door is randomly chosen from one of the four boys, and as such it is imperative to keep all four boys alive as it is impossible to tell which one of them can open the door. However, the girls are expendable and can be safely sacrificed to distract the enemies. The NPCs have very low movement, so it will take very long for them to reach the door by themselves, provided that the way ahead is clear of threats. | |||
The right group can neutralize the Dark Mage congregation and should have some free inventory slots if able. However, a few of the Dark Mages are so dangerous that they are best put to [[Status effect#Sleep|sleep]], [[Silence (condition)|silenced]], or [[Thief (staff)|thieved]] on turn 1 – specifically, the Dark Mages with [[Sleep (staff)|Sleep]], [[Silence (staff)|Silence]], [[Berserk (staff)|Berserk]], and [[Restore]]. The [[Mercenary]] on the outside of the door must be taken handled carefully, as he wields a [[Berserk Sword]], though the one on the other side of the door can be killed safely. The reinforcements from the right 2-wide hallway can be prevented from appearing by occupying the tiles they appear from. No other threat exists apart from the enemies with [[Fenrir]] and [[Hel (tome)|Hel]], meaning that the right squad can safely spend the rest of their time capturing the Dark Mages and taking their useful staves so long as the right hallway is blocked to stop reinforcements. | |||
==Trivia== | ==Trivia== | ||
* This chapter holds the only [[secret shop]] in the | *This chapter holds the only [[secret shop]] in the entirety of ''Thracia 776''. | ||
==Etymology and other languages== | ==Etymology and other languages== | ||
{{Names | {{Names | ||
|eng-fan-name=The Baron in Black | |eng-fan-name=The Baron in Black | ||
| | |jpn-name={{h|黒衣の男爵|Kokui no danshaku}} | ||
|jpn-mean=The black-clad baron | |||
| | |||
}} | }} | ||
==Gallery== | ==Gallery== | ||
<gallery> | |||
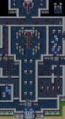
Cm fe05 24.png|Map of the chapter | |||
</gallery> | |||
{{ChapterNav | {{ChapterNav | ||
|prechapter=The | |prechapter=The Fiend's Lair | ||
|nextchapter=Sworn Upon a Sword | |||
|nextchapter= | |nextalternate=The Loptrian Altar{{!}}The Loptrian Altar <small>(side quest)</small> | ||
|nextalternate=The | |||
}} | }} | ||
{{Nav5}} | {{Nav5}} | ||
{{DEFAULTSORT:Baron in Black, The}} | |||
[[Category:Chapters of Fire Emblem: Thracia 776]] | [[Category:Chapters of Fire Emblem: Thracia 776]] | ||
Latest revision as of 02:55, 5 February 2024
| ||||||||||||
|

| “ | We don't have enough men... August, why did you divide our troops into three squads? | ” | — Leif to August |
|---|
The Baron in Black (Japanese: 黒衣の男爵 The Black-Clad Baron) is the twenty-fourth chapter of Fire Emblem: Thracia 776. In order to play the side quest after, the player must obtain the Kia Staff in this chapter and Sara must have been recruited, uncaptured, and alive.
Plot
- Main article:
The Baron in Black/Script
Leif storms Castle Munster in a final confrontation with Raydrik. During the battle, he also fights Galzus, but if Mareeta is on the battlefield, she recognizes Galzus as someone who rescued her in the past and he joins Leif's army to help save Eyvel, Mareeta's other caretaker.
After the battle ends, if Sara is in Leif's army, Leif heads toward the petrified Eyvel's location in order to undo the spell affecting her with the Kia staff. If Sara is not present, Leif's forces instead move into the Loptian temple underneath the castle in order to eliminate Veld, the man responsible for Eyvel's petrification and for the child hunts around Munster.
Chapter data
| ||||||
|
| |||||
| Victory: Seize the throne | Player | Other | Enemy | |||
|---|---|---|---|---|---|---|
| Defeat: Leif dies | 10–18+2 | 8 | 40+42+∞ | |||
| ||||||
Units are arranged based on their position in deployment order after Leif. If Saias or Ced were recruited, they appear in a fixed position above Leif.
The center-north door cannot be opened like a standard door. Instead, it can only be opened by one of the Civilians; which one can open it is determined randomly from the four boys on turn 5.
Character data
| Characters | |||||||||||
|---|---|---|---|---|---|---|---|---|---|---|---|
New units
| |||||||||||
| |||||||||||
Required characters
| |||||||||||
Available characters
| |||||||||||
If they were recruited, Saias or Ced are not available in the preparations menu, and their inventory cannot be managed from preparations. They will join the battle on turn 1.
Item data
| ||||||
|
Shop data
Swords Lances Axes Bows Tomes Staves Items Secret
None
- The secret shop is located in the isolated top-right chamber; requires Warp or Rewarp and unlocking the door.
Enemy data
- Stats with two figures separated by a ~ are presented as a range, representing stats that vary due to random growths. The figures to the left and right of the ~ are the stat's minimum and maximum possible values respectively.
| |||||||||||||||||||||||||||||||||||||||||||||||||||||||||||||||||||||||||||||||||||||||||||||||||||||||||||||||||||||||||||||||||||||||||||||||||||||||||||||||||||||||||||||||||||||||||||||||||||||||||||||||||||||||||||||||||||||||||||||||||||||||||||||||||||||||||||||||||||||||||||||||||||||||||||||||||||||||||||||||||||||||||||||||||||||||||||||||||||||||||||||||||||||||||||||||||||||||||||||||||||||||||||||||||||||||||||||||||||||||||||||||||||||||||||||||||||||||||||||||||||||||||||||||||||||||||||||||||||||||||||||||||||||||||||||||||||||||||||||||||||||||||||||||||||||||||||||||||||||||||||||||||
| |||||||||||||||||||||||||||||||||||||||||||||||||||||||||||||||||||||||||||||||||||||||||||||||||||||||||||||||||||||||||||||||||||||||||||||||||||||||||||||||||||||||||||||||||||||||||||||||||||||||||||||||||||||||||||||||||||||||||||||||||||||||||||||||||||||||||||||||||||||||||||||||||||||||||||||||||||||||||||||||||||||||||||||||||||||||||||||||||||||||||||||||||||||||||||||||||||||||||||||||||||||||||||||||||||||||||||||||||||||||||||||||||||||||||||||||||||||||||||||||||||||||||||||||||||||||||||||||||||||||||||||||||||||||||||||||||||||||||||||||||||||||||||||||||||||||||||||||||||||||||||||||||
| |||||||||||||||||||||||||||||||||||||||||||||||||||||||||||||||||||||||||||||||||||||||||||||||||||||||||||||||||||||||||||||||||||||||||||||||||||||||||||||||||||||||||||||||||||||||||||||||||||||||||||||||||||||||||||||||||||||||||||||||||||||||||||||||||||||||||||||||||||||||||||||||||||||||||||||||||||||||||||||||||||||||||||||||||||||||||||||||||||||||||||||||||||||||||||||||||||||||||||||||||||||||||||||||||||||||||||||||||||||||||||||||||||||||||||||||||||||||||||||||||||||||||||||||||||||||||||||||||||||||||||||||||||||||||||||||||||||||||||||||||||||||||||||||||||||||||||||||||||||||||||||||||
| |||||||||||||||||||||||||||||||||||||||||||||||||||||||||||||||||||||||||||||||||||||||||||||||||||||||||||||||||||||||||||||||||||||||||||||||||||||||||||||||||||||||||||||||||||||||||||||||||||||||||||||||||||||||||||||||||||||||||||||||||||||||||||||||||||||||||||||||||||||||||||||||||||||||||||||||||||||||||||||||||||||||||||||||||||||||||||||||||||||||||||||||||||||||||||||||||||||||||||||||||||||||||||||||||||||||||||||||||||||||||||||||||||||||||||||||||||||||||||||||||||||||||||||||||||||||||||||||||||||||||||||||||||||||||||||||||||||||||||||||||||||||||||||||||||||||||||||||||||||||||||||||||
Reinforcements
- Turns 2–5
- Two Soldiers appear from the eastern corridor, south of the northeast player group's starting location
- Turn 8
- Turns 10–20
- Two Dark Mages with only Jormungand from left and right of Raydrik
- Turn 20
- One Thief from the northeast stairs
- Every turn after the center-north door is opened
- Two Dark Mages appear in the upper-most room
NPC data
| |||||||||||||||||||||||||||||||||||||||||||||||||||||||||||||||||||||
| |||||||||||||||||||||||||||||||||||||||||||||||||||||||||||||||||||||
Boss data
- Main article:
Raydrik
|
|
| ||||||||||||||||||||||||||||||||||||||||||||||||||||||||||||
Strategy
| This section details unofficial strategies that may help with completion of the chapter. This may not work for everybody. |
The player's army is split into three groups for the chapter:
- The middle group must defeat Raydrik and seize the throne
- The left group can protect the 8 NPC units and obtain the Kia Staff
- The right group can neutralize the group of Dark Mages in the bottom-right room
The middle group needs 1 Door Key. Galzus can only be recruited by the middle group, and only by Mareeta. If Mareeta was assigned to either the left or right groups, she will need to be warped or rescued to the middle squad to recruit Galzus. If Galzus is not recruited, he is dangerous to engage in combat – even with Ced he is best incapacitated with a Sleep staff. The Bragi Sword is incredibly useful for defeating Raydrik, as it deals bonus damage to him and negates the attack-halving effect of his Loptr Sword. Alternatively, a unit with the Steal command can use it to forcibly give Raydrik a 2-range weapon, as to force him to unequip his Loptr Sword and become vulnerable to attack by leaving a unit for him to attack at 2-range. With brave weapons, Mareeta and Galzus can also power through by proccing Astra then getting Luna-criticals to break through Raydrik's defense with raw damage. The unarmed Bishops can be easily captured for staves.
The left group needs at least 3 Door Keys, ideally carried by different units as to ensure they can engage the enemies there as soon as possible to protect the NPC units. The enemies prioritize capturing NPCs, but if they cannot reach a tile adjacent to an NPC to capture one, they will instead attack at 2-range and kill them, so it is important to ensure that NPC units are somewhat spaced out and to kill any enemy holding an NPC as soon as possible. Once the Kia Staff room is open, two units from this group can block the staircases to stop reinforcements from appearing.
The door in the upper center of the map that leads to the room with the Kia Staff chest cannot be opened through conventional means. In order to open it, one of the child NPCs must be able to reach the door, after which they will open it on their turn in a short cut-scene. The NPC who goes to open the door is randomly chosen from one of the four boys, and as such it is imperative to keep all four boys alive as it is impossible to tell which one of them can open the door. However, the girls are expendable and can be safely sacrificed to distract the enemies. The NPCs have very low movement, so it will take very long for them to reach the door by themselves, provided that the way ahead is clear of threats.
The right group can neutralize the Dark Mage congregation and should have some free inventory slots if able. However, a few of the Dark Mages are so dangerous that they are best put to sleep, silenced, or thieved on turn 1 – specifically, the Dark Mages with Sleep, Silence, Berserk, and Restore. The Mercenary on the outside of the door must be taken handled carefully, as he wields a Berserk Sword, though the one on the other side of the door can be killed safely. The reinforcements from the right 2-wide hallway can be prevented from appearing by occupying the tiles they appear from. No other threat exists apart from the enemies with Fenrir and Hel, meaning that the right squad can safely spend the rest of their time capturing the Dark Mages and taking their useful staves so long as the right hallway is blocked to stop reinforcements.
Trivia
- This chapter holds the only secret shop in the entirety of Thracia 776.
Etymology and other languages
| Names, etymology, and in other regions | ||
|---|---|---|
| Language | Name | Definition, etymology, and notes |
| English (unofficial) |
The Baron in Black |
-- |
| Japanese |
黒衣の男爵 |
The black-clad baron |
Gallery
Map of the chapter
| ← The Fiend's Lair • | The Baron in Black | • Sworn Upon a Sword → • The Loptrian Altar (side quest) → |
|---|