| Sword and Shield of Seiros
|
|
|
|
| Location
|
Derdriu
|
| Boss(es)
|
Pirate Captain
|
|
| “
|
Of course not! We knights serve as the sword and shield of Saint Seiros herself. We pride ourselves on our integrity! We reject all rewards that are not perfectly legitimate!
|
”
|
— Alois
|
Sword and Shield of Seiros (Japanese: 剣であり盾たる騎士団 Knights Who Are Swords and Shields) is a paralogue chapter in Fire Emblem: Three Houses. It is available from Chapter 7 to Chapter 11. In order to attempt this paralogue, the player must have recruited Shamir or Alois, and neither one must have fallen in battle previously. In this chapter, pirates attack the Alliance capital of Derdriu, and Shamir and Alois are deployed to stop them.
Plot
- Main article: Sword and Shield of Seiros/Script
Byleth interrupts a discussion between Shamir and Alois. The two explain that pirates are attacking the Alliance capital of Derdriu and the Eastern Church has requested aid from the Knights of Seiros since they don't maintain a standing army. As the Knights don't have personnel to spare, Alois ropes Byleth and their students into helping out.
When the group reaches Derdriu, they find that the pirates are attempting to masquerade as the Almyran navy. The Knights and students wipe out the pirates and kill their leader, forcing them to retreat. Afterwards, Alois and Shamir thank Byleth for their aid and tell them to keep the reward.
Beginning log
The Alliance has requested aid from the monastery, but the Knights of Seiros are low on personnel. Alois and Shamir decide that the students will have to suffice...
Chapter data
|
|
|
|
|
| Victory: Defeat the boss Brigand
|
Player
|
Partner
|
Other
|
Enemy
|
Third
|
Defeat: Byleth or Edelgard  /Dimitri /Dimitri  /Claude /Claude  dies*, Shamir or Alois dies, or the enemy remains in the defended zone for five turns dies*, Shamir or Alois dies, or the enemy remains in the defended zone for five turns
|
10
|
{{{partner}}}
|
{{{other}}}
|
22+∞
|
{{{third}}}
|
|
|
|
|
|
|
|
|
|
| Victory: Defeat the boss Brigand
|
Player
|
Partner
|
Other
|
Enemy
|
Third
|
| Defeat: Byleth or Edelgard /Dimitri /Claude dies*, Shamir or Alois dies, or the enemy remains in the defended zone for five turns
|
10
|
{{{partner}}}
|
{{{other}}}
|
27+∞
|
{{{third}}}
|
|
|
|
|
|
|
|
|
|
| Victory: Defeat the boss Brigand
|
Player
|
Partner
|
Other
|
Enemy
|
Third
|
| Defeat: Byleth or Edelgard /Dimitri /Claude dies*, Shamir or Alois dies, or the enemy remains in the defended zone for five turns
|
10
|
{{{partner}}}
|
{{{other}}}
|
31+∞
|
{{{third}}}
|
|
|
|
|
Character data
Black Eagles Blue Lions Golden Deer
- Other characters may be available if the paralogue is attempted later.
This paralogue only requires Shamir or Alois to be in Byleth's party. If one of them is not a member of their party, they will be temporarily controllable for this map with the following stats.
Item data
|
|
|
|
Name
|
Obtainment Method
|

|
Concoction
|
Steal from the Pirate Captain
|

|
Bullion
|
Automatically at the end of the chapter if enemies remained in the defended area for 4 turns
|
|
|
Large Bullion
|
Automatically at the end of the chapter if enemies remained in the defended area less than 4 turns
|

|
Seraph Robe
|
Automatically at the end of the chapter if enemies remained in the defended area less than 4 turns
|

|
Holy Knights of Seiros
|
Automatically at the end of the chapter if Alois is a party member
|

|
Seiros Archers
|
Automatically at the end of the chapter if Shamir is a party member
|
|
Enemy data
- Note: The following enemies' levels are those assuming the player plays this chapter during Chapter 9. On Maddening, their levels are 1 higher starting from Chapter 10.
|
|
|
|
Name
|
Class
|
Lv
|
#
|
Inventory and Skills
|
Notes
|
|
|
Pirate
|
Thief
|
13
|
1
|
 Steel Sword Steel Sword
 Steal • Steal •  Locktouch Locktouch
|
Immediately begins moving unprovoked; begins moving to the southwest ship if any player unit ends their turn on it.
|
|
|
Pirate
|
Thief
|
13
|
1
|
Steel Sword
Steal • Locktouch
Pirates Lv 3:  Disturbance Disturbance
|
Immediately begins moving unprovoked; begins moving to the southwest ship if any player unit ends their turn on it.
|
|
|
Pirate
|
Brigand
|
13
|
2
|
 Steel Axe Steel Axe
Pirates Lv 3: Disturbance
|
• The northern one starts on a heal tile +.
• The one on the northern ship begins moving if the nearby Brawler is provoked; begins moving to the southwest ship if any player unit ends their turn on it.
|
|
|
Pirate
|
Brigand
|
13
|
3
|
Steel Axe
|
• The northern one begins moving to the southwest ship if any player unit ends their turn on it.
• The western two immediately begin moving unprovoked.
|
|
|
Pirate
|
Archer
|
13
|
2
|
 Steel Bow Steel Bow
 Bowrange +1 Bowrange +1
|
• The northern one immediately begins moving unprovoked; begins moving to the southwest ship if any player unit ends their turn on it.
• The eastern one begins moving if the nearby Wyvern Rider is provoked; begins moving to the southwest ship if any player unit ends their turn on it.
|
|
|
Pirate
|
Archer
|
13
|
3
|
Steel Bow
Bowrange +1
Pirates Lv 3: Disturbance
|
• The eastern two begin moving if the respective adjacent Brawler is provoked, one turn after either Brigand with a battalion is defeated, or one turn after any player unit ends their turn on the northern ship.
• The western one immediately begins moving unprovoked.
|
|
|
Pirate
|
Wyvern Rider
|
13
|
2
|
Iron Axe
 Canto • Canto •  Axefaire Axefaire
|
• The southern one immediately begins moving unprovoked.
• The eastern one begins moving if the nearby Archer is provoked; begins moving to the southwest ship if any player unit ends their turn on it.
|
|
|
Pirate
|
Brawler
|
13
|
7
|
 Steel Gauntlets • Unarmed Steel Gauntlets • Unarmed
 Unarmed Combat Unarmed Combat
|
• The middle three begin moving to the southwest ship if any player unit ends their turn on it.
• The northern one begins moving if the nearby Brigand is provoked; begins moving to the southwest ship if any player unit ends their turn on it.
• The southeast one begins moving one turn after after either Brigand with a battalion is defeated, or one turn after any player unit ends their turn on the northern ship.
• The middle-south two begin moving if the respective adjacent Archer is provoked, one turn after after either Brigand with a battalion is defeated, or one turn after any player unit ends their turn on the northern ship.
|
|
|
Pirate Captain
|
Brigand
|
15
|
1
|
Short Axe • Concoction
Pirates Lv 3: Disturbance
|
Immobile until three turns after the northernmost Brigand is defeated.
|
|
|
|
|
|
|
|
|
|
Name
|
Class
|
Lv
|
#
|
Inventory and Skills
|
Notes
|
|
|
Pirate
|
Thief
|
14
|
3
|
Steel Sword
Steal • Locktouch •  Sword Prowess Lv 2 Sword Prowess Lv 2
|
Immediately begins moving unprovoked; begin moving to the southwest ship if any player unit ends their turn on it.
|
|
|
Pirate
|
Thief
|
14
|
1
|
Steel Sword
Steal • Locktouch • Sword Prowess Lv 2
Pirates Lv 3: Disturbance
|
Immediately begins moving unprovoked; begins moving to the southwest ship if any player unit ends their turn on it.
|
|
|
Pirate
|
Brigand
|
14
|
2
|
Steel Axe
 Axe Prowess Lv 3 Axe Prowess Lv 3
Pirates Lv 3: Disturbance
|
• The northern one starts on a heal tile +.
• The one on the northern ship begins moving if the nearby Brawler is provoked; begins moving to the southwest ship if any player unit ends their turn on it.
|
|
|
Pirate
|
Brigand
|
14
|
3
|
Steel Axe
 Axe Prowess Lv 2 Axe Prowess Lv 2
|
• The northern one begins moving to the southwest ship if any player unit ends their turn on it.
• The western two immediately begin moving unprovoked.
|
|
|
Pirate
|
Archer
|
14
|
3
|
Steel Bow
Bowrange +1 •  Bow Prowess Lv 2 Bow Prowess Lv 2
|
• The northern one immediately begins moving unprovoked; begins moving to the southwest ship if any player unit ends their turn on it.
• The easternmost one begins moving if a nearby Wyvern Rider is provoked; begins moving to the southwest ship if any player unit ends their turn on it.
• The center-most one begins moving if a nearby Brawler is provoked; begins moving to the southwest ship if any player unit ends their turn on it.
|
|
|
Pirate
|
Archer
|
14
|
3
|
Steel Bow
Bowrange +1 •  Bow Prowess Lv 1 Bow Prowess Lv 1
Pirates Lv 3: Disturbance
|
• The southern two begin moving if the respective adjacent Brawler is provoked, one turn after either Brigand with a battalion is defeated, or one turn after any player unit ends their turn on the northern ship.
• The western one immediately begins moving unprovoked.
|
|
|
Pirate
|
Wyvern Lord
|
14
|
4
|
Iron Axe
Canto • Axefaire • Axe Prowess Lv 3
|
• The southern two immediately begin moving unprovoked.
• The eastern two begin moving if the nearby Archer is provoked; begin to the southwest ship if any player unit ends their turn on it.
|
|
|
Pirate
|
Brawler
|
14
|
7
|
Steel Gauntlets • Unarmed
Unarmed Combat •  Brawling Prowess Lv 2 Brawling Prowess Lv 2
|
• The mid-east one begins moving to the southwest ship if any player unit ends their turn on it.
• The center-east two begin moving if they or the nearby Archer is provoked; begin moving to the southwest ship if any player unit ends their turn on it.
• The northern one begins moving if the nearby Brigand is provoked; begins moving to the southwest ship if any player unit ends their turn on it.
• The southeast one begins moving one turn after either Brigand with a battalion is defeated, or one turn after any player unit ends their turn on the northern ship.
• The middle-south two begin moving if the respective adjacent Archer is provoked, one turn after either Brigand with a battalion is defeated, or one turn after any player unit ends their turn on the northern ship.
|
|
|
Pirate Captain
|
Brigand
|
16
|
1
|
Short Axe • Concoction
Axe Prowess Lv 2
Pirates Lv 3: Disturbance
|
Immobile until three turns after the northernmost Brigand is defeated.
|
|
|
|
|
|
Reinforcements
- On Maddening, all reinforcements can act the turn they appear.
- For the first three turns of four-turn cycles starting turn 1, continuing until one turn after the northernmost Brigand or the Brigand/Warrior on the northern ship
- On Maddening, every other turn, starting turn 1
- 1 Assassin from east of the boss (Maddening only)
- On Hard and Maddening, every third turn
Boss data
- Stats with two figures separated by a ~ are presented as a range. The figures to the left of the ~ are taken during Chapter 7, the earliest possible point where this chapter may be undertaken; the figures to the right of the ~ are taken from Chapter 8, the point where this boss gains a level and stops scaling.
|
|
|
|
|
|
|
Skill Levels

|

|

|

|

|

|

|

|

|

|

|

|
| E
|
E
|
C
|
E
|
E
|
E
|
E
|
E
|
E
|
E
|
E
|

|
|
|
|
|
|
|
|
|
|
Skill Levels
|
|
|
|
|
|
|
|
|
|
|
|
|
| E
|
E
|
C
|
E
|
E
|
E
|
E
|
E
|
E
|
E
|
E
|
|
|
|
|
|
|
|
|
|
|
Skill Levels
|
|
|
|
|
|
|
|
|
|
|
|
|
| E
|
E
|
C
|
E
|
E
|
E
|
E
|
E
|
E
|
E
|
E
|
|
|
|
Strategy
| This section details unofficial strategies that may help with completion of the chapter. This may not work for everybody.
|
By the end of this chapter, you will hate wyverns with a purple passion hatred. Bring lots of strong archers. You also want to leave Shamir behind in the city center as a rearguard in case any wyverns slip past you. Split your forces up, have the southern group start clearing out the southern enemies, and have the northern group fight their way east. The northern group should be careful not to overextend, as there are enemies with gambits lurking about and you could quickly find yourself swarmed. The wyverns are far and away the most dangerous enemies on the field. They should be high-priority targets for your bowmen. The boss usually charges south; kill him as fast as possible to win the battle.
Trivia
Etymology and other languages
| Names, etymology, and in other regions
|
| Language
|
Name
|
Definition, etymology, and notes
|
| English
|
Sword and Shield of Seiros
|
--
|
| Spanish
|
Espada y escudo de Seiros
|
Sword and shield of Seiros
|
| French
|
Protéger au nom de Seiros
|
To protect on behalf of Seiros
|
| German
|
Seiros' Schwert und Schild
|
Seiros' Sword and Shield
|
| Italian
|
La spada e lo scudo di Seiros
|
The sword and the shield of Seiros
|
| Korean
|
검이자 방패인 기사단
|
Knights who serve as swords and shields
|
| Simplified Chinese
|
赛罗司的剑与盾
|
Seiros' sword and shield
|
| Traditional Chinese
|
賽羅司的劍與盾
|
Seiros' sword and shield
|
|
|
Gallery
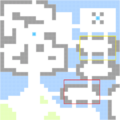
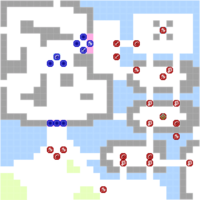
The area outlined in red is the southwest ship, the area outlined in yellow is the northern ship, entering either triggers enemy movement.
References
|
|
Sword and Shield of Seiros
|
|