| The Underground Chamber
|
|
|
|
|
|
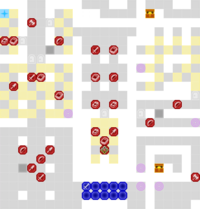
The Underground Chamber (Japanese: 秘密の地下道の戦い Battle of the Secret Underground Path) is the main battle map of the sixth chapter in Fire Emblem: Three Houses. In this map, Byleth and their students discover a secret passage behind Jeritza's room, and use it to investigate the disappearance of Flayn.
Map data
|
|
|
|
|
| Victory: Defeat the Death Knight or rout all other enemies
|
Player
|
Partner
|
Other
|
Enemy
|
Third
|
| Defeat: Byleth dies*, the player's army is routed*, or 25 turns pass
|
10
|
{{{partner}}}
|
{{{other}}}
|
26+3
|
{{{third}}}
|
|
|
|
|
|
|
|
|
|
| Victory: Defeat the Death Knight or rout all other enemies
|
Player
|
Partner
|
Other
|
Enemy
|
Third
|
| Defeat: Byleth dies*, the player's army is routed*, or 25 turns pass
|
10
|
{{{partner}}}
|
{{{other}}}
|
28+3
|
{{{third}}}
|
|
|
|
|
|
|
|
|
|
| Victory: Defeat the Death Knight or rout all other enemies
|
Player
|
Partner
|
Other
|
Enemy
|
Third
|
| Defeat: Byleth dies*, the player's army is routed*, or 25 turns pass
|
10
|
{{{partner}}}
|
{{{other}}}
|
32+3
|
{{{third}}}
|
|
|
|
|
This map features warp tiles; by using the "Warp" command while standing on them, a unit will be transported to the endpoint, and will be left with a movement stat = their base movement - the movement it took to reach the warp tile. They are located as follows:
- Column 16, row 21–Column 18, row 21: Starting chamber to southeast chamber
- Column 16, row 19–Column 22, row 14: Southeast chamber to warp nexus
- Column 8, row 13–Column 16, row 8: Western hall to warp nexus (must be activated first)
- Column 1, row 6–Column 16, row 10: Northwest chamber to warp nexus (must be activated first)
- Column 15, row 4–Column 16, row 6: Northern hall to warp nexus (must be activated first)
- Column 18, row 4–Column 15, row 1: Warp nexus to second lever (must be activated first)
- Column 20, row 4–Column 22, row 1: Warp nexus to northern chest (must be activated first)
- Column 22, row 4–Column 20, row 19: Warp nexus to southern chest (must be activated first)
There are additionally two levers present on the map, which affect which floors are active. They are located as follows:
- Column 19, row 8: Enables all inactive warp tiles
- Column 10, row 2: Disables all stat-boosting terrain, turning them into floor tiles
Character data
Black Eagles Blue Lions Golden Deer
- Note: Although Edelgard's inventory can be managed during this chapter, she cannot be deployed due to the plot.
- Note: Although Dimitri's inventory can be managed during this chapter, he cannot be deployed due to the plot.
- Note: Although Claude's inventory can be managed during this chapter, he cannot be deployed due to the plot.
Item data
Enemy data
Reinforcements
- Upon entering the warp nexus (columns 16-22, rows 4-10), or upon opening the door to it
- 2 Cavaliers in the upper corners of the warp nexus
- 1 Archer in the middle of the warp nexus
Boss data
- Main article: Death Knight
|
|
|
|
|
| Combat arts
|
Spells
|
Battalion
|
| --
|
--
|
--
|
|
Skill Levels

|

|

|

|

|

|

|

|

|

|

|

|
| B
|
A
|
C+
|
D
|
C+
|
D
|
E
|
C
|
E
|
A
|
E
|

|
|
|
|
|
|
|
|
| Combat arts
|
Spells
|
Battalion
|
| --
|
--
|
--
|
|
Skill Levels
|
|
|
|
|
|
|
|
|
|
|
|
|
| B
|
A
|
C+
|
D
|
C+
|
D
|
E
|
C
|
E
|
A
|
E
|
|
|
|
|
|
|
|
|
| Combat arts
|
Spells
|
Battalion
|
| --
|
--
|
--
|
|
Skill Levels
|
|
|
|
|
|
|
|
|
|
|
|
|
| B
|
A
|
C+
|
D
|
C+
|
D
|
E
|
C
|
E
|
A
|
E
|
|
|
|
Strategy
| This section details unofficial strategies that may help with completion of the chapter. This may not work for everybody.
|
Once again, you have 25 turns to either flatten the Death Knight or wipe out everyone else. There's no good reason for Lysithea not to have B Reason and Dark Spikes T by this point if you're a Golden Deer. If you're a Black Eagle, Hubert picks up Dark Spikes T at A Reason if you've grinded him hard enough. As for the Blue Lions, Sylvain with the Lance of Ruin and Knightkneeler makes mincemeat out of the Death Knight. Note that there's only one Chest Key dropped on this map and two chests to go around, so if you don't have Ashe or a Thief you'll need to buy one from the marketplace.
You'll be splitting into two groups for this map. The west group has a fairly simple time luring in enemies and knocking them silly. Watch out for the three Archers lurking about, as they'll make mincemeat out of your Pegasus Knights. Once you've broken through the initial wave and claimed the Door Key, move north. The next room has a bunch of Avoid Floors; try to maneuver so that you get to use them and the other guys don't. The teleporter in the bottom right corner of the Avoid Floor room takes you to the teleportation nexus on the east side. You don't really want to go that way - you have to clean out the west side first. Once you're done here, continue through the gate and kill the Armored Knight. Note that the two doors in this hallway are linked so that when one is unlocked, so is the other. Given the cramped quarters the east group faces, it is likely that the west group will arrive at the central hall first. Once you've cleaned those guys out, have the west group wait up for the east group to link up with you.
The east group will be making their way through teleport pads to reach the nexus at the northeast corner of the map. Note that unlike the stairs you might remember from Fates maps such as Rainbow Sage and Possessed, using a teleport pad commits you to that action unless you're willing to blow a Divine Pulse charge to undo it. Enemy Archers will take potshots at you as you make your way to the second and third teleporters, but as long as you have a decent bowman of your own you should be fine. Shamir is especially good to have here, given that she can take potshots at the northern Archer with Curved Shot from complete safety. Opening the door to the teleportation nexus triggers three enemies waiting to have some mean words with you. There's a nice Cover tile that gives you 2 Defense and is only attackable from ordinary flooring by the two Cavaliers, so take advantage of that. Once you're finished with these goons, pull the lever to activate the warp tiles. The top right and top center ones take you to the chests, one of which drops the almighty March Ring (+1 Movement, anyone?), the top left one takes you to the lever that deactivates the special terrain tiles, and the left-top one takes you to the central hall which leads to the Death Knight. Clean house and regroup with your allies.
The last enemies are holed up in the Death Knight's chamber. Have a ranged unit lure in and pick off the two mages. Remember that killing that last Cavalier ends the map, so if you want to take out the Death Knight you have to do it now. You can always use a Gambit like Onslaught to pin that Cavalier in place, and the Death Knight doesn't move if you attack him this time, so he's a bit easier than in the Holy Mausoleum (unless you're on Maddening, in which case uh-oh). Take him out or kill the Cavalier to secure your victory. If you're a little bit short of OHKO thresholds, you can always chip him with Gambits.
Trivia
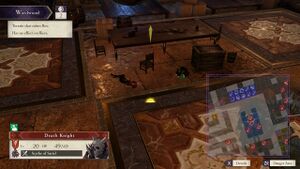
Flayn and Moncia's unconscious bodies
- If the zoom view is used to observe the Death Knight's chamber, Flayn and Monica's unconscious bodies can be seen on the ground.
Etymology and other languages
| Names, etymology, and in other regions
|
| Language
|
Name
|
Definition, etymology, and notes
|
| English
|
The Underground Chamber
|
--
|
| French
|
Sous le monastère
|
Underneath the monastery
|
|
|
Gallery
This section has been marked as a stub. Please help improve the page by adding information.


