| The Underground Chamber
|
|
|
|
|
|
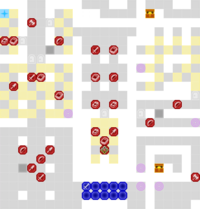
The Underground Chamber is the main battle map of the sixth chapter in Fire Emblem: Three Houses. In this map, Byleth and their students discover a secret passage behind Jeritza's room, and use it to investigate the disappearance of Flayn.
Map data
|
|
|
|
|
| Victory: Defeat the Death Knight or rout all other enemies
|
Player
|
Partner
|
Other
|
Enemy
|
Third
|
| Defeat: Byleth dies*, the player's army is routed*, or 25 turns pass
|
10
|
{{{partner}}}
|
{{{other}}}
|
26+3
|
{{{third}}}
|
|
|
|
|
|
|
|
|
|
| Victory: Defeat the Death Knight or rout all other enemies
|
Player
|
Partner
|
Other
|
Enemy
|
Third
|
| Defeat: Byleth dies*, the player's army is routed*, or 25 turns pass
|
10
|
{{{partner}}}
|
{{{other}}}
|
28+3
|
{{{third}}}
|
|
|
|
|
This map features warp tiles; by using the "Warp" command while standing on them, a unit will be transported to the endpoint, and will be left with a movement stat = their base movement - the movement it took to reach the stairs. They are located as follows:
- Column 16, row 21–Column 18, row 21: Starting chamber to southeast chamber
- Column 16, row 19–Column 22, row 14: Southeast chamber to warp nexus
- Column 8, row 13–Column 16, row 8: Western hall to warp nexus (must be activated first)
- Column 1, row 6–Column 16, row 10: Northwest chamber to warp nexus (must be activated first)
- Column 15, row 4–Column 16, row 6: Northern hall to warp nexus (must be activated first)
- Column 18, row 4–Column 15, row 1: Warp nexus to second lever (must be activated first)
- Column 20, row 4–Column 22, row 1: Warp nexus to northern chest (must be activated first)
- Column 22, row 4–Column 20, row 19: Warp nexus to southern chest (must be activated first)
There are additionally two levers present on the map, which affect which floors are active. They are located as follows:
- Column 19, row 8: Enables all inactive warp tiles
- Column 10, row 2: Disables all stat-boosting terrain, turning them into floor tiles
Character data
Black Eagles Blue Lions Golden Deer
- Note: Although Edelgard's inventory can be managed during this chapter, she cannot be deployed due to the plot.
- Note: Although Dimitri's inventory can be managed during this chapter, he cannot be deployed due to the plot.
- Note: Although Claude's inventory can be managed during this chapter, he cannot be deployed due to the plot.
Item data
Enemy data
Reinforcements
- Upon entering the warp nexus (columns 16-22, rows 4-10), or upon opening the door to it
- 2 Cavaliers in the upper corners of the warp nexus
- 1 Archer in the middle of the warp nexus
Boss data
- Main article: Death Knight
|
|
|
|
|
| Combat arts
|
Spells
|
Battalion
|
| --
|
--
|
--
|
|
Skill Levels

|

|

|

|

|

|

|

|

|

|

|
Ma
|
| B
|
A
|
C+
|
D
|
C+
|
D
|
E
|
C
|
E
|
A
|
E
|

|
|
|
|
|
|
|
|
| Combat arts
|
Spells
|
Battalion
|
| --
|
--
|
--
|
|
Skill Levels
|
|
|
|
|
|
|
|
|
|
|
|
Ma
|
| B
|
A
|
C+
|
D
|
C+
|
D
|
E
|
C
|
E
|
A
|
E
|
|
|
|
Strategy
| This section details unofficial strategies that may help with completion of the chapter. This may not work for everybody.
|
This section has been marked as a stub. Please help improve the page by adding information.
Trivia
Etymology and other languages
| Names, etymology, and in other regions
|
| Language
|
Name
|
Definition, etymology, and notes
|
| English
|
The Underground Chamber
|
--
|
|
|
Gallery
This section has been marked as a stub. Please help improve the page by adding information.


