| This page has been marked as a stub. Please help improve the page by adding information.
|
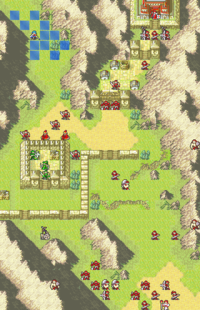
| Revolt at Carcino
|
|
|
|
|
|
Revolt at Carcino (Japanese: カルチノの内乱 Rebellion at Carcino) is the tenth chapter of Eirika's route in Fire Emblem: The Sacred Stones.
Plot
- Main article: Revolt at Carcino/Script
As Eirika proceeds to Carcino to rescue Innes, Emperor Vigarde calls Glen into his chamber and sends him to capture Eirika, who he claims massacred the citizens of Port Kiris and fled south to lead a rebellion in Carcino. Glen accepts his orders but once he is outside the chambers he expresses his doubts about the veracity of Vigarde’s claims about Eirika to his brother Cormag. Glen notes that he has met Eirika once, before Grado invaded Renais, and thought she was a woman of extraordinary kindness, or at least thought her incapable of doing what Vigarde claims she has done. At this point, Valter approaches the two and chastises Glen for doubting the emperor. Valter even notes how envious he is that Glen gets the honor of killing Eirika. This pushes Glen too far, prompting him to accuse Valter of lying his way into a pardon and a promotion into a general. Valter denies Glen’s harsh words, claiming that he, Caellach, and Riev were promoted to compensate for the unreliability of the Imperial Three. Cormag attempts to defend his brother’s name but Valter reminds him that he cannot raise his lance to a general without being marked a traitor. Glen departs with his brother, but not before reminding Valter that his crimes have neither been forgotten nor forgiven.
In Carcino, Innes is assessing his situation in between assaults from Pablo’s forces. Gerik, one of Innes’ hired mercenaries, asks whether or not they should continue. Innes answers that he must reach Jehanna no matter what, meaning surrender is not an option. Tethys, one of Gerik’s subordinates, then approaches the two with bad news: the group has no more weapons in reserve and the enemy is making preparations to attack again. Realizing just how hopeless his situation may be, Innes attempts to save the lives of his hired swords by firing them, giving them the choice to flee or surrender. Innes insists that he will be able to break through the enemies on his own, and tells the two to hurry and flee. Gerik, however, refuses to allow the prince to be a martyr for their sake and promises to stay by his side until the end. Gerik then tries to convince Tethys to surrender, but she also refuses. Somehow having managed to retain his hired help, Innes begins to concoct a strategy when Tethys notices an approaching force of reinforcements. Eirika has arrived just in time to assist Innes. The princess and her forces immediately join the battle.
Once the battle begins, Pablo muses to himself over the good fortune his plan to displace Klimt has yielded as now he has the opportunity to turn Innes over to Grado to earn some favor with them. Meanwhile, from a hidden location within the building Pablo stands in front of, Klimt watches as Pablo destroys Carcino’s bond with Frelia and submits the nation into submission to Grado, powerless to stop him.
After Eirika reaches Innes, she speaks with him and announces that she will fight alongside him. If Tana speaks with Innes, he will attempt to force Tana to return to Frelia. Tana refuses and once again insists that she cannot sit at home and watch the war from afar, powerless to affect its outcome. Innes relents and tells her they will discuss the matter later. After Innes has been recruited, he informs Gerik that their reinforcements have arrived. Gerik remarks that it was good that they held out for so long and reminds the prince to not let his guard down. Once Gerik has been recruited, he informs Tethys that their reinforcements are on the way. Tethys remarks that perhaps good things do happen to good people and joins Eirika’s army. As the battle continues, Gerik encounters Marisa on the battlefield, however, Marisa has been hired by Pablo, thus, making her Gerik’s enemy. Marisa is unsure of what to do, prompting Gerik to tell her that despite her obligation she has to her employer, he wants her to betray her employer and fight on his side. Marisa immediately decides to follow Gerik’s wishes and joins Eirika’s army.
As soon as Pablo is defeated and the gate has been seized by Eirika, Valter is revealed to the player to have been observing the fight from the mountains and muses to himself how fun it will be to fight her. However, for the time being, Valter declines his opportunity to attack and moves on.
Eirika and Innes enter the castle where Klimt was hiding himself, prompting him to come out of his hiding place and greet the two. Klimt announces himself as a member of Carcino’s Council of Elders, but is quick to clarify that the orders to capture Innes were purely those of Pablo. Carcino is a nation divided. Pablo’s faction wishes to endear his nation to Grado, however, his faction failed to garner enough support to make Carcino do as he wished, prompting him to resort to assassinations and violence to usurp rule of the council. Eirika is relieved to hear that the whole of Carcino is not their enemy, though Klimt warns the two that Pablo will almost certainly send more soldiers after them and to be on guard.
Innes then thanks Gerik and Tethys, and admits that without them, he would not have survived. He then offers to hire the two mercenaries for the rest of their journey at double the pay rate of their previous contract. The two immediately accept the offer. Later,Tethys enters the village where she told her brother Ewan to wait. When Tethys finds Ewan he asks Tethys to allow him to accompany her on her adventures. Tethys is irked by her brother's characterization of her dangerous mercenary work and clarifies that she's not just having fun. Ewan responds that he knows that her work is dangerous, hence why he requested to join her, so that he could protect with the magic he learned from his his teacher. Tethys relents and promises to speak to Eirika on his behalf.
Meanwhile, Seth, Innes, and Eirika are planning their next move. Seth advises they fall back to Frelia and assess their options from there; however, Innes refuses, emphasizing that time is of the essence if they want to ensure Grado cannot break anymore of the Sacred Stones or subjugate anymore nations. Eirika agrees with Innes but acknowledges that recklessly pressing on will invite more attacks. Ewan then appears and announces that he knows of a mountain pass that leads straight to Jehanna. At Eirika’s behest, Ewan elaborates that the pass leads through Caer Pelyn and is home to his teacher, the Sage Saleh. Eirika then requests that Ewan guide them to Saleh, which Ewan gladly agrees to do.
Beginning log
Carcino has betrayed Frelia and joined forces with Grado.
Carcino's troops stop Prince Innes, blocking his way to Jehanna.
With soldiers occupying the road forward and back,
he is trapped in a hopeless situation. Eirika rushes to the prince's aid.
Chapter data
Template:ChapDataMap
Character data
Item data
Enemy data
NPC data
|
|
|
|
|
|
|
|
Name
|
Class
|
Lv
|
#
|
Inventory and Skills
|
Notes
|
|
Boss data
- Main article: Pablo
- Note: Boss stats in Hard mode may vary slightly due to enemies using random growths.
Strategy
| This section details unofficial strategies that may help with completion of the chapter. This may not work for everybody.
|
This section has been marked as a stub. Please help improve the page by adding information.
This chapter has multiple fronts you'll want to monitor. For best results, use as many promoted units as possible (bring Joshua and Lute so they can promote this chapter).
Innes can be recruited by Tana. She should be AT LEAST Lv. 10 if you want her to survive (promoting her isn't a bad idea) against the enemies. Use Innes to recruit Gerik. From there, recruit Tethys. Gerik can also recruit Marisa. To avoid the priest putting him to sleep, kill the priest with Tana or Innes ASAP. Bringing an additional unit or two (Seth and Joshua work very well) wouldn't hurt.
Back up north, your units should be obliterating everything, pushing toward Pablo. An arena is present near him. Use it if you like.
To kill Pablo, use either a high level Eirika or a promoted unit (Joshua can OHKO him with a Killing Edge, Seth or Tana can also work very well).
Trivia
Etymology and other languages
| Names, etymology, and in other regions
|
| Language
|
Name
|
Definition, etymology, and notes
|
| English
|
Revolt at Carcino
|
|
|
|
Gallery
This section has been marked as a stub. Please help improve the page by adding information.


