| The Battle of Garreg Mach
|
|
|
|
|
|
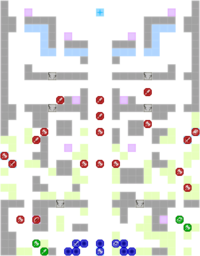
The Battle of Garreg Mach (Japanese: ガルグ=マクの戦い Battle of Garreg Mach) is the main battle map of the twelfth chapter in Fire Emblem: Three Houses. In this map, Byleth, Edelgard, and the Adrestian Empire launch a bloody war against the Church of Seiros.
Map data
|
|
|
|
|
| Victory: Defeat Rhea*
|
Player
|
Partner
|
Other
|
Enemy
|
Third
|
| Defeat: Byleth or Edelgard dies* or the player's army is routed*
|
10
|
{{{partner}}}
|
4+2
|
19+18
|
{{{third}}}
|
|
|
|
|
|
|
|
|
|
| Victory: Defeat Rhea*
|
Player
|
Partner
|
Other
|
Enemy
|
Third
|
| Defeat: Byleth or Edelgard dies* or the player's army is routed*
|
10
|
{{{partner}}}
|
4+2
|
22+18
|
{{{third}}}
|
|
|
|
|
|
|
|
|
|
| Victory: Defeat Rhea*
|
Player
|
Partner
|
Other
|
Enemy
|
Third
|
| Defeat: Byleth or Edelgard dies* or the player's army is routed*
|
10
|
{{{partner}}}
|
4+2
|
22+22
|
{{{third}}}
|
|
|
|
|
Character data
Item data
Enemy data
Reinforcements
- After (Normal/Hard)/Upon (Maddening) breaching the first wall from the center (entering columns 11-15, rows 21-25)
- 1 Armored Knight from the forest just northwest of the wall
- 1 Mage from in front of the wall
- 1 Archer from the forest just northeast of the wall
- 2 Brigands; one from the forests closest to the wall each
- After Gilbert, Flayn, and Seteth are defeated
- Rhea appears in the northern wing, along with a group of 12 (Normal/Hard)/16 (Maddening) other soldiers
NPC data
Reinforcements
Boss data
Main boss
- Main article: Rhea
|
|
|
|
|
|
|
Skill Levels

|

|

|

|

|

|

|

|

|

|

|

|
| A
|
D
|
E
|
E
|
B
|
A
|
A
|
A
|
E
|
E
|
E
|

|
|
|
|
|
|
|
|
|
|
Skill Levels
|
|
|
|
|
|
|
|
|
|
|
|
|
| A
|
D
|
E
|
E
|
B
|
A
|
A
|
A
|
E
|
E
|
E
|
|
|
|
|
|
|
|
|
|
|
Skill Levels
|
|
|
|
|
|
|
|
|
|
|
|
|
| A
|
D
|
E
|
E
|
B
|
A
|
A
|
A
|
E
|
E
|
E
|
|
|
|
Sub-bosses
- Main article: Gilbert
|
|
|
|
|
|
|
Skill Levels
|
|
|
|
|
|
|
|
|
|
|
|

|
| E
|
E
|
B
|
E
|
E
|
E
|
E
|
D
|
B
|
E
|
E
|
|
|
|
|
|
|
|
|
|
|
Skill Levels
|
|
|
|
|
|
|
|
|
|
|
|
|
| E
|
E
|
B
|
E
|
E
|
E
|
E
|
D
|
B
|
E
|
E
|
|
|
|
|
|
|
|
|
|
|
Skill Levels
|
|
|
|
|
|
|
|
|
|
|
|
|
| E
|
E
|
B
|
E
|
E
|
E
|
E
|
D
|
B
|
E
|
E
|
|
|
|
- Main article: Flayn
|
|
|
|
|
|
|
Skill Levels
|
|
|
|
|
|
|
|
|
|
|
|

|
| E
|
E
|
E
|
E
|
E
|
E
|
A
|
A
|
E
|
E
|
E
|
|
|
|
|
|
|
|
|
|
|
Skill Levels
|
|
|
|
|
|
|
|
|
|
|
|
|
| E
|
E
|
E
|
E
|
E
|
E
|
A
|
A
|
E
|
E
|
E
|
|
|
|
|
|
|
|
|
|
|
Skill Levels
|
|
|
|
|
|
|
|
|
|
|
|
|
| E
|
E
|
E
|
E
|
E
|
E
|
A
|
A
|
E
|
E
|
E
|
|
|
|
- Main article: Seteth
|
|
|
|
|
|
|
Skill Levels
|
|
|
|
|
|
|
|
|
|
|
|

|
| E
|
A/B
|
B
|
E
|
E
|
E
|
E
|
A
|
E
|
E
|
C
|
|
|
|
|
|
|
|
|
|
|
Skill Levels
|
|
|
|
|
|
|
|
|
|
|
|
|
| E
|
A/B
|
B
|
E
|
E
|
E
|
E
|
A
|
E
|
E
|
C
|
|
|
|
|
|
|
|
|
|
|
Skill Levels
|
|
|
|
|
|
|
|
|
|
|
|
|
| E
|
A/B
|
B
|
E
|
E
|
E
|
E
|
A
|
E
|
E
|
C
|
|
|
|
- Main article: Catherine
|
|
|
|
|
|
|
Skill Levels
|
|
|
|
|
|
|
|
|
|
|
|

|
| A
|
E
|
E
|
E
|
E
|
E
|
E
|
A
|
E
|
E
|
E
|
|
|
|
|
|
|
|
|
|
|
Skill Levels
|
|
|
|
|
|
|
|
|
|
|
|
|
| A
|
E
|
E
|
E
|
E
|
E
|
E
|
A
|
E
|
E
|
E
|
|
|
|
|
|
|
|
|
|
|
Skill Levels
|
|
|
|
|
|
|
|
|
|
|
|
|
| A
|
E
|
E
|
E
|
E
|
E
|
E
|
A
|
E
|
E
|
E
|
|
|
|
- Main article: Cyril
|
|
|
|
|
|
|
Skill Levels
|
|
|
|
|
|
|
|
|
|
|
|

|
| E
|
E
|
B
|
E
|
E
|
E
|
E
|
D
|
E
|
E
|
C
|
|
|
|
|
|
|
|
|
|
|
Skill Levels
|
|
|
|
|
|
|
|
|
|
|
|
|
| E
|
E
|
B
|
E
|
E
|
E
|
E
|
D
|
E
|
E
|
C
|
|
|
|
|
|
|
|
|
|
|
Skill Levels
|
|
|
|
|
|
|
|
|
|
|
|
|
| E
|
E
|
B
|
E
|
E
|
E
|
E
|
D
|
E
|
E
|
C
|
|
|
|
Strategy
| This section details unofficial strategies that may help with completion of the chapter. This may not work for everybody.
|
This is the final battle of Part I. All of your weapons are automatically repaired at the end of the battle, so feel free to cut loose. Your first order of business is to have Byleth charge west and take out the Archer manning the Ballista. Send fliers to the east side to reinforce Randolph and start pushing northward. Sadly, the green units are unlikely to survive, but there's no penalty for losing them. Once you make it past the southern gate in the central part of the map, you'll be ambushed by a bunch of enemies. Wipe them out or circumvent them by going around the sides - your call. You must take out all three bosses in order to proceed to the second stage of the battle. Gilbert is a sad joke who gets eaten alive by any semi-competent mage, especially those who can hit him from 3 range. Flayn is a bit on the slow side, but hits like a dump truck and has Miracle just in case the RNG decides it hates you. Taking her out causes the Death Knight to appear on the battlefield. Fortunately, he's on your side this time, and he's perfectly capable of smashing right through any enemy not named Catherine. Seteth is probably the most dangerous enemy on the map, seeing as he's fairly fast and he's immune to effective damage from arrows. If you didn't complete An Ocean View, his Spear of Assal can rip right through your cavalry. Send your toughest units to take him out.
Once Gilbert, Flayn, and Seteth are down, Rhea and her minions deploy, and the northern gates open. Two Golems protect the center; by now, these suckers aren't anything you can't handle. Catherine is on the west side. Do NOT engage her at one range unless you have a 100% chance of killing her, because she is faster than a speeding bullet and more powerful than a locomotive. Cyril guards the east side. He's very fast and somewhat evasive, but unlike Seteth he's weak to arrows like most Wyvern Riders, so shoot him down. Once you've broken past the bosses and taken out the artillery, it's time to face Rhea. She has the ever-dangerous combination of Vantage, Counterattack, and life drain made popular by Heroes. The safest way to deal with her is to move two spaces away from her so she is forced to use her less threatening magic attacks, then rush in with your most powerful attacks to take her out. Beat her, and Part I is yours.
Trivia
Etymology and other languages
| Names, etymology, and in other regions
|
| Language
|
Name
|
Definition, etymology, and notes
|
| English
|
The Battle of Garreg Mach
|
--
|
| Spanish
|
La batalla de Garreg Mach
|
The battle of Garreg Mach
|
| French
|
La bataille de Garreg Mach
|
The battle of Garreg Mach
|
| German
|
Schlacht um Garreg Mach
|
Battle of Garreg Mach
|
| Italian
|
La battaglia del Garreg Mach
|
The battle of Garreg Mach
|
| Korean
|
가르그 마크의 전투
|
Garreg mach battle
|
| Simplified Chinese
|
加尔古·玛库之战
|
Battle of garreg mach
|
| Traditional Chinese
|
加爾古‧瑪庫之戰
|
Battle of garreg mach
|
|
|
Gallery
This section has been marked as a stub. Please help improve the page by adding information.


