Oath of the Dagger
Clash at the Imperial Capital
|
|
|
|
|
|
| “
|
So...that grotesque creature was Edelgard... If she is prepared to transform her very body to fight for this future of hers... Then I have no choice but to defeat her, even if it costs me my life! We must defend the present... After all, it is all that we truly have.
|
”
|
— Dimitri
|
Oath of the Dagger (Japanese: 短剣の誓い Dagger's Oath) is the twenty-second and final chapter of Fire Emblem: Three Houses in the Azure Moon route. It is not possible to return to Garreg Mach Monastery during this chapter; the previous chapter and this one must be completed consecutively. The chapter consists solely of a mission, Clash at the Imperial Capital (Japanese: 帝都決戦 Imperial Capital Decisive Battle).
Plot
- Main article: Oath of the Dagger/Script
Dimitri and his forces storm the Imperial palace and face Edelgard in a climatic final battle. Her most elite forces and her newfound demonic power prove no match for Dimitri, and she is defeated and reverted to human form. Dimitri offers her hand in reconciliation one last time, but she throws his old dagger into his shoulder, forcing him to execute her. Afterwards, as narrated by Jeralt, Dimitri unites Fódlan under his prosperous rule as king of Faerghus. Rhea is rescued and retires from her role as Archbishop of the Church of Seiros, passing her role onto Byleth.
Beginning log
After tearing through Enbarr, you proceed to storm the Imperial palace. The time has finally come for Dimitri to confront Edelgard.
Chapter data
|
|
|
|
|
| Victory: Defeat Edelgard
|
Player
|
Partner
|
Other
|
Enemy
|
Third
|
| Defeat: Byleth or Dimitri dies* or the player's army is routed*
|
12
|
{{{partner}}}
|
{{{other}}}
|
48-8+∞
|
{{{third}}}
|
|
|
|
|
|
|
|
|
|
| Victory: Defeat Edelgard
|
Player
|
Partner
|
Other
|
Enemy
|
Third
|
| Defeat: Byleth or Dimitri dies* or the player's army is routed*
|
12
|
{{{partner}}}
|
{{{other}}}
|
52-10+∞
|
{{{third}}}
|
|
|
|
|
|
|
|
|
|
| Victory: Defeat Edelgard
|
Player
|
Partner
|
Other
|
Enemy
|
Third
|
| Defeat: Byleth or Dimitri dies* or the player's army is routed*
|
12
|
{{{partner}}}
|
{{{other}}}
|
54-9+4+∞
|
{{{third}}}
|
|
|
|
|
Character data
Item data
Enemy data
|
|
|
|
Name
|
Class
|
Lv
|
#
|
Inventory and Skills
|
Notes
|
|
|
Imperial Soldier
|
War Master
|
42
|
2
|
 Brave Axe Brave Axe
 Fistfaire • Fistfaire •  Axefaire • Axefaire •  Crit +20 Crit +20
|
The center-south one begins moving if any player unit enters the throne room, or if the central Mortal Savant or a nearby Grappler or Gremory is provoked.
|
|
|
Imperial Soldier
|
Mortal Savant
|
42
|
3
|
 Bolganone • Bolganone •  Brave Sword Brave Sword
 Swordfaire • Swordfaire •  Black Tomefaire Black Tomefaire
 Empire Holy Magic Users Lv 5: Empire Holy Magic Users Lv 5:  Blessing Blessing
|
The central one begins moving if any player unit enters the throne room, or if the center-south War Master or a nearby Grappler or Gremory is provoked.
|
|
|
Imperial Soldier
|
War Master
|
42
|
3
|
 Silver Gauntlets Silver Gauntlets
Fistfaire • Axefaire • Crit +20
|
The central one begins moving if any player unit enters the throne room, or if the nearby War Master is provoked.
|
|
|
Imperial Soldier
|
War Master
|
42
|
2
|
Silver Axe
Fistfaire • Axefaire • Crit +20
|
The central one begins moving if any player unit enters the throne room, or if the nearby War Master is provoked.
|
|
|
Imperial Soldier
|
War Master
|
42
|
1
|
Killer Knuckles
Fistfaire • Axefaire • Crit +20
|
Begins moving if a nearby Mortal Savant or Bishop is provoked.
|
|
|
Imperial Soldier
|
Mortal Savant
|
42
|
2
|
Bolganone • Silver Sword
Swordfaire • Black Tomefaire
Empire Holy Magic Users Lv 5: Blessing
|
Both begin moving if any player unit enters the throne room, or if either is provoked.
|
|
|
Imperial Soldier
|
War Master
|
42
|
1
|
Tomahawk
Fistfaire • Axefaire • Crit +20
 Black Eagle Heavy Axes Lv 5: Black Eagle Heavy Axes Lv 5:  Onslaught Onslaught
|
Begins moving if any player unit enters the throne room, or if the adjacent War Master is provoked.
|
|
|
Imperial Soldier
|
War Master
|
42
|
1
|
Silver Gauntlets
Fistfaire • Axefaire • Crit +20
 Black Eagle Heavy Axes Lv 5: Onslaught Black Eagle Heavy Axes Lv 5: Onslaught
|
Begins moving if any player unit enters the throne room, or if the adjacent War Master is provoked.
|
|
|
Imperial Soldier
|
Gremory
|
42
|
1
|
 Abraxas • Physic Abraxas • Physic
 Black Magic Uses x2 • Black Magic Uses x2 •  Dark Magic Uses x2 • Dark Magic Uses x2 •  White Magic Uses x2 White Magic Uses x2
Empire Holy Magic Users Lv 5: Blessing
|
--
|
|
|
Imperial Soldier
|
Grappler
|
42
|
2
|
Silver Gauntlets • Unarmed
Fistfaire •  Unarmed Combat Unarmed Combat
|
Both begin moving if any player unit enters the throne room, or if they, the central Mortal Savant, or the nearby War Master or Gremory is provoked.
|
|
|
Mysterious Soldier
|
Assassin
|
42
|
2
|
Wo Dao
Swordfaire •  Locktouch • Locktouch •  Stealth Stealth
|
• Both begin moving if either of them or the nearby Altered Demonic Beast is provoked.
• Leaves the map if Myson is defeated.
|
|
|
Mysterious Soldier
|
Warlock
|
42
|
1
|
Ragnarok • Bolganone
Black Tomefaire • Black Magic Uses x2
 Mysterious Magic Users Lv 5: Mysterious Magic Users Lv 5:  Resonant Flames Resonant Flames
|
Leaves the map if Myson is defeated.
|
|
|
Mysterious Soldier
|
Dark Bishop
|
42
|
2
|
 Banshee Θ • Miasma Δ • Death Γ Banshee Θ • Miasma Δ • Death Γ
 Miasma Δ • Miasma Δ •  Fiendish Blow • Fiendish Blow •  Heartseeker Heartseeker
Mysterious Magic Users Lv 5: Resonant Flames
|
• Begins moving if the adjacent Altered Demonic Beast is provoked.
• Leaves the map if Myson is defeated.
|
|
|
Demonic Beast
|
Altered Demonic Beast
|
42
|
1
|
 Artificial Crest Stone L Artificial Crest Stone L
 Renewal • Heartseeker • Renewal • Heartseeker •  Seal Strength • Seal Strength •  Barrier • Barrier •  Vital Defense • Anti-Magic Armor • Vital Defense • Anti-Magic Armor •  Vantage Vantage  • •  Seal Defense Seal Defense 
 Brimstone Breath Brimstone Breath
|
•  Weak to Axes. Weak to Axes.
• Begins moving if the nearby Dark Bishop is provoked.
|
|
|
Demonic Beast
|
Altered Demonic Beast
|
42
|
1
|
Artificial Crest Stone L
Renewal • Heartseeker • Seal Strength • Barrier • Vital Defense • Anti-Magic Armor • Vantage • Seal Defense
Brimstone Breath
|
•  Weak to Lances. Weak to Lances.
• Begins moving if a nearby Assassin is provoked.
|
|
|
Demonic Beast
|
Altered Demonic Beast
|
42
|
1
|
Artificial Crest Stone L
Renewal • Heartseeker • Seal Strength • Barrier • Vital Defense • Anti-Magic Armor • Vantage • Seal Defense
Brimstone Breath
|
•  Weak to Swords. Weak to Swords.
• Begins moving if the nearby Dark Bishop is provoked.
|
|
|
Imperial Soldier
|
Mortal Savant
|
42
|
1
|
Ragnarok • Wo Dao
Swordfaire • Black Tomefaire
|
Begins moving if the nearby War Master, Mortal Savant, or Bishop is provoked.
|
|
|
Imperial Soldier
|
Mortal Savant
|
42
|
1
|
Ragnarok • Wo Dao
Swordfaire • Black Tomefaire
|
Begins moving if the nearby War Master, Mortal Savant, or Bishop is provoked.
|
|
|
Imperial Soldier
|
Mortal Savant
|
42
|
1
|
Ragnarok • Wo Dao
Swordfaire • Black Tomefaire
Empire Holy Magic Users Lv 5: Blessing
|
Begins moving if the adjacent Sniper is provoked.
|
|
|
Imperial Soldier
|
Mortal Savant
|
42
|
1
|
Ragnarok • Silver Sword
Swordfaire • Black Tomefaire
|
Begins moving if the nearby Mortal Savant or Gremory is provoked.
|
|
|
Imperial Soldier
|
Mortal Savant
|
42
|
1
|
Ragnarok • Armorslayer
Swordfaire • Black Tomefaire
|
Begins moving if the nearby Mortal Savant or Gremory is provoked.
|
|
|
Imperial Soldier
|
Bishop
|
42
|
1
|
Abraxas • Fortify
White Magic Uses x2 •  White Magic Heal +10 • White Magic Heal +10 •  Terrain Resistance Terrain Resistance
Empire Holy Magic Users Lv 5: Blessing
|
Begins moving if an adjacent War Master or Mortal Savant is provoked.
|
|
|
Imperial Soldier
|
Sniper
|
42
|
1
|
 Silver Bow Silver Bow
 Bowfaire • Bowfaire •  Bowrange +1 Bowrange +1
Empire Snipers Lv 5: Flash-Fire Arrows
|
• Immobile.
• Mans a Ballista.
|
|
|
Imperial Soldier
|
Sniper
|
42
|
1
|
Brave Bow
Bowfaire • Bowrange +1
|
Begins moving if the nearby Mortal Savant is provoked.
|
|
|
Imperial Soldier
|
Gremory
|
42
|
2
|
Ragnarok • Physic
Black Magic Uses x2 • Dark Magic Uses x2 • White Magic Uses x2
Empire Holy Magic Users Lv 5: Blessing
|
• The western one is immobile and mans a Fire Orb.
• The southwest one begins moving if a nearby Mortal Savant is provoked.
|
|
|
Imperial Soldier
|
Gremory
|
42
|
1
|
Abraxas • Fortify
Black Magic Uses x2 • Dark Magic Uses x2 • White Magic Uses x2
Empire Holy Magic Users Lv 5: Blessing
|
Begins moving if any player unit enters the throne room, or if the central Mortal Savant or a nearby War Master or Grappler is provoked.
|
|
|
Imperial Soldier
|
Gremory
|
42
|
4
|
Ragnarok • Silence
Black Magic Uses x2 • Dark Magic Uses x2 • White Magic Uses x2 •  Hit +20 Hit +20
Empire Holy Magic Users Lv 5: Blessing
|
• The upper-left one begins moving if the closest Gremory is provoked.
• The upper-right one begins moving if the closest Gremory is provoked.
|
|
|
Imperial Soldier
|
Gremory
|
42
|
2
|
Ragnarok • Meteor
Black Magic Uses x2 • Dark Magic Uses x2 • White Magic Uses x2 •  Reason Lv 3 Reason Lv 3
Empire Holy Magic Users Lv 5: Blessing
|
• The left one begins moving if the Gremory to the upper-right is provoked.
• The right one begins moving if the Gremory to the upper-right is provoked.
|
|
|
Mysterious Soldier
|
Warlock
|
42
|
3
|
Ragnarok
Black Tomefaire • Black Magic Uses x2
Mysterious Magic Users Lv 5: Resonant Flames
|
Leaves the map if Myson is defeated.
|
|
|
Myson
|
Warlock
|
43
|
1
|
Bohr Χ •  Hexlock Shield • Death Γ Hexlock Shield • Death Γ
Agarthan Technology • Black Tomefaire • Black Magic Uses x2 •  Reason Lv 5 • Reason Lv 5 •  Immune Status • Immune Status •  Dark Magic Range +1 • Dark Magic Range +1 •  Infinite Magic • Hit +20 Infinite Magic • Hit +20
Dark Magic Corps Lv 5: Resonant Lightning
|
Immobile.
|
|
|
Hegemon Edelgard
|
Hegemon Husk
|
44
|
1
|
Crest of Flames Power • Twin-Crest Power
 Imperial Lineage+ • Imperial Lineage+ •  Twin Crests • Twin Crests •  Commander • Commander •  Monster Effect Null • Monster Effect Null •  Counterattack • Heavily Armored Wall • Vital Defense • Vantage Counterattack • Heavily Armored Wall • Vital Defense • Vantage  • •  Desperation Desperation  • •  Wrath Wrath 
Wilted Flower
|
• Immobile; stands on a throne.
• Always attacks Dimitri with her first move if he is in range.
• Will never attack the same unit twice in one turn.
• Switches to Twin-Crest Power when a unit ends their turn in the throne room.
|
|
|
|
|
|
|
|
|
|
Name
|
Class
|
Lv
|
#
|
Inventory and Skills
|
Notes
|
|
|
Imperial Soldier
|
War Master
|
43
|
2
|
Brave Axe
Fistfaire • Axefaire • Crit +20 •  Axe Prowess Lv 3 • Axe Prowess Lv 3 •  Brawling Prowess Lv 3 Brawling Prowess Lv 3
|
The center-south one begins moving if any player unit enters the throne room, or if the central Mortal Savant or a nearby Grappler or Gremory is provoked.
|
|
|
Imperial Soldier
|
Mortal Savant
|
43
|
3
|
Bolganone • Brave Sword
Swordfaire • Black Tomefaire • Reason Lv 3 •  Sword Prowess Lv 3 Sword Prowess Lv 3
Empire Holy Magic Users Lv 5: Blessing
|
The central one begins moving if any player unit enters the throne room, or if the center-south War Master or a nearby Grappler or Gremory is provoked.
|
|
|
Imperial Soldier
|
War Master
|
43
|
4
|
Silver Gauntlets
Fistfaire • Axefaire • Crit +20 • Axe Prowess Lv 3 • Brawling Prowess Lv 3
|
• The central one begins moving if any player unit enters the throne room, or if the nearby War Master is provoked.
• The southwest one begins moving if the adjacent War Master is provoked.
|
|
|
Imperial Soldier
|
War Master
|
43
|
2
|
Silver Axe
Fistfaire • Axefaire • Crit +20 • Axe Prowess Lv 3 • Brawling Prowess Lv 3
|
• The central one begins moving if any player unit enters the throne room, or if the nearby War Master is provoked.
• The southwest one begins moving if the adjacent War Master is provoked.
|
|
|
Imperial Soldier
|
War Master
|
43
|
1
|
Killer Knuckles
Fistfaire • Axefaire • Crit +20 • Axe Prowess Lv 3 • Brawling Prowess Lv 3
|
Begins moving if a nearby Mortal Savant or Bishop is provoked.
|
|
|
Imperial Soldier
|
Mortal Savant
|
43
|
2
|
Bolganone • Silver Sword
Swordfaire • Black Tomefaire • Reason Lv 3 • Sword Prowess Lv 3
Empire Holy Magic Users Lv 5: Blessing
|
Both begin moving if any player unit enters the throne room, or if either is provoked.
|
|
|
Imperial Soldier
|
War Master
|
43
|
1
|
Tomahawk
Fistfaire • Axefaire • Crit +20 • Axe Prowess Lv 3 • Brawling Prowess Lv 3
Black Eagle Heavy Axes Lv 5: Onslaught
|
Begins moving if any player unit enters the throne room, or if the adjacent War Master is provoked.
|
|
|
Imperial Soldier
|
War Master
|
43
|
1
|
Silver Gauntlets
Fistfaire • Axefaire • Crit +20 • Axe Prowess Lv 3 • Brawling Prowess Lv 3
Black Eagle Heavy Axes Lv 5: Onslaught
|
Begins moving if any player unit enters the throne room, or if the adjacent War Master is provoked.
|
|
|
Imperial Soldier
|
Gremory
|
43
|
2
|
Abraxas • Physic
Black Magic Uses x2 • Dark Magic Uses x2 • White Magic Uses x2 • Reason Lv 3
Empire Holy Magic Users Lv 5: Blessing
|
--
|
|
|
Imperial Soldier
|
Grappler
|
43
|
2
|
Silver Gauntlets • Unarmed
Fistfaire • Unarmed Combat • Brawling Prowess Lv 3
|
Both begin moving if any player unit enters the throne room, or if they, the central Mortal Savant, or the nearby War Master or Gremory is provoked.
|
|
|
Mysterious Soldier
|
Assassin
|
43
|
2
|
Wo Dao
Swordfaire • Locktouch • Stealth • Sword Prowess Lv 3
|
• Both begin moving if they or the nearby Altered Demonic Beast is provoked.
• Leaves the map if Myson is defeated.
|
|
|
Mysterious Soldier
|
Warlock
|
43
|
3
|
Ragnarok • Bolganone
Black Tomefaire • Black Magic Uses x2 • Reason Lv 3
Mysterious Magic Users Lv 5: Resonant Flames
|
• The western one begins moving if the nearby Dark Bishop or Altered Demonic Beast is provoked.
• The eastern one begins moving if the nearby Dark Bishop or Altered Demonic Beast is provoked.
• Leaves the map if Myson is defeated.
|
|
|
Mysterious Soldier
|
Dark Bishop
|
43
|
2
|
Banshee Θ • Miasma Δ • Death Γ
Miasma Δ • Fiendish Blow • Heartseeker • Reason Lv 3
Mysterious Magic Users Lv 5: Resonant Flames
|
• The western one begins moving if the nearby Warlock or Altered Demonic Beast is provoked.
• The eastern one begins moving if the nearby Warlock or Altered Demonic Beast is provoked.
• Leaves the map if Myson is defeated.
|
|
|
Demonic Beast
|
Altered Demonic Beast
|
43
|
1
|
Artificial Crest Stone L
Renewal • Heartseeker • Seal Strength • Barrier • Vital Defense • Anti-Magic Armor • Vantage • Seal Defense
Brimstone Breath
|
• Weak to Axes.
• Begins moving if the nearby Warlock or Dark Bishop is provoked.
|
|
|
Demonic Beast
|
Altered Demonic Beast
|
43
|
1
|
Artificial Crest Stone L
Renewal • Heartseeker • Seal Strength • Barrier • Vital Defense • Anti-Magic Armor • Vantage • Seal Defense
Brimstone Breath
|
• Weak to Lances.
• Begins moving if a nearby Assassin is provoked.
|
|
|
Demonic Beast
|
Altered Demonic Beast
|
43
|
1
|
Artificial Crest Stone L
Renewal • Heartseeker • Seal Strength • Barrier • Vital Defense • Anti-Magic Armor • Vantage • Seal Defense
Brimstone Breath
|
• Weak to Swords.
• Begins moving if the nearby Warlock or Dark Bishop is provoked.
|
|
|
Imperial Soldier
|
Mortal Savant
|
43
|
1
|
Ragnarok • Wo Dao
Swordfaire • Black Tomefaire • Reason Lv 3 • Sword Prowess Lv 3
|
Begins moving if the nearby War Master, Mortal Savant, or Bishop is provoked.
|
|
|
Imperial Soldier
|
Mortal Savant
|
43
|
1
|
Ragnarok • Wo Dao
Swordfaire • Black Tomefaire • Reason Lv 3 • Sword Prowess Lv 3
|
Begins moving if the nearby War Master, Mortal Savant, or Bishop is provoked.
|
|
|
Imperial Soldier
|
Mortal Savant
|
43
|
1
|
Ragnarok • Wo Dao
Swordfaire • Black Tomefaire • Reason Lv 3 • Sword Prowess Lv 3
Empire Holy Magic Users Lv 5: Blessing
|
Begins moving if the adjacent Sniper is provoked.
|
|
|
Imperial Soldier
|
Mortal Savant
|
43
|
1
|
Ragnarok • Silver Sword
Swordfaire • Black Tomefaire • Reason Lv 3 • Sword Prowess Lv 3
|
Begins moving if the nearby Mortal Savant or Gremory is provoked.
|
|
|
Imperial Soldier
|
Mortal Savant
|
43
|
1
|
Ragnarok • Armorslayer
Swordfaire • Black Tomefaire • Reason Lv 3 • Sword Prowess Lv 3
|
Begins moving if the nearby Mortal Savant or Gremory is provoked.
|
|
|
Imperial Soldier
|
Bishop
|
43
|
1
|
Abraxas • Fortify
White Magic Uses x2 • White Magic Heal +10 • Terrain Resistance •  Faith Lv 3 Faith Lv 3
Empire Holy Magic Users Lv 5: Blessing
|
Begins moving if an adjacent War Master or Mortal Savant is provoked.
|
|
|
Imperial Soldier
|
Sniper
|
43
|
1
|
Silver Bow
Bowfaire • Bowrange +1 •  Bow Prowess Lv 3 Bow Prowess Lv 3
Empire Snipers Lv 5: Flash-Fire Arrows
|
• Immobile.
• Mans a Ballista.
|
|
|
Imperial Soldier
|
Sniper
|
43
|
1
|
Brave Bow
Bowfaire • Bowrange +1 • Bow Prowess Lv 3
|
Begins moving if the adjacent Mortal Savant is provoked.
|
|
|
Imperial Soldier
|
Gremory
|
43
|
2
|
Ragnarok • Physic
Black Magic Uses x2 • Dark Magic Uses x2 • White Magic Uses x2 • Reason Lv 3
Empire Holy Magic Users Lv 5: Blessing
|
• The western one is immobile and mans a Fire Orb.
• The southwest one begins moving if a nearby Mortal Savant is provoked.
|
|
|
Imperial Soldier
|
Gremory
|
43
|
1
|
Abraxas • Fortify
Black Magic Uses x2 • Dark Magic Uses x2 • White Magic Uses x2 • Reason Lv 3
Empire Holy Magic Users Lv 5: Blessing
|
Begins moving if any player unit enters the throne room, or if the central Mortal Savant or a nearby War Master or Grappler is provoked.
|
|
|
Imperial Soldier
|
Gremory
|
43
|
4
|
Ragnarok • Silence
Black Magic Uses x2 • Dark Magic Uses x2 • White Magic Uses x2 • Hit +20
Empire Holy Magic Users Lv 5: Blessing
|
• The upper-left one begins moving if the closest Gremory is provoked.
• The upper-right one begins moving if the closest Gremory is provoked.
|
|
|
Imperial Soldier
|
Gremory
|
43
|
2
|
Ragnarok • Meteor
Black Magic Uses x2 • Dark Magic Uses x2 • White Magic Uses x2 • Reason Lv 3
Empire Holy Magic Users Lv 5: Blessing
|
• The left one begins moving if the Gremory to the upper-right is provoked.
• The right one begins moving if the Gremory to the upper-right is provoked.
|
|
|
Mysterious Soldier
|
Warlock
|
43
|
3
|
Ragnarok
Black Tomefaire • Black Magic Uses x2 • Reason Lv 3
Mysterious Magic Users Lv 5: Resonant Flames
|
Leaves the map if Myson is defeated.
|
|
|
Myson
|
Warlock
|
44
|
1
|
Bohr Χ • Hexlock Shield • Death Γ
Agarthan Technology • Black Tomefaire • Black Magic Uses x2 • Reason Lv 5 • Immune Status • Dark Magic Range +1 • Infinite Magic • Hit +20
Dark Magic Corps Lv 5: Resonant Lightning
|
Immobile.
|
|
|
Hegemon Edelgard
|
Hegemon Husk
|
45
|
1
|
Crest of Flames Power • Twin-Crest Power
Imperial Lineage+ • Twin Crests • Commander • Monster Effect Null • Counterattack • Heavily Armored Wall • Vital Defense • Vantage • Desperation • Wrath
Wilted Flower
|
• Immobile; stands on a throne.
• Always attacks Dimitri with her first move if he is in range.
• Will never attack the same unit twice in one turn.
• Switches to Twin-Crest Power when a unit ends their turn in the throne room.
|
|
|
|
|
|
|
|
|
|
Name
|
Class
|
Lv
|
#
|
Inventory and Skills
|
Notes
|
|
|
Imperial Soldier
|
War Master
|
50
|
2
|
Brave Axe
Fistfaire • Axefaire • Crit +20 •  Axe Prowess Lv 5 • Brawling Prowess Lv 3 • Axe Prowess Lv 5 • Brawling Prowess Lv 3 •  Tomebreaker Tomebreaker
|
The center-south one begins moving if any player unit enters the throne room, or if the central Mortal Savant or a nearby Grappler or Gremory is provoked.
|
|
|
Imperial Soldier
|
Mortal Savant
|
50
|
3
|
Bolganone • Brave Sword
Swordfaire • Black Tomefaire • Reason Lv 5 •  Sword Prowess Lv 5 • Sword Prowess Lv 5 •  Seal Magic Seal Magic
Empire Holy Magic Users Lv 5: Blessing
|
The central one begins moving if any player unit enters the throne room, or if the center-south War Master or a nearby Grappler or Gremory is provoked.
|
|
|
Imperial Soldier
|
War Master
|
50
|
4
|
Silver Gauntlets
Fistfaire • Axefaire • Crit +20 • Axe Prowess Lv 5 • Brawling Prowess Lv 3 • Tomebreaker
|
• The central one begins moving if any player unit enters the throne room, or if the nearby War Master is provoked.
• The southwest one begins moving if the adjacent War Master is provoked.
|
|
|
Imperial Soldier
|
War Master
|
50
|
2
|
Silver Axe
Fistfaire • Axefaire • Crit +20 • Axe Prowess Lv 5 • Brawling Prowess Lv 3 • Tomebreaker
|
• The central one begins moving if any player unit enters the throne room, or if the nearby War Master is provoked.
• The southwest one begins moving if the adjacent War Master is provoked.
|
|
|
Imperial Soldier
|
War Master
|
50
|
1
|
Killer Knuckles
Fistfaire • Axefaire • Crit +20 • Axe Prowess Lv 5 • Brawling Prowess Lv 3 • Tomebreaker
|
Begins moving if a nearby Mortal Savant or Bishop is provoked.
|
|
|
Imperial Soldier
|
Mortal Savant
|
50
|
2
|
Bolganone • Silver Sword
Swordfaire • Black Tomefaire • Reason Lv 5 • Sword Prowess Lv 5 • Seal Magic
Empire Holy Magic Users Lv 5: Blessing
|
Both begin moving if any player unit enters the throne room, or if either is provoked.
|
|
|
Imperial Soldier
|
War Master
|
50
|
1
|
Tomahawk
Fistfaire • Axefaire • Crit +20 • Axe Prowess Lv 5 • Brawling Prowess Lv 3 • Tomebreaker
Black Eagle Heavy Axes Lv 5: Onslaught
|
Begins moving if any player unit enters the throne room, or if the adjacent War Master is provoked.
|
|
|
Imperial Soldier
|
War Master
|
50
|
1
|
Silver Gauntlets
Fistfaire • Axefaire • Crit +20 • Axe Prowess Lv 5 • Brawling Prowess Lv 3 • Tomebreaker
Black Eagle Heavy Axes Lv 5: Onslaught
|
Begins moving if any player unit enters the throne room, or if the adjacent War Master is provoked.
|
|
|
Imperial Soldier
|
Gremory
|
50
|
2
|
Abraxas • Physic
Black Magic Uses x2 • Dark Magic Uses x2 • White Magic Uses x2 • Reason Lv 5 •  Defiant Mag Defiant Mag
Empire Holy Magic Users Lv 5: Blessing
|
--
|
|
|
Imperial Soldier
|
Grappler
|
50
|
2
|
Silver Gauntlets • Unarmed
Fistfaire • Unarmed Combat •  Brawling Prowess Lv 5 • Tomebreaker • Brawling Prowess Lv 5 • Tomebreaker •  Defiant Spd Defiant Spd
|
Both begin moving if any player unit enters the throne room, or if they, the central Mortal Savant, or the nearby War Master or Gremory is provoked.
|
|
|
Mysterious Soldier
|
Assassin
|
50
|
1
|
Wo Dao
Swordfaire • Locktouch • Stealth • Sword Prowess Lv 5 •  Pass • Pass •  Poison Poison
|
• Begins moving if a nearby Altered Demonic Beast is provoked.
• Leaves the map if Myson is defeated.
|
|
|
Mysterious Soldier
|
Warlock
|
50
|
3
|
Ragnarok • Bolganone
Black Tomefaire • Black Magic Uses x2 • Reason Lv 5 •  Magic +2 • Seal Defense Magic +2 • Seal Defense
Mysterious Magic Users Lv 5: Resonant Flames
|
• The western one begins moving if the nearby Dark Bishop or Altered Demonic Beast is provoked.
• The eastern one begins moving if the nearby Dark Bishop or Altered Demonic Beast is provoked.
• Leaves the map if Myson is defeated.
|
|
|
Mysterious Soldier
|
Dark Bishop
|
50
|
2
|
Banshee Θ • Miasma Δ • Death Γ
Miasma Δ • Fiendish Blow • Heartseeker • Reason Lv 5 • Magic +2 • Seal Strength
Mysterious Magic Users Lv 5: Resonant Flames
|
• The western one begins moving if the nearby Warlock or Altered Demonic Beast is provoked.
• The eastern one begins moving if the nearby Warlock or Altered Demonic Beast is provoked.
• Leaves the map if Myson is defeated.
|
|
|
Demonic Beast
|
Altered Demonic Beast
|
50
|
2
|
Artificial Crest Stone L
Renewal • Heartseeker • Seal Strength • Barrier • Vital Defense • Anti-Magic Armor • Vantage • Seal Defense
Brimstone Breath
|
• Weak to Axes.
• The center-east one begins moving if the nearby Warlock or Dark Bishop is provoked.
• The southeast one only moves to attack units in range.
|
|
|
Demonic Beast
|
Altered Demonic Beast
|
50
|
2
|
Artificial Crest Stone L
Renewal • Heartseeker • Seal Strength • Barrier • Vital Defense • Anti-Magic Armor • Vantage • Seal Defense
Brimstone Breath
|
• Weak to Lances.
• The southeast one only moves to attack units in range.
|
|
|
Demonic Beast
|
Altered Demonic Beast
|
50
|
1
|
Artificial Crest Stone L
Renewal • Heartseeker • Seal Strength • Barrier • Vital Defense • Anti-Magic Armor • Vantage • Seal Defense
Brimstone Breath
|
• Weak to Swords.
• Begins moving if the nearby Warlock or Dark Bishop is provoked.
|
|
|
Imperial Soldier
|
Mortal Savant
|
50
|
1
|
Ragnarok • Wo Dao
Swordfaire • Black Tomefaire • Reason Lv 5 • Sword Prowess Lv 5 • Seal Magic
|
Begins moving if the nearby War Master, Mortal Savant, or Bishop is provoked.
|
|
|
Imperial Soldier
|
Mortal Savant
|
50
|
1
|
Ragnarok • Wo Dao
Swordfaire • Black Tomefaire • Reason Lv 5 • Sword Prowess Lv 5 • Seal Magic
|
Begins moving if the nearby War Master, Mortal Savant, or Bishop is provoked.
|
|
|
Imperial Soldier
|
Mortal Savant
|
50
|
1
|
Ragnarok • Wo Dao
Swordfaire • Black Tomefaire • Reason Lv 5 • Sword Prowess Lv 5 • Seal Magic
Empire Holy Magic Users Lv 5: Blessing
|
Begins moving if the adjacent Sniper is provoked.
|
|
|
Imperial Soldier
|
Mortal Savant
|
50
|
1
|
Ragnarok • Silver Sword
Swordfaire • Black Tomefaire • Reason Lv 5 • Sword Prowess Lv 5 • Seal Magic
|
Begins moving if the nearby Mortal Savant or Gremory is provoked.
|
|
|
Imperial Soldier
|
Mortal Savant
|
50
|
1
|
Ragnarok • Armorslayer
Swordfaire • Black Tomefaire • Reason Lv 5 • Sword Prowess Lv 5 • Seal Magic
|
Begins moving if the nearby Mortal Savant or Gremory is provoked.
|
|
|
Imperial Soldier
|
Bishop
|
50
|
1
|
Abraxas • Fortify
White Magic Uses x2 • White Magic Heal +10 • Terrain Resistance •  Faith Lv 5 • Renewal • Faith Lv 5 • Renewal •  Miracle Miracle
Empire Holy Magic Users Lv 5: Blessing
|
Begins moving if an adjacent War Master or Mortal Savant is provoked.
|
|
|
Imperial Soldier
|
Sniper
|
50
|
1
|
Silver Bow
Bowfaire • Bowrange +1 •  Bow Prowess Lv 5 • Bow Prowess Lv 5 •  Poison Strike • Vantage Poison Strike • Vantage
Empire Snipers Lv 5: Flash-Fire Arrows
|
• Immobile.
• Mans a Ballista.
|
|
|
Imperial Soldier
|
Sniper
|
50
|
1
|
Brave Bow
Bowfaire • Bowrange +1 • Bow Prowess Lv 5 • Poison Strike • Vantage
|
Begins moving if the adjacent Mortal Savant is provoked.
|
|
|
Imperial Soldier
|
Gremory
|
50
|
2
|
Ragnarok • Physic
Black Magic Uses x2 • Dark Magic Uses x2 • White Magic Uses x2 • Reason Lv 5 • Defiant Mag
Empire Holy Magic Users Lv 5: Blessing
|
• The western one is immobile and mans a Fire Orb.
• The southwest one begins moving if a nearby Mortal Savant is provoked.
|
|
|
Imperial Soldier
|
Gremory
|
50
|
1
|
Abraxas • Fortify
Black Magic Uses x2 • Dark Magic Uses x2 • White Magic Uses x2 • Reason Lv 5 • Defiant Mag
Empire Holy Magic Users Lv 5: Blessing
|
Begins moving if any player unit enters the throne room, or if the central Mortal Savant or a nearby War Master or Grappler is provoked.
|
|
|
Imperial Soldier
|
Gremory
|
50
|
4
|
Ragnarok • Silence
Black Magic Uses x2 • Dark Magic Uses x2 • White Magic Uses x2 • Hit +20
Empire Holy Magic Users Lv 5: Blessing
|
• The upper-left one begins moving if the closest Gremory is provoked.
• The upper-right one begins moving if the closest Gremory is provoked.
|
|
|
Imperial Soldier
|
Gremory
|
50
|
2
|
Ragnarok • Meteor
Black Magic Uses x2 • Dark Magic Uses x2 • White Magic Uses x2 • Reason Lv 3
Empire Holy Magic Users Lv 5: Blessing
|
• The left one begins moving if the Gremory to the upper-right is provoked.
• The right one begins moving if the Gremory to the upper-right is provoked.
|
|
|
Mysterious Soldier
|
Warlock
|
50
|
3
|
Ragnarok
Black Tomefaire • Black Magic Uses x2 • Reason Lv 5 • Magic +2 • Seal Defense
Mysterious Magic Users Lv 5: Resonant Flames
|
Leaves the map if Myson is defeated.
|
|
|
Imperial Soldier
|
Fortress Knight
|
50
|
1
|
Silver Axe • Silver Shield
Axefaire •  Weight -5 • Axe Prowess Lv 5 • Weight -5 • Axe Prowess Lv 5 •  Armored Blow • Armored Blow •  Defiant Def Defiant Def
 Kingdom Heavy Soldiers Lv 5: Group Lance Attack Kingdom Heavy Soldiers Lv 5: Group Lance Attack
|
Immobile.
|
|
|
Myson
|
Warlock
|
51
|
1
|
Bohr Χ • Hexlock Shield • Death Γ
Agarthan Technology • Black Tomefaire • Black Magic Uses x2 • Reason Lv 5 • Immune Status • Dark Magic Range +1 • Infinite Magic • Hit +20
Dark Magic Corps Lv 5: Resonant Lightning
|
Immobile.
|
|
|
Hegemon Edelgard
|
Hegemon Husk
|
52
|
1
|
Crest of Flames Power • Twin-Crest Power
Imperial Lineage+ • Twin Crests • Commander • Monster Effect Null • Counterattack • Heavily Armored Wall • Vital Defense • Vantage • Desperation • Wrath
Wilted Flower
|
• Immobile; stands on a throne.
• Will never attack the same unit twice in one turn.
• Switches to Twin-Crest Power when a unit ends their turn in the throne room.
|
|
|
|
|
|
Reinforcements
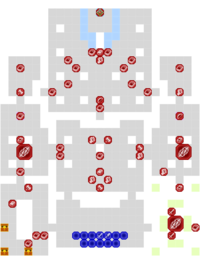
- Beginning after entering the throne room, continuing until every enemy in the central and throne rooms except Edelgard and the Bishop are defeated
- After any player unit ends their turn in the throne room (Maddening only)
- The first three turns of five-turn cycles, starting one turn after any player unit ends their turn in the throne room, continuing until every enemy in the central and throne rooms except Edelgard and the Bishop are defeated (Maddening only)
Boss data
Main boss
- Main article: Edelgard
|
|
|
|
|
|
|
Skill Levels

|

|

|

|

|

|

|

|

|

|

|

|
| E
|
E
|
E
|
E
|
E
|
E
|
E
|
E
|
E
|
E
|
E
|

|
|
|
|
|
|
|
|
|
|
Skill Levels
|
|
|
|
|
|
|
|
|
|
|
|
|
| E
|
E
|
E
|
E
|
E
|
E
|
E
|
E
|
E
|
E
|
E
|
|
|
|
|
|
|
|
|
|
|
Skill Levels
|
|
|
|
|
|
|
|
|
|
|
|
|
| E
|
E
|
E
|
E
|
E
|
E
|
E
|
E
|
E
|
E
|
E
|
|
|
|
Sub-boss
- Main article: Myson
|
|
|
|
|
|
|
Skill Levels
|
|
|
|
|
|
|
|
|
|
|
|

|
| E
|
E
|
E
|
E
|
E
|
A
|
E
|
E
|
E
|
E
|
E
|
|
|
|
|
|
|
|
|
|
|
Skill Levels
|
|
|
|
|
|
|
|
|
|
|
|
|
| E
|
E
|
E
|
E
|
E
|
A
|
E
|
E
|
E
|
E
|
E
|
|
|
|
|
|
|
|
|
|
|
Skill Levels
|
|
|
|
|
|
|
|
|
|
|
|
|
| E
|
E
|
E
|
E
|
E
|
A
|
E
|
E
|
E
|
E
|
E
|
|
|
|
Strategy
| This section details unofficial strategies that may help with completion of the chapter. This may not work for everybody.
|
This section has been marked as a stub. Please help improve the page by adding information.
This is it, your final battle. If you've been saving anything like stat boosters or relic weapons for a rainy day, it's time to take out your umbrella. Hegemon Edelgard's 30 range and two moves per turn are a lot more terrifying on paper than in practice; she always targets Dimitri with one of her attacks, who can more than take it, and she has an unfortunate tendency to attack your mages. Myson and his Bohr Χ spell and a Demonic Beast are on the right side, so the safest route to the throne room is up the left. The three chests are a waste of time, as two measly points of Strength and Resistance and one measly Elixir probably aren't going to help you much with three quarters of a chapter to go.
In Maddening difficulty however, Hegemon Edelgard's long range attacks are an actual threat by virtue being stronger and more accurate, meaning any physically frail units in her range are constantly in danger of losing a good chunk of their health and even get OHKO'd by a critical hit if their luck stat happens to be low enough. Likewise, War Masters and the Warlocks & Gremories with Meteor/Bolting can quickly put your best units down after they've been weakened by Edelgard and a ballista in the left and right rooms.
Battle suggestions: Combat Arts/Magic: Windsweep, Silence, Meteor, Bolting; Gambits: Impregnable Wall, Stride; Equipment: Seiros Shield. Try to keep at least one attack gambit use for Dimitri, Dedue, and Ingrid for the final confrontation with Edelgard. Make sure you have a fully repaired Arhedbar lance for Dimitri and try to hold off using it until you fight Edelgard as the Atrocity combat art is highly effective against her.
This battle requires patience as you slowly whittle down the number of enemies so take your time. Start by taking out the enemies closest to you in the room to the left using long-range attacks (Lysithea with the Thyrsus staff works great as does Hapi classed as a War Cleric). Subsequently, use a gambit like Impregnable Wall on at least one character and draw out some of the enemies in the middle room using the left entrance to the middle room. It is advised to avoid the right rooms for now as Myson will use Bohr, which completely ignores Impregnable Wall and will leave a character with only 1 HP.
After taking out these enemies, take a character with high avoid and resistance (Ingrid with Avoid+ works well) to begin drawing out the mages in the throne room by putting her in range of a mage that has the Meteor spell (you can also use Impregnable Wall again but it’s advised too many early uses of this gambit in case you’re in a pinch later). Be patient as these enemies draw near and take them out with your whole group when they’re within range. Note that the mage with Meteor can only use it twice and will then join the remaining enemies headed your way.
Once these enemies are dealt with, split your group into two and work on the demonic beast in the central room (weak to lances) while taking your second group to draw out the mages in the left central room (Ingrid with Avoid+ works well here again). The mage stationed at the ballista can be problematic so keep your low resistance personnel out of range until the mage is dealt with (if you have a mage with the Warp spell, consider warping someone who can finish the ballista mage off which will make dealing with these enemies much easier).
Once both demonic beasts and the mages are cleared out of the left central and central rooms, it’s time to draw out the remaining mages in the throne room to the central room that have the Meteor spell. Use a similar strategy as before by kiting a mage to attack someone with with high resistance and avoid and after the spell has been used up, safely finish off these enemies.
After this, use your group to finish off some straggler enemies (the mage and Mortal Savant in the upper left, the War Masters to the right while staying out of range of Myson).
While it’s not required to kill Myson, it will make finishing the battle easier so continue reading if you want to do this or skip to the next paragraph. Consider having someone in your group with their own long range spell (Dorothea has Meteor, Constance has Bolting) and use it on the mages, the demonic beast, or War Master near Myson. This will draw draw these enemies to you and once they’re safely outside of Myson’s Bohr spell range, finish them off. If you’ve been following the guide to this point, this will leave you with an archer at the ballista and Myson in the central right room. You can ignore the Fortress Knight that has zero movement range as well as the two demonic beats nearby. Due to Myson having Bohr equipped and it having a minimum range of three spaces, you can warp someone or use the Stride gambit to move someone in range to finish him off (try to use a brave sword or someone with high enough attack speed to land two hits) without fear of him counterattacking. At the same time, move someone else in to finish off the archer at the ballista. Be mindful of the War Master and the mage in the top right room and finish them off before proceeding to the throne room.
Once a single character enters the throne room, two mages will spawn in the top right and top left rooms (the ones on the left have Meteor and the ones of the right have Bolting). However, this will also cause Edelgard to stop her long-range attacks. Use the previous high avoid/resistance method and/or Impregnable Wall to get these enemies closer and finish them off.
At this point you can bring your team into the throne room, however, before you start attacking Edelgard, you should prevent enemy reinforcements that will spawn every turn at the top left and top right stairwells (Dark Knight with Death on the left, War Master on the right). Safely approach each room and then take two of your weaker, non-healer characters and plug each one on the stairs to prevent further reinforcements. This will help immensely when fighting Edelgard.
It’s time for the big confrontation. If you have someone with the Serios Shield, they should be your primary attacker as the shield will reduce the amount of damage dealt by Edelgard. Edelgard’s shield is unique in that it’s only one space but it will regenerate each turn. Note that Monster Breaker combat arts and abilities are not effective to her Monster Effect Null ability. However, her shield is still susceptible to Gambits and you can break her shield armor after only one gambit hit. The only personnel that should be attacking at this point are the character with the Seiros Shield, those with high avoid, and those with both high defense (30+) and high HP (60+). They’re the only ones who will be able to withstand Edelgard’s area effect attack. After the first health gauge is deputed, Edelgard will have Vantage, the second gauge gives her Desperation, and the last gauge gives her Wrath. Windsweep is a great option here due to preventing counterattacks.
Using Attrocity with Dimitri after an armor break will take out either most or all of a full health gauge. If you have someone that is a mastered War Master, the War Master’s Strike combat art (especially if they’re also holding the Seiros Shield) also works great after an armor break. The Cursed Ashiya Sword (especially paired with the combat art Sunder) is an almost 100% critical hit chance after an armor break. Bringing a dancer to give Dimitri or another strong character a second hit works great. If you obtained the Opera Co. Volunteers gambit from the last battle with either Dorothea or Manuela, this also works great here as you can give multiple characters a second turn. Keep at it using some of these suggested strategies and she’ll be dead in no time.
Trivia
- This is the only final map which doesn't use the song "A Vow Remembered" for the Preparations Screen, choosing to reuse instead the theme used for the final map: "Apex of the World".
Etymology and other languages
Oath of the Dagger
| Names, etymology, and in other regions
|
| Language
|
Name
|
Definition, etymology, and notes
|
| English
|
Oath of the Dagger
|
--
|
| Spanish
|
El juramento de la daga
|
The oath of the dagger
|
| French
|
Le serment de la dague
|
The oath of the dagger
|
| German
|
Eid des Dolches
|
Oath of the Dagger
|
| Italian
|
La promessa del pugnale
|
The promise of the dagger
|
| Korean
|
단검의 맹세
|
Dagger's oath
|
| Simplified Chinese
|
短剑的誓约
|
Dagger's oath
|
| Traditional Chinese
|
短劍的誓約
|
Dagger's oath
|
|
|
Clash at the Imperial Capital
| Names, etymology, and in other regions
|
| Language
|
Name
|
Definition, etymology, and notes
|
| English
|
Clash at the Imperial Capital
|
--
|
| Spanish
|
Pugna en la capital imperial
|
Battle in the imperial capital
|
| French
|
Bataille décisive à Enbarr
|
Decisive battle at Enbarr
|
| German
|
Konfrontation in Enbarr
|
Confrontation in Enbarr
|
| Italian
|
Sfida nella capitale imperial
|
Challenge in the imperial capital
|
| Korean
|
제도 결전
|
Decisive battle at the imperial capital
|
| Simplified Chinese
|
帝都决战
|
Decisive battle at the imperial capital
|
| Traditional Chinese
|
帝都決戰
|
Decisive battle at the imperial capital
|
|
|
Gallery
This section has been marked as a stub. Please help improve the page by adding information.
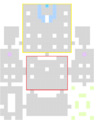
The red area is the central room and the yellow area is the throne room; entering the throne room triggers reinforcements and defeating every enemy in both stops them.
References