Land of Sorrow (Gaiden)/Rigel Falls Battle
Rigel Falls Battle (Japanese: リゲルの滝の戦い Rigel Falls Battle) is the eighth map of the fourth act of Alm's route in Fire Emblem Gaiden and Fire Emblem Echoes: Shadows of Valentia.
| ||||||||
|

Map data
Gaiden Echoes: Shadows of Valentia
| ||||||
|
| |||||
| Victory: Rout the enemy | Player | Enemy | ||||
|---|---|---|---|---|---|---|
| Defeat: Alm dies | 1–16 | 20+reinforcements | ||||
| Map dimensions: 30 columns by 28 rows | ||||||
Character data
Gaiden Echoes: Shadows of Valentia
| Characters | |
|---|---|
New units
| |
| |
Required characters
| |

| |
Available characters
| |
              
|
Item data
| ||||||||||||||||||
|
- Note: There are no items to be found in the original Gaiden. The item list above is for Echoes: Shadows of Valentia.
Enemy data
Gaiden Echoes: Shadows of Valentia Normal Echoes: Shadows of Valentia Hard
| |||||||||||||||||||||||||||||||||||||||||||||||||||||||||||||||||||||||||||||||||||||||||||||||||||||||||||||||||||||||||||||||||||||||||||||||||||||||||||||||||||||||||||||||||||||||||||||||||||||||||||||||||||||||||||||||||||||||||||||||
| |||||||||||||||||||||||||||||||||||||||||||||||||||||||||||||||||||||||||||||||||||||||||||||||||||||||||||||||||||||||||||||||||||||||||||||||||||||||||||||||||||||||||||||||||||||||||||||||||||||||||||||||||||||||||||||||||||||||||||||||
| |||||||||||||||||||||||||||||||||||||||||||||||||||||||||||||||||||||||||||||||||||||||||||||||||||||||||||||||||||||||||||||||||||||||||||||||||||||||||||||||||||||||||||||||||||||||||||||||||||||||||||||||||||||||||||||||||||||||||||||||
| |||||||||||||||||||||||||||||||||||||||||||||||||||||||||||||||||||||||||||||||||||||||||||||||||||||||||||||||||||||||||||||||||||||||||||||||||||||||||||||||||||||||||||||||||||||||||||||||||||||||||||||||||||||||||||||||||||||||||||||||
Boss data
- Main article:
Magnus
Gaiden Echoes: Shadows of Valentia Normal Echoes: Shadows of Valentia Hard
|
|
| |||||||||||||||||||||||||||||||||||||||||||||||

Strategy
| This section details unofficial strategies that may help with completion of the chapter. This may not work for everybody. |
The party starts split into two. The bottom party fights a wave of various cavalry units, a few Arcanists, and then has to single-file their way up a mountain to cross the bridge. The top party gets to immediately go for the fortress, and deals with mainly Barons and Arcanists.
The bottom party mostly needs either physically bulky units to choke the bridge to the right, and mages to kill the low-RES cavs. However, non-Saint magic users cannot cross the bridge later on, so they'll be out of the fight once they're done mopping up in the south unless you kept a Warp user down here. Using Warp to move a Baron over to choke the bridge is a good idea, but expect them to take a Death hit unless the enemies block the Arcanists out. Once a stable chokepoint setup is achieved, archers and mages can chip the blocked enemies to oblivion.
The top party has a much more time-sensitive and somewhat riskier objective, being to shut down the Witch and Gargoyle spawns before they overwhelm the bottom party or themselves. While the Gargoyles are mere annoyances to non-mage units, the Witch spawns are legitimately threatening. In order to break through the lines of Barons and Arcanists, Mage Rings are recommended, as they can help magic units shred Barons without taking a Javelin to the face. The Arcanists get taken out by Snipers pretty effectively. As the Cantor is on the right Supply tile, he can be safely shot to death with Bows in a timely fashion. Marla, on the other hand, is much harder to deal with. While she is statistically identical to her sister, who you already fought (assuming you recruited Zeke/Tatiana), trying to approach her means either aggroing Magnus or the Bridge Arcanist squad. Try to shoot newly-spawned witches if able, since conjured units can't act the turn they spawn. Magnus requires strong magic units to take out quickly, as he is both harder-hitting and physically bulkier than other Barons by a noticeable margin. You can also bait Marla into attacking, just like her sister.
Map Turn Count: 9
Game Turn Count: 292
Flavor text
| Game | Text (English) |
Text (Japanese) |
|---|---|---|
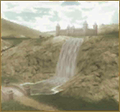
| Echoes: Shadows of Valentia | Valentia's largest
waterfall, situated in the Rigelian Empire. It boasts impressive height, and the sheer volume of water is astonishing. |
リゲル帝国領内にある
バレンシア大陸でも 最大の滝。 落差が大きい上に、 滝の水量も莫大である。 |
Etymology and other languages
| Names, etymology, and in other regions | ||
|---|---|---|
| Language | Name | Definition, etymology, and notes |
| English |
Rigel Falls Battle |
-- |
| Japanese |
リゲルの滝の戦い |
Rigel Falls Battle |
| French |
Bataille: Chutes de Rigel |
Battle: Rigel Falls |
| Korean |
리겔 폭포의 전투 |
Rigel waterfall battle |
Gallery
Thumbnail of Rigel Falls.

| ← Fight at the Dragon's Maw • | Rigel Falls Battle | • Attack on the Last Bastion → • Secret Shrine → |
|---|
| Fire Emblem Echoes: Shadows of Valentia | ||||||||||||||||||||||||||||||||||||||||||||||||||||||||||||||||||||||||||
|---|---|---|---|---|---|---|---|---|---|---|---|---|---|---|---|---|---|---|---|---|---|---|---|---|---|---|---|---|---|---|---|---|---|---|---|---|---|---|---|---|---|---|---|---|---|---|---|---|---|---|---|---|---|---|---|---|---|---|---|---|---|---|---|---|---|---|---|---|---|---|---|---|---|---|
| ||||||||||||||||||||||||||||||||||||||||||||||||||||||||||||||||||||||||||