Ryoma asks Saizo and Kagero to steel themselves for battle, to which Saizo and Kagero each vow to win Ryoma the vacation; Ryoma states it would be an honor to fight alongside them for a noble cause. The battle begins at this point.
Once the battle ends, Ryoma states the battle is theirs and praising his retainers; Saizo states that they are unworthy of his praise and their win was due to his leadership, with Kagero revealing the battle was exhausting but wishes Ryoma safe travels now that the ticket is his. Ryoma thanks them both and promises to make the most of his relaxing time there and asks them to watch over everything in his absence.
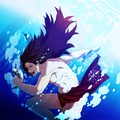
A few days later, back at the castle, Saizo states he's glad he and Kagero earned his praise for helping him win the ticket, yet unnerving to be separated from the lord he's sworn to protect; Kagero arrives in the area stating she's brought a message from Ryoma, to which Saizo asking how it reached the area without him knowing about it first. Kagero reveals that the message was delivered by a merchant named Anna, and that Ryoma trusted her with a letter and picture of himself on the island; Saizo asks Kagero if she's opened it already, to which Kagero denies and resents Saizo for implying such—they won the ticket together and thus they should open the message together. Saizo states he understands, and the two of them open the message, after which both Saizo and Kagero have shocked reactions. A CG image of Ryoma diving appears.
Saizo takes some time to deduce that Ryoma is diving, after which Kagero reads the letter and deduces that Ryoma is keeping up with his combat training; Saizo notes that Ryoma has seized four fish with his bare hands, with Kagero noting it to be a slippery challenge—fish are very aware creatures, and thus it's easier to catch dandelion seeds in the wind than fish, yet Ryoma snatches fish by the fistful. Saizo states he would have loved to see this action firsthand, that only Ryoma could teach schools of fish a lesson in sea combat, then tells Kagero it appears Ryoma's failed in his mission to find relaxation; Kagero reveals there's more to the letter, revealing he collapsed in exhaustion on the beach, then lies there until night and marvels at the stars. Kagero later states that Ryoma's having the fish dried to bring back to them so they can have a taste of his tropical victories; Saizo states he's not worthy of Ryoma's favor but will accept it, with Kagero revealing the fish is a frank expression of his favor. Saizo tells Kagero to not let this experience get to her head, and asks them to double their training until Ryoma returns, to which Kagero states she agrees but make the amount triple—they must be ready to serve Ryoma when he returns; Saizo asks if they should get started, to which Kagero states they shall sharpen their steel while Ryoma relaxes—yet is probably making the sea his battlefield as they speak.
Hinoka states she wishes anyone had asked her what she wanted first, but alas, she has to go to a tropical island all by herself if she wins—causing her to suggest that she forfeit; Setsuna denies the forfeit request, stating that their team is going to win and thus Hinoka will be going to the island, after which Hinoka chimes in that this action is against her wishes. Setsuna notes that Hinoka works hard and thus deserves a vacation, after which Azama tells Hinoka ought to spread her wings and fly close to the tropical sun—but make sure she tans and not burns; after a reaction from Hinoka, Azama asks her to return from paradise bearing gifts for her retainers, with Setsuna specifically asking for a pineapple, causing Hinoka to react in shock thinking the gifts are really what her retainers are after. The battle begins at this point.
Once the battle finishes, Hinoka notes a good all-around effort from her team and that they now stand victorious; after some encouraging words from Azama and Setsuna, Hinoka thanks them and apologizes that she can't bring them to the island with her, and asks them not to get into too much trouble while she's gone.
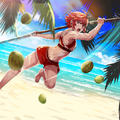
Later, back at the castle, Azama attempts to gauge how long Hinoka's been gone, deriving estimates of three days, twenty days, and a whole year, then states he hopes Hinoka's had her fun under the sun as he misses her constant criticism; Setsuna appears on the scene announcing herself, to which Azama states he thinks she would be lying forgotten in a trap without Hinoka to save her from peril. Setsuna states she would be stuck in a trap right now if it weren't for someone; Azama asks who that someone is, to which Setsuna states is a merchant by the name of Anna who came to deliver them a letter from Hinoka. Azama attempts to use a fancy word, after which Setsuna states that Anna said a picture came along with the letter; Azama states he hopes Setsuna hasn't been sitting on this letter all day, to which Setsuna confirms she has—she was very comfortable before she saw Azama. Azama asks if the message inside the letter happens to be urgent, and initially states they should get to reading the letter first, then later asks to see the picture first, hoping to see Hinoka in bliss under the sun; Setsuna states she's excited to look at the picture. A CG image of Hinoka training with coconuts appears.
Azama notes the image is a far cry from Hinoka snoozing, as she appears to be preoccupied with a swarm of coconuts; Setsuna deduces Hinoka is training, to which Azama notes her curiosity. Setsuna deduces that Hinoka might have wanted them to see her like that and that the answer might be in the letter, to which she reads silently; Azama demands to see the letter by threatening to snatch it from Setsuna, after which Setsuna hands over the letter. Azama reads out the letter, with one detail revealing Hinoka having had to take a job knocking down coconuts to earn money for souvenirs since they forgot to pack some money for them; Setsuna and Azama note Hinoka's caring thoughts into the letter. As Setsuna starts daydreaming about crab, Azama attempts to snap her out, asking her not to complain about what souvenir Hinoka brings back; Azama states that he might go mad if Hinoka doesn't return soon.
As Takumi realizes the challenge is on, he reveal his plan for the challenge—they lose, everyone is to drop their weapons on the first turn, causing puzzled reactions from Hinata and Oboro; Takumi questions the puzzled reactions and asks if he detects anything other than total obedience, to which Oboro states she knows he wants to go on the vacation, which Takumi denies. Hinata tells Takumi he's not buying the excuse, but he and Oboro have his back, and he'll be going on that vacation; Takumi finally agrees to fight the challenge fair. The battle begins at this point.
Once the battle ends, Takumi states the battle went well and congratulates Hinata and Oboro, to which Hinata states the other teams didn't stand a chance and Oboro revealing the ticket now belongs to Takumi; Takumi thanks Hinata and Oboro, and promises he'll do his best to make the most out of it.
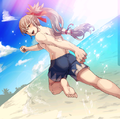
Later, at the castle, Hinata states he wishes he could have gone with Takumi on his vacation, but stating he's still glad Takumi got to go as he's always wanted to visit a tropical island; Oboro rushes onto the scene and cries out to Hinata that something appears to have happened involving Takumi, to which she reveals to Hinata that Takumi sent them a letter when asked if anything's wrong with Takumi. Oboro states she thinks it wonderful that Takumi thinks of her and Hinata while on vacation, after which Hinata asks her not to go scaring him, as he thought Takumi was hurt, then asks how the letter arrived, guessing carrier pigeon; Oboro reveals a merchant named Anna delivered the letter and also stated that there's a picture inside. Hinata asks Oboro to open the letter, to which Oboro states she will, but wants to see the picture first; a CG image of Takumi running along a beach appears.
After puzzled reactions from both Hinata and Oboro, Hinata states he thinks the person in the picture can't be Takumi; Oboro in agreement states it has to be some sort of impostor, based on the smile. Once Hinata realizes it really is Takumi in the picture, he deduces that the island really is working its magic on him; Oboro, upon further examining the picture, states she could look at it for hours. Hinata asks where Takumi got the outfit he's wearing, then notices he wrote about it in the letter—it's a swimsuit Anna made for him, to which Oboro notes Anna being quite the seamstress and the swimsuit fits him perfectly; Hinata reads more of the letter and reveals that Anna took him to her favorite beach where she took the picture—angering Oboro in the process, who reveals she wants to have a few words with Anna, forcing Hinata to attempt to calm Oboro down, revealing it's only a smile depicted in the picture. Hinata also reveals that Takumi wrote down that he's having a lot of fun under the sun and all of his dreams have come true thanks to them; Oboro asks if Takumi really wrote that, to which Hinata confirms and reveals the exact phrase, stating he's never heard him say anything like that before—then deduces that Takumi really did need the vacation. Oboro begins to cry in happiness, to which Hinata again has to get Oboro back in line; Hinata states that Takumi wrote that he's bringing them gifts, prompting a further joyful reaction from Oboro.
Sakura states that she would like to go on vacation, but only if everybody was going, asking Subaki and Hana if anyone's worried about sending her to the island all alone; Hana states she is worried, stating that the whole trip must be a trap and that island must be overrun with pirates, after which Subaki states there's no need to worry—he's already patrolled the locale—he's flown over to the island to ensure that it's safe, and also reveals Sakura'll find a variety of tropical foods there as well, after which Sakura states she's a little interested. Hana states that if Sakura does want to go, they'll fight for that ticket; Subaki states that, while they're battling, he'll get to work on Sakura's vacation itinerary, to which Sakura thanks him and Hana. The battle begins at this point.
Once the battle ends, Sakura thanks Hana and Subaki for their help in winning, after which Subaki accepts and states he'll get her her vacation itinerary before she leaves, while Hana tells her to enjoy her trip; Sakura again expresses regret that Subaki and Hana couldn't come along, but promises she'll try to have a good time on her own.
Later, at the castle, Hana states she's been on edge ever since Sakura left, being used to being at her side, but states she hopes she's having fun eating tropical treats; Subaki appears and states he caught Hana in the nick of time, asking her what people would say if they heard her. Hana asks what was wrong with what she was saying, to which Subaki states they have a line they must never cross—they're loyal retainers, not sad puppy dogs, with Subaki telling Hana to remain professional; Hana thinks Subaki is trying to start an argument, stating she can be sad Sakura's not her and asks Subaki if he's sad as well, to which Subaki asks Hana to remain calm or he might not show her what he's carrying. Hana notes the paper, after which Subaki states it's a letter from Sakura; Hana asks when the letter arrived, with Subaki stating it just now arrived, delivered by a merchant named Anna and that Sakura also included a picture as well. Hana asks Subaki if he opened the letter, to which Subaki confirms but only so much as to verify its contents, after which he sought out Hana; Hana appears skeptical of Subaki's story, but states she thanks him if it's true, after which Subaki states they'll look at the picture. A CG image of Sakura eating a fruit bowl appears.
Hana notes that Sakura looks happy, to which Subaki states he planned her whole trip, right down to the dessert—he found a place that serves an unparalleled fruit parfait, and he's a reason Sakura's eating it; Hana tells Subaki he can't take credit for the dessert, but Subaki says he can—he was busy planning every detail, and the proof is in the letter, proceeding to read a passage. Hana asks Subaki when he found time for everything, but then simply states she's just happy that Sakura's happy; Subaki then states there's one detail in the picture that bothers him—the swimsuit Sakura's wearing is not the one he picked out, he picked out one with a floral print, and deduces the person who took his order must have gotten it wrong. After a giddy reaction from Hana, Subaki asks Hana if she had anything to do with this "travesty", to which Hana confirms—she gave that swimsuit to Sakura before she left; Hana deduces that Subaki tried to dress Sakura in a tablecloth, and believes even he'd admit Sakura looks good in her choice of swimsuit, to which Subaki reluctantly agrees, feeling like a failure in the process. After a little more banter, Subaki and Hana read more of the letter, which reveals accolades for both of them; Subaki asks Hana to put aside their little rivalry and smile for Sakura's sake, to which Hana agrees to the truce, with the both of them waiting to hear more from Sakura about the trip.
Xander tells Peri and Laslow that he expects their best out of them, and that means no slacking, to which Laslow states he would never rest on his laurels—he's willing to dance around the competition to win Xander the ticket—while Peri states she never loses; Xander notes that they both seem more eager than usual to win this challenge. Peri states that she lives to serve and asks Xander to bring her back some seashells, while Laslow asks Xander to sketch a beach beauty for him and not skimp on the details; Xander reacts puzzled to the requests but decides to refer his statement to another time and calls Peri and Laslow into battle, but they will discuss their requests another time. The battle begins at this point.
Once the battle ends, Xander congratulates Peri and Laslow on a job well done, the other teams have been defeated and victory is theirs; Laslow and Peri respectively thank Xander, with Laslow stating the praise is music to his ears and Peri stating it was the spree of her dreams. Xander states that he now feels less guilty about profiting from Peri's and Laslow's hard work, and asks them to excuse him while he makes use of the ticket.
Later, back at the castle, Peri notes that it seems like Xander's been gone forever and states he'd better be having fun as she's getting lonely; Laslow asks Peri what's wrong, to which Peri states that she doesn't like what she's feeling at all as she misses Xander and asks when he'll be back. Laslow tells Peri he's not certain when Xander will be back but it must be soon, then tells her to cheer up as he's still there; he then states that they don't often get the chance to socialize, and asks if they can get a spot of tea, to which Peri refuses. Laslow notices Peri's harsh retort and that it's uncalled for, then states he thinks he can restore her back to her usual sunny disposition—revealing a letter from Xander in his hand; he reveals a traveling merchant named Anna just stopped by, talking about her looks then stating she ran into Xander on the tropical island—and not only delivered the letter, but also took a picture of him as well. After a brief exchange over whether or not Laslow was also feeling lonely, Laslow states they should open the letter and see the picture as well, revealing that Anna stated that Xander cut a fine figure. A CG image of Xander standing on the beach holding a water toy in Lilith's likeness appears.
Peri reacts to the picture, after which Laslow states that there isn't a man alive who surpasses this depiction of Xander; Laslow then asks what is strapped to Xander's arm that appears to be Lilith, to which Peri deduces it's a water toy in Lilith's likeness and that someone must have made him take it into the water with him—then reveals she forgot Xander doesn't know how to swim. Laslow appears shocked at the revelation that Xander can't swim, to which Peri states he can't even dog paddle yet is really good at sinking; Laslow states that this explains the look on his face with Peri noting Xander's pushing himself by going into the water when he shouldn't. Laslow notes that, in addition to the letter, there appears to be a list, then finds out it's a tally of seashells; Peri states it's a list of the seashells she wanted, even making notes next to each kind of shell—right down to their color, luster, and scientific names—then wonders why Xander would go to such trouble, as she merely asked for a bunch of pretty shells. Laslow then finds another list, this one intended for him, of beauties of the beach; besides their names, Xander wrote down their professions, family heritage, and aspirations in life—then notes that Xander must have spent more time on research than relaxation. Peri asks Laslow to look at the letter, which states that Xander's having a great time, to which Laslow asks Peri to read onward; Peri reveals the letter itself is short, after which Laslow notes its efficiency with equal praise and reprimand. After both Peri and Laslow end up driven to tears of joy, after which they both have to struggle to smile, Peri asks Laslow if they can grab that cup of tea; Laslow accepts, as they need to restore themselves until Xander returns.
Camilla notes that a trip to the tropical island could be so tantalizing yet sounds dreary if she can't take Corrin with her; Selena tells Camilla that she's going as they're going to win this challenge no matter what, causing her and Beruka to get into an argument. Seeing that she appears to be caught between her retainers, Camilla states she really doesn't want to go on this trip but states she'll bend just this once, on the condition Selena and Beruka promise to battle the others into the ground, to which they both agree, confident Camilla will win; Camilla notes this challenge looks like fun and calls Selena and Beruka to get to fighting. The battle begins at this point.
Once the battle ends, Camilla states that beating everyone was hardly a challenge at all, to which Selena notes the victory was easy and Camilla'll get something for her trouble, with Beruka stating the mission is accomplished and the ticket now belongs to Camilla; Camilla thanks Selena and Beruka, their devotion is what matters most to her, and tells them to be good as she's off on her little trip.
Later, at the castle, Beruka is wondering what to do without Camilla around to give her missions—she and Selena secured the ticket for her, which pleased her, yet she's had nothing to do; Selena appears on the scene apparently having found Beruka by chance, to which Beruka asks Selena what's going on, as if she looks ready to explode. Selena states she has great news, to which Beruka asks if it's a mission for her and someone for her to attack—to which Selena asks why that would be great news, since she wouldn't run for that, after which Beruka asks what could be so exciting; Selena states a letter for them has arrived from Camilla, delivered by a merchant named Anna. Beruka apparently noticed Anna's red hair, to which Selena asks her if she saw Anna—then asks her what she did to Anna; Beruka admits she may have seen Anna, stating Anna was stalking her, thus she chucked an axe at Anna and sent her packing, with Selena not finding this behavior surprising. Selena states she has the letter now, and that Anna told her there's a picture inside; Beruka states there had better be a mission in the envelope, with Selena stating there might be but they won't find out until they open the letter. A CG image of Camilla relaxing on a beach towel with drink in hand appears.
Selena notes the image of Camilla is stunning, and that seeing Camilla really enjoy herself is worth the trouble, yet she's a little jealous; Beruka asks Selena why she's jealous, to which Selena asks Beruka if she's also jealous and to look at how much fun Camilla is having—only for Beruka to state that only one word comes to mind looking at the picture, and that word is "danger". Selena asks Beruka if she's serious about the danger thought, to which Beruka confirms; Selena asks Beruka what she sees in the picture, noting Camilla is at ease on the beach—then deduces Beruka thinks the drink in Camilla's hand is poisoned, to which Beruka states Selena's so far off she can't believe it. Beruka states that Camilla's back is turned toward the ocean, and the waves might look pretty, but danger is lurking under them; Selena asks Beruka why she's worrying about the ocean, to which Beruka states Selena might be letting herself get distracted, but she won't let her guard down. Selena notes that Camilla's perfectly safe, as she sent them a letter, thus she must be perfectly fine, then asks Beruka to listen to the letter; Beruka asks if Camilla has a mission for her, to which Selena asks her to pay attention to the letter, which she proceeds to read. Upon finishing reading the letter having revealed Camilla is sending gifts, Selena states that Camilla is always thinking of her and Beruka, to which Beruka states she doesn't know—she doesn't have sufficient information to make such an assumption, but does state there's no kinder liege than Camilla and thus they can't let their guard down and they must protect her from any and all harm; Selena admts Beruka's right, that they do need to protect Camilla no matter what. Beruka states that the picture still has her worried, as Camilla's out in the open with no armor on and notes any assassin could come swimming by; Selena notes Beruka is more obsessed than usual, then states Camilla's on vacation and thus they're also on vacation—Selena then tells Beruka to stop worrying and to think about the gifts Camilla's bringing home. Beruka starts wondering what her gift might be, guessing the venom from an island snake or the juice of a toxic fruit that she can use to poison her weapons with; Selena tells Beruka she's hopeless, then guesses that her own gift may be a necklace made from seashells or something else cute, then states she can't wait for Camilla to come home.
Leo notes that this challenge is a colossal waste of time, considering the concept of fighting for a ticket he won't even use stupid—stating that he doesn't care what anyone else says, he states he and his team are leaving; Odin tells Leo that they cannot retreat, this is the most crucial battle of his life and he must reach the fabled isle, proceeding to talk about the experience. Niles also implores Leo to take the vacation, to which Leo refuses—prompting Niles to state he can't stand Leo denying himself the way he is; Niles states that they're fighting and their team is going to win, and Leo is getting a tan even if Odin and Niles have to slather him in suntan lotion themselves. Odin states that the three of them stand together, that they will win and Leo will return a bronze god; this prompts Leo to state that he'll go on the vacation just to get away from Odin and Niles, then notes that this exchange means he's going into battle irritated and tells Odin and Niles to cover him. Odin states he'll cover Leo's back—and front, sides, and parallel dimensions; Niles states that he wants Leo to get to paradise in one piece. The battle begins at this point.
Once the battle ends, Leo states that their team won and thus he feels awful; Odin states that the ticket belongs to Leo and tells him to let his spirit be reforged in the scorching furnace of paradise. Niles asks Leo to promise him he'll wring every last drop of pleasure from the trip; Leo, irritated at Odin and Niles, states that he's never wanted anything less than this vacation—then tells Odin and Niles not to get into any weird trouble while he's gone or else he'll have their heads.
Later, at the castle, Niles notes the look of disgust Leo had when he left and envisions whatever agony Leo might be going through on the island; Odin appears and attempts to silence Niles, to which Niles asks Odin how long he's been eavesdropping, with Odin stating he's done so too long and now he needs to plug his ears with beeswax. Niles again attempts to explain the agony Leo might possibly be in, possibly alluding to a sunburn; Odin makes a note of Niles's manner of speech. Odin then states in a long-winded fashion about something that just arrived for him, prompting Niles to tell Odin to get straight to the point; Odin reveals that a letter from Leo has arrived for them, and that a merchant named Anna came to deliver it. Niles and Odin have a brief exchange over each others' manner of speech, after which Odin states that Anna revealed the letter came with a picture of Leo, after which Niles asks Odin to open the envelope; Odin gets into theatrics as he opens the envelope. A CG image of Leo sitting in the shade with drink in hand appears.
Niles notes that this image is more revealing than any of them hoped, with Odin starting to state the possible agony Leo might be in, prompting a surprising reaction from Niles; Odin and Niles have a brief exchange over each others' familiarity with Leo before Odin asks Niles to predict the letter's content. Niles predicts that Leo wouldn't go into the water, that he hates tanning, that he probably stopped going out during the day and leaving his bungalow only at night, all of which Odin confirms is in the letter; Odin asks Niles to predict what Leo's drinking in the picture, with Niles guessing freshly squeezed tomato juice, with Odin again confirming the prediction as correct. Niles asks what else Leo wrote about and if there are any tasks for them, to which Odin reveals that only thanks remain; Odin reveals that Leo states the island isn't as bad as he thought, saying it hasn't been an absolute waste of time; Odin and Niles begin another exchange before Odin reveals they must prepare for Leo's return, celebrating Leo's victory over vacation even if he brings them no souvenirs.
Elise notes that she's got a chance to win a ticket to paradise all for herself, but states that she couldn't go without Arthur and Effie; Arthur states that winning this victory for her is all the time in the sun he needs, after which Effie states she'll crush the others and that's all the vacation she needs. Elise excitedly states that it's time for her to hit the beach, then asks if Arthur and Effie are sure they don't want to go since they'd have so much fun; Effie asks Elise not to worry about them, and all she wants out of Elise is for her to have a good time, with Arthur confirming and asks that Elise returns with sand between her toes and a smile on her face. Elise thanks the two and asks them to get to winning that ticket. The battle begins at this point.
Once the battle ends, Elise notes that they won thanks to Arthur and Effie; Arthur states that no one is more deserving of the ticket than Elise, with Effie telling Elise to enjoy her trip. Elise states she'd like it if they could all go, but promises she'll bring them back some nice gifts.
Later, at the castle, Effie is wondering what Elise is doing at that moment and hoping she comes back soon as it's kind of quiet in the area; Arthur arrives and states he's here to break that silence, to which Effie asks him why his flanks are covered in mud. Arthur explains a run of bad luck he's had, then reveals he has something to show Effie; Effie guesses Arthur's showing off his spare pants, to which Arthur starts searching for the object and reveals that a letter for them has come from Elise. Effie asks Arthur to give her the letter, to which Arthur tells Effie she'll rip the paper and they must hold it with caution; Effie then asks how Arthur got the letter, to which Arthur states a kind merchant named Anna helped him while he was deep in the mud, offered him a helping hand, and states she came with this letter—with Anna even stating Elise was concerned about their well-being; Effie and Arthur state that they think themselves unworthy of Elise, before Arthur reveals that Elise sent them a letter and a picture, with the two of them agreeing to take a look. A CG image of Elise sitting in the shade handling flowers appears.
Effie notes that it looks like Elise is having fun, to which Arthur states it brings a tear to his eye how long they've been apart, thinking her beach attire is quite heroic; Effie agrees that the victory was worth it to see Elise the way she is, to which Arthur confirms. Effie states that she knows Elise was sad she and Arthur couldn't go with her, yet seeing her happy is all she needs; Arthur states he couldn't have worded it any better and he would be courting disaster if he were on the island. Arthur asks Effie to imagine him charging out of the crashing surf only to slip on a jellyfish, then run into a tree while running to get a potion to quell the pain; Effie states she'd just train on the beach and thus she might as well be right where she is, then asks Arthur what's in the letter. Arthur reads out Elise's letter, to which Effie's reaction ends up shattering her lance with her fist, to which Effie states she was overcome with emotion; Arthur and Effie have an exchange about theirs and Elise's physical strength and agreeing to get back to training to prepare for Elise's return.